
Submit Your Listing for Approval
Once you’ve completed the required implementation steps, submit your AWS Marketplace listing to AWS for final approval and go-live.
Overview
After your product listing is fully configured in Suger Console, the last step before your product is publicly available is submitting it to AWS for review. AWS validates your listing — including simulating the buyer experience — before switching its visibility to Public.
Two things are needed to complete this step:
- A completed final implementation checklist.
- A short Buyer Experience Demo video that walks AWS reviewers through your product’s purchase and login flow.
This page covers the pre-submission checklist, how to record the demo video, and how to publish your listing.
Final Implementation Checklist
Before submitting, make sure the following items are complete:
- Product Listing is complete in Suger Console.
- Customer Registration Page is set up and functional.
- AWS Seller Profile is registered.
- AWS Public Profile is live.
- Tax and payment information is completed and verified in AWS — both a bank account and a disbursement method must be added and confirmed.
- Your AWS account is connected to Suger (visible under the Integrations tab).
- Your listing is in Limited View mode.
- Your Buyer Experience Demo video is recorded (see below).
Buyer Experience Demo Video
AWS performs a series of validations during the approval process. One of them is simulating the buyer experience — subscribing to the product, receiving credentials, and navigating your software. Providing a short walkthrough video lets AWS confirm this flow without requesting test credentials or scheduling calls, which accelerates your approval and go-live.
What to Show
Record a simple walkthrough of the customer experience covering:
- Navigating to your listing on AWS Marketplace.
- Clicking Continue to Subscribe (or similar) to simulate a purchase.
- How the buyer receives credentials after subscribing — if possible, include a sample confirmation email sent to the customer.
- The login screen and logging in for the first time using the credentials from the email.
- A brief walkthrough of your product UI, highlighting key features such as the dashboard overview, how to make integrations or connections, and how to contact support or access documentation.
- Confirmation that no payment information is collected outside of AWS.
If you don’t yet have a complete platform, show how buyers will interact with the software conceptually (for example, via onboarding pages or demo tools).
Recording Tips
- Use any screen recording tool (for example, OBS or QuickTime).
- Keep it short — around 2–3 minutes — clear, and unedited.
- Upload the recording to a secure platform (Google Drive, Dropbox, etc.) and make sure the link is public or accessible without login.
- Share the link with your Suger team. Once submitted, Suger initiates the final listing approval request with AWS.
Publish Your Listing
Once the checklist items above are complete:
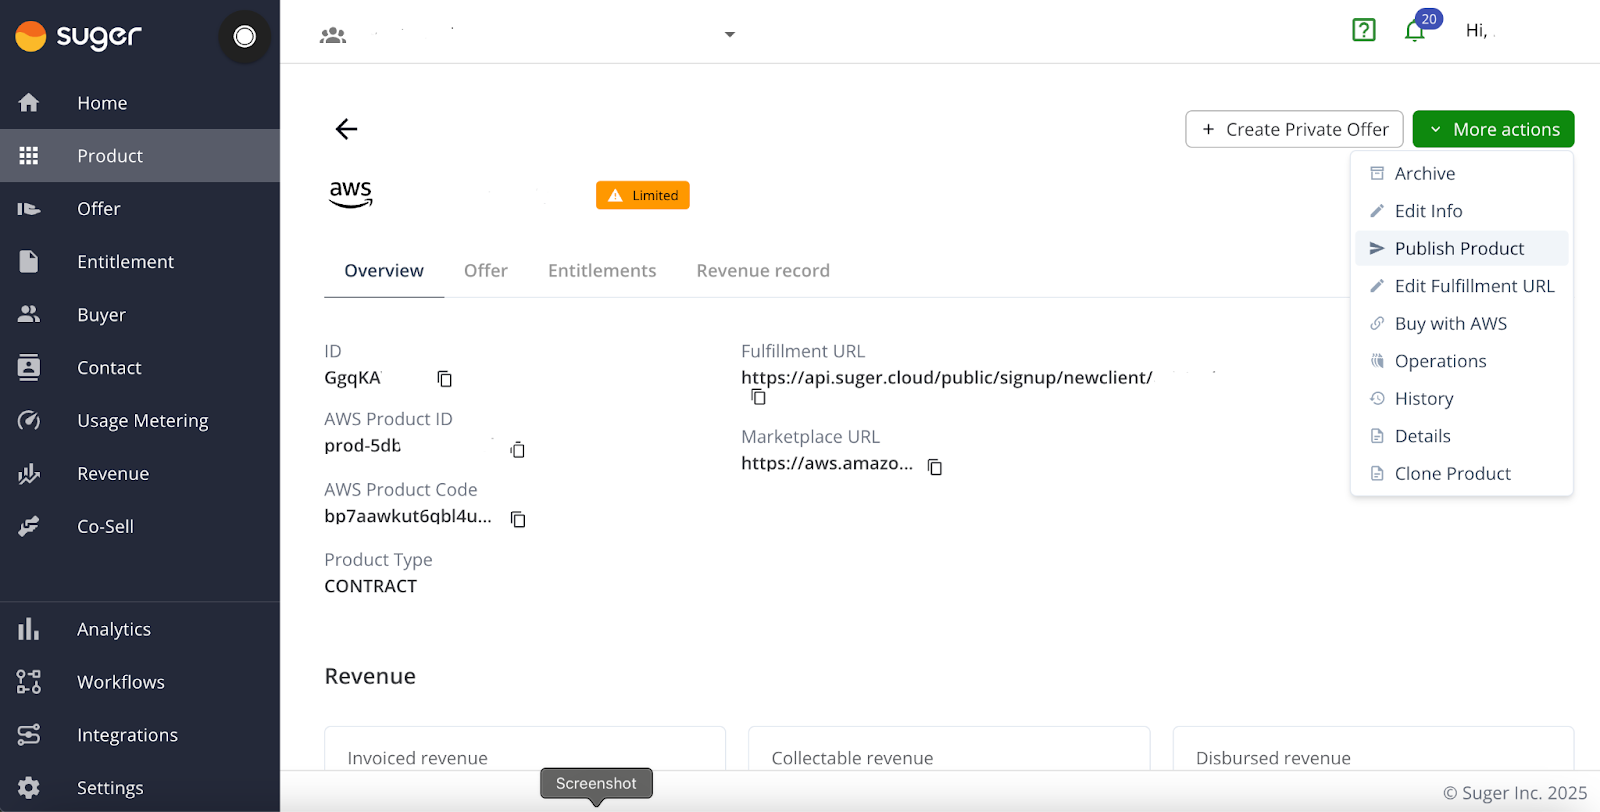
- Go to your listing in the Suger Console.
- Confirm it is in Limited View (indicated by a yellow banner).
- Click More Actions and select Publish Product.
- Review your public pricing display under Commits and/or Usage Dimensions. If needed, update it to reflect your final intended public price.
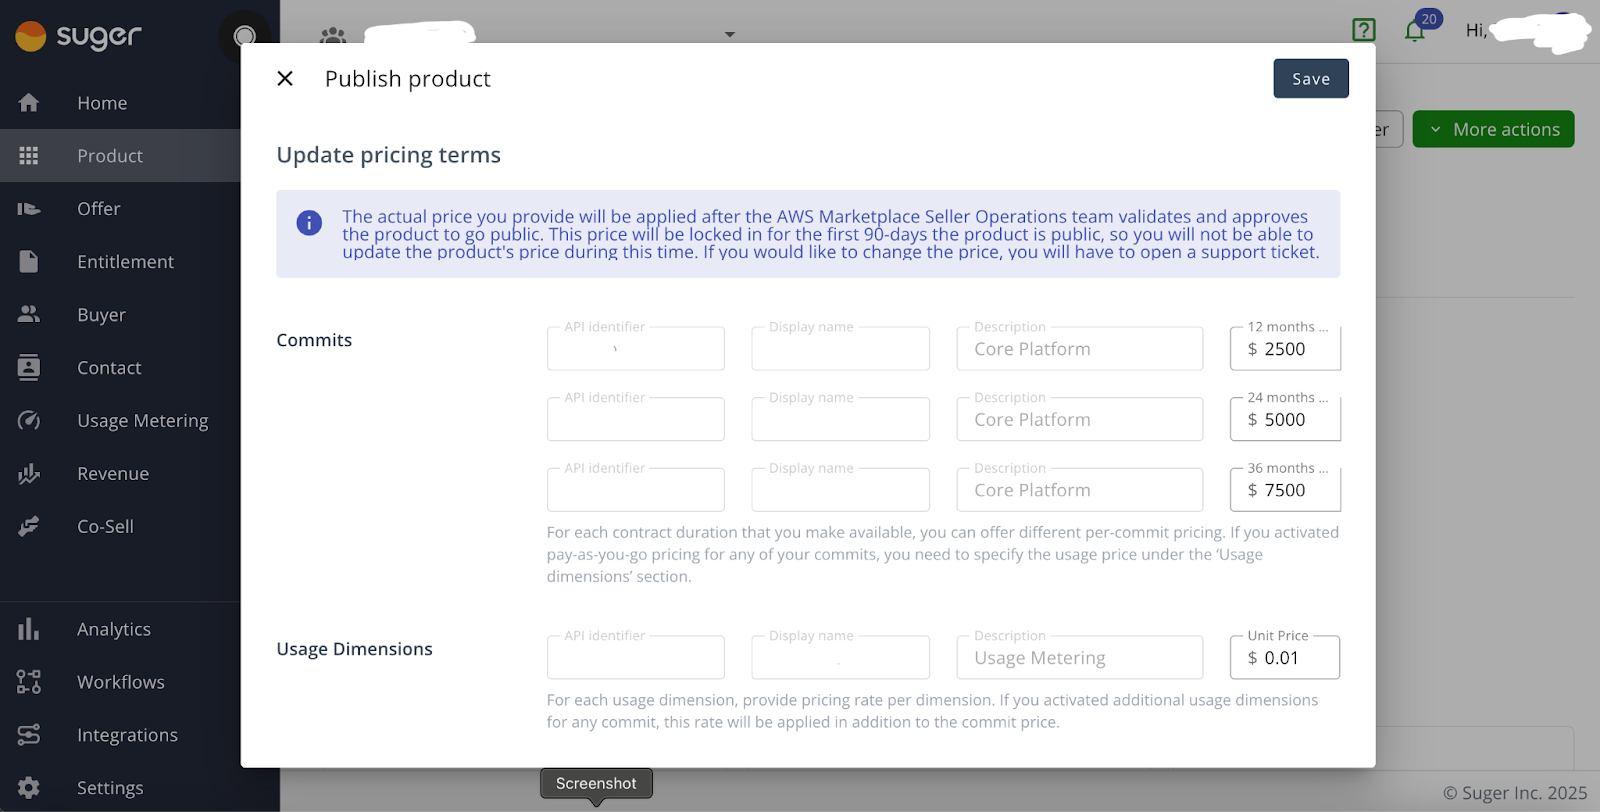
- Click Save.
This action automatically triggers a request to AWS to update the listing’s visibility to Public. Let your Suger Customer Success Manager (CSM) know you’ve completed this step.
AWS Review Timeline
AWS review time varies. It can take up to 2–4 weeks, though many listings are approved within a few days. Once submitted, the review is entirely in AWS’s hands, so please manage internal expectations accordingly.
If you have questions or run into blockers during the process, reach out to your Suger Customer Success Manager for support with the final approval steps.