
List Product
List your SaaS products in Azure Marketplace, fully managed by Suger on your behalf.
Overview
You can list your SaaS products via Microsoft Partner Center, so your clients can search & buy your services in Azure Marketplace.
In Suger, a product is your centralized listing configuration and system of record. In Azure Marketplace, buyers see and purchase an offer. Each product in Suger maps to one Azure Marketplace offer.
This guide walks you through filling out the listing form in Suger, submitting it, and finishing the publishing process in Partner Center.
Prerequisites
Make sure the following are already in place before creating your listing in Suger.
Azure Marketplace
- Partner Center Account and Program Enrollment — Create a Microsoft Partner Center account and enroll in both the Commercial Marketplace program and the Microsoft AI Cloud Partner Program. See Create a Microsoft Marketplace account in Partner Center. The Commercial Marketplace program is added under Settings > Account Settings > Identifiers > Publisher tab.
- Profile Verification — Fully complete and verify your Legal Info, Payout profile, and Tax profile within Partner Center. See Set up Microsoft Marketplace payout and tax profiles.
- Entra ID and App Registration — Associate your Microsoft Entra ID tenant with your Partner Center account (in the Tenant tab) and register a new Microsoft Entra Application with the required API permissions. See Register a SaaS application. For more details on the Microsoft Entra tenant ID and Application ID, see the Azure integration prerequisites.
Suger
You need Admin access to the Suger Console. If you don’t have access yet, ask your company admin to invite you to the organization. See Manage Users and Roles.
Create Your Azure Marketplace Product in Suger
Step 1: Start a new product draft
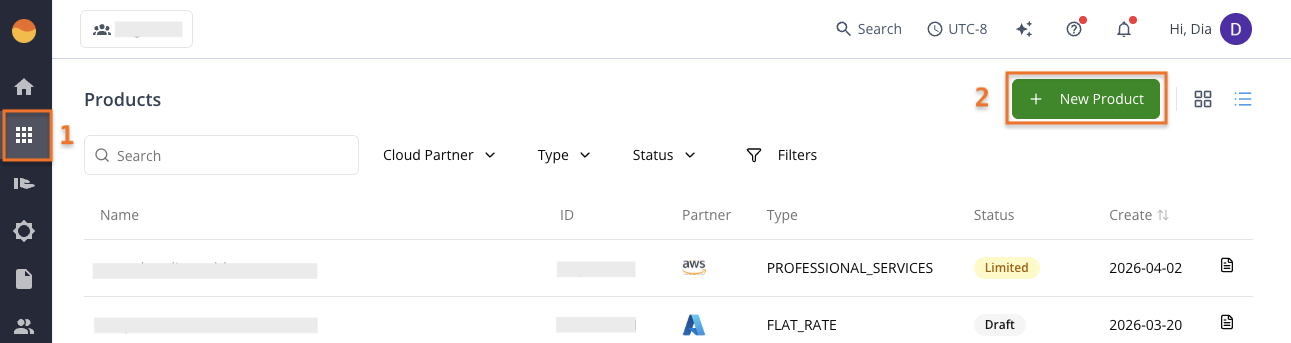
- Go to the Product menu in the Suger Console, then click + New Product.
- Select Azure Marketplace as the Marketplace.
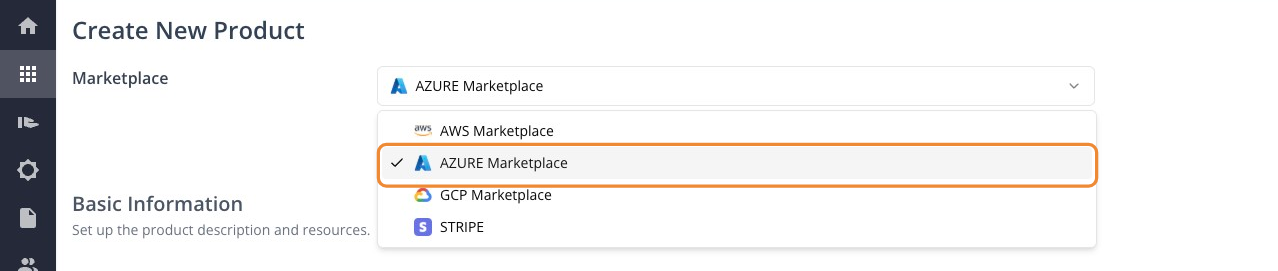
This opens the Azure listing configuration form. Complete the fields described below.
Step 2: Complete Basic Information
Review and complete the following fields.
Basic Information & Marketing
- Product ID (Required) — Your unique internal identifier. Use only lowercase letters, numbers, dashes, or underscores. Cannot end in
-preview. Think of it as a short code for your product. For example, if your public product title is “Contoso SaaS Platform”, your Product ID could becontoso-saas. Once you click Create, you can’t change it. - Product Alias (Required) — An internal reference name just for you inside Microsoft Partner Center. Buyers won’t see this, and you can simply reuse your Product ID here.
- Product Title (Required) — The name that customers see in Azure Marketplace. Make it clear and descriptive so buyers immediately understand what the product is.
- Primary Category (Required) — The main category where your product should appear. This helps Microsoft organize the Marketplace and lets customers find you more easily.
- Secondary Category (Required) — An optional additional category to help further classify your product and support storefront placement and discoverability.
- Description (Required) — A few paragraphs that explain what your product does, who it’s for, and what problem it solves. Include: 1) a product overview, 2) your target user, and 3) the customer problem your product solves. Write in plain language; don’t assume the customer already knows your product. Up to 5,000 characters.
- Search Result Summary (Required) — A one-line summary that appears in search results. Keep it short and precise, plain text with no line breaks, so people understand the purpose at a glance.
- Getting Started Instructions (Required) — Step-by-step guidance for a customer to start using your product after purchase. Focus on the essentials: login, setup, or connection steps. If you don’t have a well-defined PLG motion, explain how your company will start account provisioning with the customer after purchase.
- Search Keywords (Required) — Up to 3 words or phrases that match what customers might type when looking for your product. Use words that also appear in your Description and Summary to improve search relevance.
Media & Resources
- Company Logo (Required) — Your brand identity in the marketplace. Upload a PNG square company logo between 216x216px and 350x350px (for example, 280x280px).
- Screenshot (Required) — Upload a 1280x720px PNG image that clearly shows your product interface or key features. Add a short caption to provide context.
- Supporting Document (Required) — Upload a PDF file containing sales or marketing assets (such as brochures or checklists) and a caption to back up your claims.
- Resources (Required) — Click + Add resource to add helpful links like documentation, FAQs, forums, or release notes. You can add up to 10 resources.
Audience, Legal & Contacts
- Preview Audience (Required) — The Microsoft email addresses of users who need permission to view the hidden preview of your listing before it goes live, along with an optional description for context (for example, reviewer helping with the listing creation process). You can add up to 10 audiences.
- Support Contact (Required) — Contact info (name, email, phone, and support URL) for Microsoft partners to use when your customers open support tickets. This info isn’t listed in the marketplace.
- Engineering Contact (Required) — An internal contact (name, email, phone) for Microsoft to reach in case of technical issues.
- Cloud Solution Provider (CSP) Program Contact (Required) — The internal contact person (name, email, phone) for CSP or reseller partnerships related to your product.
- CSP Program Marketing Materials URL (Required) — A link where CSP partners can access your marketing materials. Only relevant if you support the CSP program.
- Privacy Policy URL (Required) — A link to your privacy policy hosted on your site. This is required, and the link must be valid and publicly accessible.
Step 3: Add Pricing Information
Start by choosing a Pricing Model. Each plan can use one of two pricing models: either Flat Rate (per site) or Per User (per seat). All plans in the same offer must share the same pricing model — an offer cannot have one plan that’s flat rate and another that’s per user. If you plan on mostly transacting via Private Offer, we recommend Flat Rate.
Flat Rate — Use Flat Rate when you want to charge a fixed price per plan, regardless of the number of users.
- (Optional) Add a Usage Dimension. This lets you charge for metered overages or consumption-based add-ons that fall outside the fixed contract price.
- Tip: As a best practice, add at least one generic usage dimension with a price of $0.01 to allow future billing flexibility.
- Add a Plan. Each plan represents what customers can purchase (e.g. Basic, Pro, Enterprise).
- (Optional) Add Billing Term if you want to offer multiple contract durations under the same plan.
- (Optional) Select + Add Plan to create additional tiers.
Per User — Use Per User pricing when your product charges based on the number of users in an account.
- Add a Plan. Each plan represents what customers can purchase (e.g. Basic, Pro, Enterprise).
- (Optional) Set user limits — the minimum and maximum number of users a plan supports.
- (Optional) Add Billing Term if you want to offer multiple contract durations under the same plan.
- (Optional) Select + Add Plan to create additional tiers.
Each plan requires the following fields:
| Field | Description |
|---|---|
| Plan ID | Unique identifier for the plan. For a plan called Contoso Platform Access, a good ID is contoso-platform-access. |
| Name | Plan name. |
| Description | Overview of what’s included. |
| Billing Term | Per month, per year, per 2 years, or per 3 years. |
| Price (USD) | The plan price in US dollars for each billing term. |
You can define multiple plans, but make sure every field is completed on each one.
Usage Dimensions (Optional but Recommended)
We strongly recommend adding at least one generic usage dimension to enable more flexible, usage-based pricing. Azure does not allow changes to the pricing model after a plan is published — without a usage dimension in place, charging for overages or additional usage later would require creating a new plan from scratch.
| Field | Description |
|---|---|
| ID | Unique identifier for the usage metric. |
| Display Name | What the usage metric will be called. |
| Unit of Measure | Unit that defines the metric (e.g., GB, user, transaction). |
| Price (USD) | Cost per unit. |
Step 4: Save, Preview, or Create
-
Save as draft — Use this while you’re still filling things out, or if your Azure Marketplace integration is not yet complete.
-
Preview — Always check this before publishing to catch issues.
-
Create — This finalizes your listing. Once you hit Create, you’re moving forward with publishing, so make sure everything is complete and accurate.
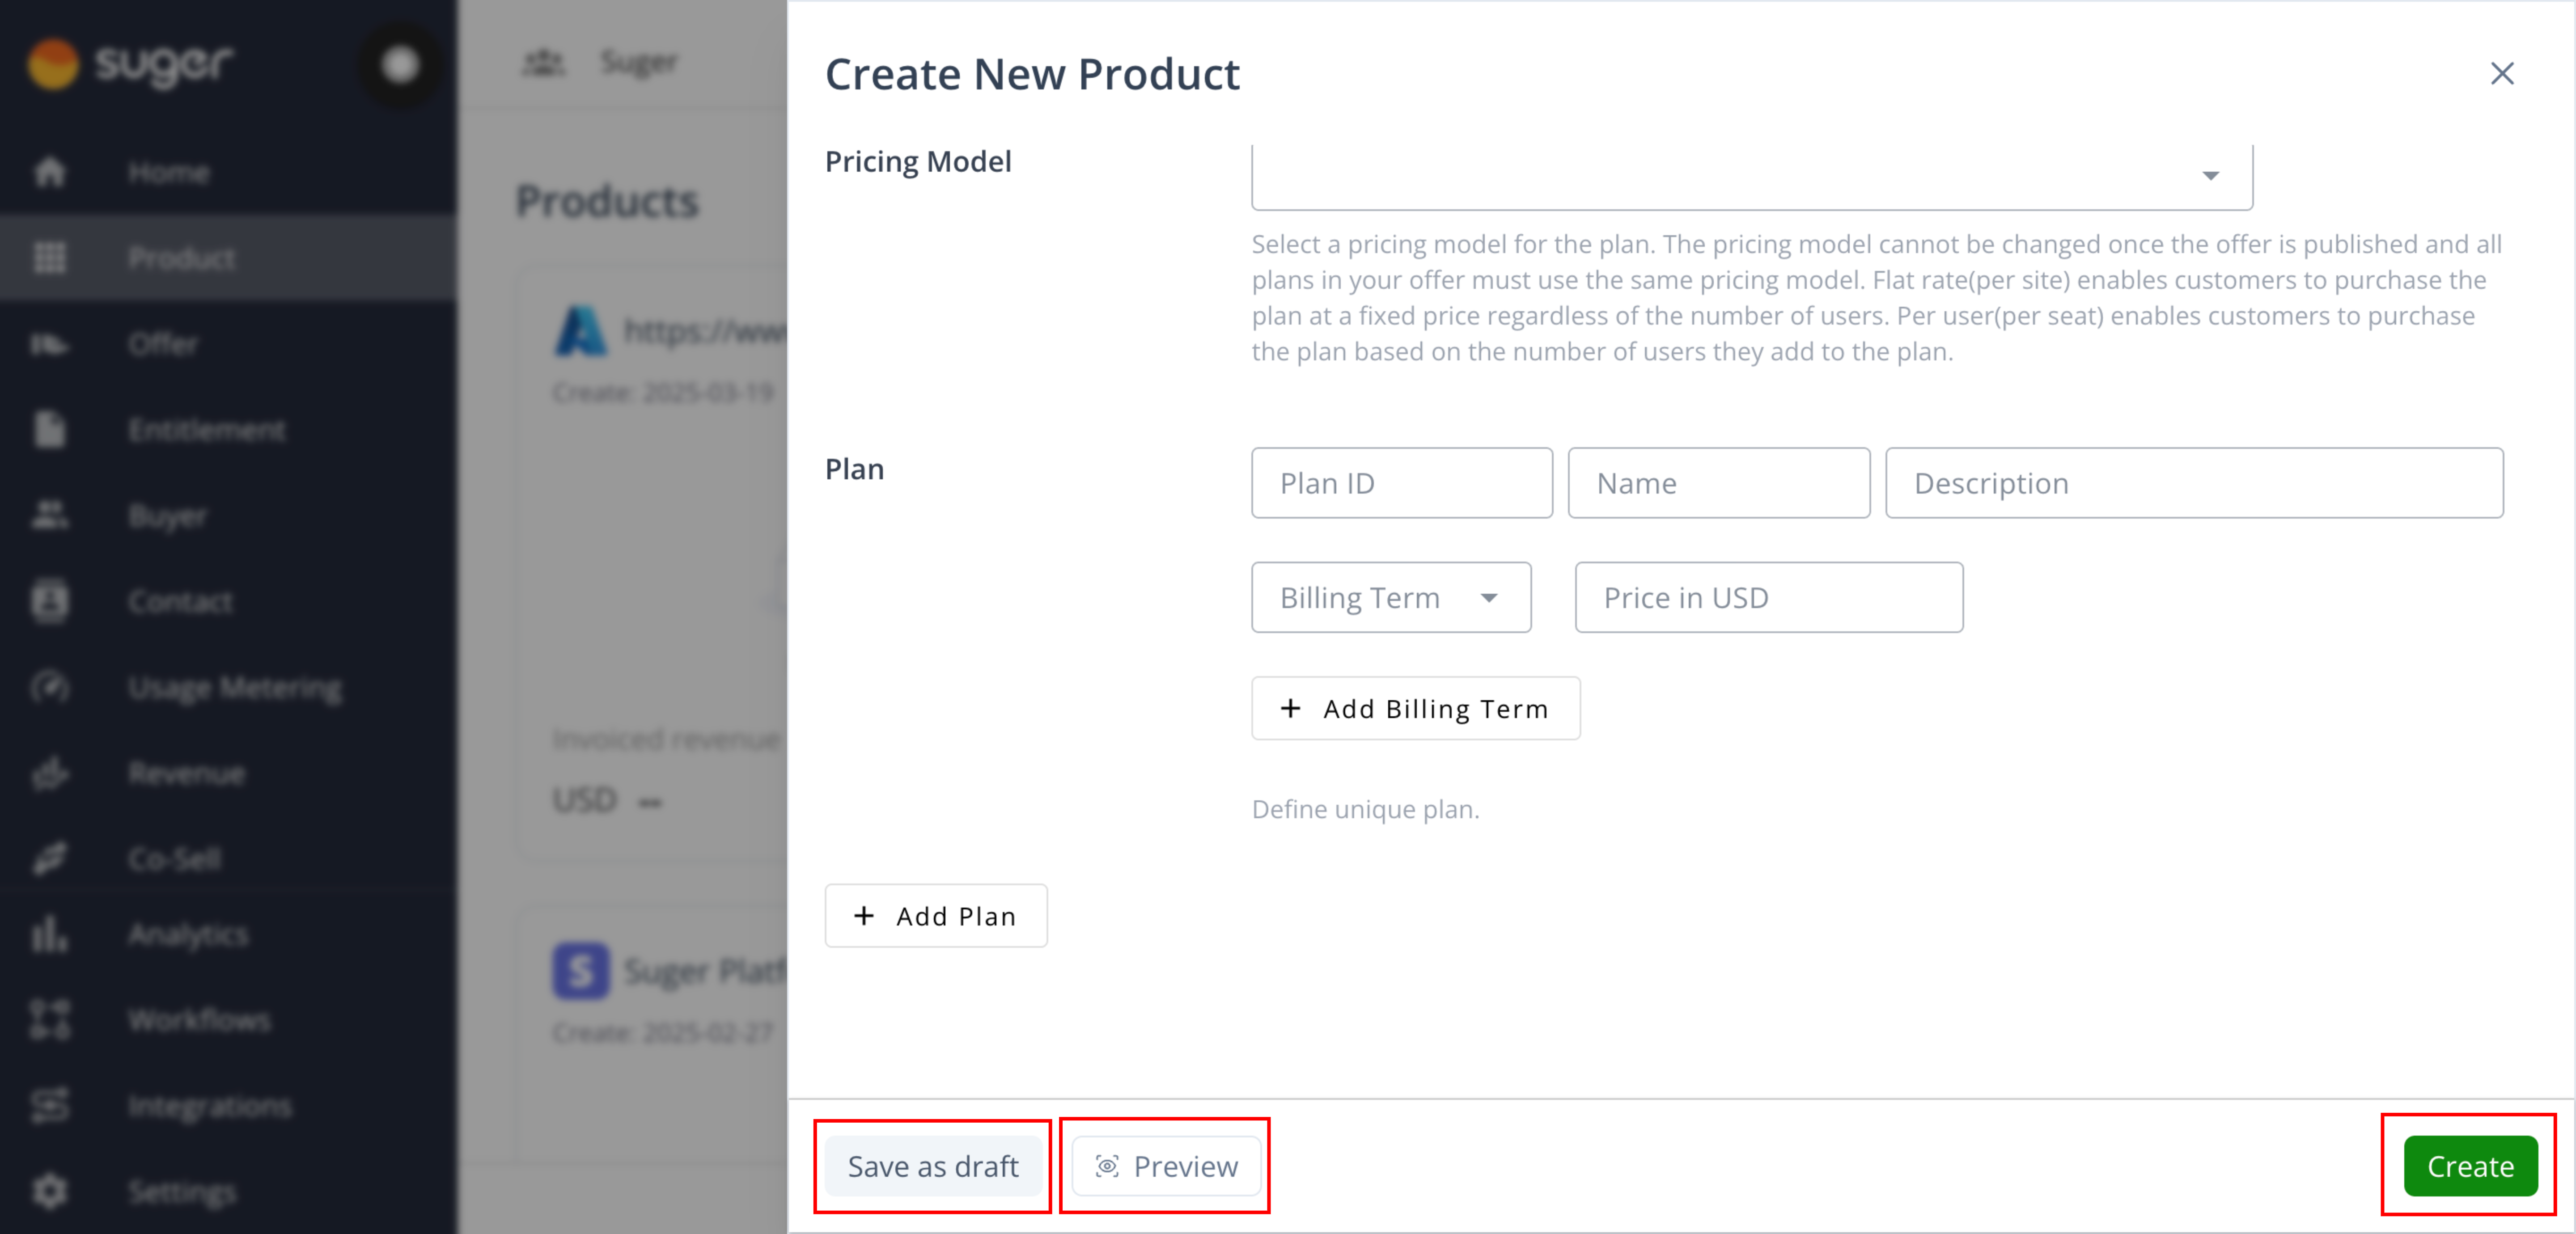
Your listing is created in a Pending status in Suger. To continue the submission, the next steps happen within your connected Partner Center account. If you need help during setup or defining next steps, contact the Suger Support team at support@suger.io.
Technical Setup in Microsoft Partner Center
After your draft syncs from the Suger Console, add your Suger endpoints to the Technical configuration tab in Partner Center.
- Navigate to Technical Configuration — Open your draft listing in Partner Center and go to the Technical configuration tab. For step-by-step navigation, see Add technical details for a SaaS offer.
- Enter your Suger endpoints and Microsoft Entra credentials — Paste the following values when prompted.
- Save your work — Click Save draft before leaving the page.

| Input Field | Value |
|---|---|
| Landing page URL | https://api.suger.cloud/public/signup/azure/orgId/{your-suger-org-id} |
| Connection webhook | https://api.suger.cloud/public/azure/fulfillment/webhook/orgId/{your-suger-org-id} |
| Microsoft Entra tenant ID | The ID of the Azure AD Tenant associated with your Microsoft Partner Center. See the Azure integration prerequisites for details. |
| Microsoft Entra application ID | The ID of the Azure AD Application created & added to your Microsoft Partner Center. See the Azure integration prerequisites for details. |
Publish and Go Live
Once your listing status in Suger changes to Pending, complete the submission in Microsoft Partner Center.
- Complete Supplemental Content — Navigate to Microsoft Partner Center, go to Marketplace offers, locate your newly created draft listing, and open the Supplemental content tab. Fill in all required fields and click Save draft.
- Review and Publish — Return to Offer overview, click Review and publish, check for any remaining issues that need attention, and click Publish (or Submit) to submit your product for certification.
- Go Live — Azure generates a preview version of your listing within approximately 45 minutes (allow up to 1–2 hours). Then return to Offer overview in Partner Center and click Go live to officially submit the offer for Microsoft’s review. Skipping this step means your product won’t appear publicly.
Once live, Suger automatically updates the product status.
Set Product Signup URL
The last step is connecting your Azure listing to your actual software so buyers can register and start using it. Without this, purchases go through, but users won’t know where to sign up.
Suger automatically syncs with Azure Partner Center and pulls all your listed products’ info. You can see all your listings on the Suger Console Product page.
- Open your product — Log in to the Suger Console, go to the Product tab, and select your Azure product.
- Edit product info — On the overview page, find Product Info and click Edit.
- Add your Fulfillment URL — Paste the direct link to your software’s signup or registration page (for example,
https://your-app.com/signup) and click Save.
Once saved, your automated provisioning flow is active.
Signup URL Redirect
- After purchasing the product, your buyer is directed to
https://api.suger.cloud/public/signup/azure/orgId/your-suger-org-idfirst. - Then they are redirected to your product Signup URL with two query parameters
sugerEntitlementId&partner— for example,https://your-product-signup-url?sugerEntitlementId=1234abcd&partner=azure. - Your service needs to collect this
sugerEntitlementIdand save it with the account created by the buyer. - More details can be found here.
How it works for buyers:
- Purchase — The buyer completes the transaction in Azure.
- Suger Intercept — Suger securely validates the purchase and creates an entitlement in your console.
- Final Redirect — Suger redirects the buyer to your Fulfillment URL with parameters that let your system grant immediate access.
Make Your Listing Azure Benefit Eligible (MACC)
Once your listing is live, you can work toward making it Azure benefit eligible — Microsoft’s designation that a purchase counts toward the buyer’s Microsoft Azure Consumption Commitment (MACC). When an offer is benefit eligible, 100% of the pretax purchase amount draws down the customer’s Azure commitment, and buyers see an Azure benefit eligible label on your offer in the Azure portal. This makes your product far more attractive to enterprise customers who hold an active Azure commitment. For how commit drawdown works across clouds, see Cloud Commits and Drawdown.
Step 1: Reach Co-sell Ready status
Azure IP Co-sell eligibility builds on Co-sell Ready status. In Partner Center, make sure you have:
- A complete business profile.
- Your offer published live on Microsoft Marketplace — complete the Publish and Go Live steps above first. Free and BYOL offers aren’t transactable and don’t qualify.
- A sales contact for each co-sell-eligible geography.
- The required listing details and collateral (a one-pager and a pitch deck) on the Co-sell > Solutions page. See Configure co-sell for a Microsoft Marketplace offer.
Step 2: Meet the Azure IP Co-sell requirements
After reaching Co-sell Ready, your SaaS offer must also meet Microsoft’s four Azure IP Co-sell requirements:
- Revenue threshold — At the organization level, generate at least USD $100,000 in Azure Consumed Revenue or Marketplace Billed Sales over the trailing 12 months. Azure credits don’t count toward this figure.
- Azure-platformed technical validation — Your solution must be primarily hosted on Azure and pass Microsoft’s technical validation.
- Reference architecture diagram — Upload a reference architecture diagram with your co-sell documents in Partner Center (required for SaaS offers). See Reference architecture diagram.
- Transactable offer — Your offer must be transactable on Microsoft Marketplace, which Suger-managed listings already are.
Your solution type must be IP and your offer type must be SaaS. (Azure Application, Azure Container, and Azure Virtual Machine offers also qualify, but Suger-managed listings are SaaS.)
Step 3: Confirm enrollment in Partner Center
After your offer becomes Azure IP Co-sell eligible, verify MACC enrollment:
- Sign in to Partner Center and select the Marketplace offers tile.
- Open your offer and go to the Offer overview page.
- In the Marketplace programs section, confirm that Microsoft Azure consumption commitment shows Enrolled.
If you need help getting your Suger-managed listing to benefit-eligible status, contact the Suger Support team at support@suger.io.
FAQ
-
Do we need any extra development? We only want to sell via the Azure Marketplace, so it won’t be part of the actual Azure solution.
You can get your solution listed on Azure without any extra development.
-
Can I transact with a private (not visible to the public) listing?
Azure doesn’t allow private listings to be transactable, so the product must be live.
-
My listing submission keeps failing. What setup am I missing?
The most common blocker is incomplete tax and payment profiles in Partner Center. These must be fully completed and verified before your listing can be published. See Set up Microsoft Marketplace payout and tax profiles for instructions.
-
How should I price my Azure listing? Do I need public pricing like AWS?
Unlike AWS, Azure doesn’t require public pricing. You can create listings that are only available through private offers. However, if you do set public pricing, consider using placeholder pricing to encourage private offer requests. Azure supports different pricing models including flat-rate annual commits and per-user pricing, but avoid complex multi-dimensional pricing that might hit Azure’s limits.
-
Does my Suger-managed Azure listing count toward a customer’s Azure commitment (MACC)?
Only if the offer is Azure benefit eligible. Microsoft enrolls your offer in MACC automatically — typically within a week — once it reaches Azure IP Co-sell eligible status, and the customer must complete the purchase through the Azure portal path. See Make Your Listing Azure Benefit Eligible (MACC) for the full process.
Spotted something wrong or out of date on this page? Tell us and we'll correct it.