
Channel Partner Private Offers (CPPO)
Authorize a reseller to transact your software on AWS Marketplace on your behalf, and create and manage Channel Partner Private Offers (CPPO) and Resale Authorizations in Suger.
Overview
The Channel Partner Private Offer (CPPO) empowers Independent Software Vendors (ISVs) to grant Channel Partners access to wholesale pricing for their software solutions. This functionality enables ISVs to delegate the financial and contractual aspects of customer relationships within the AWS Marketplace to their Channel Partners.
Within the Suger platform, ISVs/Sellers can efficiently oversee CPPO resell opportunities, CPPO private offers, and CPPO entitlements in a unified manner. Additionally, CPPO entitlements benefit from overage usage metering support when the relevant usage metering dimensions are available.
Key terms
- Channel Partner Private Offer (CPPO) — A private offer where a channel partner works with an ISV to sell a product to a buyer through the marketplace.
- Resale Authorization — A configuration in Suger that allows a Channel Partner to resell a product. It defines pricing, terms, and allowed plans.
- ISV (Independent Software Vendor) — The company that owns and publishes the software in AWS Marketplace.
- Channel Partner (Reseller) — The partner who sells the ISV’s product to the buyer and creates the final private offer.
Each cloud marketplace has its own term for this reseller motion — on AWS it’s the Channel Partner Private Offer (CPPO), on Azure it’s the Multiparty Private Offer (MPO), and on GCP it’s the Reseller Private Offer (RPOP). In Suger, all three are managed the same way under Resale Authorizations. This page covers the AWS flow; for the other clouds, see Azure Resale Authorizations and GCP Resale Authorizations.
Requirements
AmazonEventBridgeFullAccess
The AWS managed IAM policy AmazonEventBridgeFullAccess is required, to set up the notification webhook for the CPPO related events, such as CPPO_OUT offer released, or CPPO offer created by the reseller.
Please attach the AmazonEventBridgeFullAccess IAM policy to the IAM role created by the Suger CloudFormation stack when connecting the AWS Marketplace integration.
Service-linked role for AWS Marketplace
It is required to enable the CPPO function in the Suger platform. AWS Marketplace uses the service-linked role named AWSServiceRoleForMarketplaceResaleAuthorization, which enables access to AWS services and resources used or managed by AWS Marketplace for Resale Authorizations. Both parties (ISV and Channel Partner) must enable this role so that AWS can process and exchange resale authorizations between accounts. Here are the steps to set up the service-linked role:
-
In the AWS Marketplace Management Portal, sign in to the management account and choose Settings.
-
In the Settings section, select the Service-linked roles tab.
-
On the Service-linked roles page, select Service-linked role for Resale Authorizations or Resale Authorizations integration, and then choose Create service-linked role or Configure integration.
-
On the Service-linked role for Resale Authorizations or Create Resale Authorizations integrations page, review the information and confirm by choosing Create service-linked role or Create integration. A message appears on the Service-linked roles page, indicating that the Resale Authorization service-linked role was successfully created.
Product and account eligibility
- Register as AWS Marketplace sellers. Both the ISV and the Channel Partner must be registered AWS Marketplace sellers.
- Publish an eligible product (ISV only). The ISV must have an active, publicly listed product in AWS Marketplace (SaaS, AMI, Container, or Professional Services). Only published products can be used in CPPO deals.
- Suger admin access. You need Admin access to the Suger Console to create a Resale Authorization. If you don’t have access yet, ask your company admin to invite you to the organization. See Manage Users and Roles.
Required information
When creating a Resale Authorization, collect or define the following before you proceed:
- Reseller ID (AWS Account ID): Always request this directly from the reseller.
- Buyer ID (AWS Account ID): Optional. Always request this directly from the buyer.
- Start and End Dates: Communicate to the reseller the period during which the authorization will be available to use.
- Pricing Details: Align on the discount type you will provide to your reseller.
- EULA: This document will be visible to the end buyer.
- Reseller agreement: This document will be visible only to the reseller.
Create a Resale Authorization
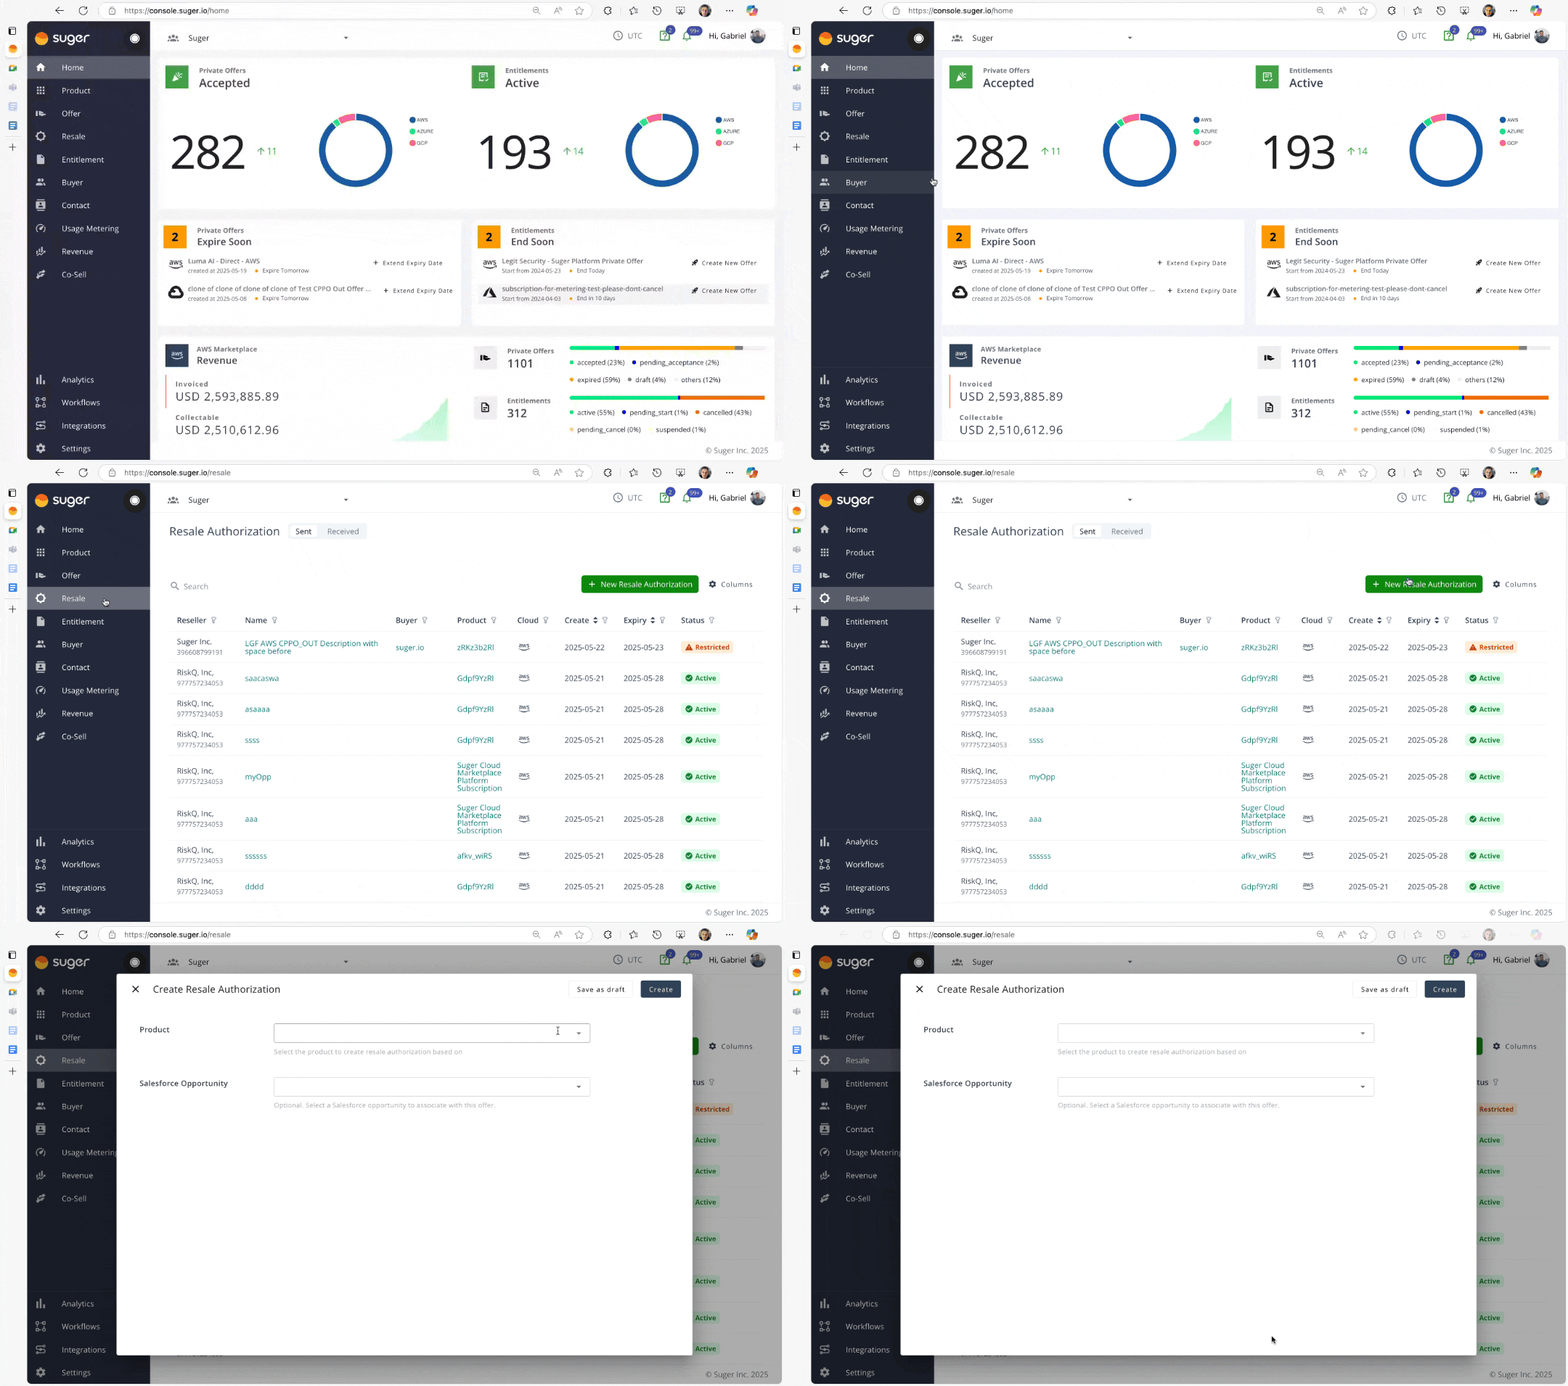
The Suger Console lets you create a Resale Authorization (CPPO_OUT) directly, independently of a CRM. From the Suger Console main menu, click Resale in the left-hand navigation, then follow the steps below.
Step 1: Create the resale authorization
- Open the Resale Authorization flow.
- Go to the Resale page in the Suger Console.
- Click + New Resale Authorization in the upper-right corner.
- Select the AWS Product you want to use. This defines what the Channel Partner is allowed to resell. Only products already connected to your AWS Marketplace account appear here.
- Add basic information.
- Opportunity Name — a name to identify the resale authorization (visible to the reseller).
- (Optional) Salesforce Opportunity — link the record to a Salesforce Opportunity.
- (Optional) HubSpot Deal — link the record to a HubSpot Deal.
- (Optional) Description — describe the purpose of the authorization.
- Reseller Account — the partner allowed to resell.
- (Optional) Buyer(s) — restrict the authorization to specific end customers.
- (Optional) Contact(s) — associate contacts with the authorization.
- (Optional) Internal Description — internal notes.
- Set Contract Duration to define how long the resale authorization is valid (in months).
- Set pricing information.
- Currency — the pricing currency used in the authorization.
- Discount Type — how pricing is applied (see the field reference below).
- Commits — the committed spend terms.
- Usage Dimensions — usage-based pricing items, if applicable.
- Set availability.
- Selling Authorization Availability — how the authorization can be used:
- Single Use — the partner can use this authorization once to create a single private offer.
- Specific time duration — the partner can create multiple offers until the expiry date.
- No set time duration — the partner can create unlimited offers until you manually deactivate the authorization.
- Expiry Date — the date after which the authorization can no longer be used.
- Maximum allowed service start date — the latest possible service start date.
- (Optional) Maximum buyer net payment term — see below.
- Selling Authorization Availability — how the authorization can be used:
- Add other information.
- EULA — the legal terms shown to the end buyer.
- Reseller Agreement — the reseller-side legal terms.
- Renewal — whether this authorization is a renewal offer.
- Click Create offer.
The status shows Pending Create while AWS processes it. After a few minutes, refresh the page to see it change to Active, meaning it has been sent to the Channel Partner, who can then add markup and issue the final private offer.
Step 2: Hand off to the Channel Partner
Once your resale authorization becomes Active, the Channel Partner takes ownership of creating the final private offer. As the ISV, you can’t build the offer for them, but you must initiate the handoff and monitor the deal’s progress.
- Notify the Channel Partner.
- Open the active authorization in the Suger Console.
- Click More actions in the top-right corner, and select Notify Contact. This sends the reseller an email with a direct link to the authorization, letting them know it’s ready to use.
- Coordinate deal details. Work with your partner to confirm the correct buyer AWS Account ID and align on timing for when the final offer will be sent to the buyer.
Step 3: Track buyer acceptance and entitlements
After the reseller generates the private offer, you won’t see their final markup, but you can oversee the entire deal lifecycle in the Suger Console.
- Track your wholesale plan (
CPPO_OUT). Once the reseller generates the private offer, your original Resale Authorization status changes toUsed. If you allowed multiple uses, it staysActiveso the reseller can use it again. - Monitor the new private offer (
CPPO). A new deal entry appears automatically with the typeCPPOand aPending Acceptancestatus, confirming the final private offer has been delivered to the buyer and is awaiting approval. - Confirm buyer acceptance. Once the buyer accepts and the offer is activated, a CPPO Entitlement is generated automatically. This is your authoritative record of the active contract and supports overage usage metering if applicable.
Field reference and best practices
When creating a Resale Authorization via Suger, use the table below as a reference for each field.
| Field | Description | Best practices |
|---|---|---|
| Opportunity Name | The name of the offer that will be visible to the reseller. Required, 1–100 characters after leading and trailing spaces are trimmed. The characters ;, ", ', <, and > are not allowed; spaces and ordinary punctuation such as _, -, /, ., (, and ) are fine. | Use a clear, consistent naming format such as ResellerName_ProductName_MM/YYYY. Avoid apostrophes in company names — write Acme Corps Renewal, not Acme Corp's Renewal. |
| Description | Selling authorization description. Optional. | A short description of what the resale authorization covers, what was agreed with the reseller, or other relevant notes. |
| Reseller Account | AWS Account ID(s) of the reseller. | Always request the 12-digit AWS Account ID directly from the reseller and verify accuracy to avoid offer failures. If you don’t find the reseller name in the dropdown list, contact support@suger.io. |
| Renewal | Indicates if the offer renews an existing subscription. | Toggle “Migration Renewal” for non-Marketplace to Marketplace conversions. Use “Direct Renewal” if renewing a prior AWS Marketplace deal. |
| Buyer(s) | AWS Account ID(s) of the end buyer. Supports multiple IDs. Required for a renewal opportunity. | To restrict the authorization to a specific end buyer, request the 12-digit AWS Account ID and verify accuracy. If the authorization can be used with any buyer, leave the field empty. |
| Commit Term Length | Duration during which the buyer can use the commits. | Disabled when creating a CPPO for a Subscription product. Ensure this matches the expected usage or contract period (e.g., 12 months). |
| Discount Type | How you’d like to apply discounts to the public price. | Flexible payment schedule (most popular): define payment installments, choosing the amount and invoice date. Individual pricing: apply specific discounts to a commit. Percentage discount: apply a single discount rate to all selected products. |
| Payment Installments | Splits payment into multiple scheduled installments. | Disabled if you select “individual pricing” or “percentage discount”. Ensure payment dates are in the future and match your billing plan — AWS doesn’t allow back-dated installments, and installments must be in chronological order. Even for one-time, upfront payments, enabling Payment Installments with a single installment ensures consistent processing across multiple SKUs. |
| Percentage Discount | The discount percentage compared to the public price. | Disabled if you select “individual pricing” or “flexible payment schedule”. |
| Commits (SKUs) | The services and amounts the customer is purchasing. | Add the relevant SKU(s), set the quantity, and confirm all pricing before submitting. Define a generic SKU that can be reused across most deals to avoid reaching the AWS limit of 24 SKUs for CPPO. Suggested format — Dimension Name: {{Your Company Name}} Private Offer; Description: Access to {{Your Company Name}} Platform. |
| Usage Dimensions & Unit Price | Pricing for metered usage (optional). | Set appropriate prices if using usage-based billing. |
| Duration | How long the license is available for the reseller to use. | Single use: one offer per product specified (the only option if you select “flexible payment schedule”). Specific time duration: expires after the specified expiry date. No set time duration: lasts until you manually deactivate it. |
| Expiry Date | The date by which the reseller must use the authorization. | Align this with your reseller and communicate the deadline clearly with the buyer. |
| Maximum buyer net payment term | The longest net payment term the channel partner may give the end buyer. Optional. | Leave it unset unless you have agreed a term with the partner — see Maximum buyer net payment term. It cannot be changed once the authorization is released. |
| EULA | The EULA visible to the buyer. Applied to all selling authorizations created. | Use AWS’s default EULA or upload your own. If uploading, ensure it’s a signed PDF; you can optionally merge it with the default contract. |
| Reseller Agreement | The reseller agreement between you and the channel partner. Not visible to the buyer. | Upload the signed agreement with the terms agreed upon. |
Maximum buyer net payment term
A resale authorization can cap how generous the channel partner may be about when the end buyer pays. Set Maximum buyer net payment term on the authorization and the partner can offer that term or a shorter one — never a longer one.
The ceiling is one of the same six options a direct private offer uses: Net 15, 30, 45, 60, 90, or 120 days. Leave it unset and the authorization does not authorize custom net payment terms at all.
How it plays out downstream, when the partner builds the buyer-facing offer in Suger:
| On the authorization | On the partner’s offer |
|---|---|
| No maximum set | The partner cannot set a buyer net payment term. Attempting one is refused: the linked resale authorization does not authorize custom net payment terms. |
| A maximum is set, partner picks nothing | The offer inherits the maximum as its buyer term. |
| A maximum is set, partner picks a shorter term | The shorter term is used. |
| A maximum is set, partner picks a longer term | Refused: the buyer net payment term cannot exceed the resale authorization maximum. |
Two constraints carry over from direct offers. Like any released payment term it is immutable — once the authorization leaves Draft the ceiling is fixed, and changing it means creating a new authorization. And your seller account has to be enabled for it: if AWS is not, the authorization is rejected with “This seller account or integration is not enabled for resale net payment terms; omit the maximum or resolve eligibility with AWS.”
See Buyer net payment term for what the term means for the buyer and for your own disbursement timing.
CPPO lifecycle
The end-to-end flow of a CPPO deal in Suger:
- Offer creation (
CPPO_OUT). You create a Resale Authorization in the Suger Console or via the Salesforce App, with all required details including buyer ID, pricing, and terms. - Offer sent to reseller. The offer is automatically pushed to AWS Marketplace and made available to the reseller for review and acceptance.
- Reseller accepts offer. The reseller logs in to their AWS Marketplace account and accepts the Resale Authorization.
- Suger syncs acceptance status. Upon acceptance, AWS triggers an event or exposes the
Activestatus (depending on the start date). - Reseller uses the authorization. When used, the status becomes
Used(for single-use or specific-time-duration authorizations; otherwise it staysActive). An offer of typeCPPOappears with statusPending Acceptance— this is the private offer your reseller sent to the end buyer. - Buyer accepts the private offer. The buyer logs in to their AWS Marketplace account and accepts the private offer.
- Entitlement created in Suger. Suger creates a new Entitlement record in both the Suger Console and your CRM, confirming the buyer now has access under the accepted offer.
Track CPPO status in the Suger Console
After submitting a Resale Authorization, track its status from the Offers page in the Suger Console.
Offer types
CPPO_OUT— the Resale Authorization you send out to the reseller.CPPO— the private offer the reseller sends to the end buyer.CPPO_IN— a Resale Authorization you received as a reseller.
Status flow
Pending Create— immediately after creation. Wait up to 5 minutes, then refresh the page.Active— the authorization was successfully created in AWS Marketplace and shared with the reseller.Create Failed— an error occurred during creation. Open the offer to view the error message, fix it via Edit Draft, and create the offer again.Used— the reseller has used the authorization.Expired— the reseller didn’t use the authorization before the expiry date. You’ll need to create a new authorization.Restricted— you manually deactivated the authorization.
Click any offer in the list to open its full detail page, where you’ll find all offer information, status history, pricing breakdown, and entitlement tracking.
Refresh the authorizations you received
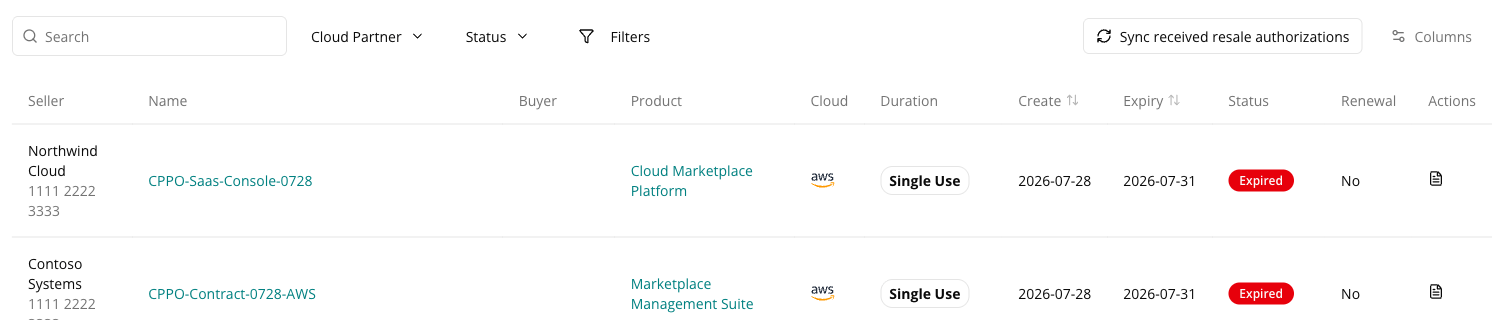
If you also resell another ISV’s product, the Received tab of the Resale page has a Sync received resale authorizations button in its toolbar. Click it to pull your CPPO_IN authorizations from AWS Marketplace on demand instead of waiting for the next scheduled sync — useful right after an ISV tells you they have sent one.
Suger confirms with Sync triggered. Received offers will be updated in a few minutes. The sync runs in the background, so refresh the list after a few minutes to see the result.
The button appears only when your organization has Enable Reseller turned on. If you don’t see it and you expect to receive authorizations, ask Suger support to enable reselling for your organization.
Cancel a Resale Authorization
Cancelling a resale authorization lets you manually stop a Channel Partner from using an active authorization before its expiration date. Once deactivated, the authorization is no longer usable for creating new private offers.
To cancel an authorization:
- Go to the Resale tab in the Suger Console.
- Find and click the name of the authorization you want to deactivate.
- Select Cancel in the upper-right corner.
- Confirm the action when prompted.
The status initially changes to Pending_Cancel while AWS processes the request, and permanently updates to Canceled (or Restricted) once confirmed.
Clone a Resale Authorization
Use the Clone feature when you need to change an existing resale authorization. This is the main way to update terms like pricing, expiry dates, or EULA, since active authorizations can’t be edited.
To clone an authorization:
- Go to the Resale (or Offers) tab in your Suger Console.
- Open the authorization you want to update.
- Click More actions in the top-right corner.
- Select Clone.
- Review the new draft and update required fields (pricing, expiry date, EULA, etc.).
- Click Create to submit the new authorization to AWS.
Once the status is Active, inform your Channel Partner to use the new version.
CPPO Resell Opportunity
You, as ISV/Seller, can authorize channel partners to resell your products by creating a CPPO resell opportunity for these partners in the Suger platform. Click New Resale Authorization on the Suger Console offer page, select the target AWS SaaS product, and fill in the info listed below:
-
Opportunity Name: Custom name for your opportunity, displayed to the reseller.
-
Reseller Account: Reseller account attached to this opportunity.
-
Buyer(s): To constrain resale to specific buyers, add the buyer AWS account ID. Required if it is a Renewal Opportunity.
-
Commit Amount: How much the buyer needs to pay for the contract private offer created by this opportunity.
-
Usage Dimension Absolute Price: Configure the absolute price of each usage metering dimension. An example is shown below:

-
Expiry Date: The opportunity is valid until the expiry date.
-
End User License Agreement: Select the EULA between the Standard AWS Marketplace Contract and your custom contract.
-
Flexible Payment Installments (optional): Specifies payment installment details, applicable only to Contract offers.
CPPO Private Offer
After the CPPO resell opportunities have been created, authorized channel partners can offer one or more of the products on AWS Marketplace. They will extend CPPO private offers to the end buyers based on these resell opportunities. Suger promptly receives notifications as soon as these CPPO private offers are generated.
CPPO Entitlement
After the end buyer accepts the CPPO private offer initiated by the channel partner, Suger automatically generates an active entitlement for the transaction. The CPPO Resell Opportunity, CPPO Private Offer, and CPPO Entitlement are interconnected, providing ISVs/Sellers with a comprehensive overview of the entire CPPO deal process.
FAQ
How do we know when a CPPO is accepted? Is there a notification in Suger?
Once the entitlement is about to start, AWS will send you a confirmation that the customer has signed the contract, and you’ll also receive a confirmation on the Suger console of a new Offer.
We have a CPPO offer that was accepted in March. The reseller has asked us to add 30 licenses. Is there a way in Suger to send out another CPPO offer that will override the current offer and start a new agreement immediately?
In this case, only the reseller can create an agreement-based offer to add the 30 additional users. Ideally, a situation like this should only be managed through metering. Customers who accept an offer with an additional usage option agree to pay future overages, which is why it’s the ideal solution. There’s no way to replace an existing CPPO offer. In the case of a CPPO, the agreement exists between the customer and your reseller.
Spotted something wrong or out of date on this page? Tell us and we'll correct it.