
Self Serve Onboarding Guide
Everything you need to get live on AWS Marketplace with Suger, step by step.
What to expect
Suger connects your AWS Marketplace seller account to a single console where you manage listings, private offers, and revenue, so you don’t have to work directly inside AWS Marketplace’s own interface for day-to-day tasks.
This is a self-serve guide — no need to wait for a meeting to get started. Most of the hands-on work takes only a few hours; the longest part is waiting for AWS to review your listing (about 2 weeks). Seller verification itself is quick — usually under 48 hours. Use your dedicated Slack channel for questions at any point.
| Phase | What you’re doing | Est. time |
|---|---|---|
| 0 — Become an AWS seller | Seller registration, tax, bank account, verification | Less than 1 hour work, then ~48 hours AWS review |
| 1 — Get Suger Console access | Create & get approved on the Suger console | Day 1-2 |
| 2 — Connect & submit your listing | Connect AWS Marketplace, build and submit your listing | ~1-2 hrs work, then ~2 weeks AWS review |
| 3 — Go live & test | Confirm listing, send test private offer | Less than 1 hour |
| 4 — CRM integration (optional) | Connect Salesforce or HubSpot | Anytime after Phase 1 |
| 5 — Co-Sell setup (optional) | Connect AWS ACE co-sell | Anytime after Phase 1 |
Work through Phases 0-5 in order — Phases 4 and 5 are optional, skip them if they don’t apply to you.
Before you start
You don’t need everything perfect on day one, but having these ready will help you move faster:
- Your business — a registered legal business entity and a company email address (not a personal Gmail or similar).
- An AWS account — an active AWS account with billing enabled. If you don’t have one yet, create one at aws.amazon.com.
- Someone with AWS admin access — required to register as an AWS seller (Phase 0) and to create the IAM role that connects AWS to Suger (Phase 2, ~20 minutes). Without this access, steps will fail or look incomplete, not broken.
- Someone who can make pricing decisions — needed when you create your listing (Phase 2), since AWS requires at least one price above $0.00, even if you plan to sell only through private offers.
- Your product — a live, publicly accessible URL that AWS can reach, plus a support email and support URL (AWS checks these during listing review).
- A logo — a company or product logo in PNG format.
Bank account details for payouts and tax forms can be set up as you go through Phase 0.
Phase 0: Become an AWS Marketplace seller
Before you can publish products on AWS Marketplace or connect your account to Suger, you must complete AWS’s one-time seller registration and verification process. Registration happens entirely in AWS — this section walks you through what to do and in what order, with links to the official AWS instructions for each step. It’s how Independent Software Vendors (ISVs), Managed Service Providers (MSPs), and other eligible entities list, manage, and monetize software or services through AWS’s global customer base. Completing your public profile lets you list free products; providing tax and banking information lets you publish paid and BYOL (Bring Your Own License) products.
Estimated time: Less than 1 hour of hands-on work, plus typically about 48 hours for AWS to review and verify. The full process takes 1–4 weeks end to end when Know Your Customer (KYC) verification isn’t required; if it is, plan for KYC separately — AWS puts it at approximately 2–3 months (see Step 6).
Before you register, have these ready:
- AWS account — an existing AWS account, or a new one dedicated to marketplace activity (using a separate account from your production workloads is recommended — see Step 2).
- Eligible jurisdiction — you must be a permanent resident of, or have a business entity in, an eligible country or region. See Eligible Jurisdictions.
- Business information — legal business name, address, official website, and contact details.
- Government-issued photo ID — required to verify your identity during registration.
- Tax information — relevant tax identification numbers and documentation (for example, a W-9 for U.S. entities or a W-8 for non-U.S. entities).
- Bank account details — a bank account capable of receiving USD disbursements.
- AWS alliance lead — the name and email of the person managing your AWS partner relationship.
Confirm you meet AWS’s eligibility requirements (Step 1 below), then work through registration in order — some steps won’t become available until you’ve finished the previous one. Here’s the sequence:
| Step | What it covers | Can’t start until |
|---|---|---|
| 1: Check eligibility | Confirm AWS’s baseline seller requirements | Nothing — do this first |
| 2: Choose your selling account | Pick (or create) the AWS account that becomes your seller of record | Nothing |
| 3: Register & public profile | Company name, website, description, logo, support contact info | Selling account chosen |
| 4: Tax information | Tax interview (W-9 for US entities, W-8 for non-US) | Public profile created |
| 5: Bank account & disbursement | Add a USD-capable bank account, then set your payout currency and schedule | Tax information complete |
| 6: KYC — Know Your Customer (only if required) | Business and beneficial-owner verification | Typically after bank account setup |
| 7: Bank account verification (only if required) | Upload a bank statement matching your account details | Typically after KYC, if required |
Step 1: Check your eligibility
Confirm you meet AWS’s baseline requirements. All sellers must:
- Have an active AWS account in good standing
- Sell publicly available, production-ready software
- Have a defined customer support process
If you plan to sell paid or BYOL products, your business must be incorporated in an AWS-approved country or region, and individual sellers must be permanent residents or citizens of one of those locations. For more details, see Seller eligibility requirements.
Step 2: Choose the AWS account you’ll use for selling
To register as a seller, you must first have an active AWS account. If you don’t already have one, register on the AWS website and use your credentials to sign in to the AWS Management Console.
AWS recommends using a dedicated AWS account for your marketplace seller activity. This account becomes your seller of record and is used for listings, reporting, payments, and communications from AWS Marketplace. A dedicated account makes it easier to separate marketplace operations from your other AWS workloads, so if you’re creating one from scratch, consider using a subaccount rather than the account where your product is deployed.
When setting up access, use IAM roles instead of sharing root credentials, and consider using a role-based email address that your marketplace team can monitor.
For more details, see AWS account setup considerations and best practices.
Step 3: Register as a seller and create your public profile
Your public profile is visible to potential customers and includes essential information about your company.
Have these ready before you start:
- Government-issued photo ID
- Official business name and website
- Business tax ID (EIN for U.S. companies; VAT or GST number for non-U.S. companies)
- Name and email of your AWS alliance lead
Instructions:
-
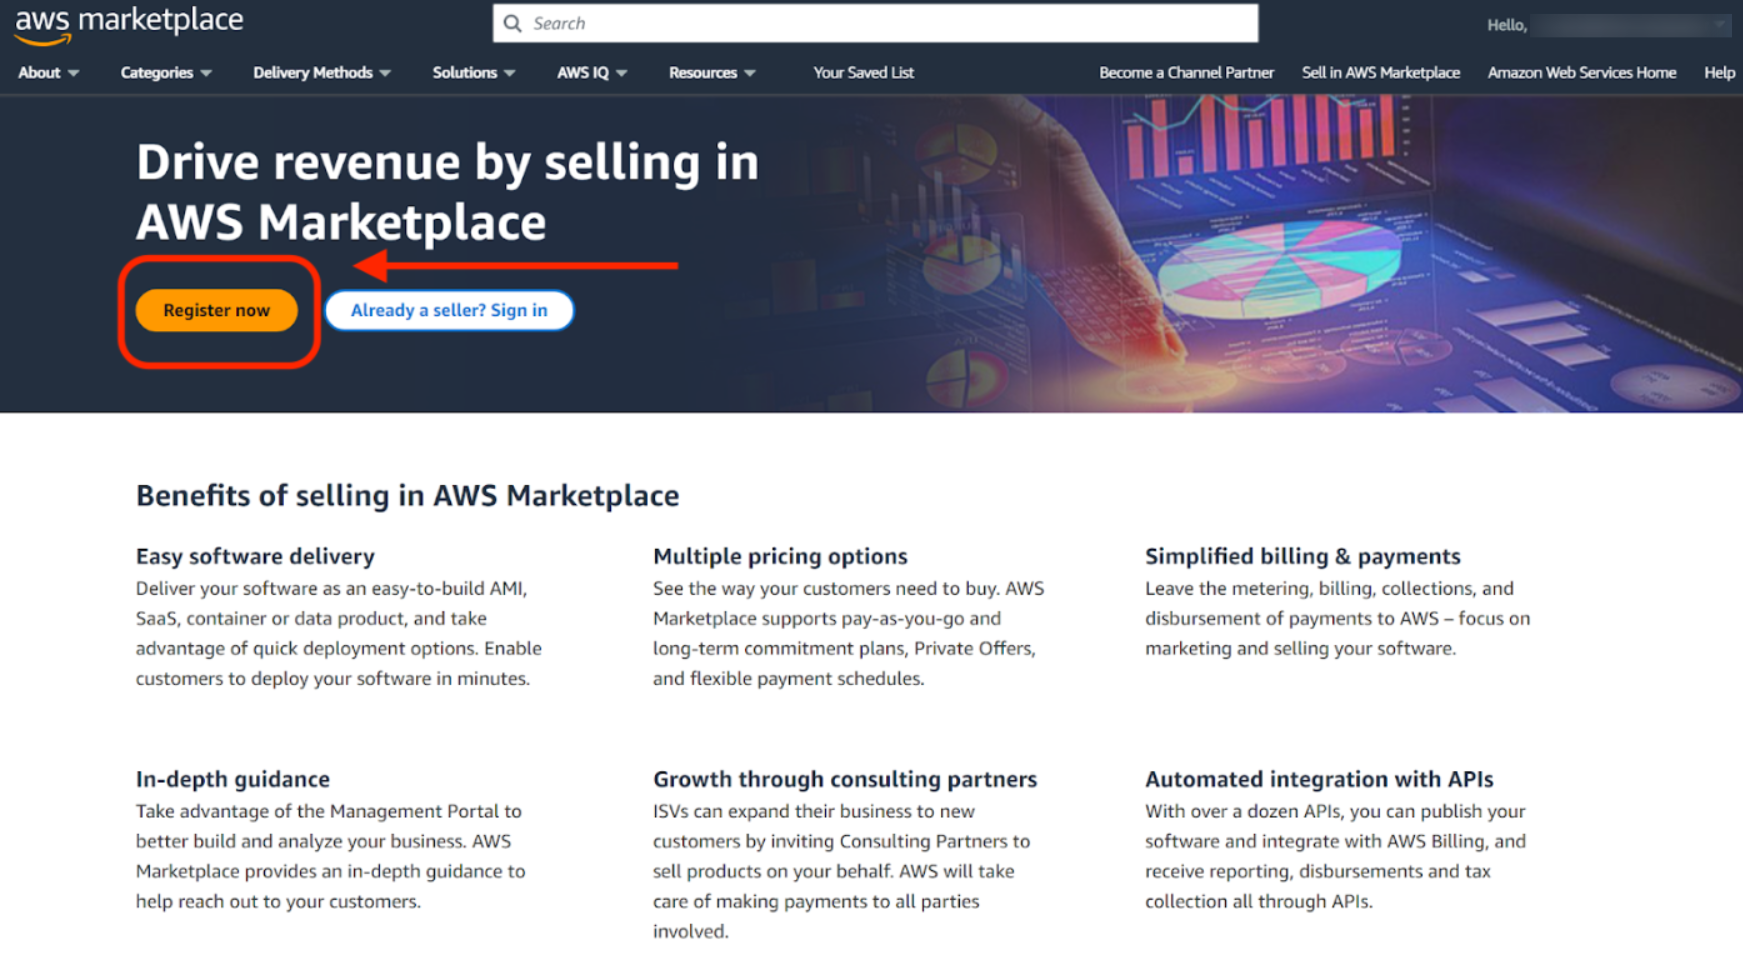
Navigate to the AWS Marketplace Management Portal and click Register now, then sign in with your AWS account credentials.
-
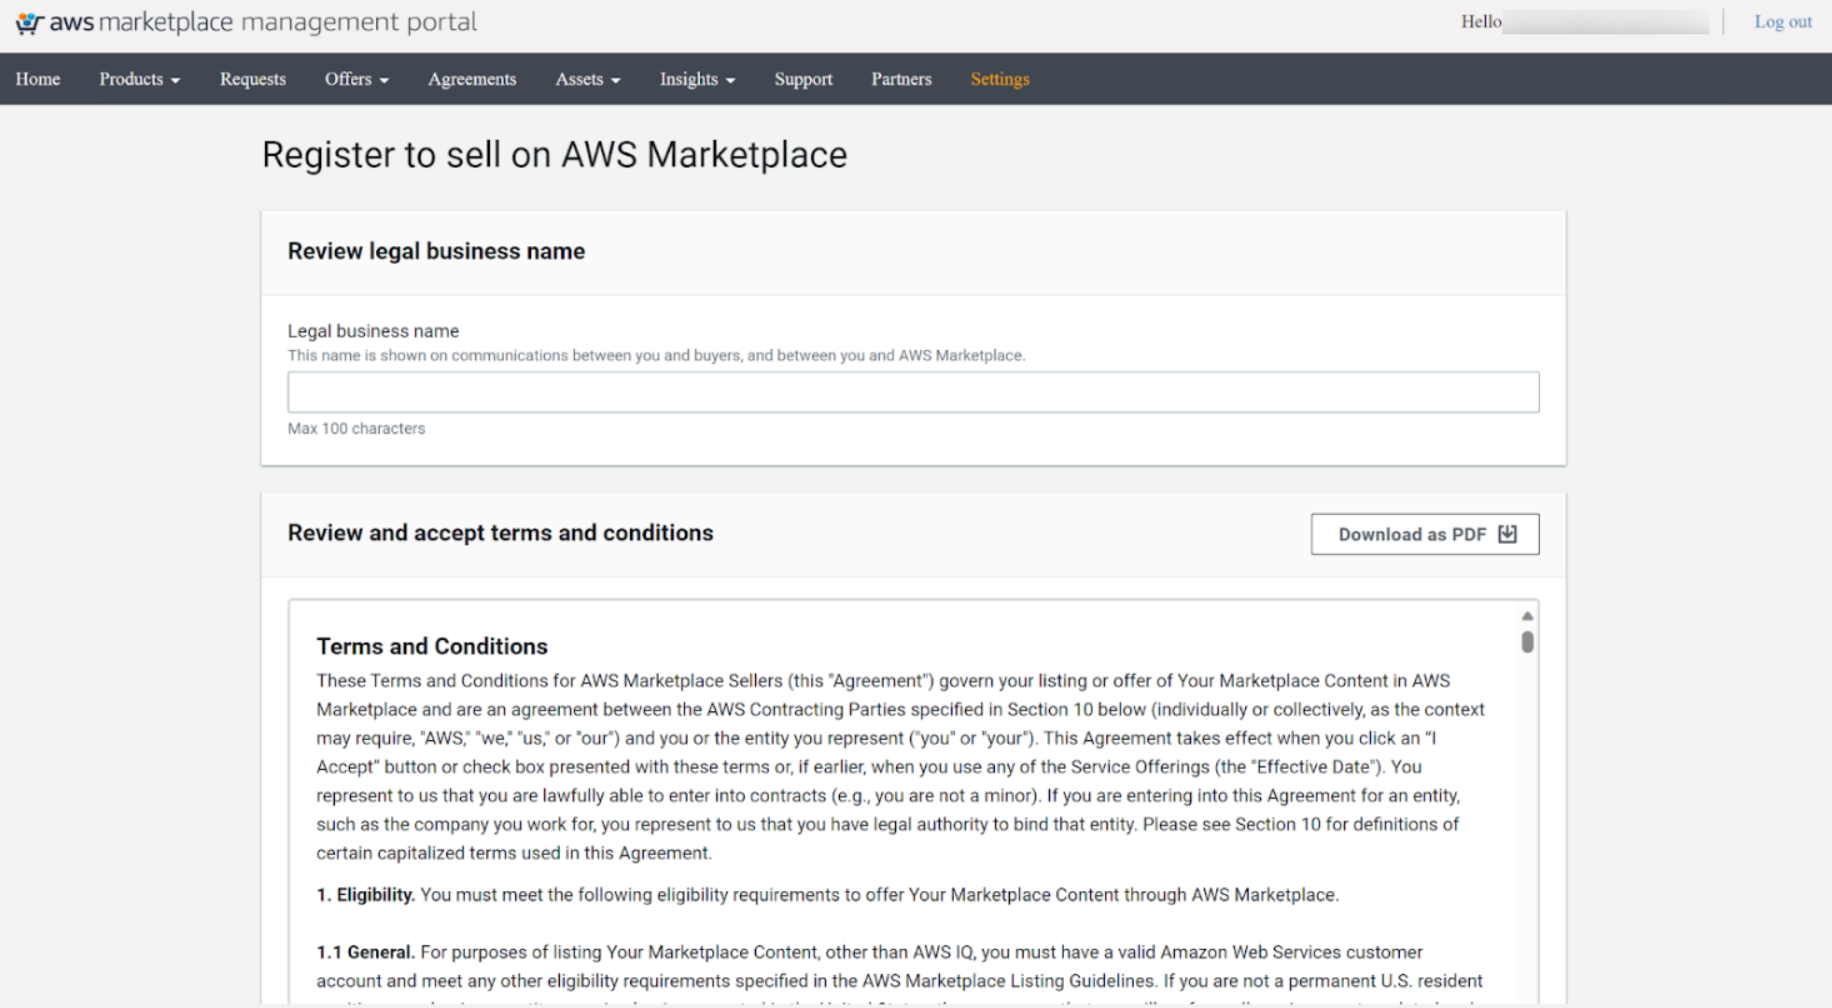
Fill in your company details, accept the terms and conditions, and provide the necessary information.
-
Once you complete registration, you’re taken to the AWS Marketplace Management Portal settings to set up your public profile. Select Add public profile and provide:
- Seller Display Name: Your company’s name as it will appear to customers.
- Company Website URL: Link to your official website.
- Company Description: A brief overview of your company and offerings.
- Company Logo: Upload a logo (SVG or PNG format, up to 300px wide by 150px high, max 500KB).
- Support Contact Information: Email and/or phone number for customer support.
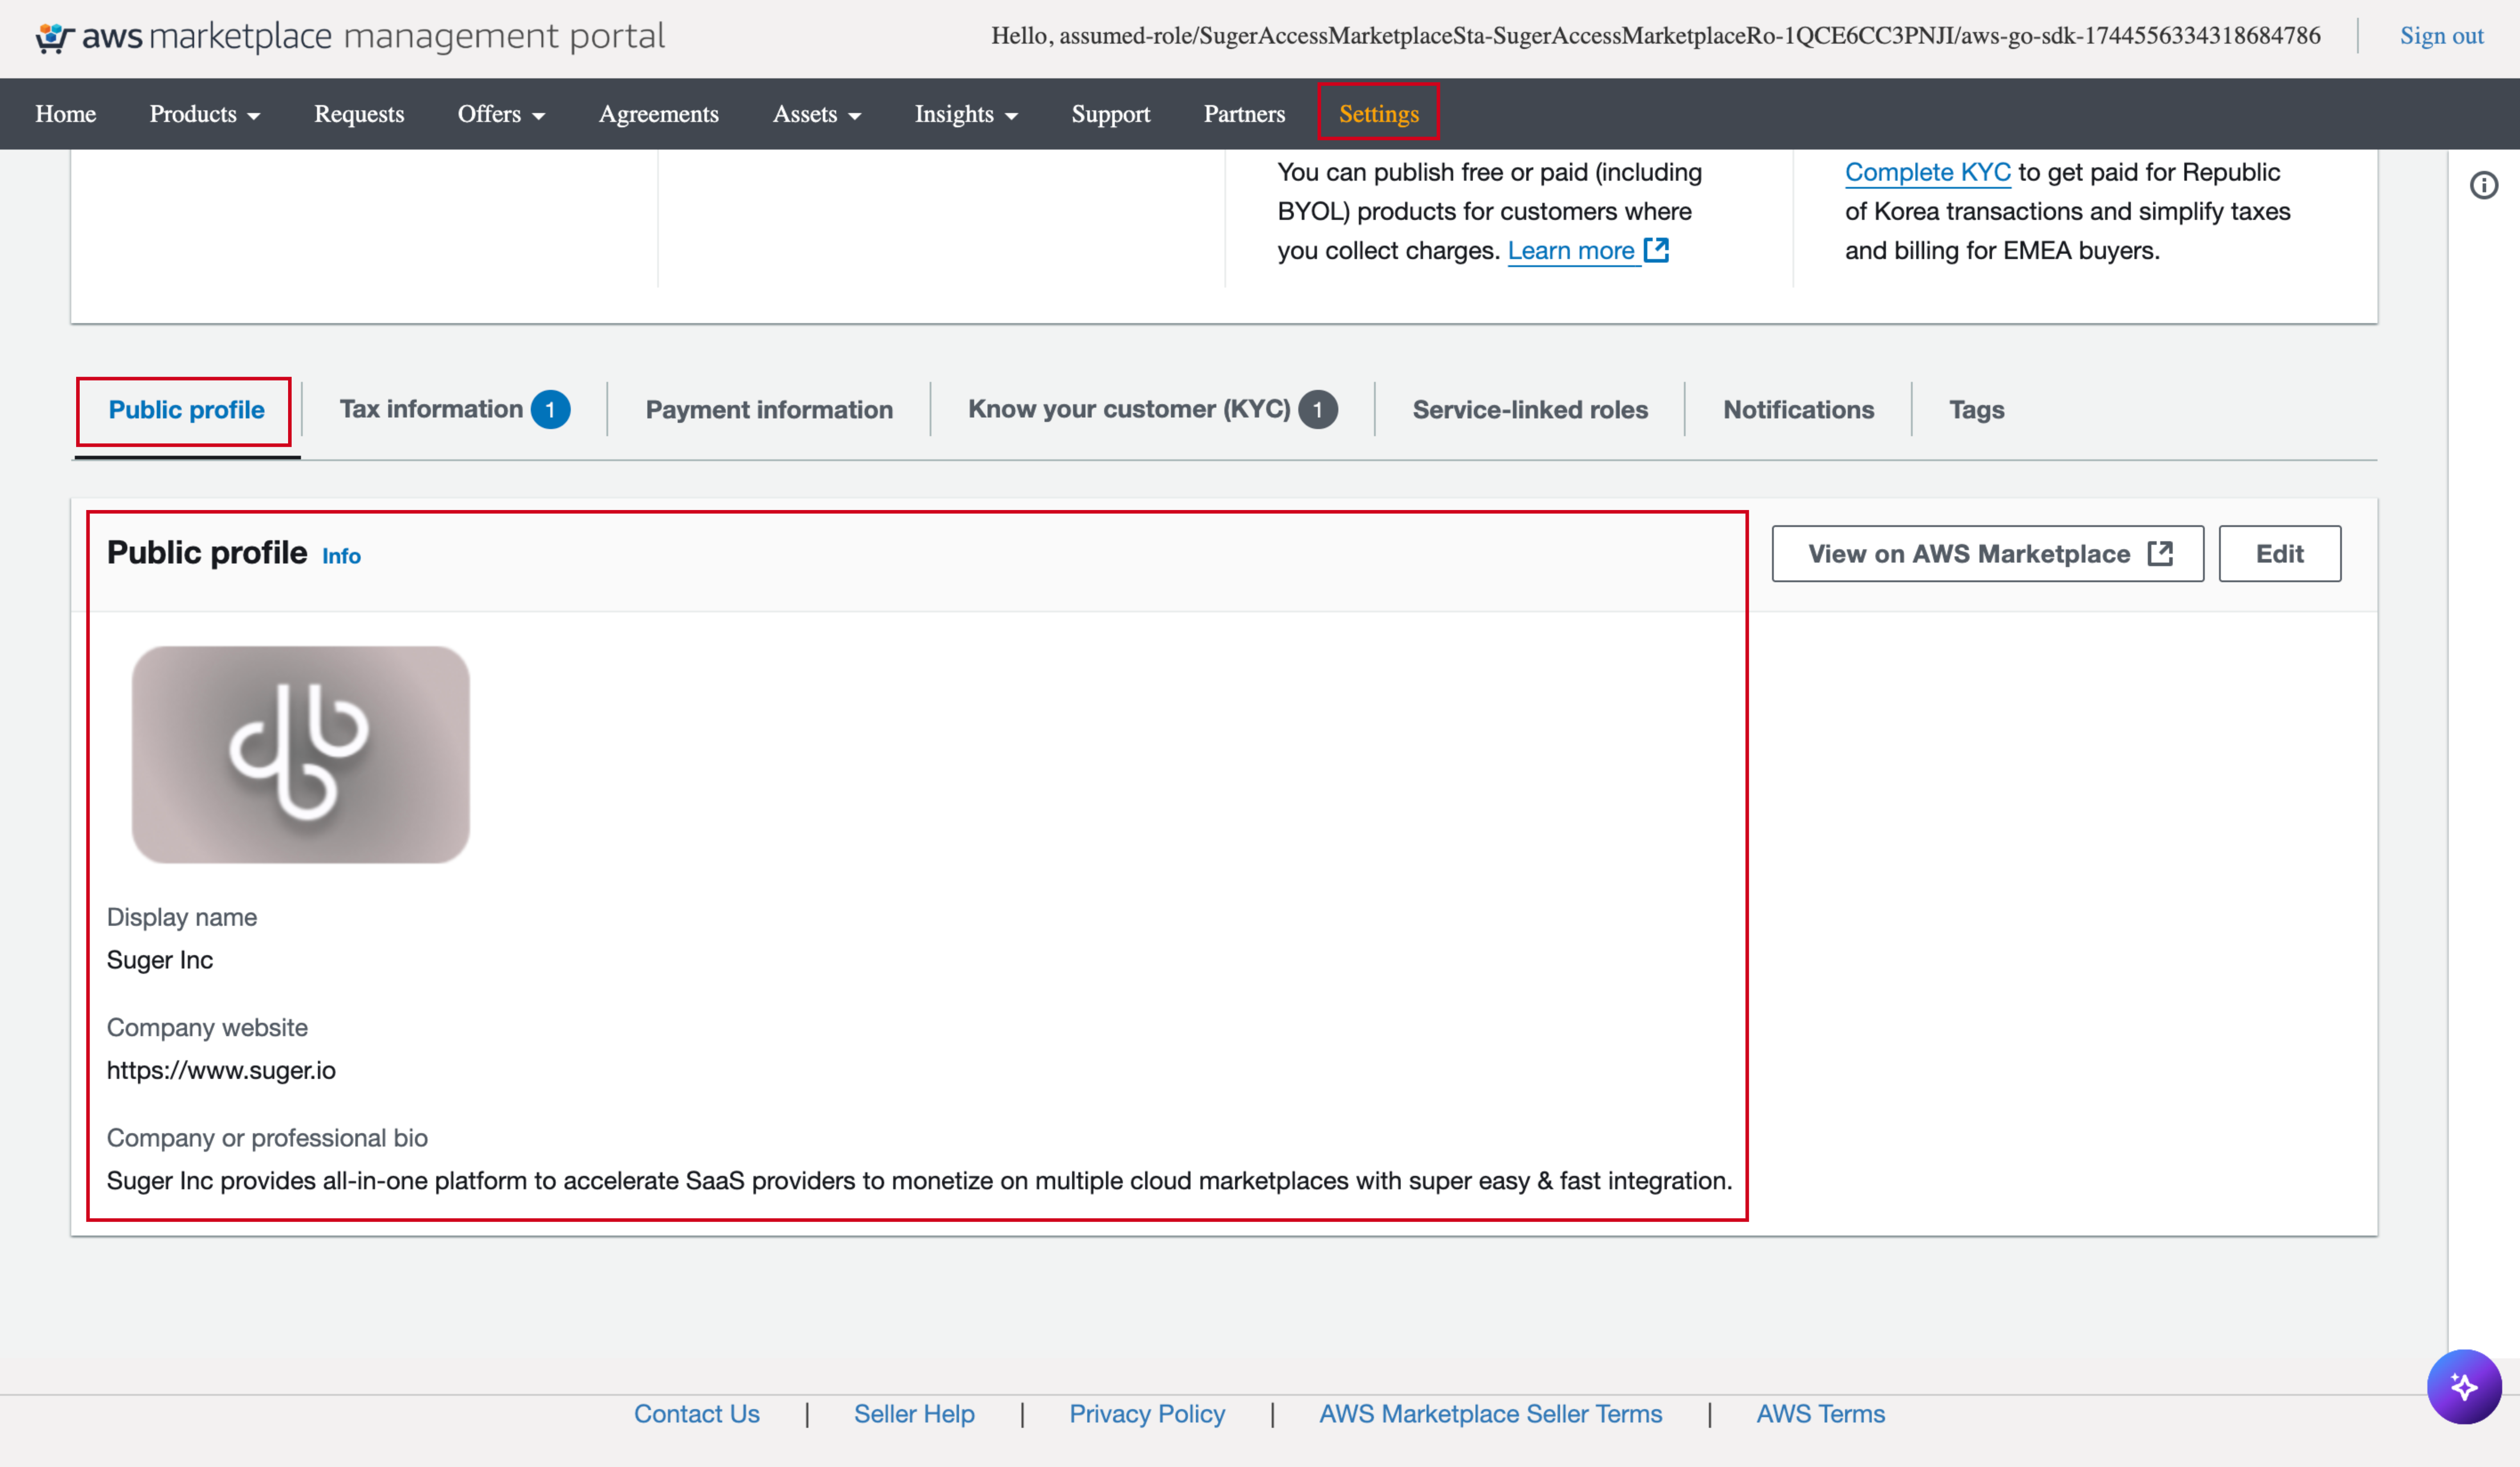
Completing your public profile allows you to list free products. To list paid or BYOL products, continue with the remaining steps.
For the full AWS walkthrough, see Register as a seller on AWS Marketplace.
Step 4: Submit your tax information
AWS requires tax information to comply with regional tax laws before you can publish paid products.
Instructions:
- In the AWS Marketplace Management Portal, go to Settings.
- Under Tax Information, click Go to tax dashboard and complete the tax interview:
- U.S. sellers: Submit a W-9 form.
- Non-U.S. sellers: Submit a W-8 form and provide VAT or GST registration numbers, if applicable.
- If available, complete the VAT Information section with your relevant VAT details.
The following fields are typically required:
- Federal tax classification. Most companies are a
C Corporation; others may be anS Corporation,Partnership, orLimited liability company. - Business Name and Business Address.
- EIN (Federal Employer Identification Number).
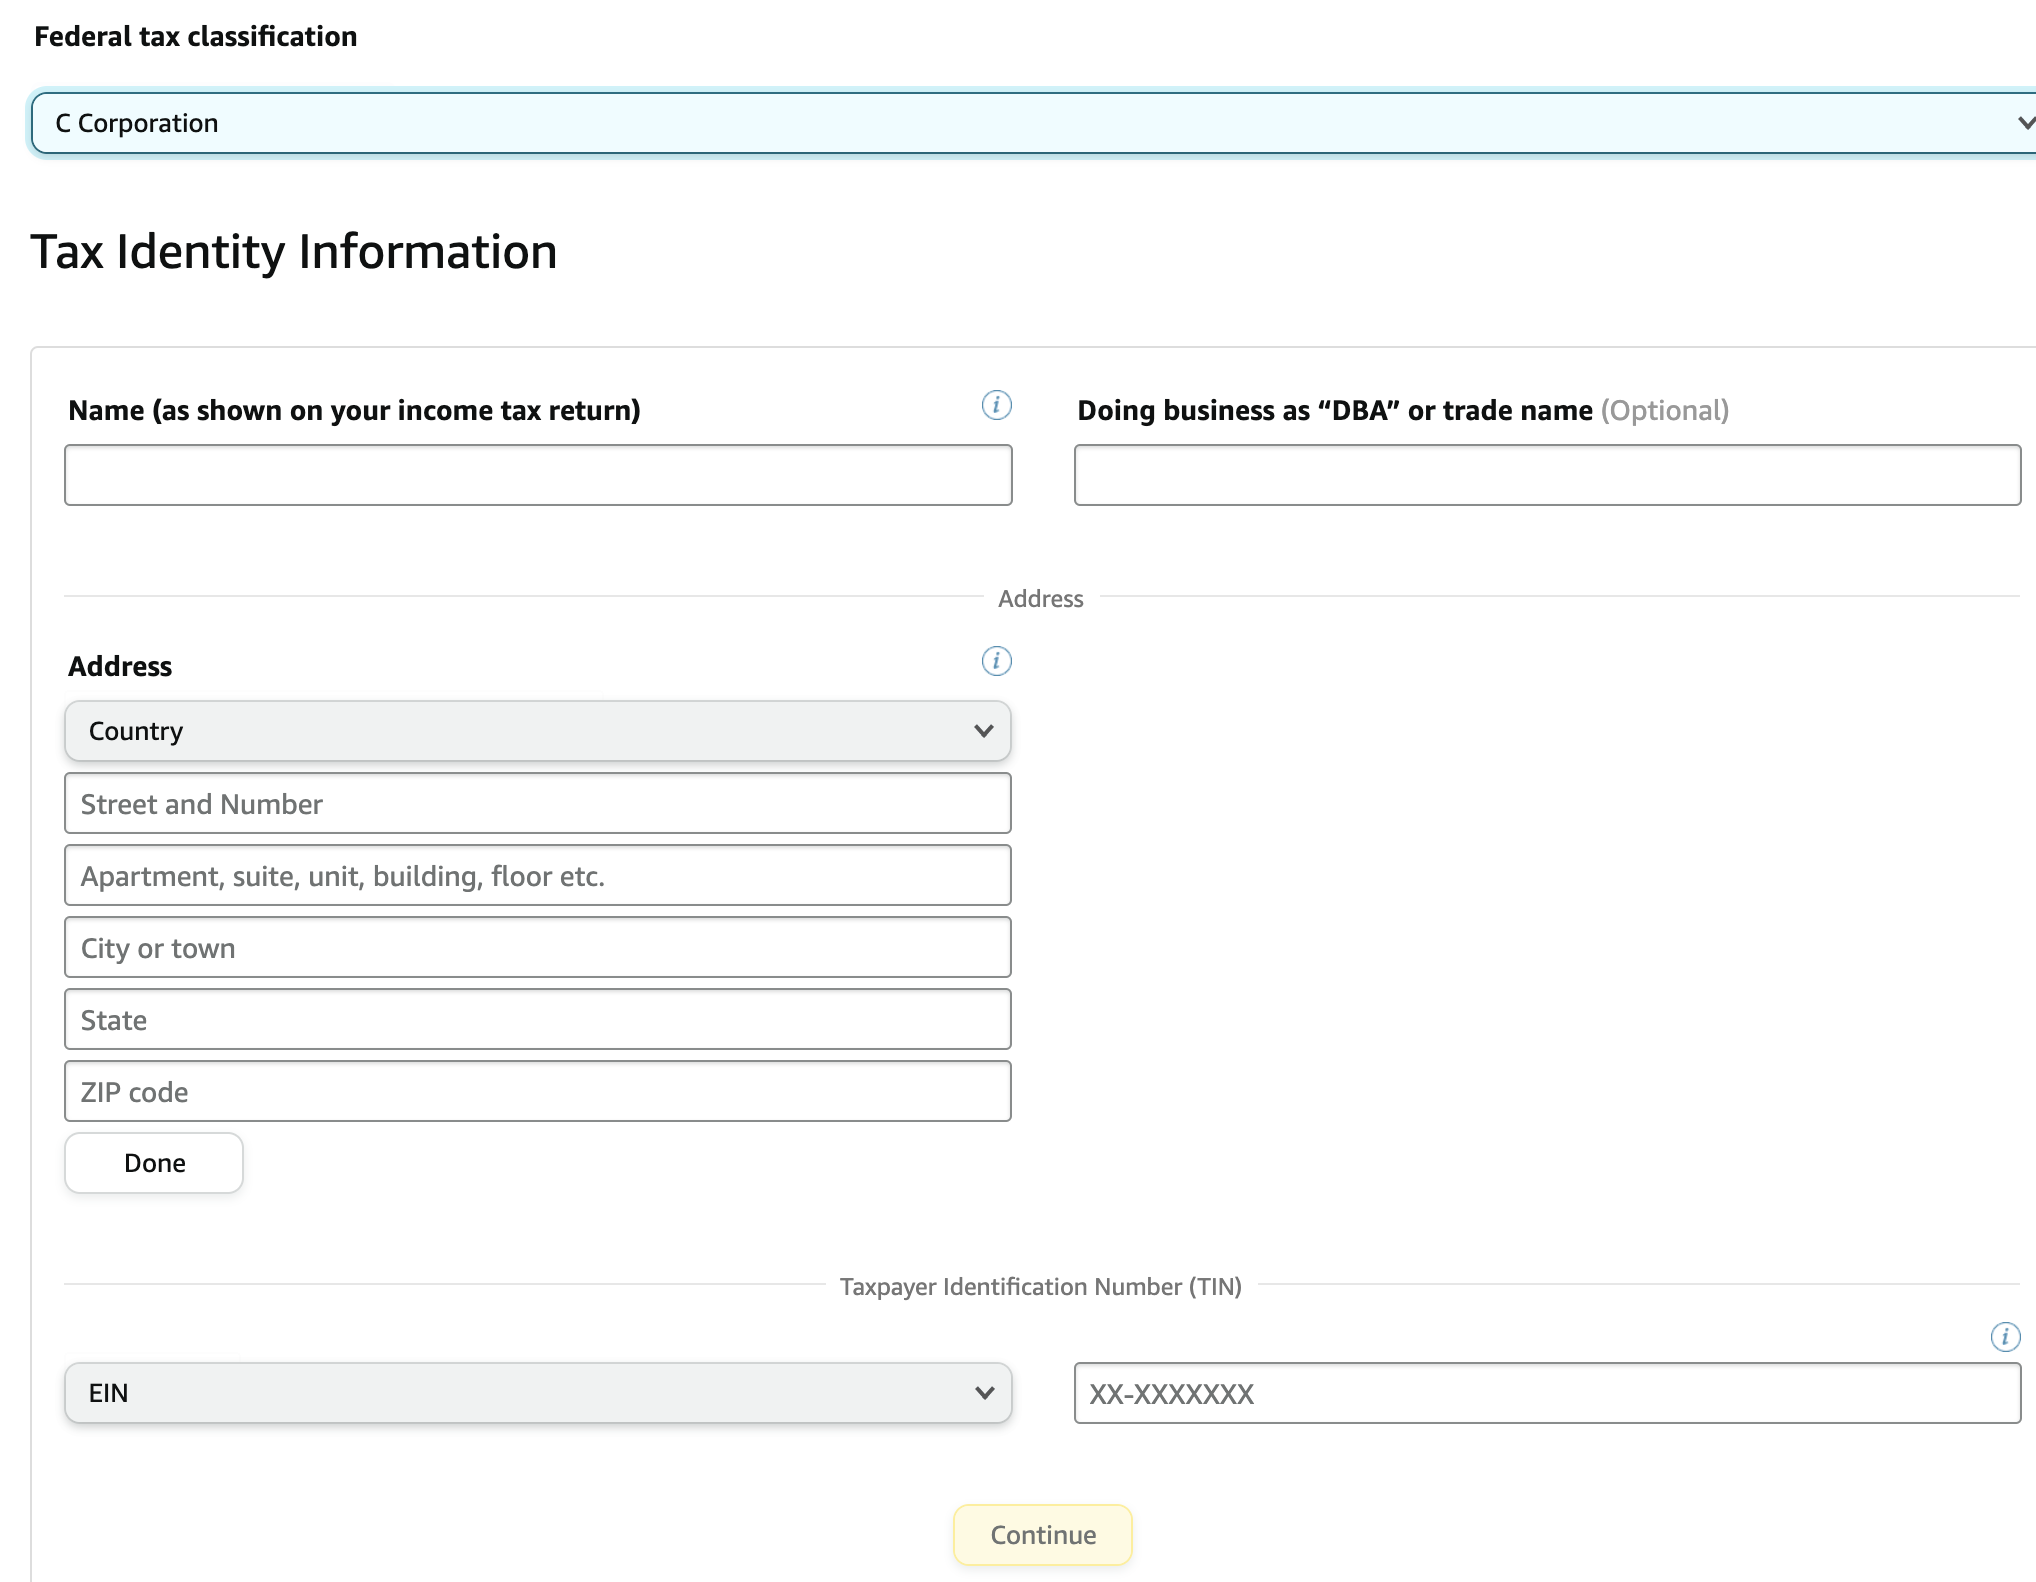
For the full AWS walkthrough, see Provide tax information to AWS.
Step 5: Add your banking and disbursement information
To receive payments from AWS, you must provide valid banking details. You must complete the tax information step first.
Add a bank account:
- In the AWS Marketplace Management Portal, go to Settings.
- Under Payment Information, select Add Bank Account and provide your details:
- U.S. Bank Account: Enter your ACH-enabled account information.
- Non-U.S. Bank Account: Provide your SWIFT code and account details.
- Hyperwallet: If you don’t have a U.S. bank account, you can register for a virtual U.S. bank account through Hyperwallet.
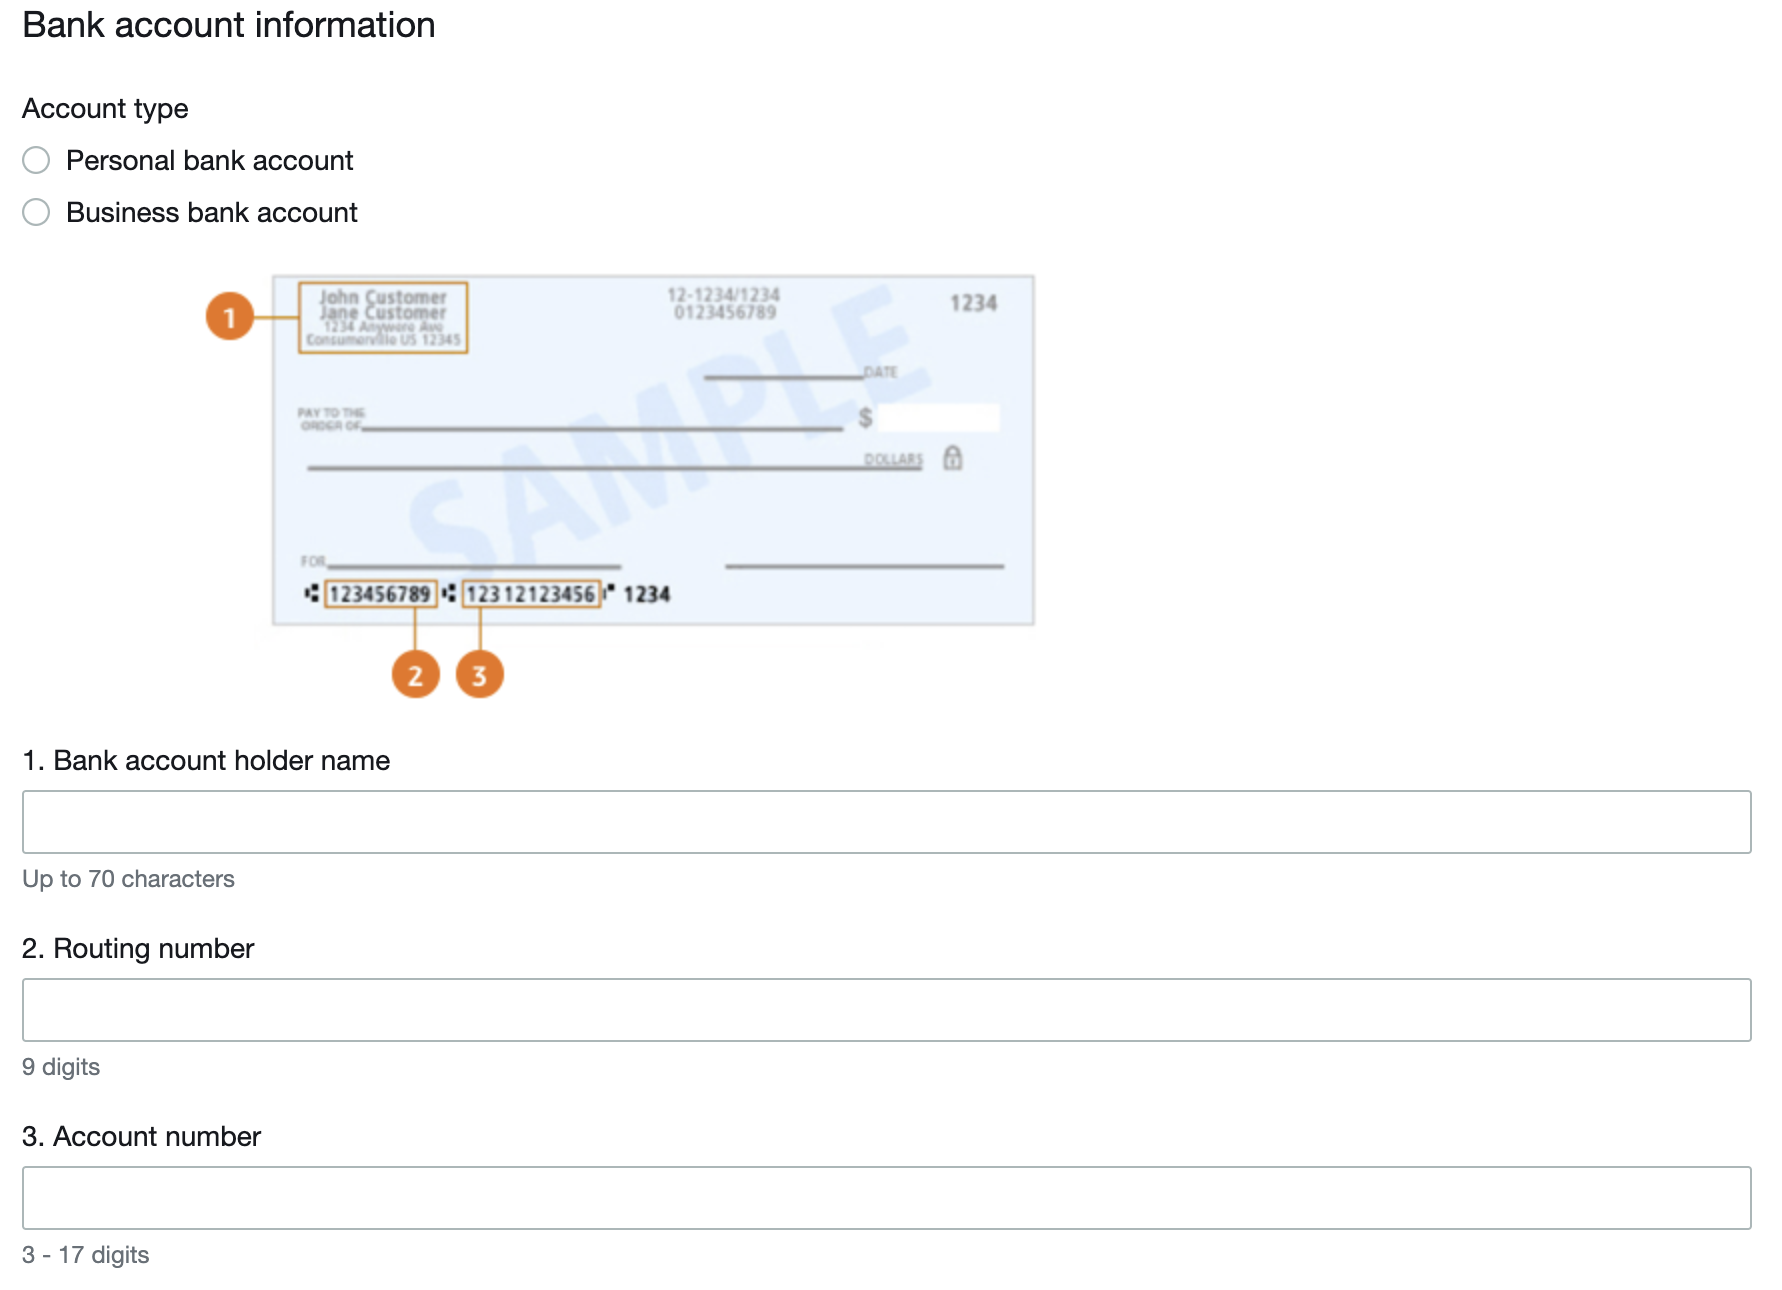
The following fields are typically required:
- Bank account address — the address on your company bank account.
- Bank account holder name — in most cases, your company’s legal name.
- Routing Number
- Account Number
Set your disbursement preference:
After your bank account is added, configure how and when AWS sends your funds. Under Settings > Payment Information, click Add disbursement and fill out these sections:
- Disbursement Currency Info — Select the currency you want to receive disbursements in. Only one currency can be associated per disbursement method.
- Disbursement Bank Account Info — Select the bank account you added previously. UK bank accounts may not appear for disbursements in AUD, JPY, or USD; use an alternate account in those cases.
- Disbursement Schedule — Choose Daily (disbursements occur automatically as they become available, requires a positive balance) or Monthly (a fixed day of the month, 1–28).
Click Save to finalize your disbursement method.
For the full AWS walkthroughs, see Provide bank account information and Set disbursement preferences.
Step 6: Complete KYC verification (if required)
Know Your Customer (KYC) verification is required if you plan to:
- Sell to buyers in Europe, the Middle East, or Africa (EMEA)
- Receive disbursements for South Korea transactions
- Use a UK-based bank account
Instructions:
- In the AWS Marketplace Management Portal, go to Settings and open the Know Your Customer (KYC) tab.
- Start the KYC compliance process and provide the required information:
- Company Details: Legal name, registration number, and address.
- Beneficial Ownership: Information about individuals who own or control the company.
- Supporting Documents: Upload documents such as business registration certificates and identification proofs.
- Submit the information for verification.
You can optionally add secondary users who can manage KYC information and financial details; these users must also complete the KYC verification process.
For the full AWS walkthrough, see Complete the Know Your Customer (KYC) process.
Step 7: Verify your bank account
To finalize your registration and start receiving disbursements, verify your bank account.
- In the AWS Marketplace Management Portal, go to Settings.
- Under Payment Information, select Update banking information.
- Choose the bank account you provided earlier.
- Click Verify and follow the instructions to upload a recent bank statement that matches your account details.
- Submit the information for verification.
Confirm your seller status
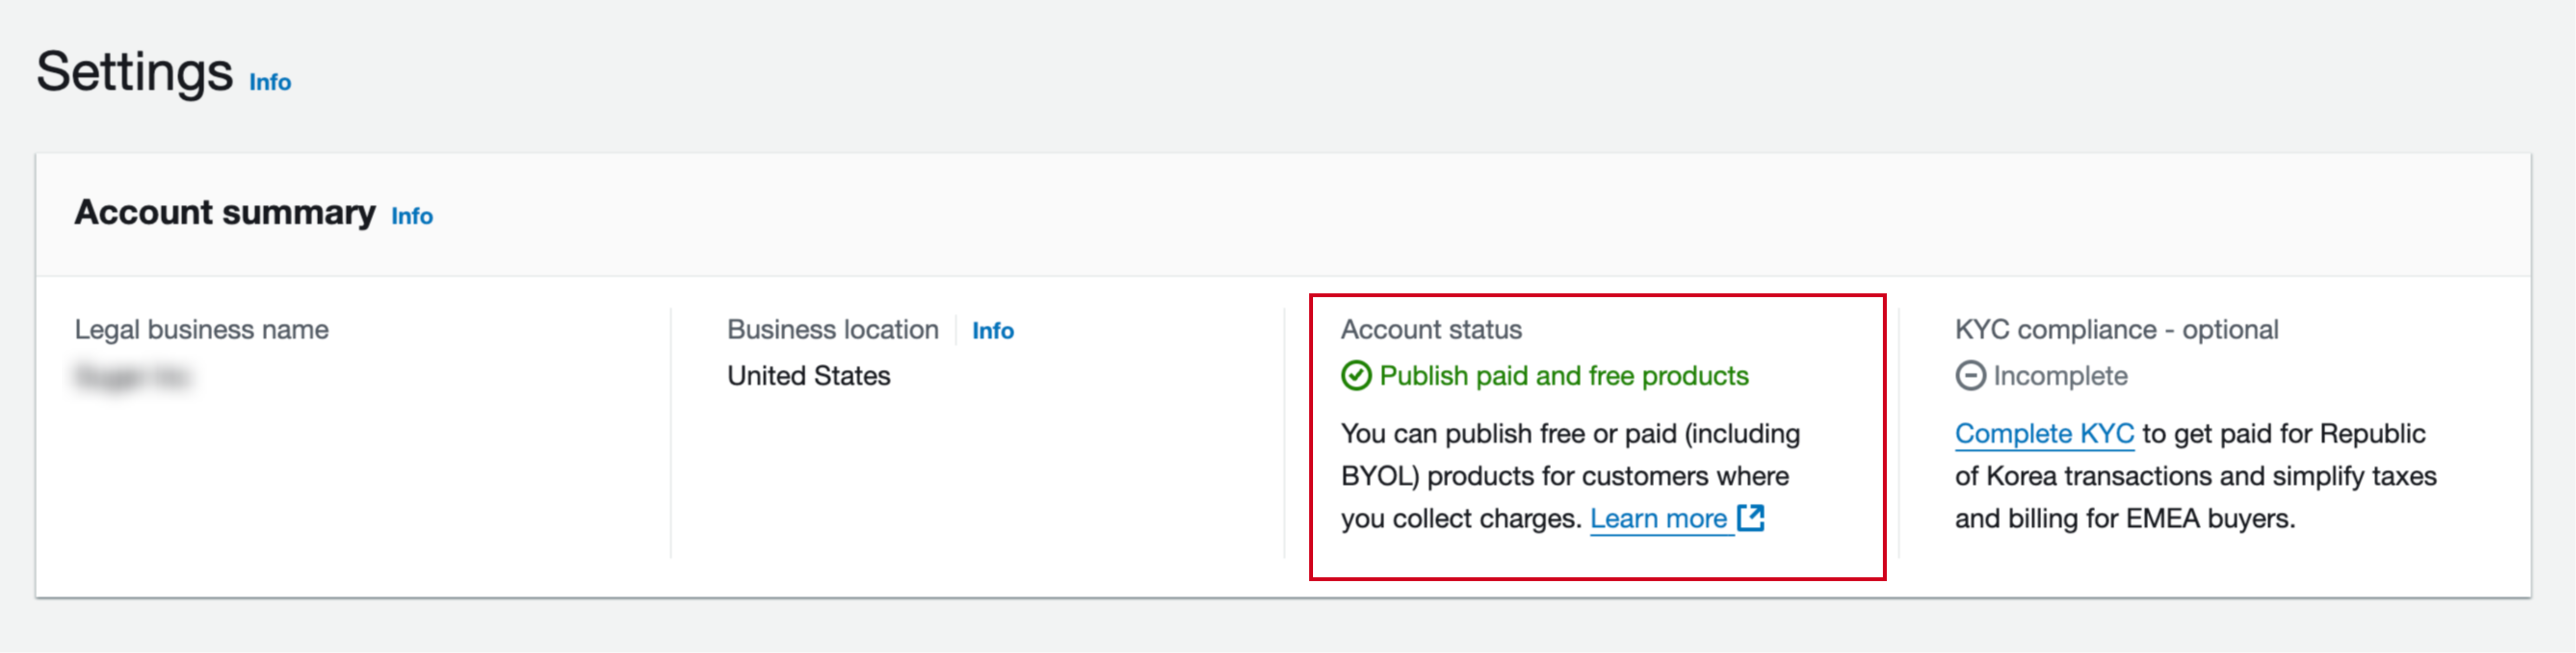
Once all the required steps are complete — public profile set up, tax and banking information submitted, and your disbursement method configured — your AWS Marketplace account status updates automatically. In the AWS Marketplace Management Portal, the status changes from Public Free products to Publish Paid and Free products (displayed in green).
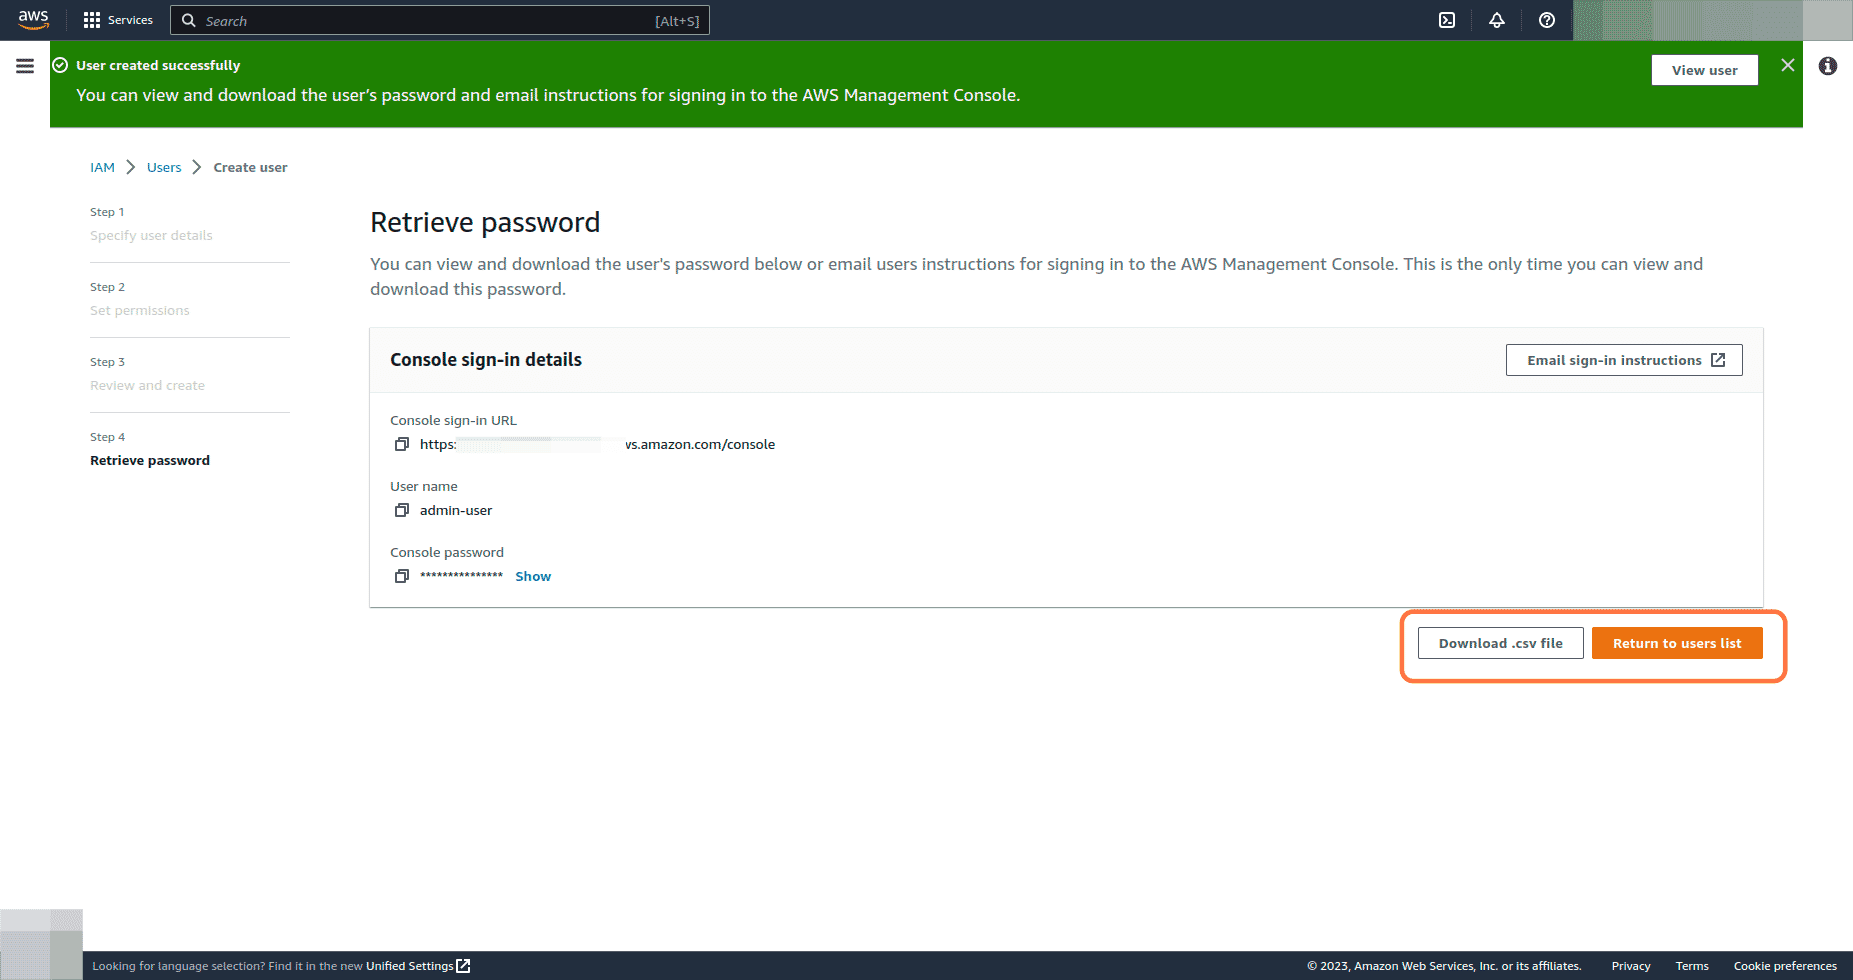
Create an IAM Admin user (recommended)
The root user has unrestricted access to all resources in an AWS account and should only be used for activities that require root credentials, such as billing or managing accounts through AWS Organizations. Following the principle of least privilege, create an Admin user in an Admin group and use it to operate your AWS account.
-
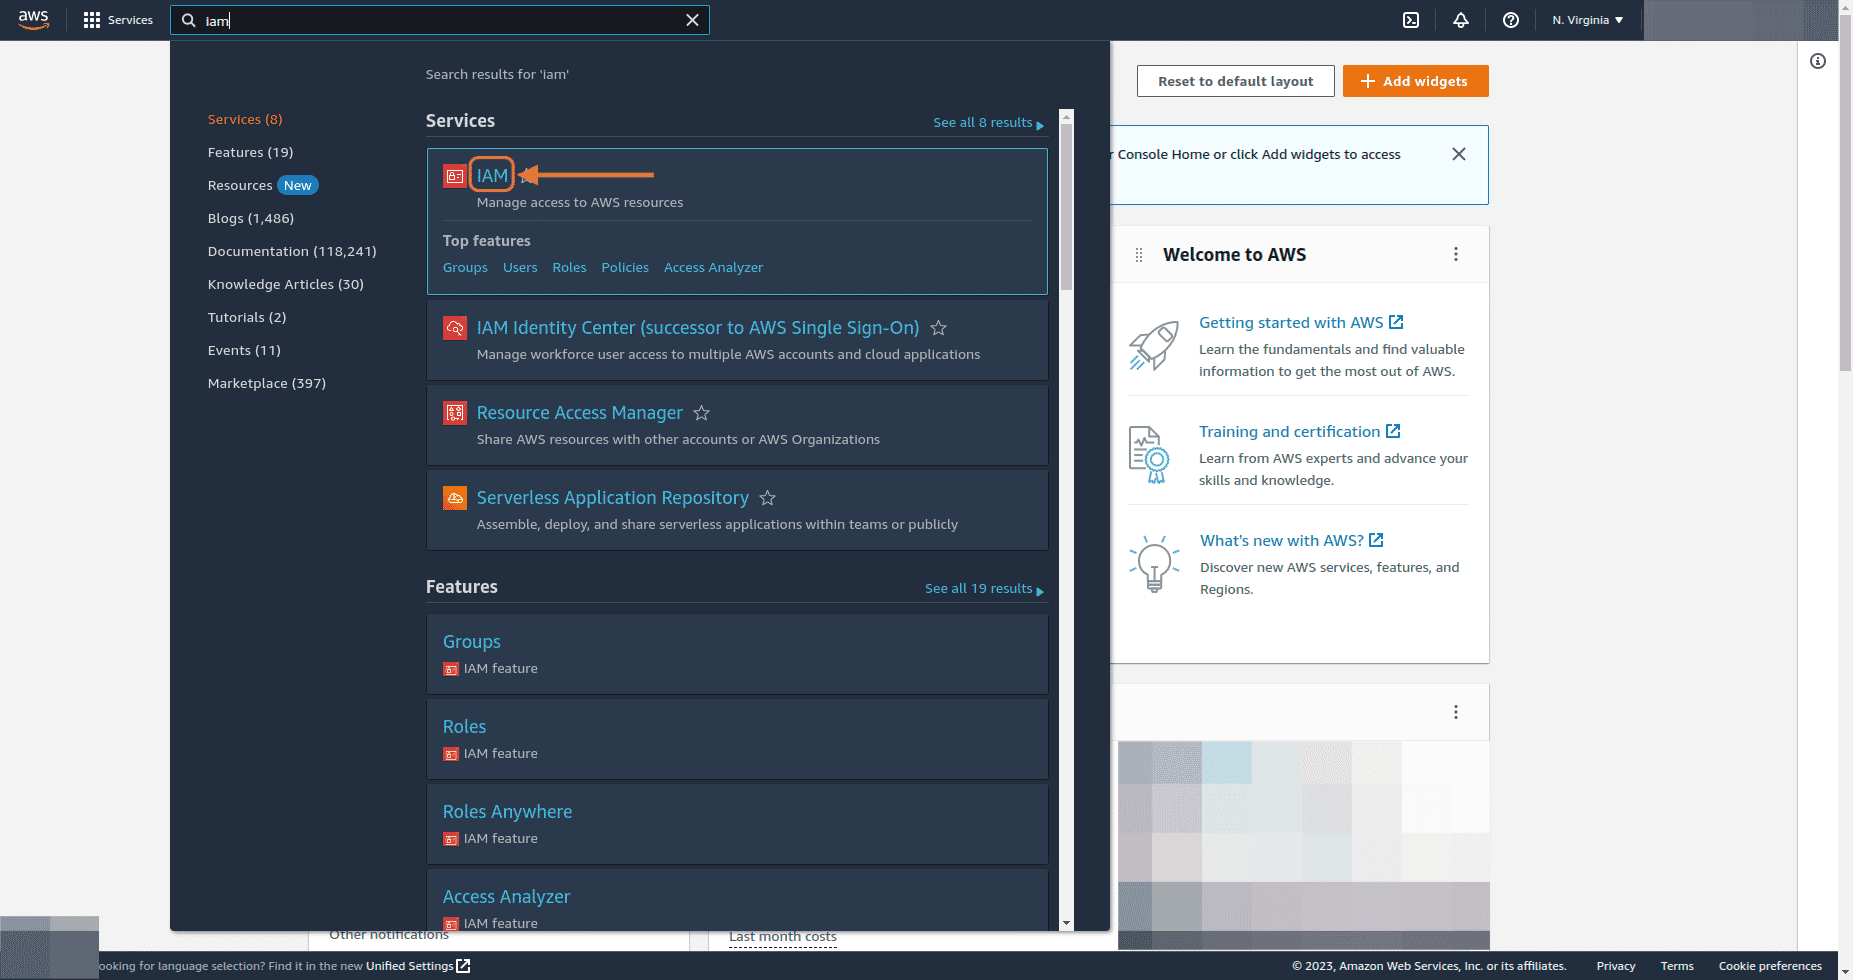
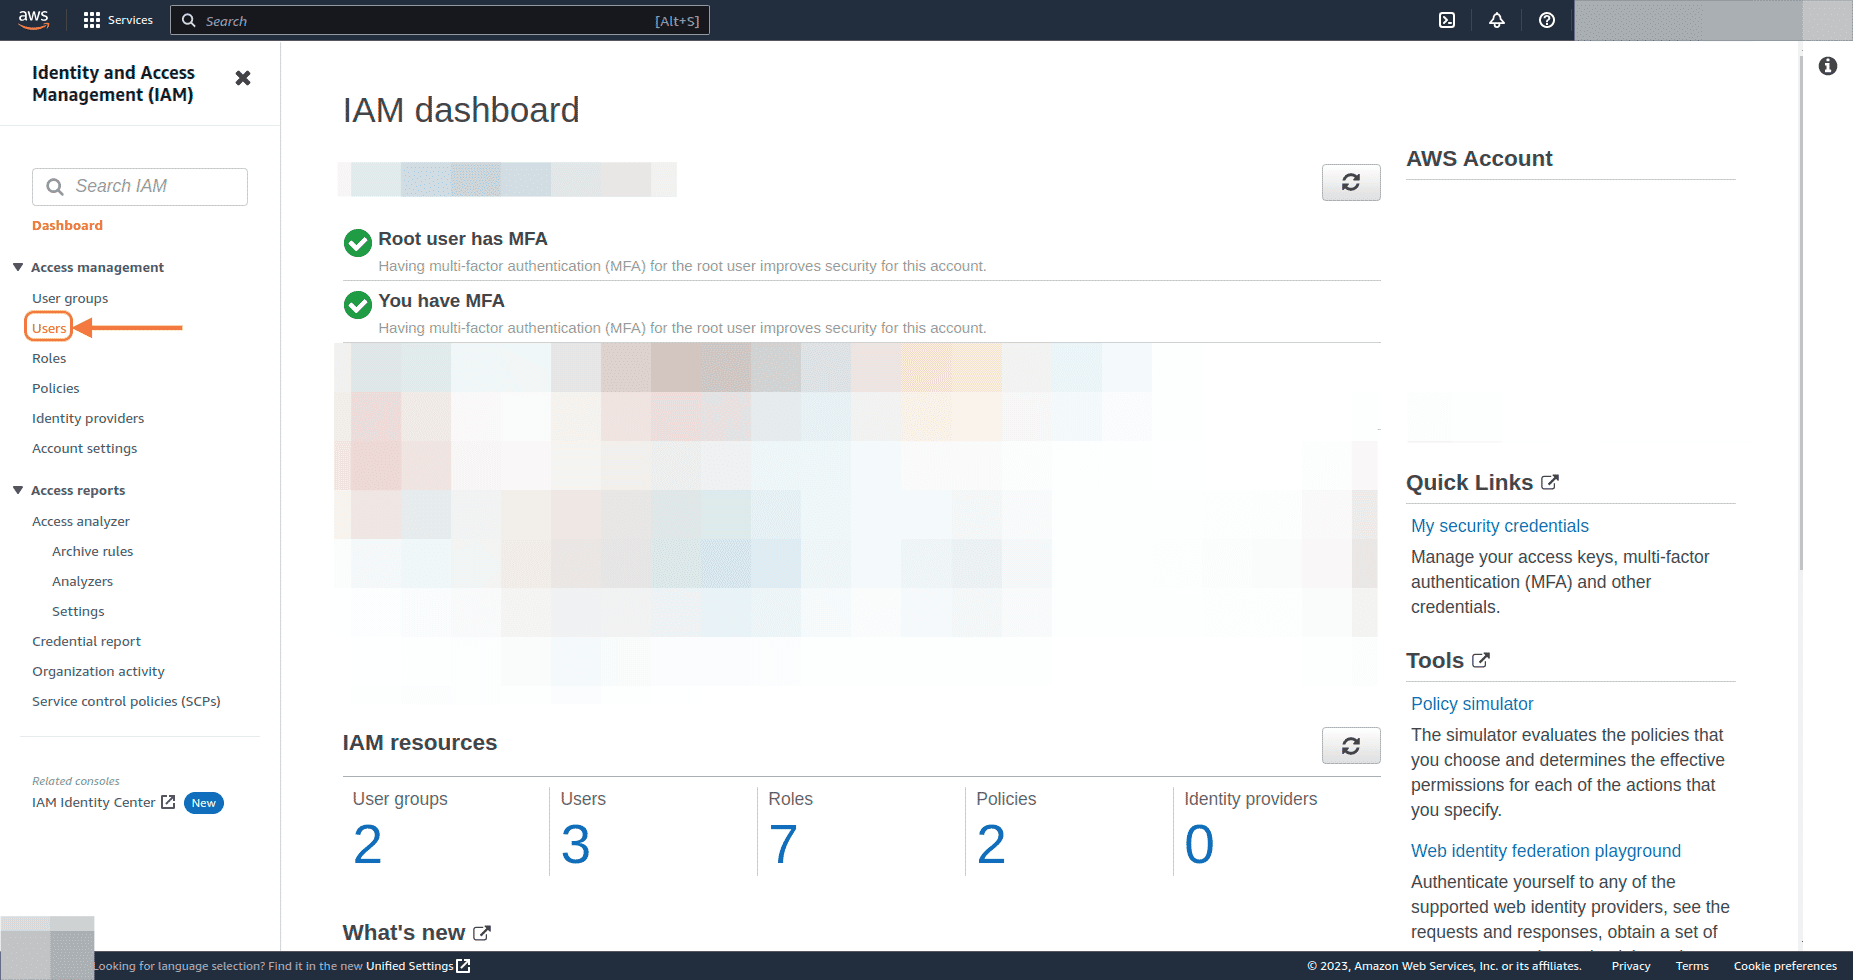
Sign in to the AWS Management Console and navigate to the IAM service.
-
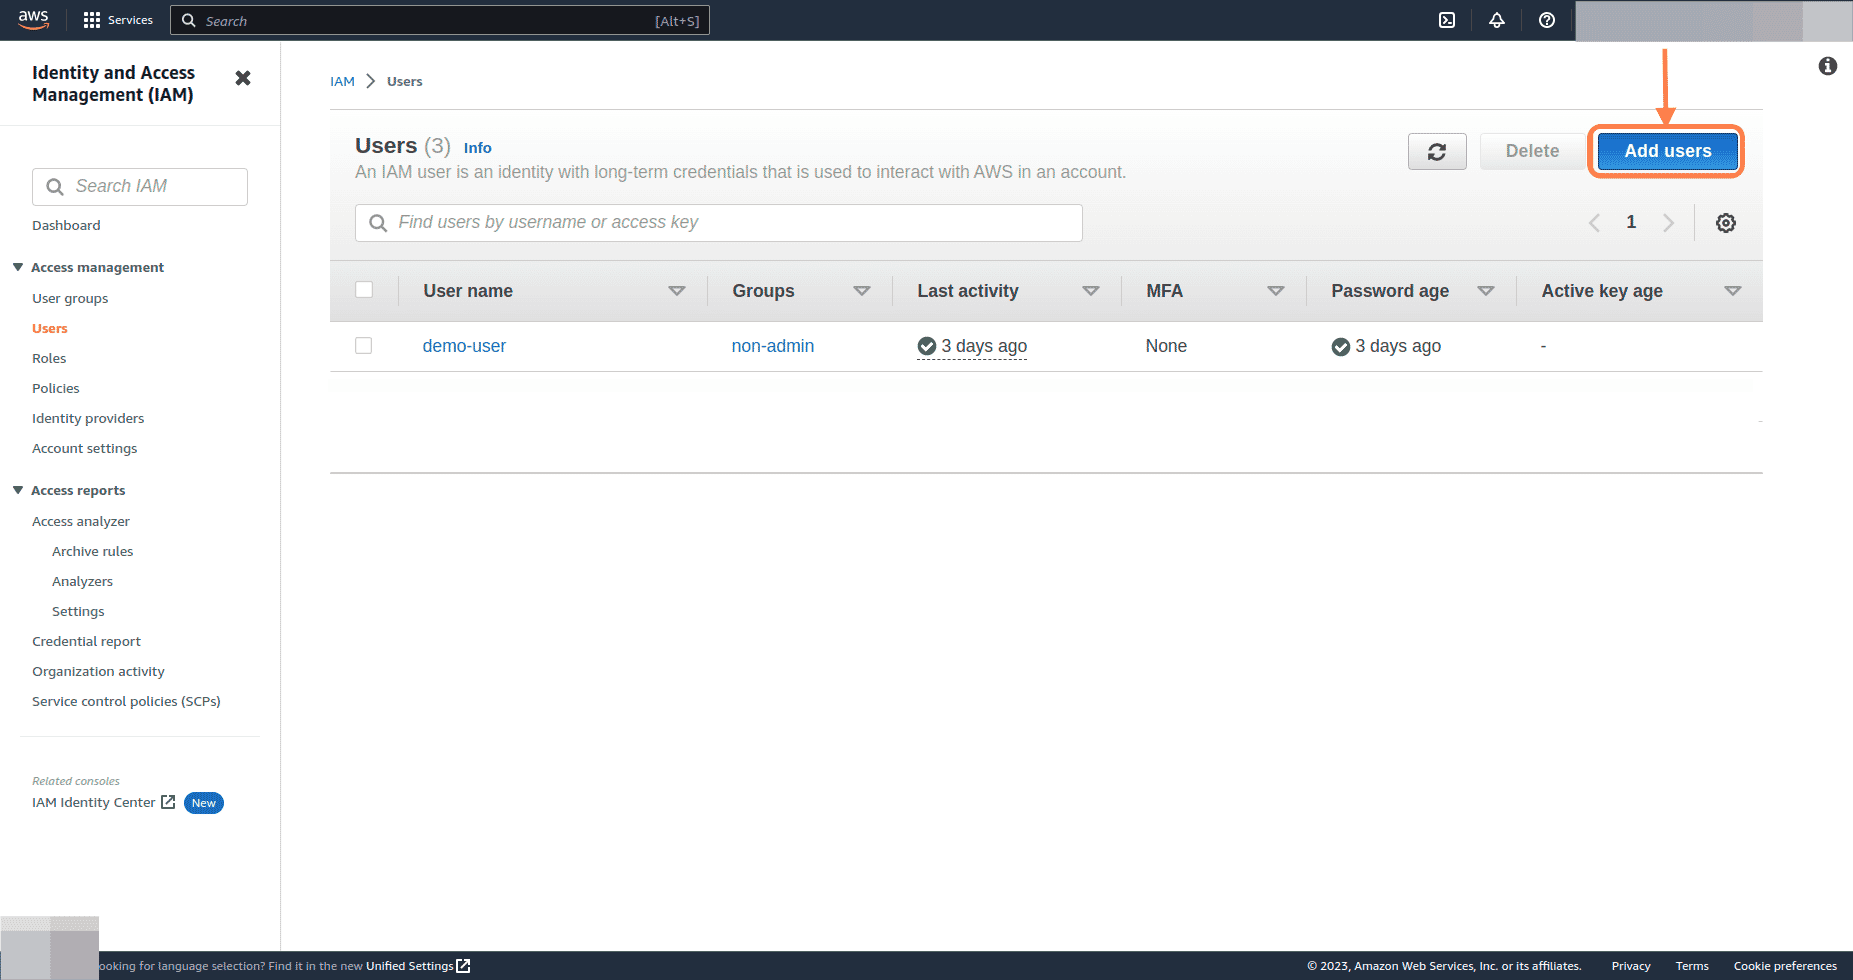
Under Access management on the IAM dashboard, go to Users.
-
On the Users page, click Add users.
-
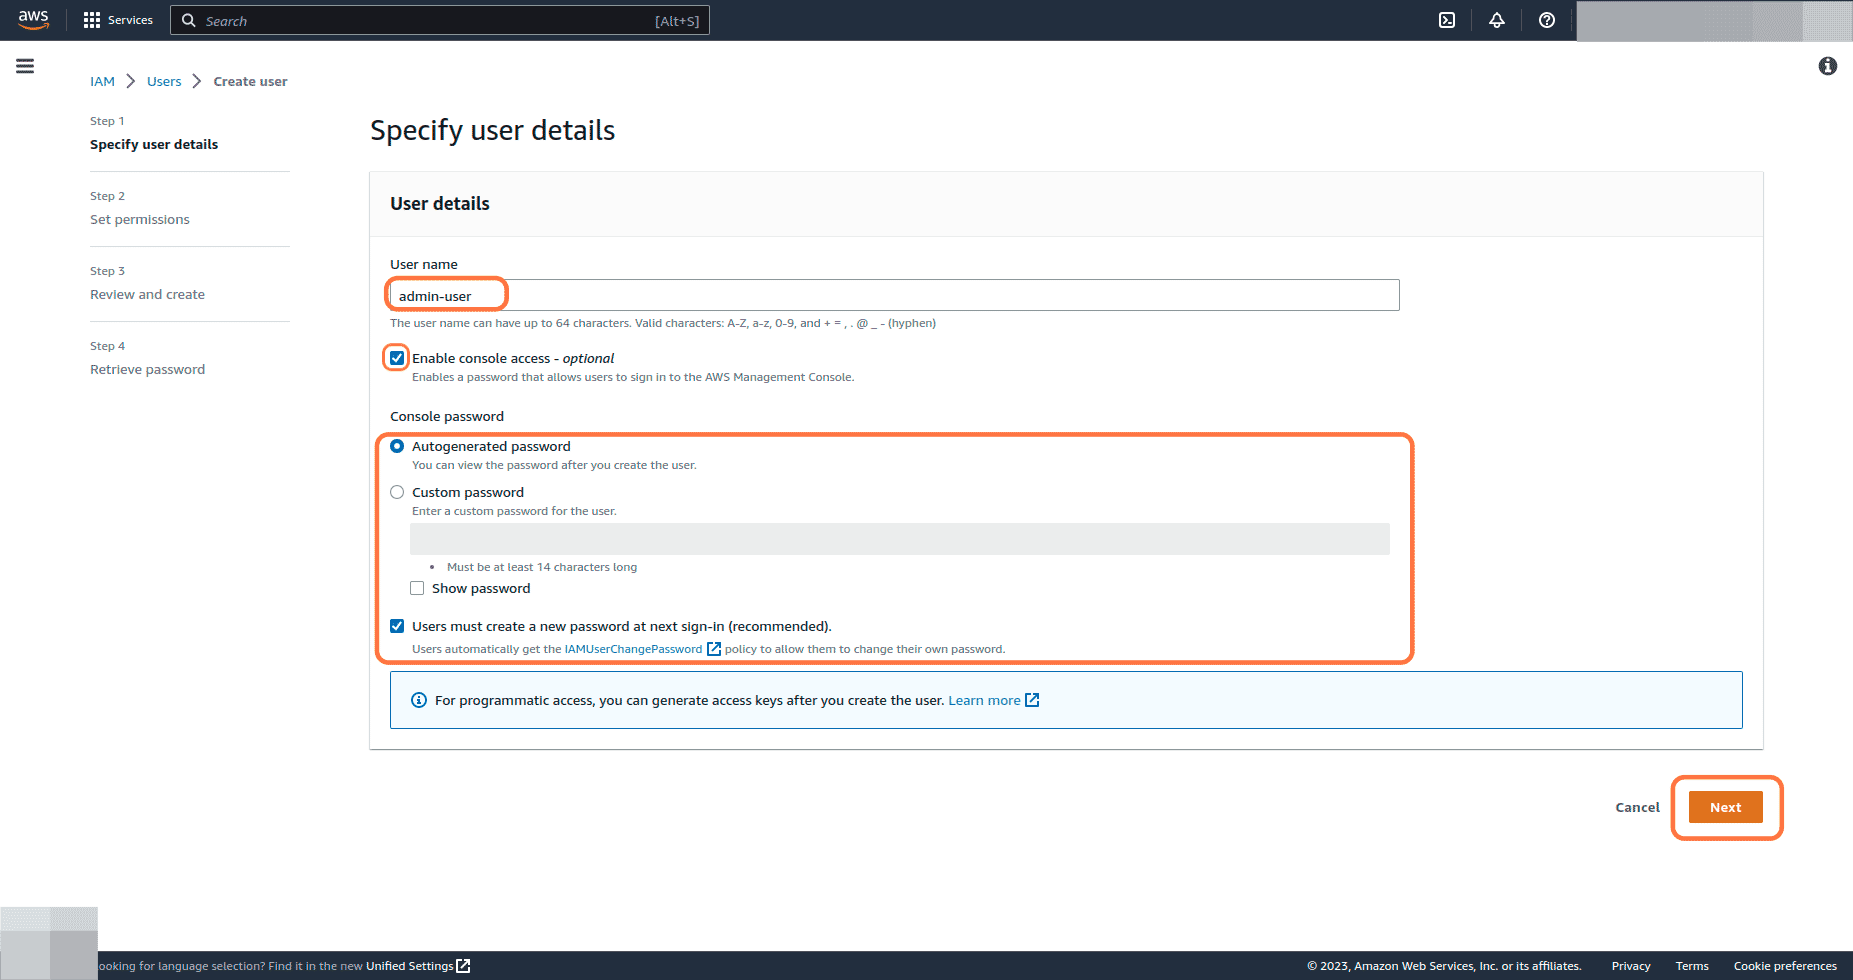
Provide a user name and check Enable console access. Select the appropriate options under Console password, then click Next.
-
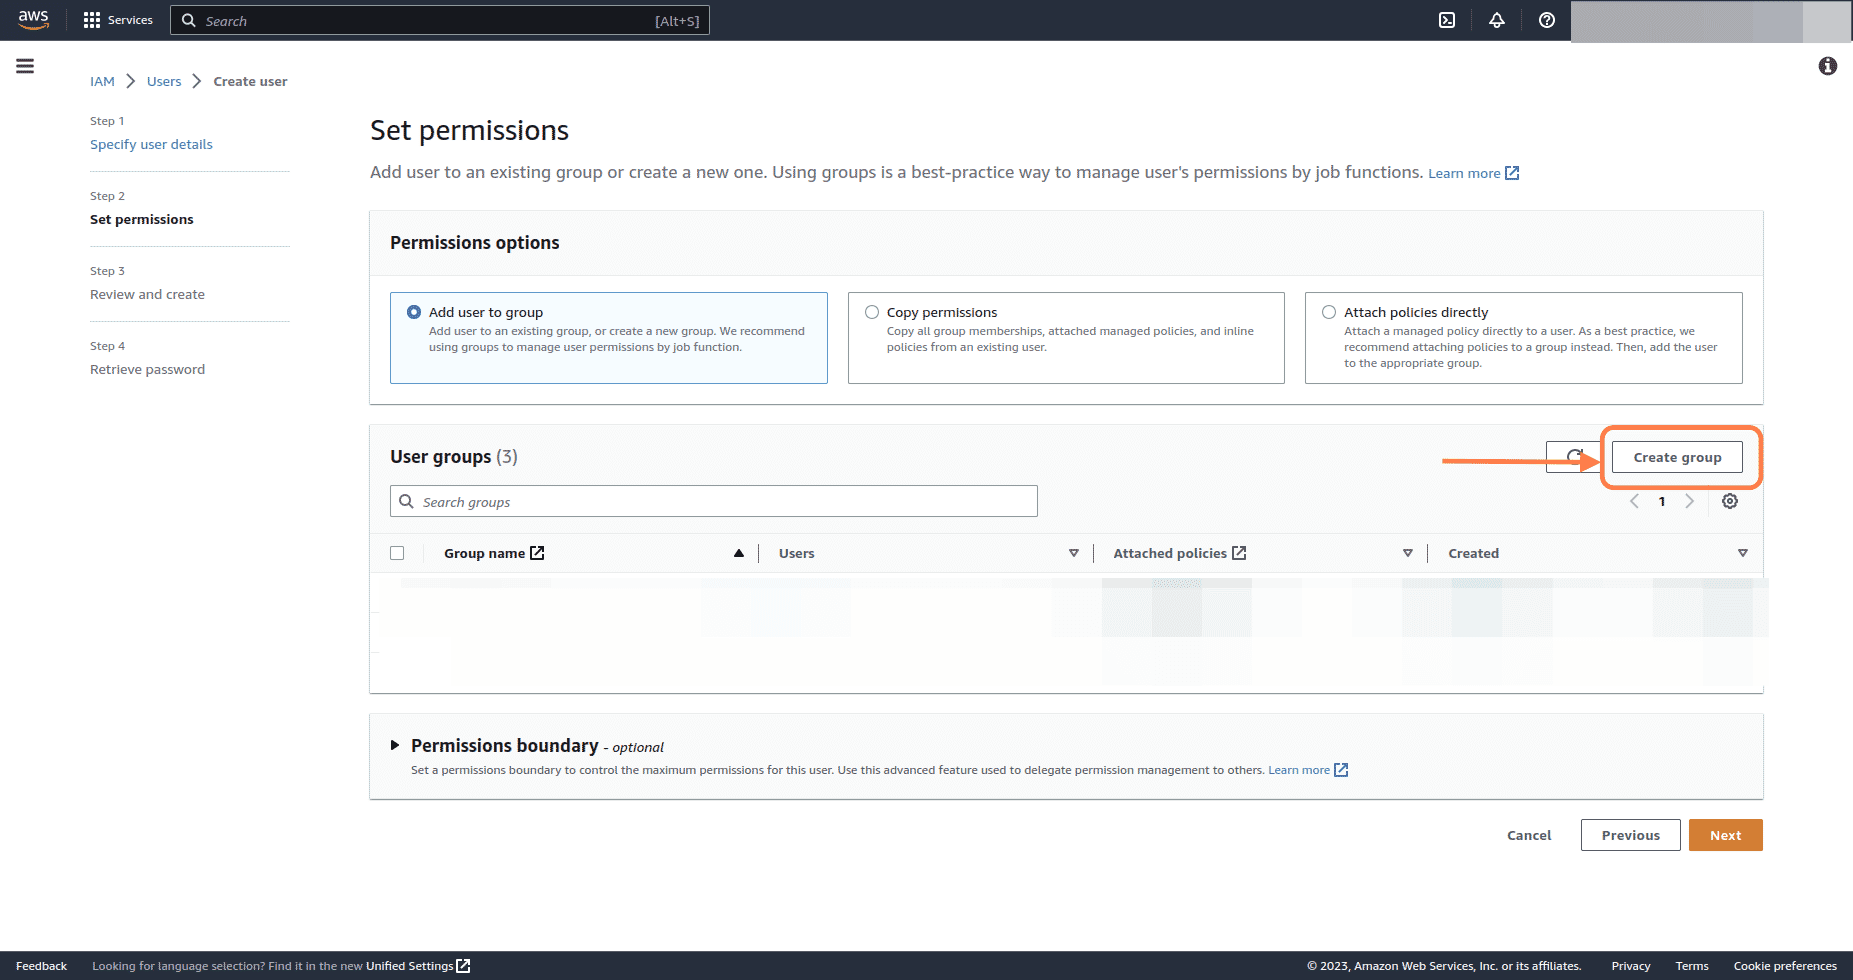
(Optional) If you don’t already have an Admin group, click Create group. If you do, skip to step 8.
-
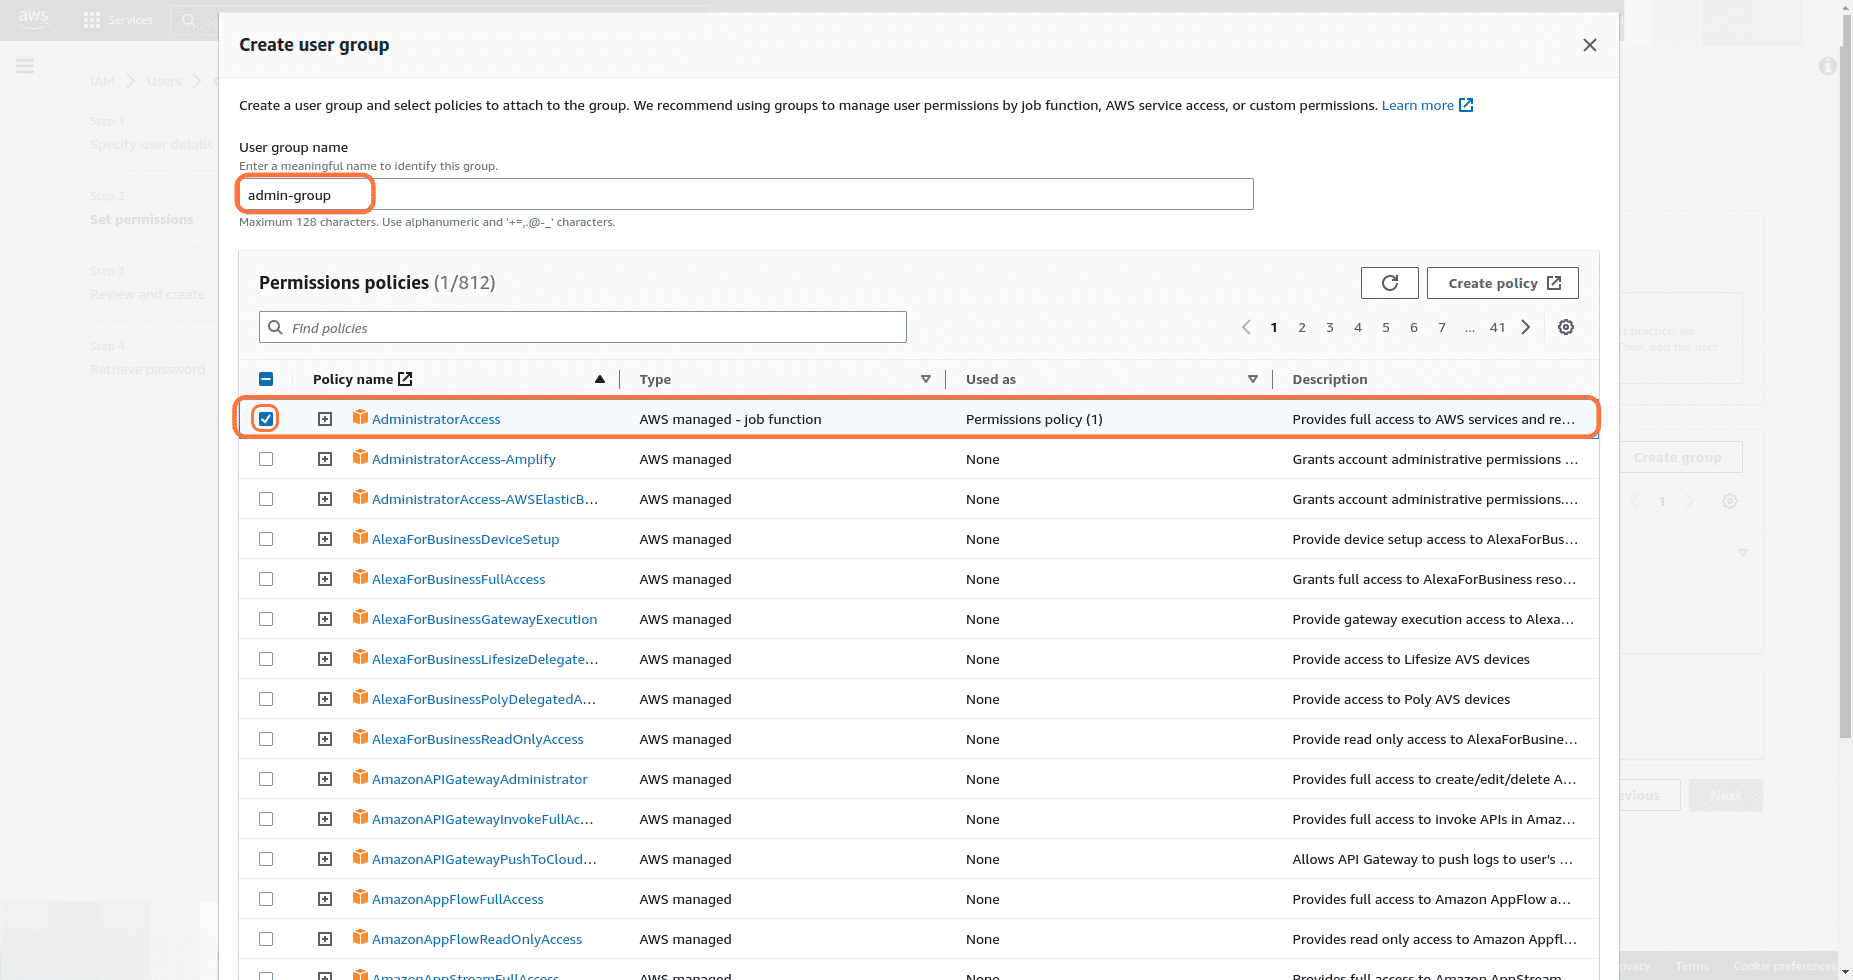
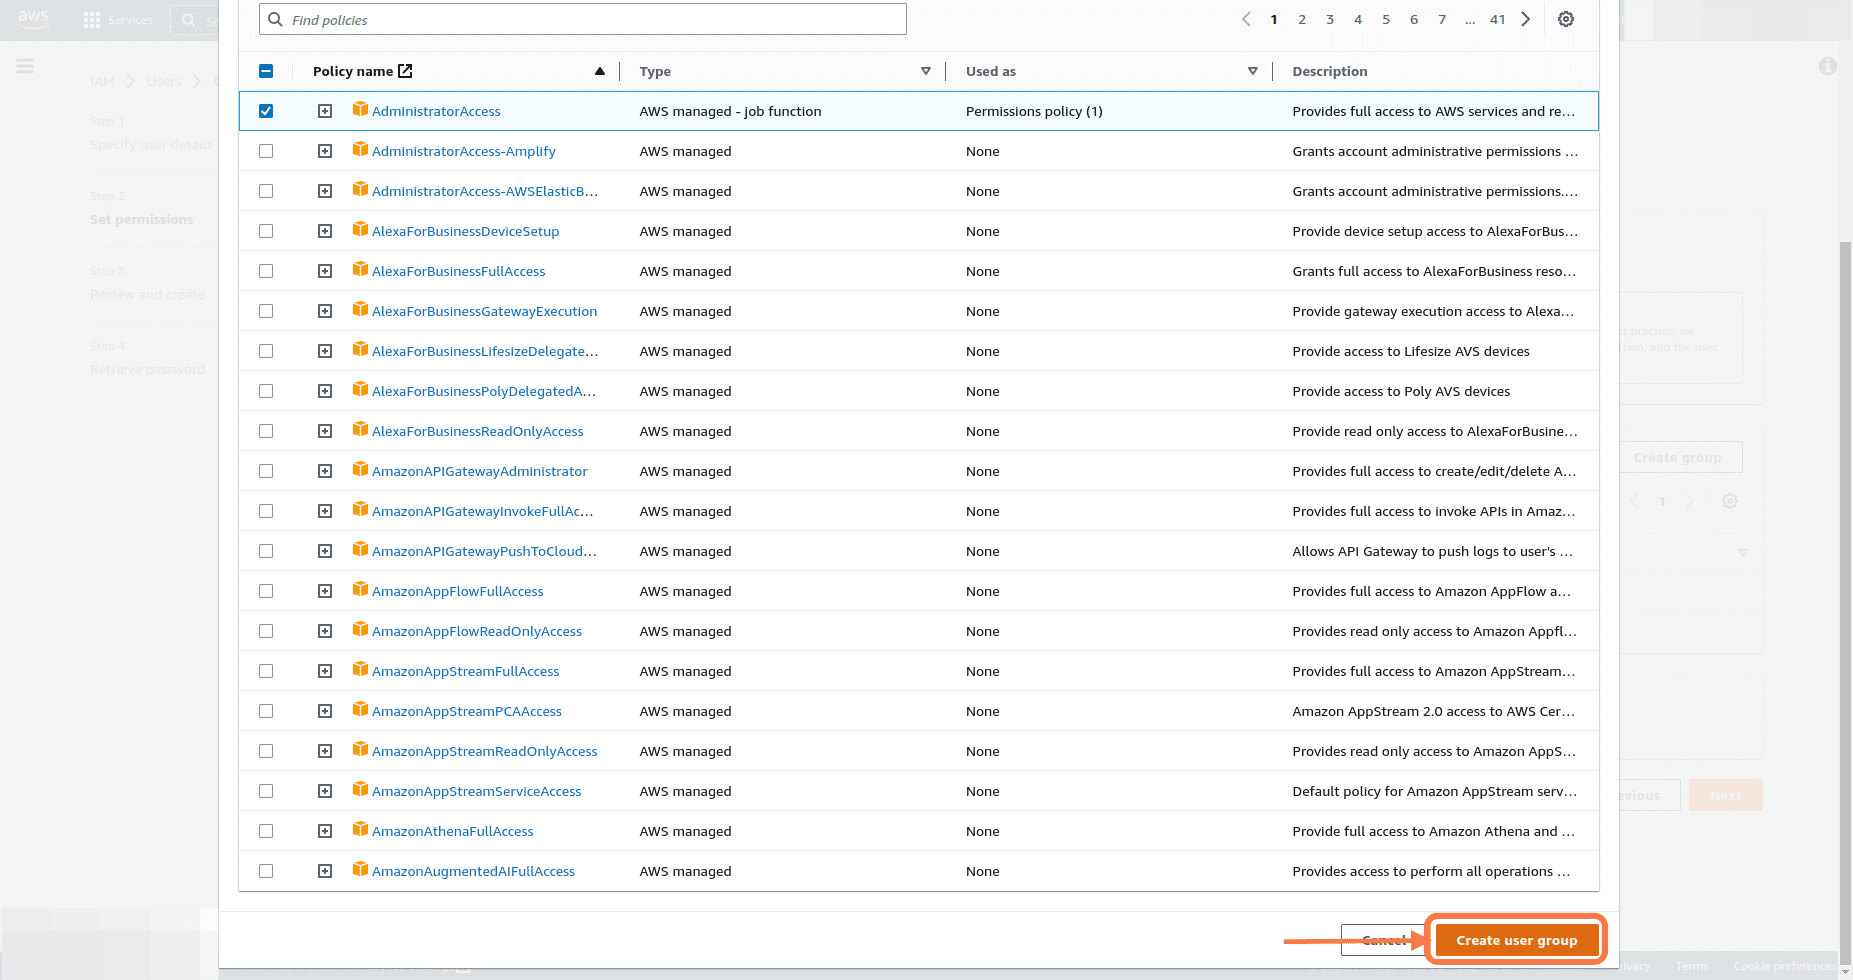
Provide a name for the Admin group and select the AdministratorAccess policy under Permissions policies.
-
Click Create user group to create the Admin group.
-
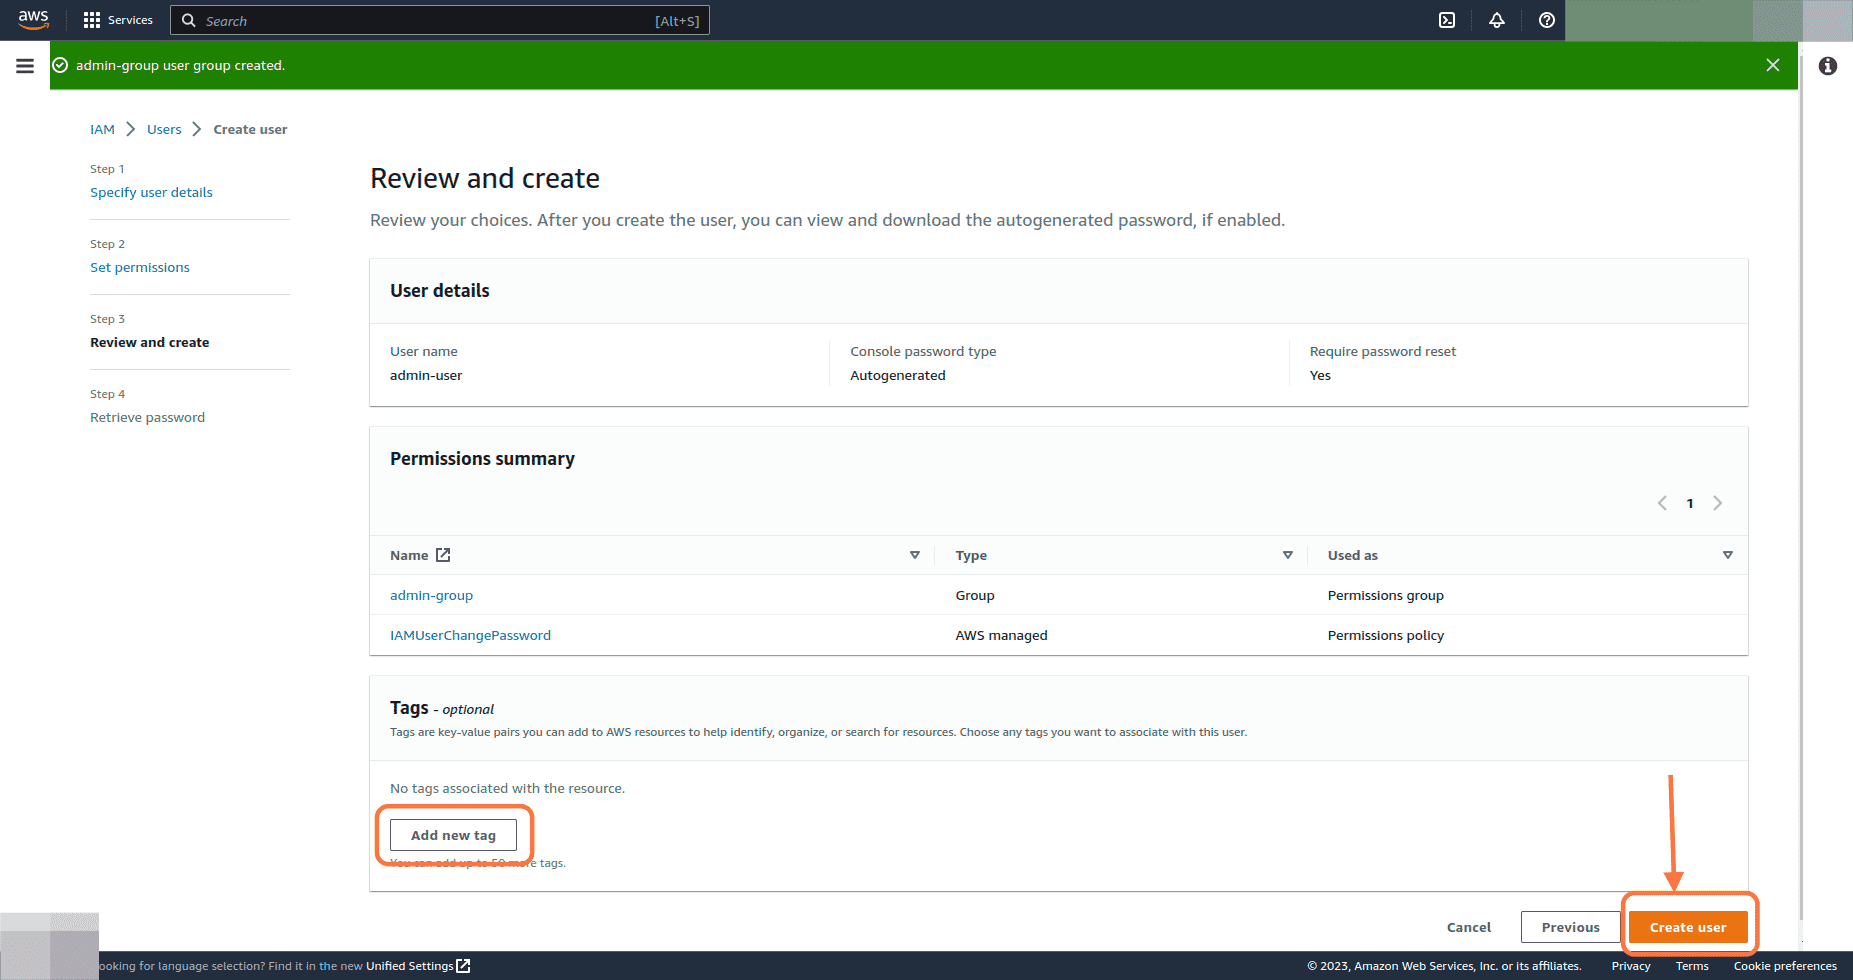
Select the Admin group to add the user to, then click Next.
-
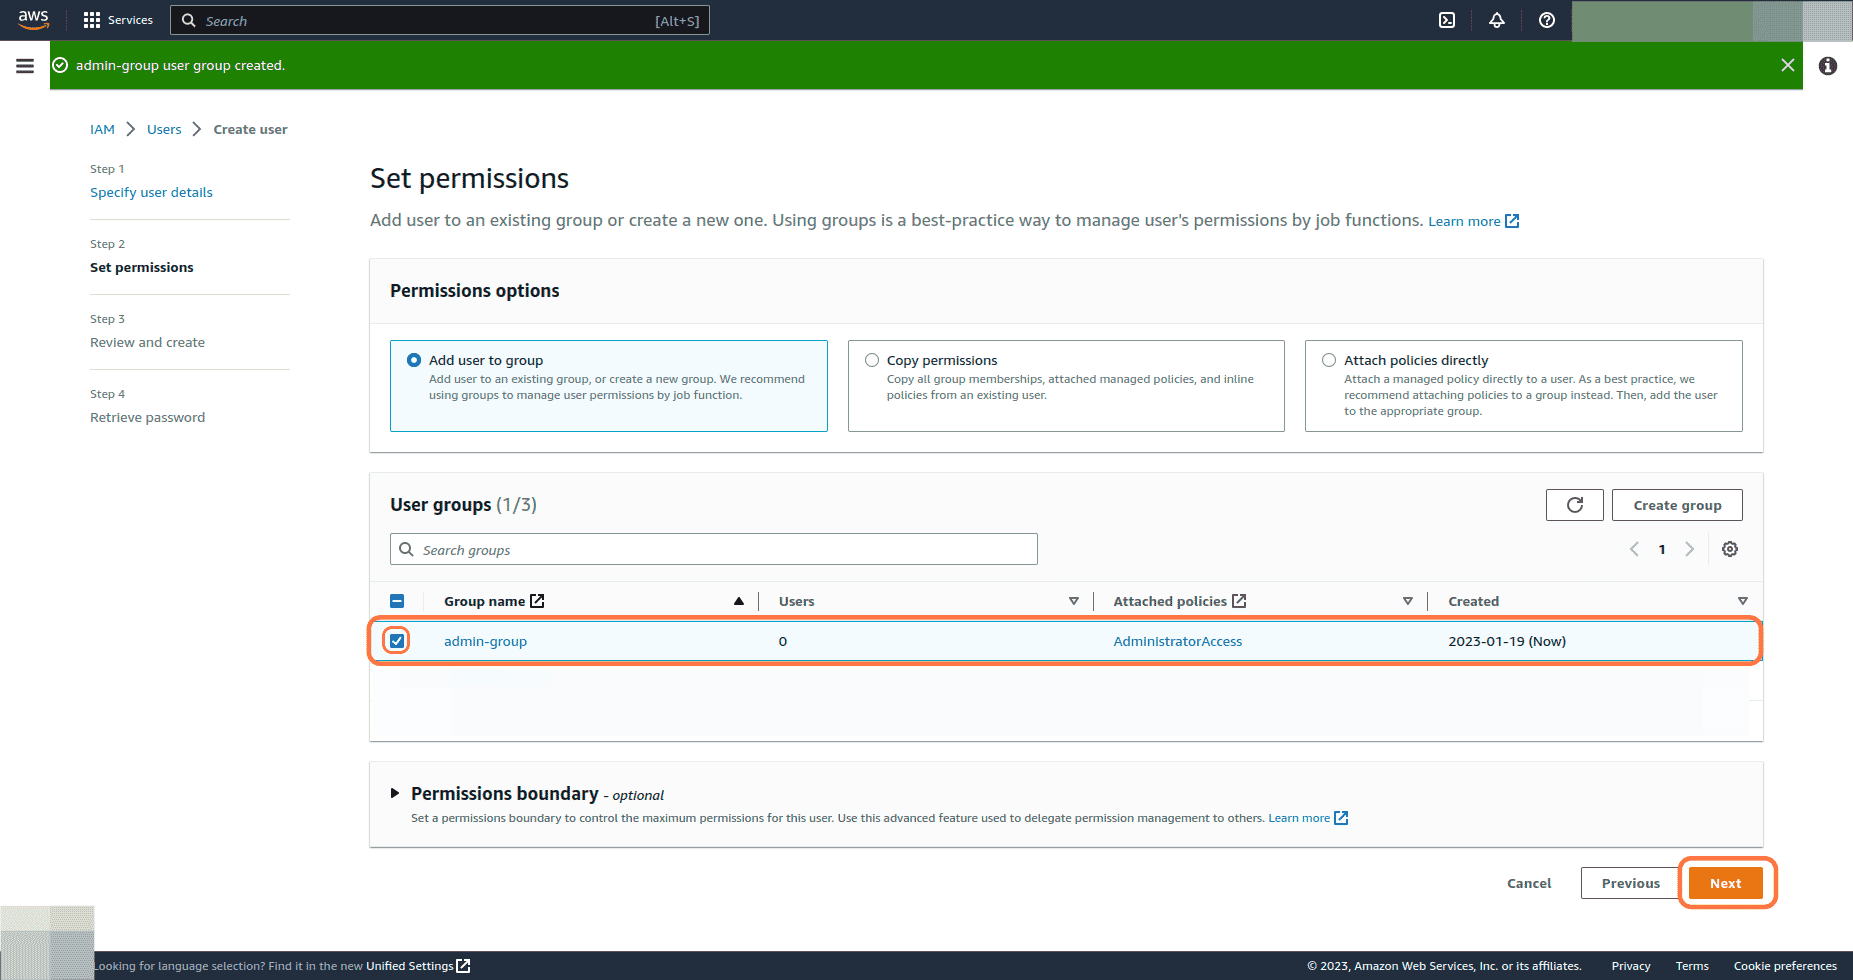
Adding tags is optional but recommended. Add tags as appropriate, then click Create user.
-
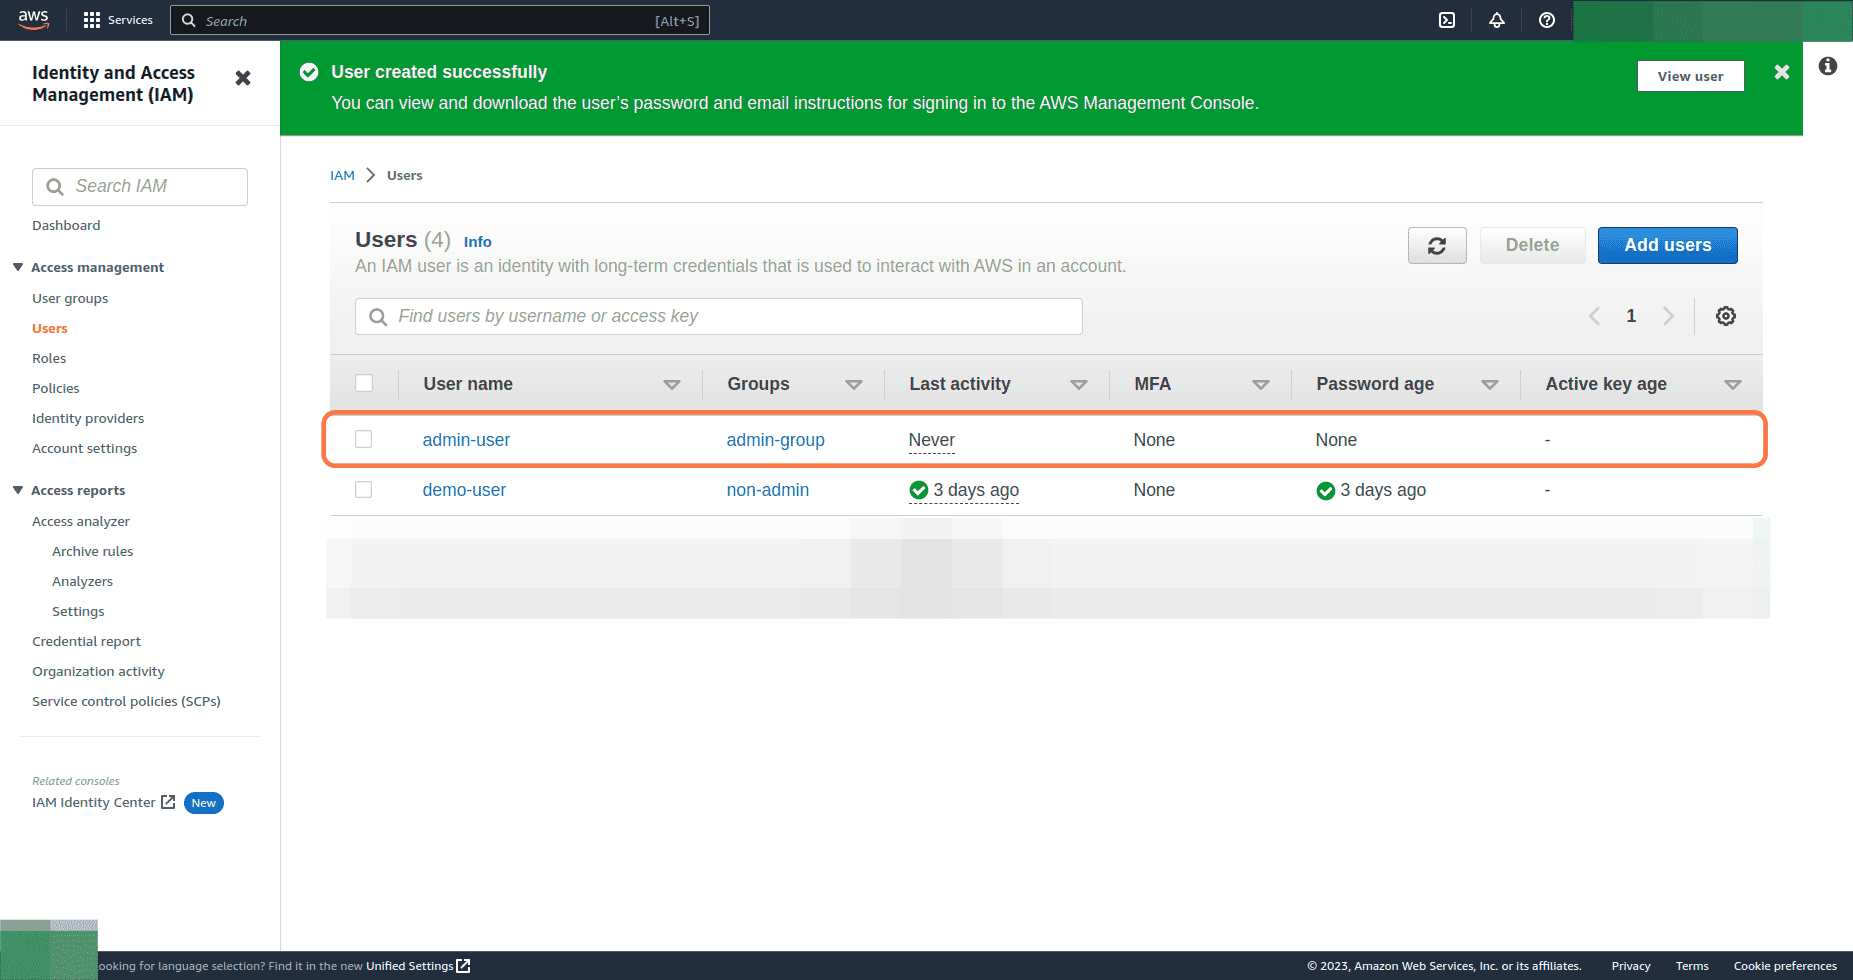
Save or securely share the sign-in details for the Admin user, then click Return to users list.
-
In the Users list, confirm the Admin user has been created and added to the Admin group.
AWS sends updates about your registration — approvals, rejections, requests for more information — to your AWS account’s root user email address, not the email of whoever is currently signed in. Check under Settings → Notifications in the AWS Marketplace Management Portal if you’re not sure which email that is. If AWS rejects a step, reply from that same root email address, since some AWS teams only process requests from it. If you’ve already passed KYC, avoid editing your information unless AWS asks — submitting a change sends your KYC back under review.
Need help? For seller registration, verification, or product review issues, submit a request through AWS Partner Central Support. For AWS account or billing issues, open a case in the AWS Support Console.
Phase 1: Get access to the Suger Console
Before you can connect your cloud marketplaces or begin implementation, you’ll need access to the Suger Console. In this phase, you’ll create your organization, wait for approval, and invite the teammates who will participate in your marketplace implementation.
Estimated time: About 10 minutes of hands-on setup, plus 1 to 2 business days for organization approval.
- Go to Suger Console and sign up using your company email address. If your company is new to Suger, click Create New Organization.
- Your organization stays in a Pending Approval state until the Suger team approves it — send a quick message in your shared Slack channel once you’ve created it so we can track your onboarding and process the approval. Once approved, you’ll get a confirmation email. Approval typically takes 1 to 2 business days; if you haven’t heard back after 2, reach out in your Slack channel.
- Once approved, invite the teammates who will participate in the implementation — see Invite Your Team. The person who created the organization automatically becomes its first Admin.
Adding everyone early helps prevent delays later when configuring integrations, creating listings, testing, and sending offers. We recommend starting with:
| Area | Recommended roles |
|---|---|
| AWS Marketplace | AWS Console Full Admin |
| Business stakeholders | Sales Ops · Finance · Deal Desk · Marketplace Ops |
Phase 2: Connect to AWS Marketplace and submit your first listing
Now it’s time to connect your AWS Marketplace seller account to Suger and create your first product listing.
Estimated time: ~20 minutes for the integration, ~1-2 hours to create your listing, plus ~2 weeks for AWS’s review.
Step 1: Connect with AWS Marketplace
Creating an IAM role is a security-sensitive action, so make sure the person completing this step has permission to create IAM roles and approve IAM changes in CloudFormation — otherwise the setup may fail or remain incomplete. If your security team restricts AWS permissions, some resources may need to be configured manually instead of automatically; that’s expected for locked-down AWS environments, not a Suger issue.
Follow AWS Marketplace Integration to connect your account, configure required services such as Marketplace Data Feeds (MDFS), and verify the integration is working.
Step 2: Create, test, and submit your listing
Before creating your listing, decide your selling approach — public pricing, private offers, or both. If you plan to negotiate every sale through a private offer, keep in mind that AWS requires at least one publicly priced dimension above $0.00; a common approach is a high placeholder public price with a note asking interested buyers to contact your sales team for a private offer.
Also decide your fulfillment URL — where AWS sends customers immediately after they subscribe. Use your own if you already have a signup page (AWS validates this during review, so custom implementations may need extra troubleshooting if something doesn’t behave as expected); use Suger’s hosted fulfillment URL if you don’t have one, since it’s already designed to meet AWS’s requirements. Either way, AWS requires a successful test purchase before approving your listing.
Follow List Product to create your product in Suger, configure pricing, complete the required test purchase, and submit for AWS review. Review timelines vary — see that page’s FAQ for current estimates, and leave extra time if you’re working toward a launch date, since AWS may request revisions first.
Optional: request the “Deployed on AWS” badge
If your buyers negotiate AWS spend commitments (Enterprise Discount Programs or Private Pricing Addendums), they’ll usually want their purchase to count toward that commitment — and only products with the “Deployed on AWS” badge qualify. It doesn’t affect your ability to list or sell; skip this if your buyers don’t care about spend commitments.
To qualify, your product’s entire application and control plane need to run on AWS (the only exceptions are CDNs, DNS, and corporate identity providers) — you submit an architecture diagram through the AWS Marketplace Management Portal for AWS to review. Your listing just needs to exist (even in Limited status from Step 2 above), not be publicly live yet, so it’s worth submitting early to leave time for any AWS feedback. See Deployed on AWS Badge for the full requirements and submission steps.
Phase 3: Go live & test with a private offer
Once your listing is approved, confirm it’s live and validate the buyer experience end to end before working with real customers.
Estimated time: Less than 1 hour once your listing has been approved.
- In the Suger Console, go to Product, open your AWS product, and confirm the status is Public. Copy the Marketplace URL and open it in an incognito window — if it loads, your product is live.
- Create and accept a private offer using an account you control, to verify your private offer workflow, fulfillment, and entitlement processing all work before inviting real customers. See Create an AWS Marketplace Private Offer.
This is a different test than the one in Phase 2 — that one confirms your public listing accepts a purchase; this one confirms your private-offer workflow end to end. Don’t skip either — it’s much easier to catch issues here than after a real customer transacts.
Phase 4: CRM integration (optional)
If your team uses Salesforce or HubSpot, connect it to Suger to manage private offers and co-sell opportunities more efficiently. Skip this phase if you use neither — check with your Suger contact if you’re unsure whether CRM integration is included in your subscription.
- Salesforce (~1 hour, requires a Salesforce Admin) — lets your sales team send private offers and share opportunities with AWS without leaving Salesforce. See Integrate Salesforce with Suger.
- HubSpot (~10 minutes, requires access to install apps and grant CRM permissions in HubSpot) — enables co-sell capabilities from the Suger console. See Integrate HubSpot with Suger.
Phase 5: Co-Sell setup (optional)
If you plan to co-sell with AWS and your Suger subscription includes co-sell capabilities, complete this phase — otherwise, skip it. AWS co-selling lets you share opportunities with your AWS account team so they can collaborate with you throughout the sales cycle.
Estimated time: ~30 minutes, plus any time needed to complete AWS eligibility requirements.
- Confirm your organization meets the eligibility requirements for AWS ACE (AWS’s co-sell program) — see the APN Customer Engagements Program.
- Connect your AWS co-sell integration — see Integrate AWS ACE with Suger. Your Suger contact will then help you configure field mapping so opportunities sync correctly between your CRM and AWS ACE.
You’re live — what’s next
Congratulations! You’re ready to start transacting with customers through AWS Marketplace using Suger. From here, your focus shifts from setup to day-to-day marketplace operations — creating private offers, managing agreements, tracking revenue, and growing your marketplace business.
Self-serve customers
Your onboarding is complete; post in your dedicated Slack channel or email support@suger.io, and expect a response within 1 business day.
SMB / Mid-Market / Enterprise customers
Your Customer Success Manager will schedule a post-launch check-in to help you plan your growth strategy, manage private offers, set up co-sell workflows, and answer product questions.
Important links
| Resource | Where |
|---|---|
| Your AWS listings, offers, and payment settings | AWS Marketplace Management Portal |
| Create a private offer | AWS Marketplace Private Offers |
| Check if an invoice has been paid | Revenue Records |
| Refunds and cancellations | AWS Marketplace Refunds and Cancellations |
Spotted something wrong or out of date on this page? Tell us and we'll correct it.