
Private Offers
View, share, and manage your private offers across AWS, Azure, and GCP from the Offers page in Suger Console.
Overview
The Offers page in Suger Console is your central place for tracking and managing every private offer you send. From here you can monitor pipeline health, find specific deals, take actions on an offer (cancel, clone, extend, share, notify contacts, download EULA), and track offer statuses across all three cloud marketplaces.
After a private offer is sent, AWS does not allow you to edit it. Instead, you manage the offer through the actions on this page: cancel it, clone it into a corrected version, extend its expiry date, notify additional contacts, or download the EULA. To manage any offer, open the Offers section in the Suger Console and select the offer you want to work with. Most actions live in the More actions menu on the offer detail page. Each of these actions is also available from the Salesforce App — see Manage Offers in the Salesforce App.
Quick pipeline view
At the top of the Offers page, a set of summary cards shows the current state of your deal pipeline. These cards update automatically based on the latest status from AWS, Azure, and GCP, giving you a quick snapshot of both pipeline health and revenue performance in one place.
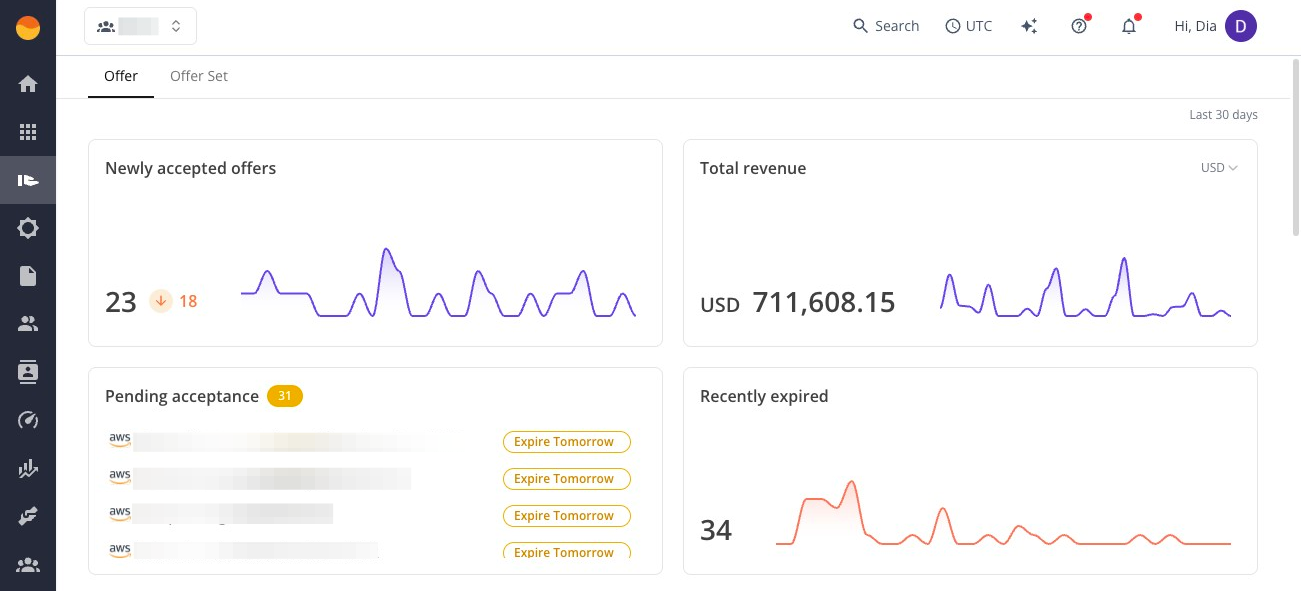
- Newly accepted offers — offers recently accepted by the buyer. Use this to confirm which deals have just closed and are ready for handoff to implementation or customer success.
- Total revenue — the total revenue value from your deals in the system (in USD). For deeper breakdowns like invoiced, collectible, or disbursed amounts, use the Revenue or Home dashboards.
- Pending acceptance — offers that have been sent but are still waiting for buyer action. Use this to quickly identify deals that may need follow-up before they expire.
- Recently expired — offers that were not accepted before their expiration date. Use this to spot stalled deals that may need to be reissued or extended.
Two ways to view offers
The Offers page gives you two ways to view your pipeline, depending on how your deals are structured. Switch between the Offer and Offer Set tabs.
Offer tab
This is your main view for managing offers. It shows each individual private offer across AWS, Azure, and GCP.
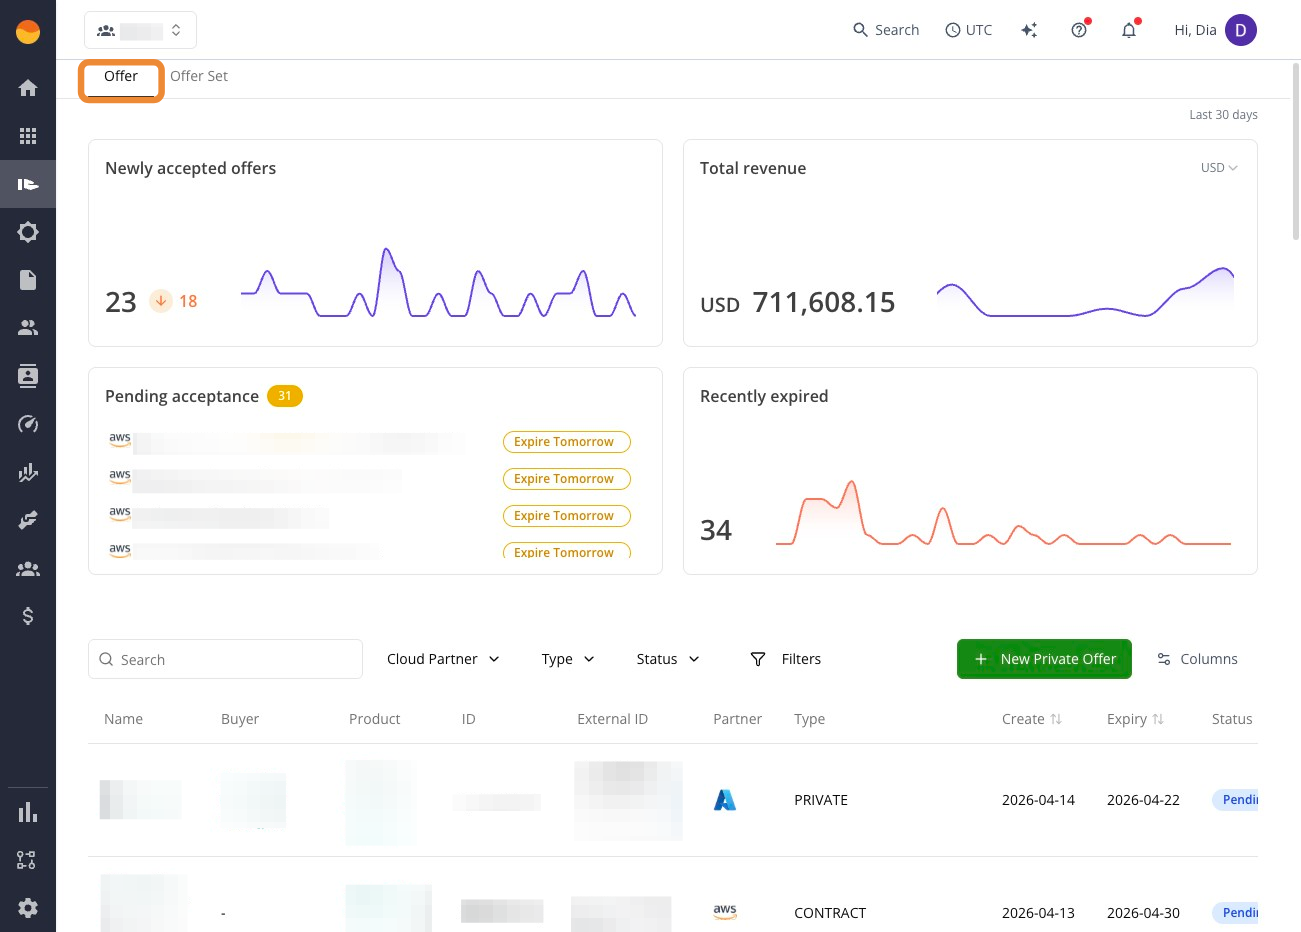
From here, you can:
- Track standard, single-offer deals
- Check offer status and progress
- Search or filter across all cloud providers
Offer Set tab (AWS only)
This view groups multiple AWS offers into a single bundle (up to 7 offers). It’s used only for AWS Marketplace deals that involve multiple products being sold together.
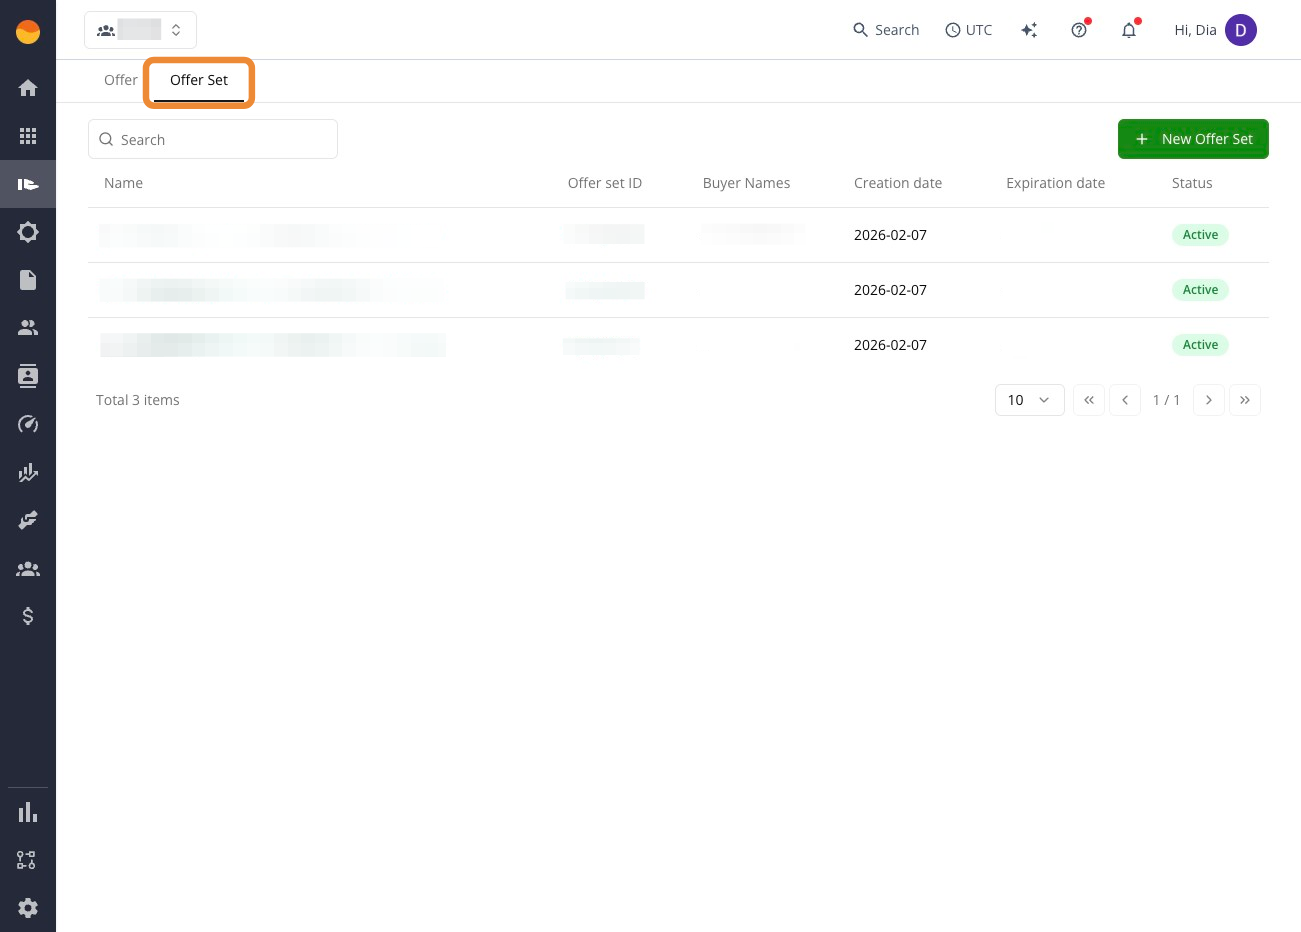
Use this view when:
- You are selling a multi-product solution in AWS
- You want to bundle multiple offers into one buyer flow
- You need to manage AWS offer sets instead of individual offers
See Create an AWS Marketplace offer set below.
Find the right offer
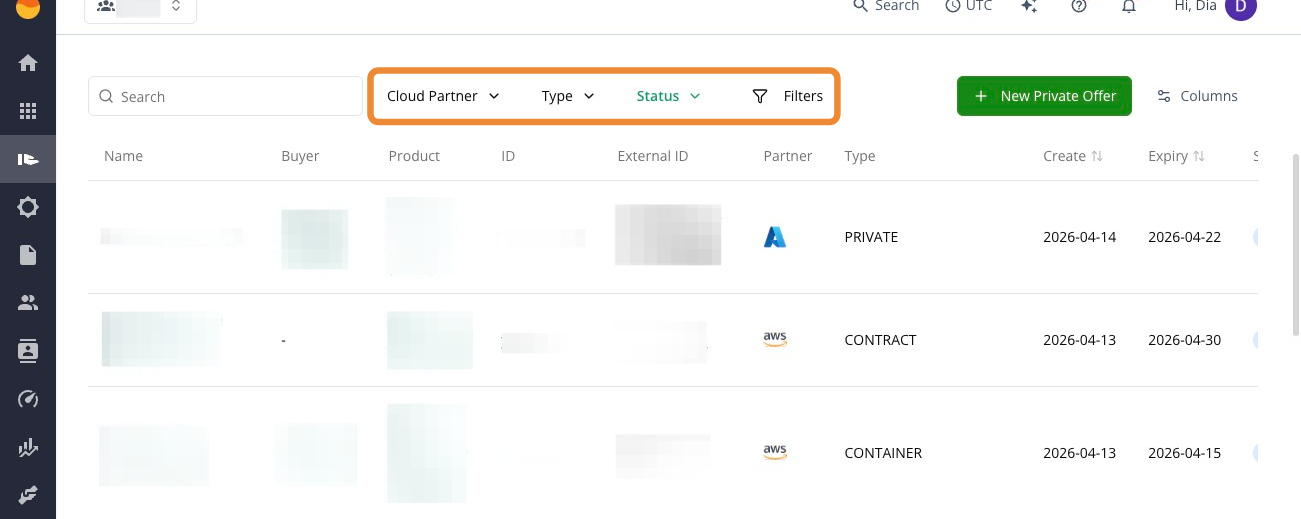
When you have a large number of offers, use search and filters to quickly locate specific deals without scrolling through the full list.
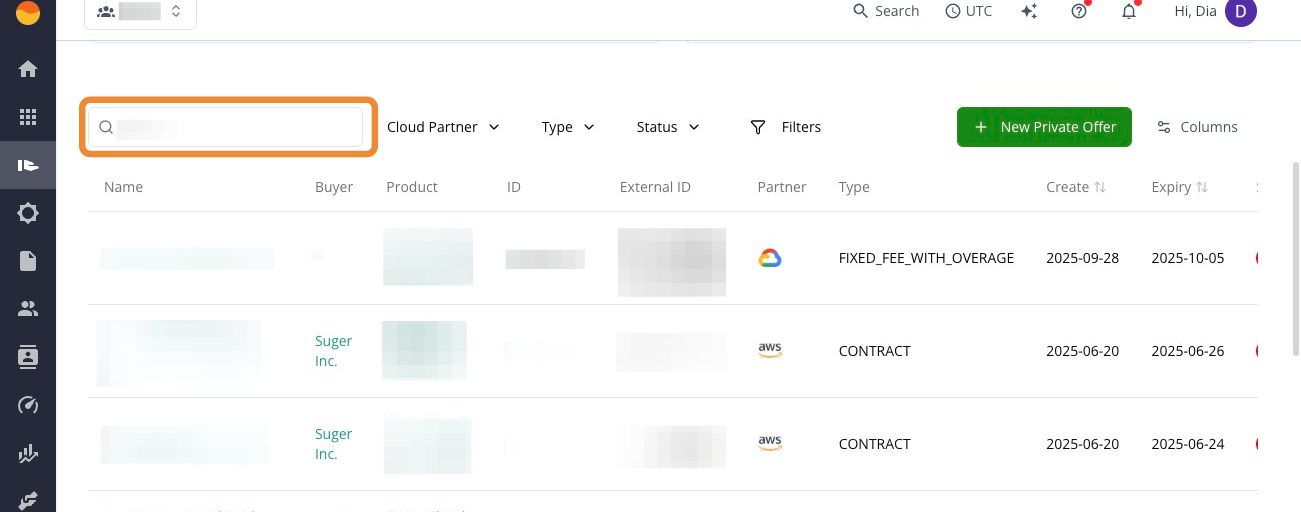
Search
Use the search bar to quickly find a specific offer by name, buyer, or Offer ID. This is the fastest way to jump directly to a single deal when you already know what you’re looking for.
Filters
Use filters when you want to narrow down your pipeline instead of finding one specific deal. For example, view all offers in Pending_Acceptance, or filter by AWS vs. Azure vs. GCP.
Columns
Customize the table columns to control what information you see in the Offers list, so you can tailor the view to what matters most without cluttering the table.
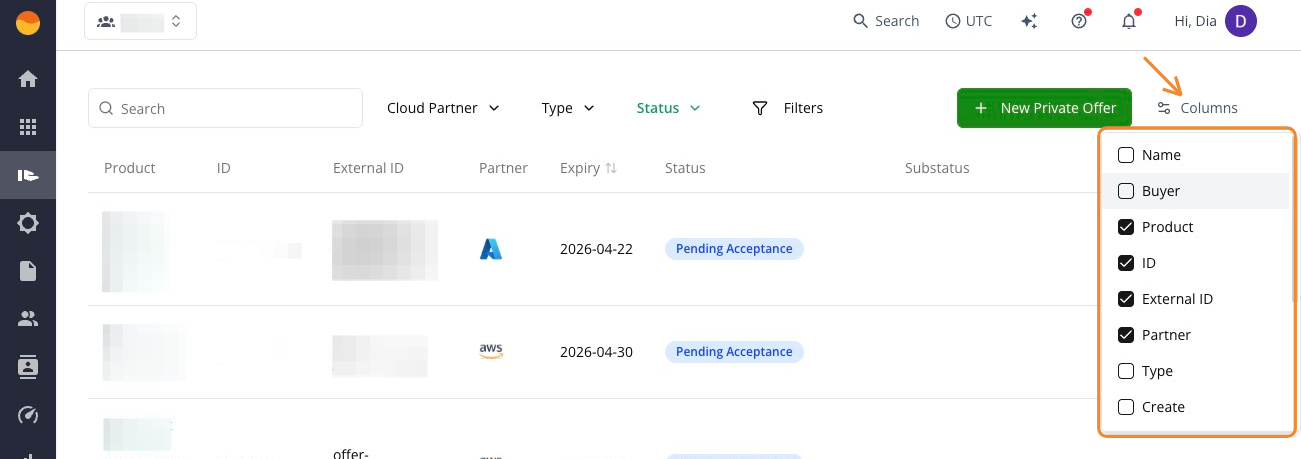
Click the Columns button to add fields you want to see or remove fields you don’t need. Your changes affect only your view, not other users.
Cancel an offer
Canceling an offer withdraws it before the buyer accepts it. Use this when an offer has incorrect details or is no longer needed. AWS does not allow editing an offer once it has been sent to the buyer, so canceling lets you remove the incorrect offer and start fresh.
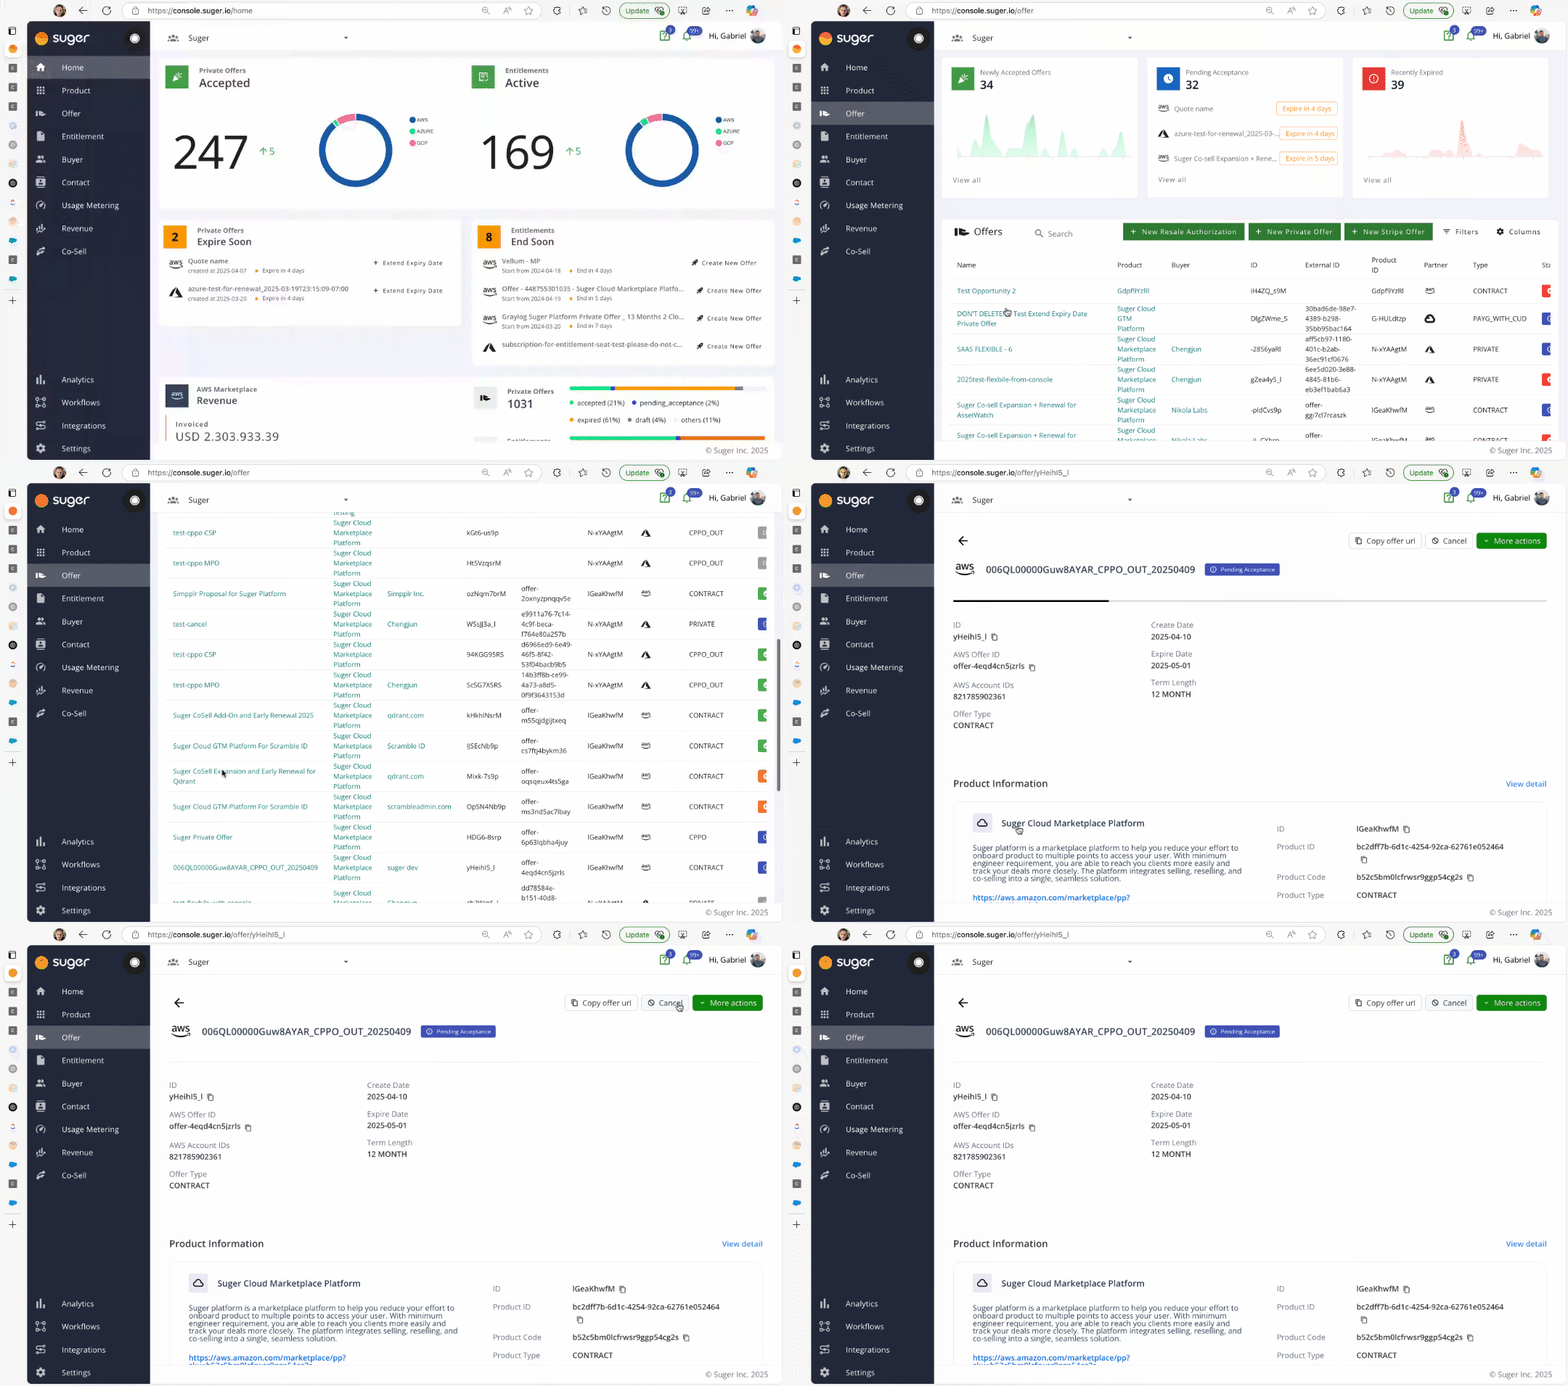
- Go to the Offers page in Suger Console.
- Open the offer you want to cancel, then click Cancel in the top-right corner.
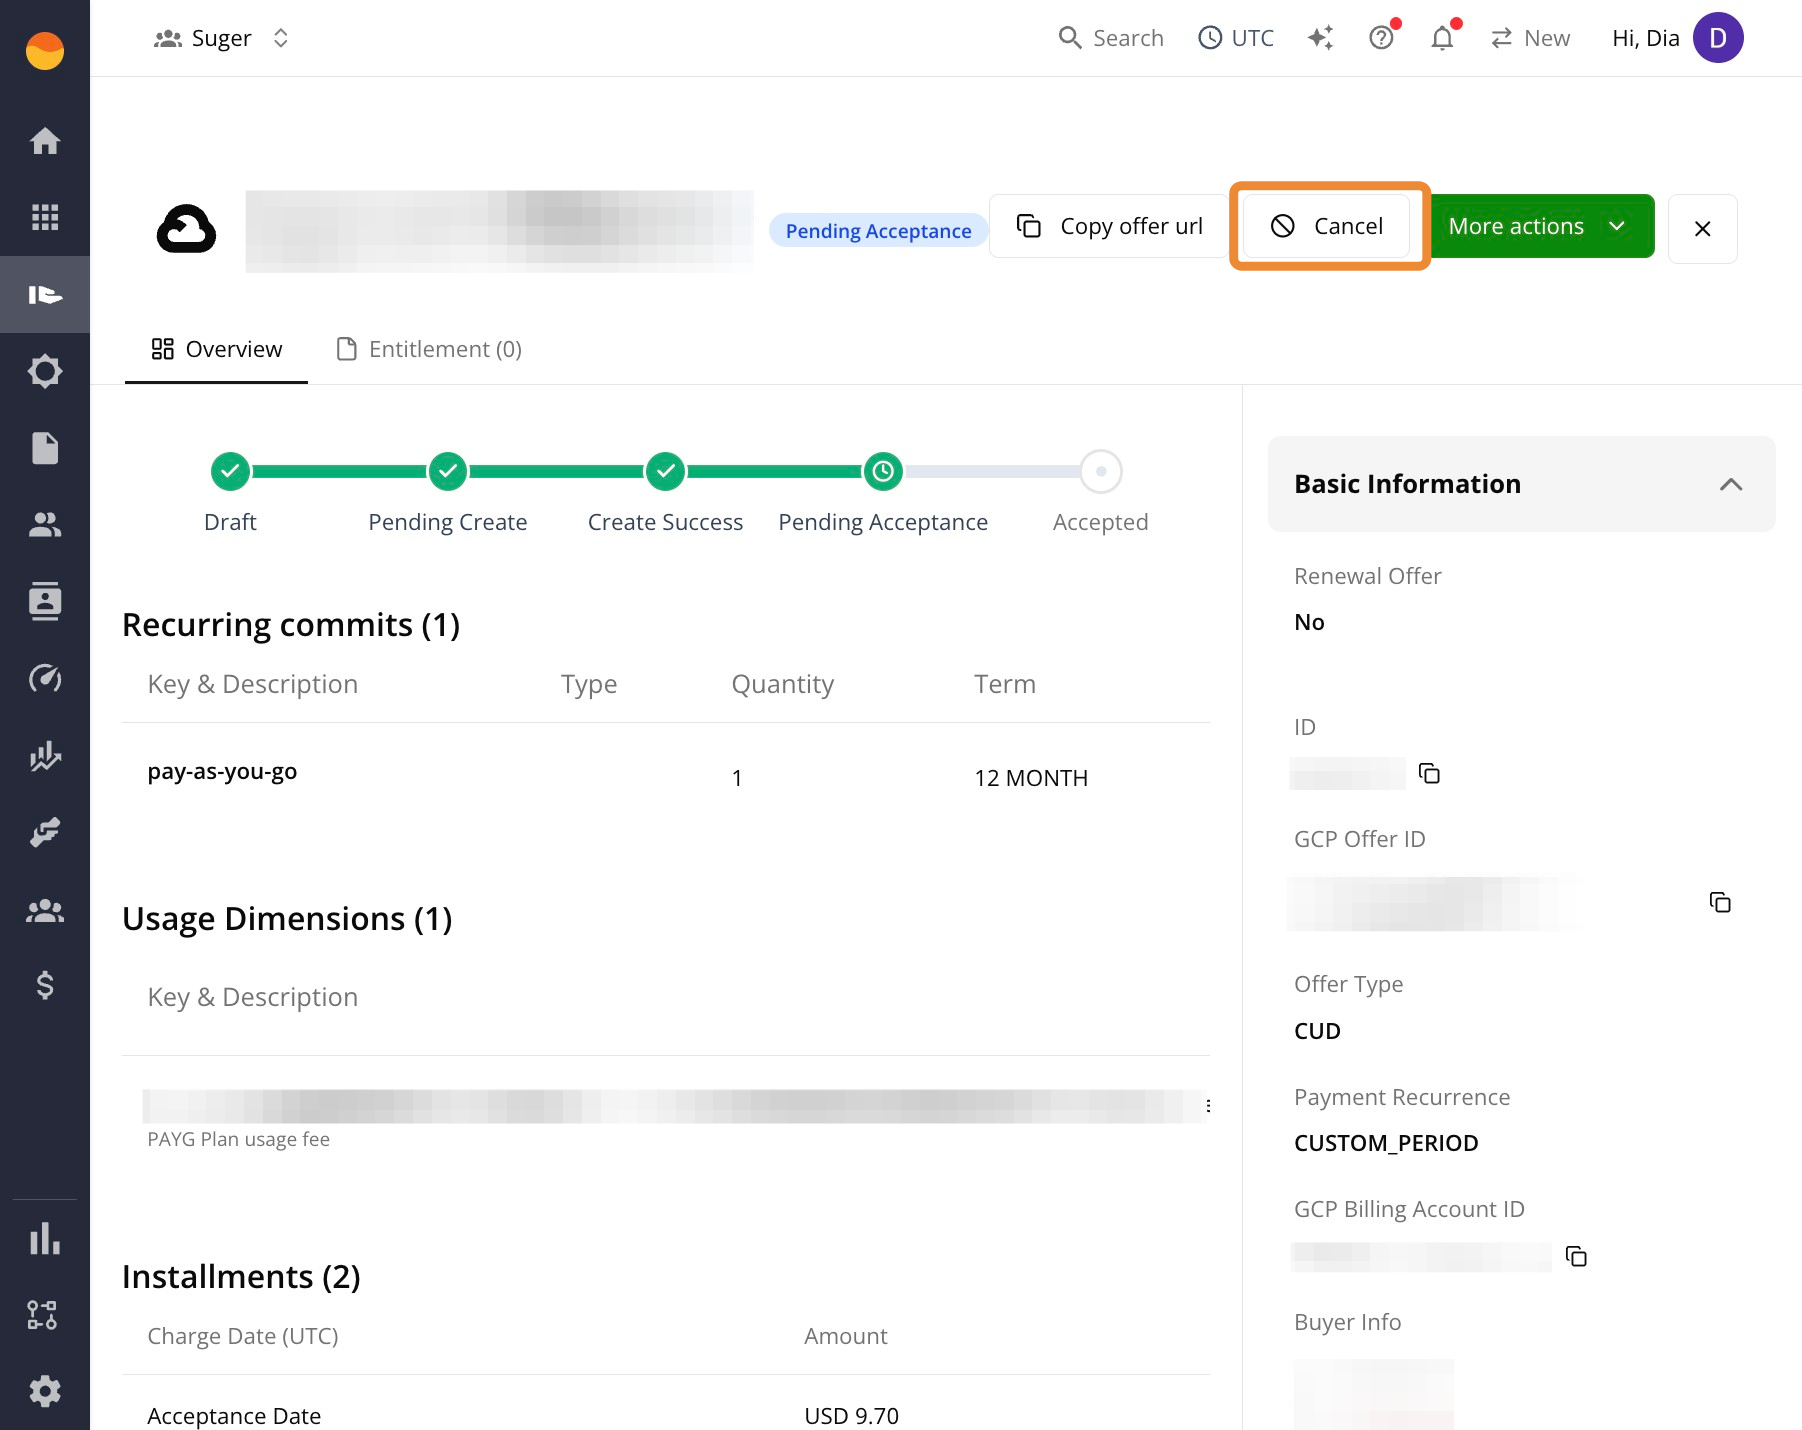
- Confirm the action.
Once cancelled, the buyer can no longer see the offer in their AWS portal. The status moves to Pending_Cancel while Suger processes the request, then becomes Canceled once AWS confirms it. No charges or entitlements are activated.
When to cancel
- The buyer requested changes after the offer was sent.
- The offer contains incorrect information (for example, wrong AWS Account ID, pricing, or term).
- The offer was misconfigured (for example, wrong pricing or the wrong product was selected).
After canceling, you can clone the canceled offer to quickly recreate a corrected version using the same structure.
Clone an offer
Cloning copies an existing offer into a new draft so you don’t have to rebuild it from scratch. This works for both active and canceled offers.
- Go to the Offers page in Suger Console.
- Open the offer you want to clone.
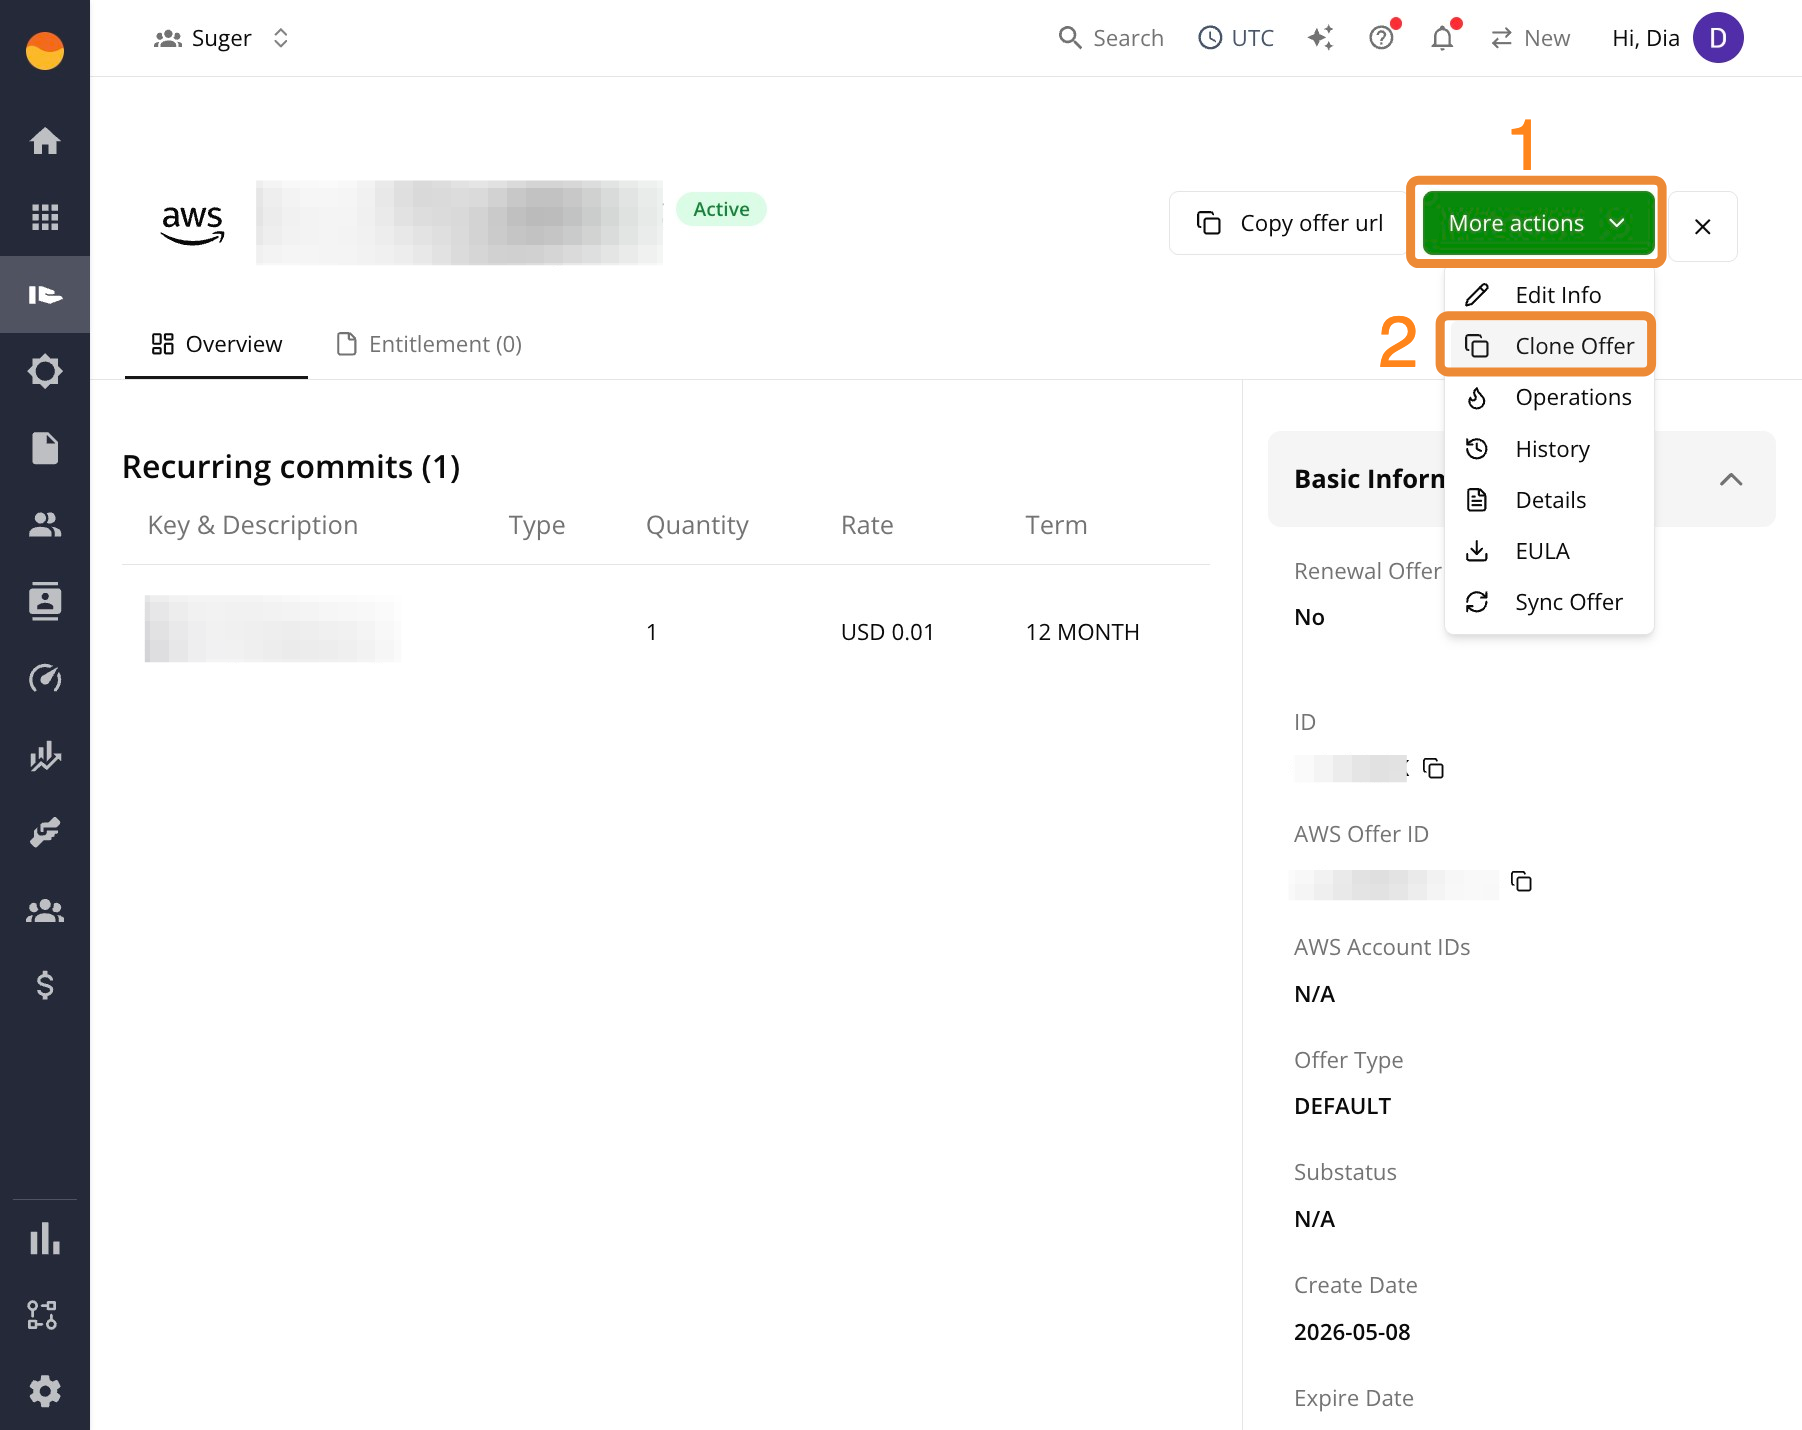
- Click More actions, then select Clone.
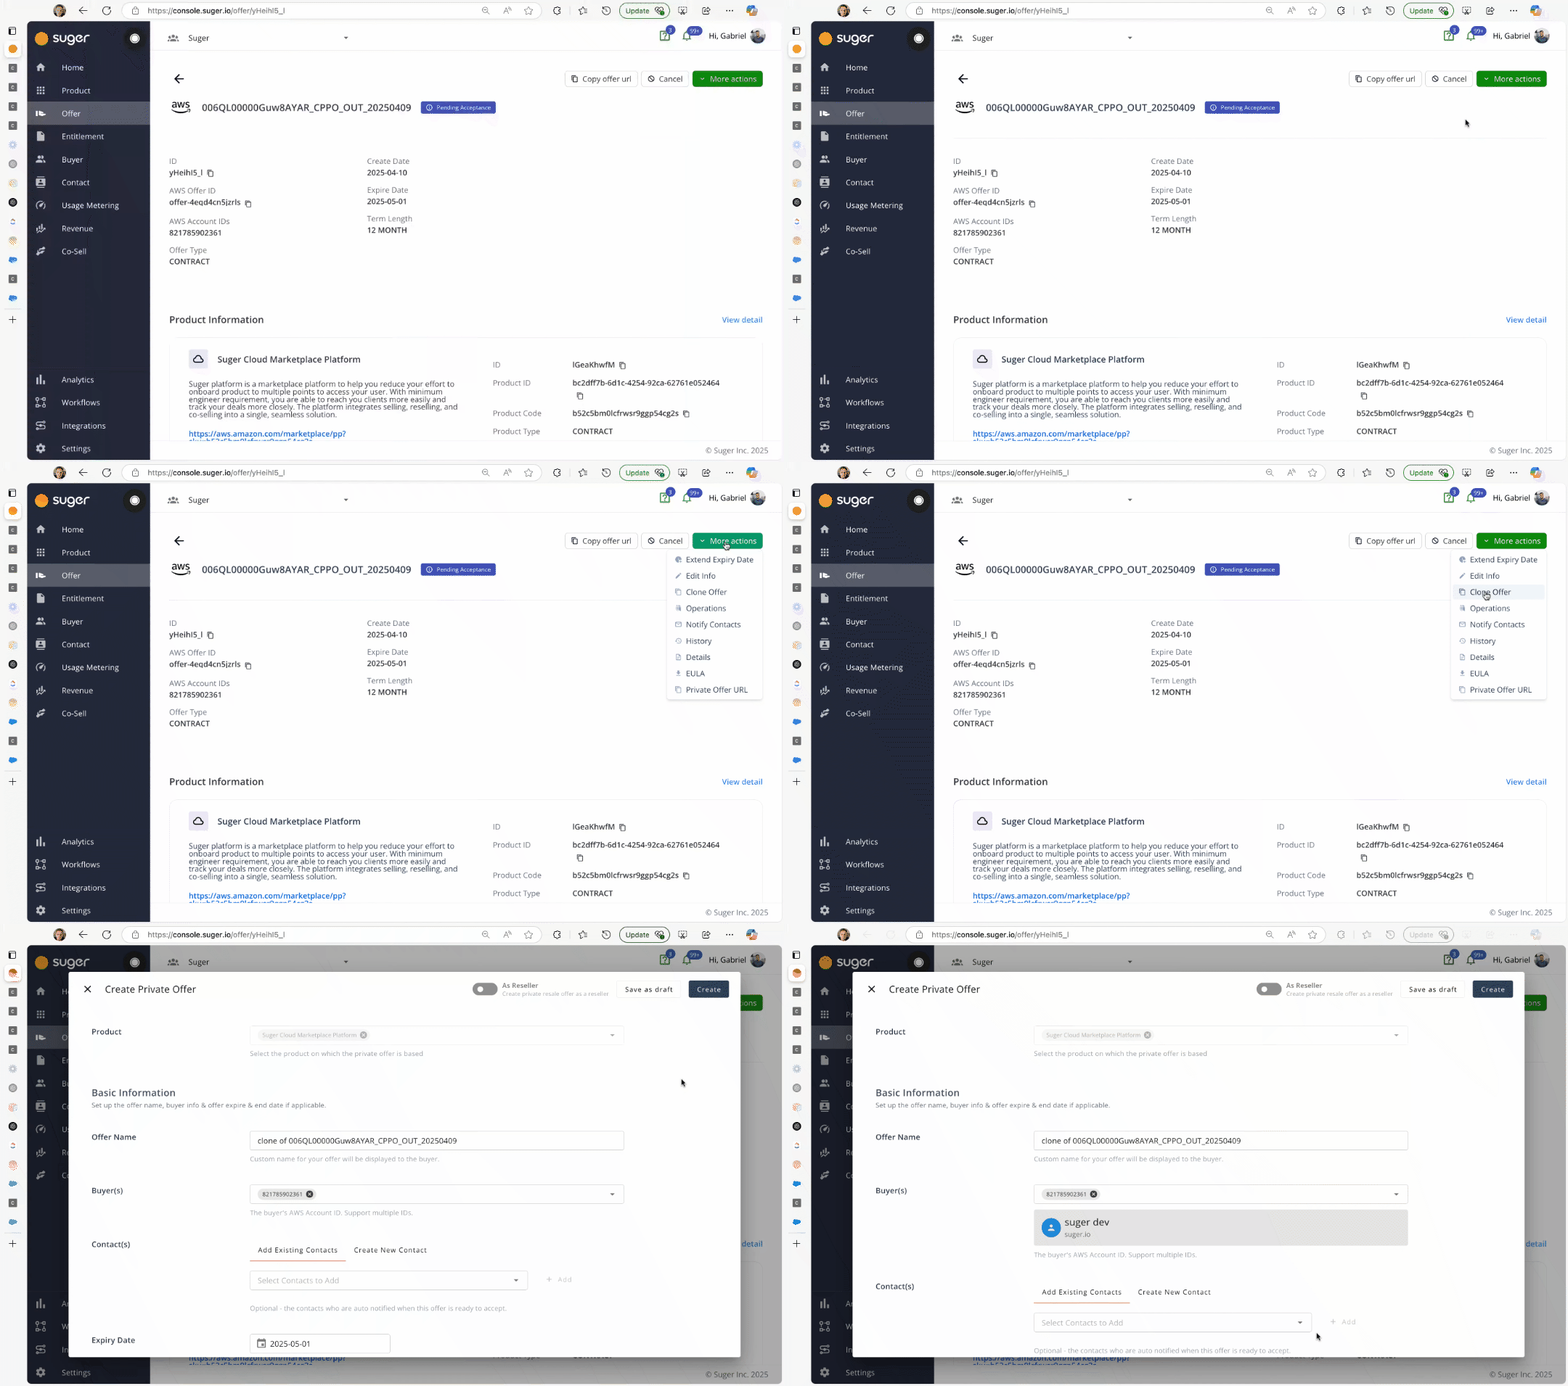
- Make your updates to the pre-filled offer draft.
- Click Create to submit the new offer.
When to clone
- You’re sending a similar offer to a different buyer.
- You canceled an offer and want to reuse its structure.
- You need to make small adjustments, such as pricing or term changes.
What gets copied
- Product
- SKUs and pricing
- Term dates
- EULA
- Internal notes
What to update before resubmitting
- Buyer ID(s)
- Offer name
- Any updated pricing or expiration dates
Extend the expiry date of an offer
Extending an offer pushes back the expiration date so the buyer has more time to review and accept it. This saves you from recreating the offer if the deadline passes before the buyer responds.
You can extend offers in the Pending_Acceptance, Expired, and Update_Failed statuses. Extending an expired offer reactivates it so the buyer can access and accept it again. Update_Failed is included so that a failed extend can be retried — if an extend request fails, the offer is left in Update_Failed and the Extend Expiry Date action reappears so you can try again.
When the marketplace rejects an update such as an extension, the offer page shows an Update Offer Failed alert with the marketplace’s reason. Azure offers don’t show this alert.
For AWS offers, More actions → History shows a Why AWS rejected this panel under the failed entry, with AWS’s error code and message and the latest attempts (up to three) with their change set IDs. The same panel appears on the Logs tab of the Offers page.
- Go to the Offers page in Suger Console.
- Open the offer you want to extend.
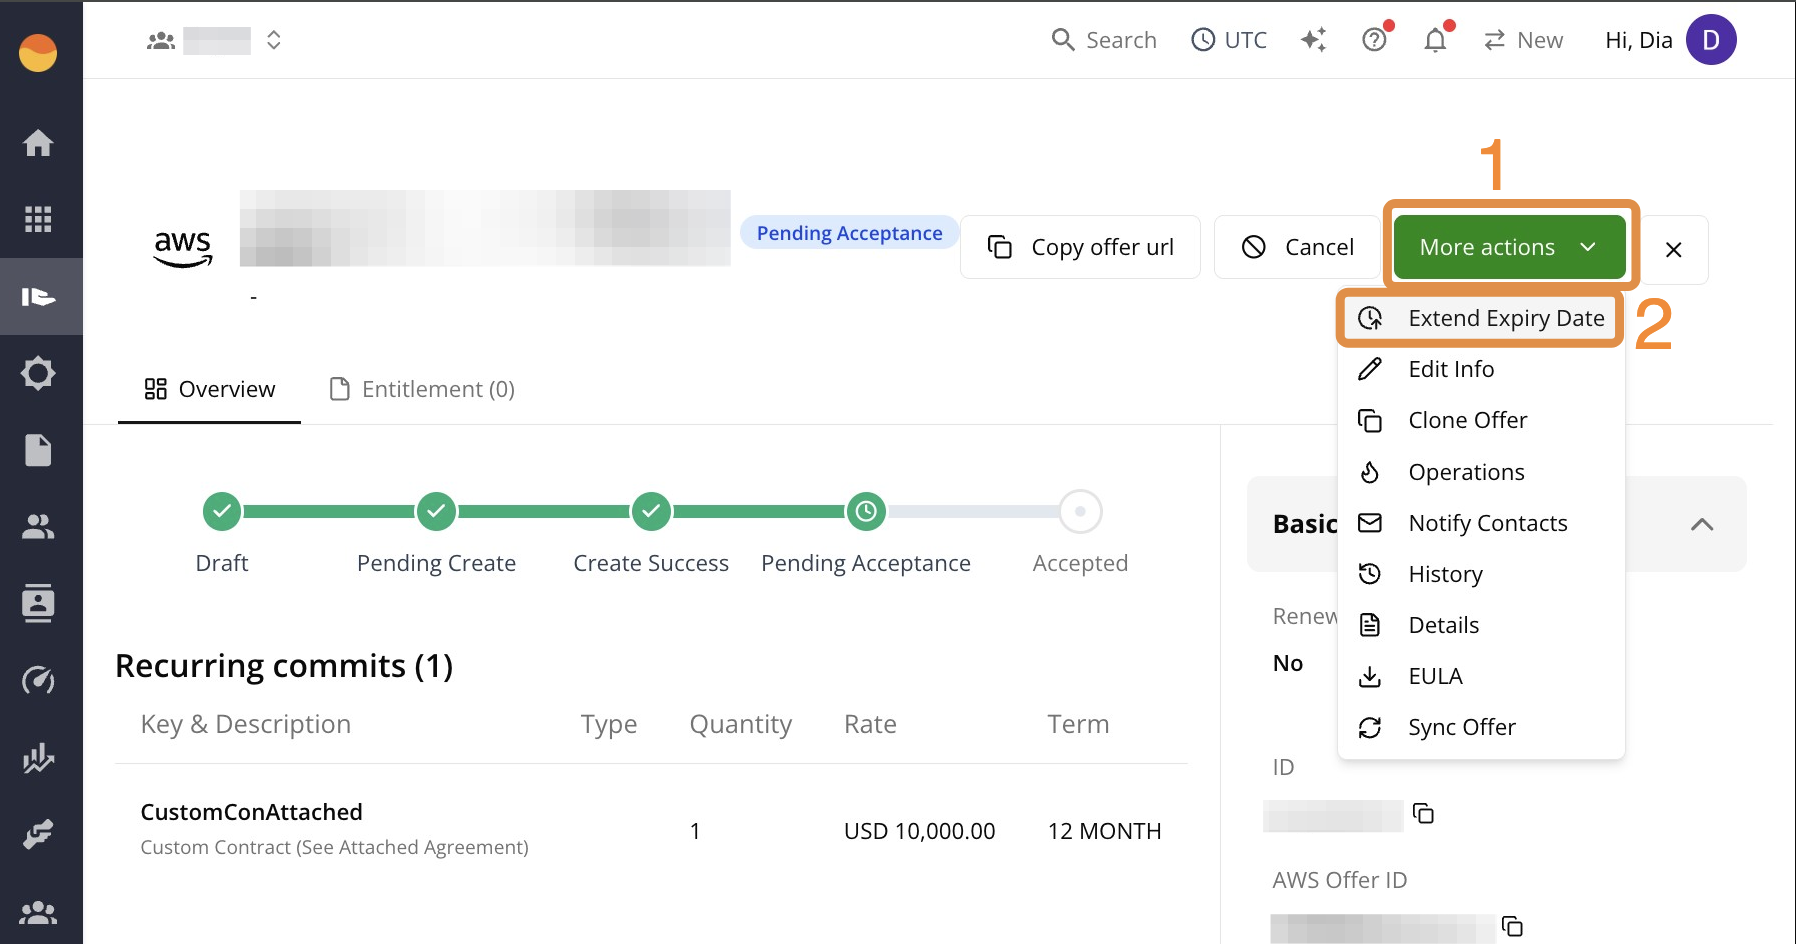
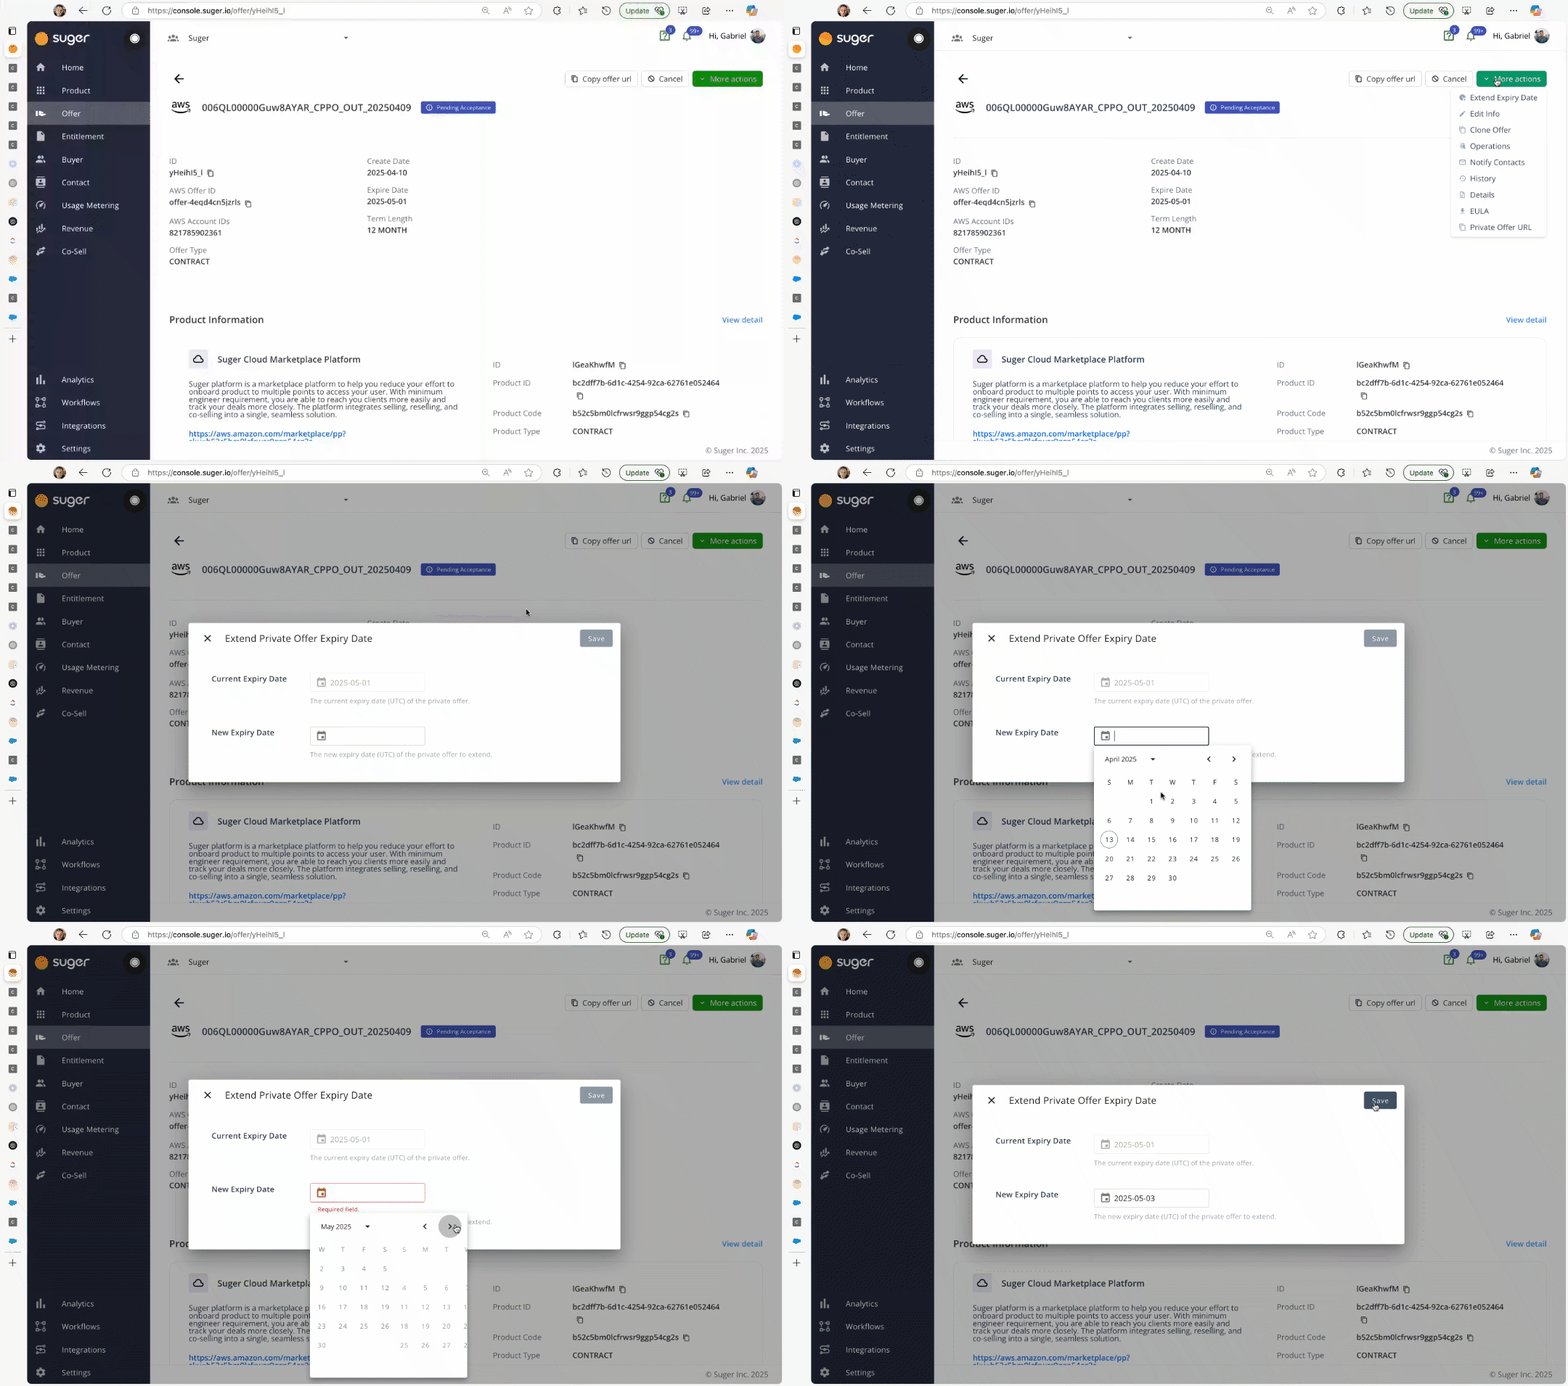
- Click More actions, then select Extend Expiry Date.
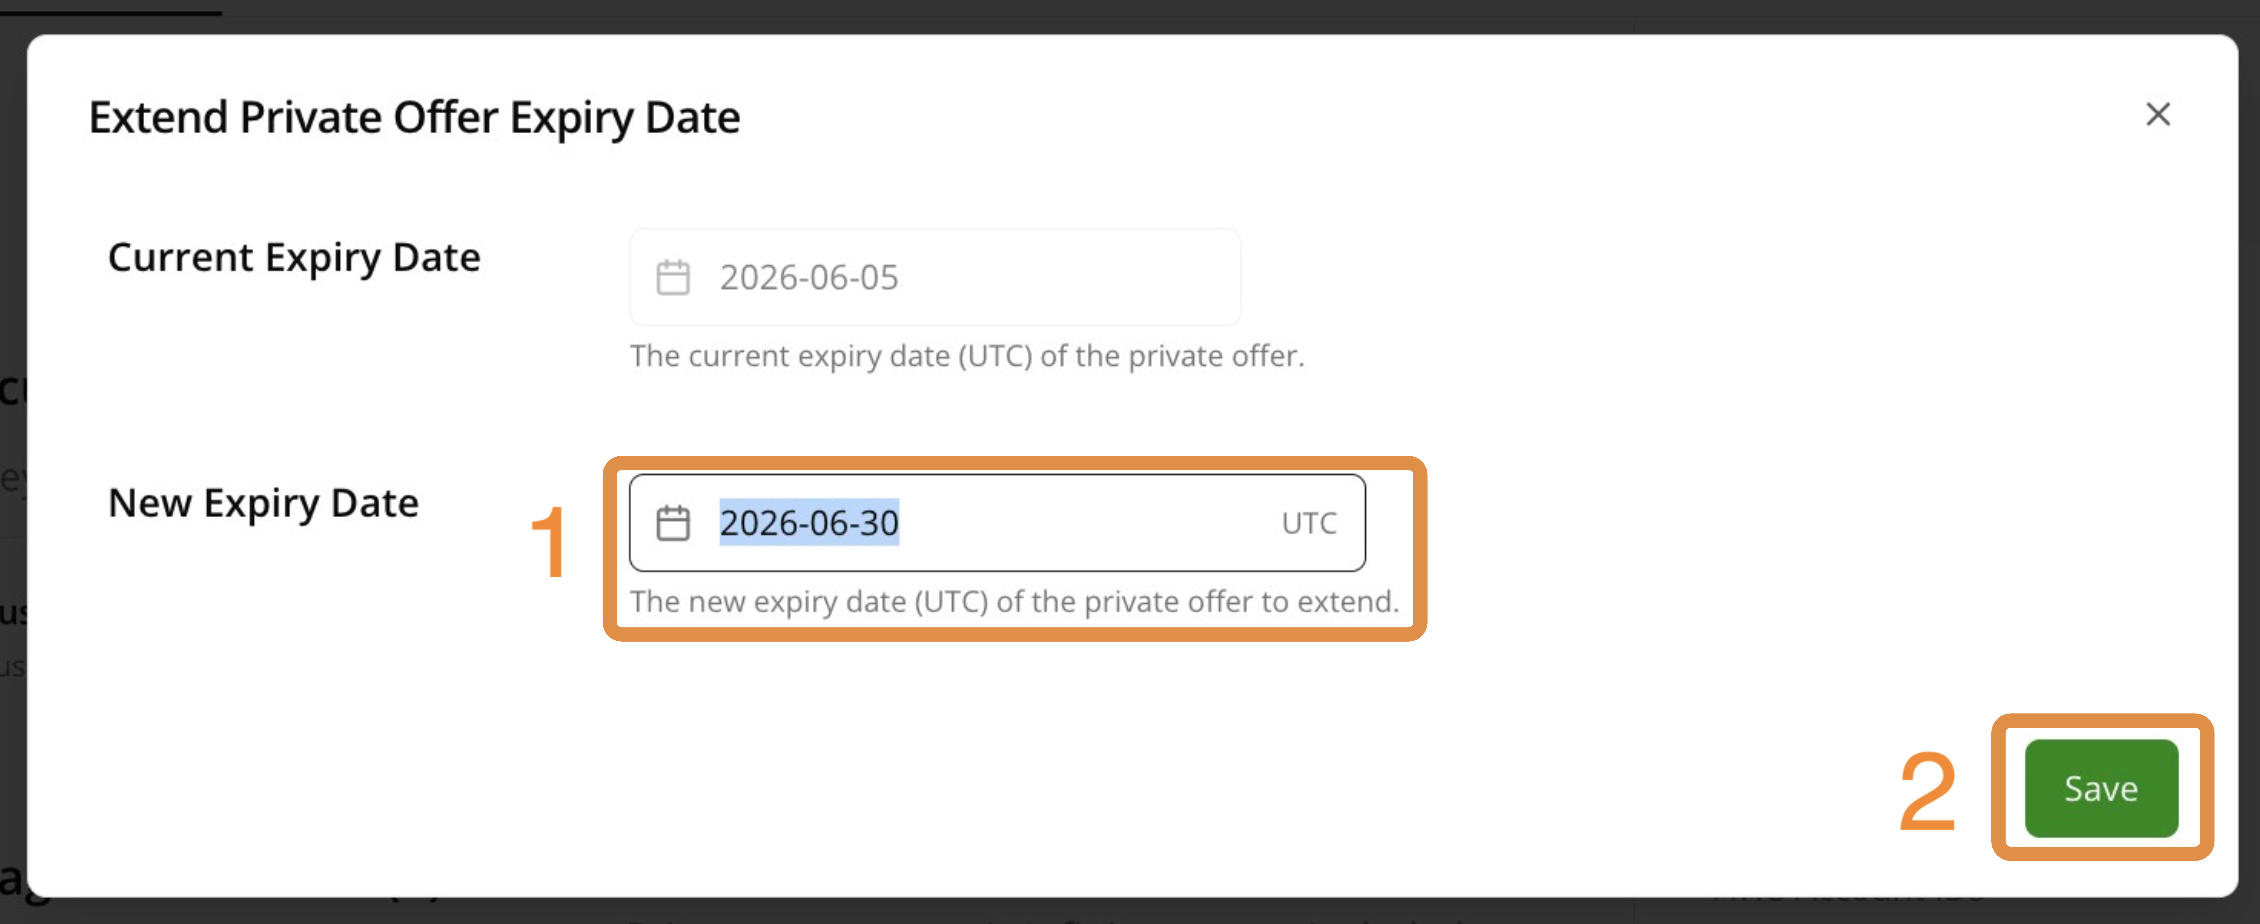
- Enter the New Expiry Date, then Save your changes. The new date must be in the future and later than the offer’s current expiry date — the same date or an earlier one isn’t an extension.
When to extend
- The buyer hasn’t accepted the offer and the expiry date is approaching.
- You’re in ongoing negotiations but need more time.
Share the offer with your buyer
Once your offer is ready, you have two ways to get it to your buyer: copy the link yourself or trigger an email directly from Suger. Use whichever fits your workflow.
Share the offer URL
Manually copy the offer link and send it to your buyer through your own email or messaging tool.
- Go to the Offers page in Suger Console.
- Open the offer and wait for the status to show
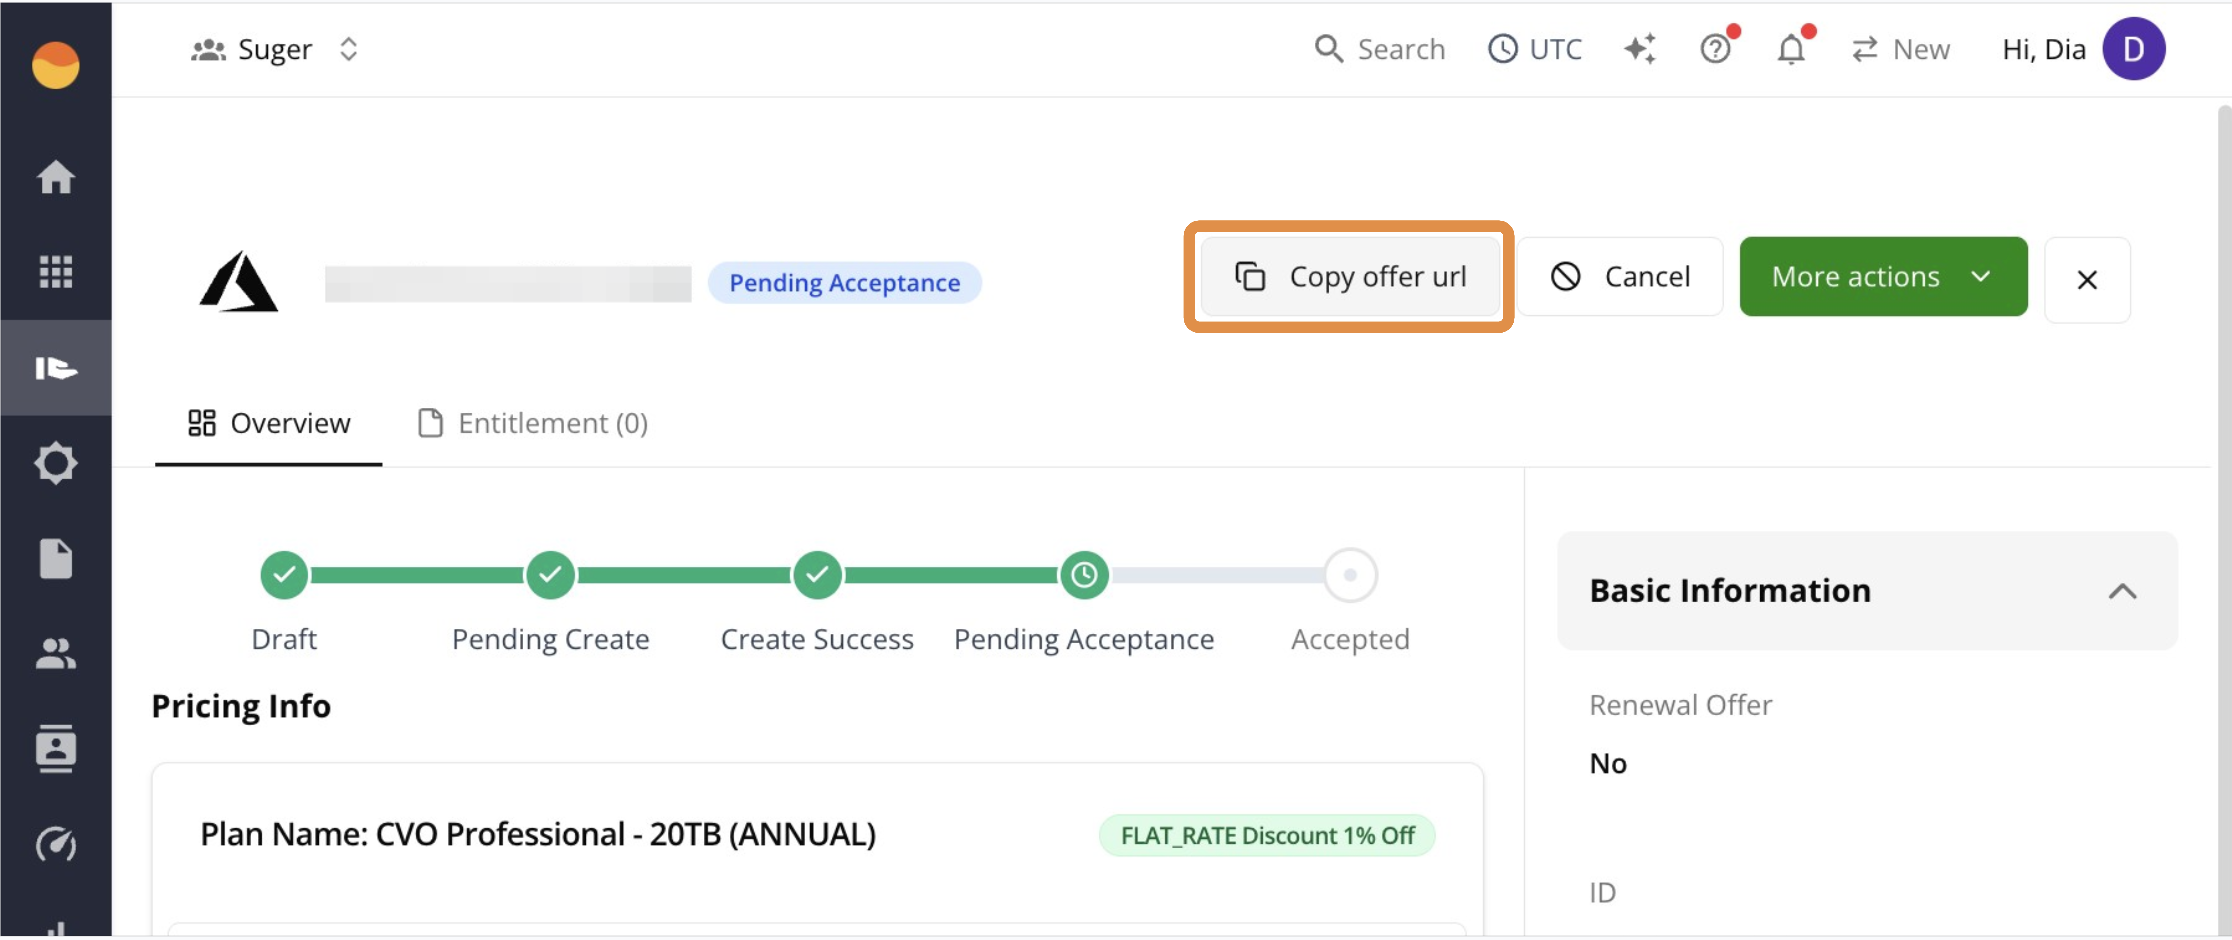
Pending Acceptance. - Click Copy Offer URL in the top-right corner.
- Send the link to your buyer.
Notify contacts
The Notify Contacts feature sends an email with the offer link and current status directly to people linked to the offer. Use this to keep buyers and internal stakeholders informed without sending emails manually outside of Suger.
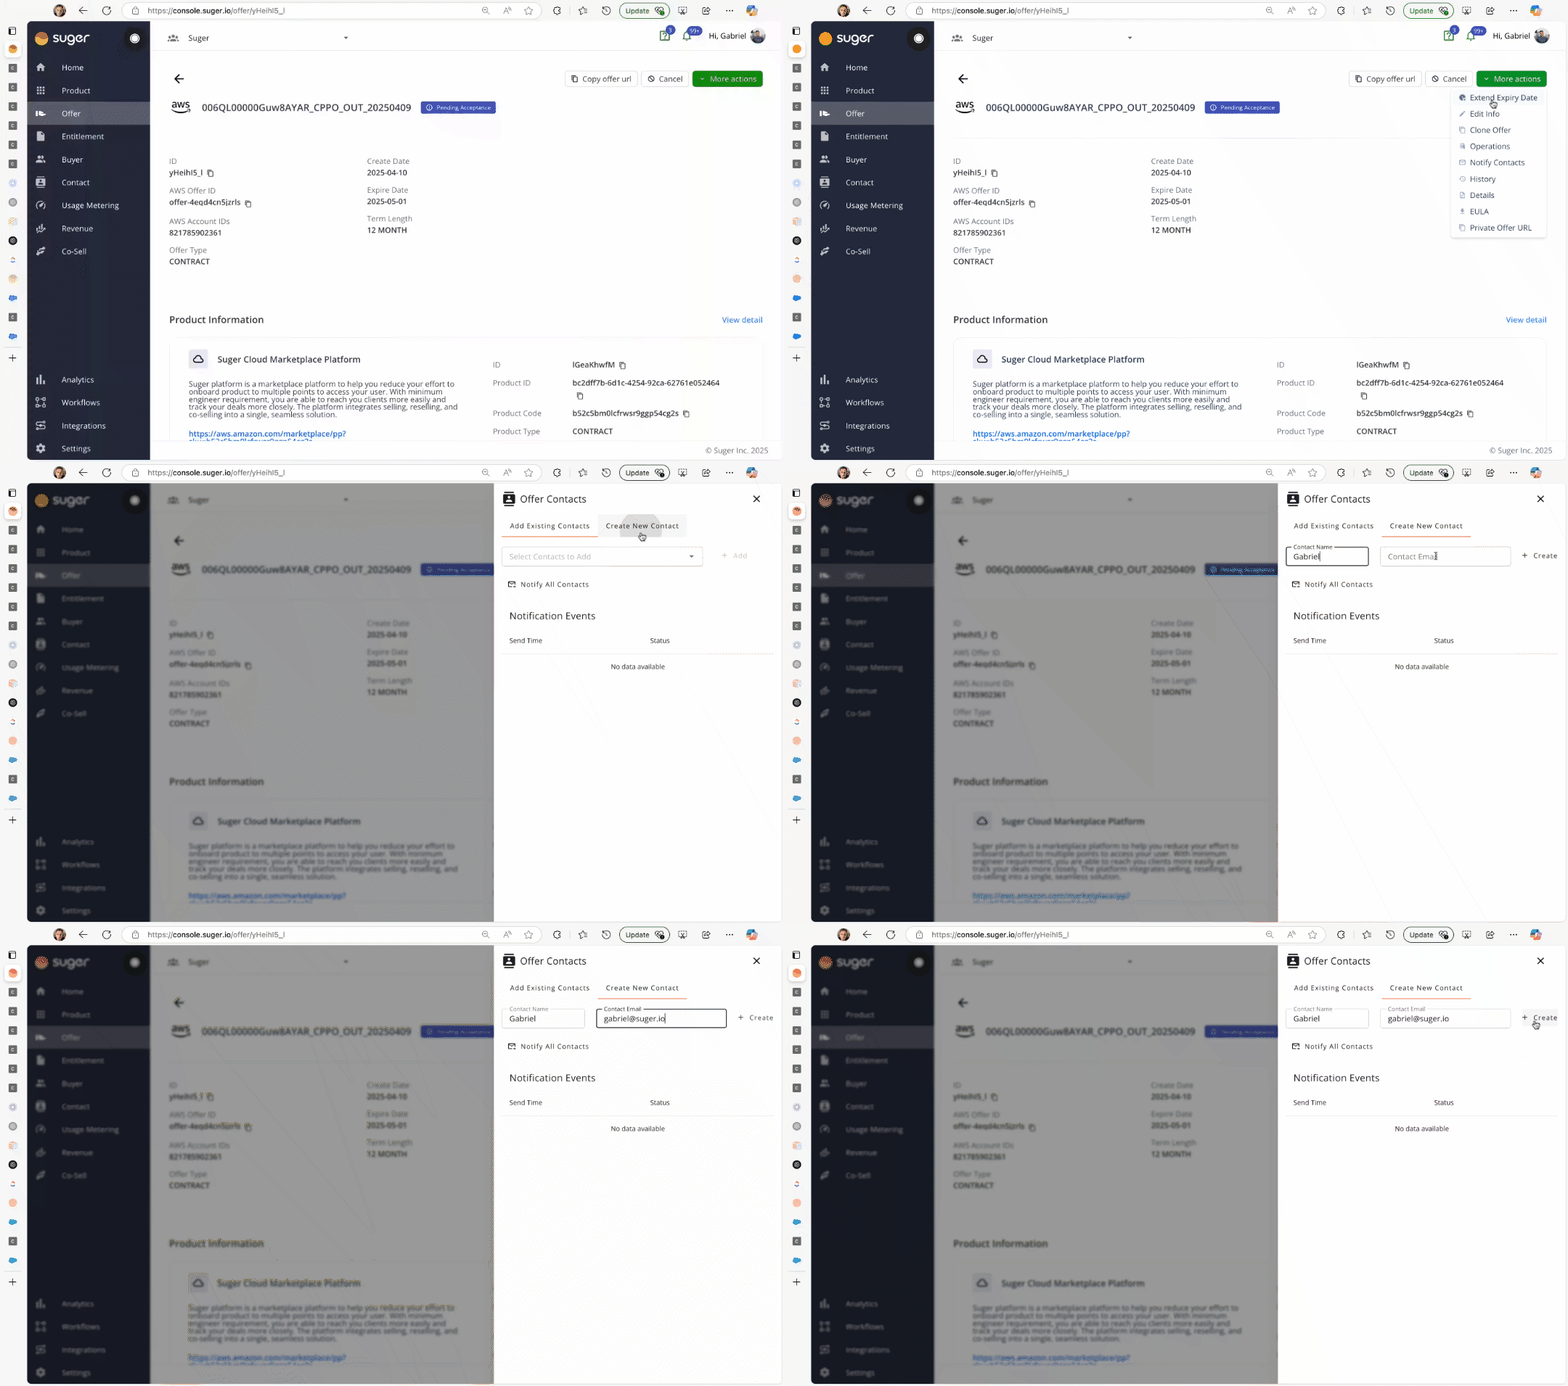
- Go to the Offers page in Suger Console.
- Open the relevant offer.
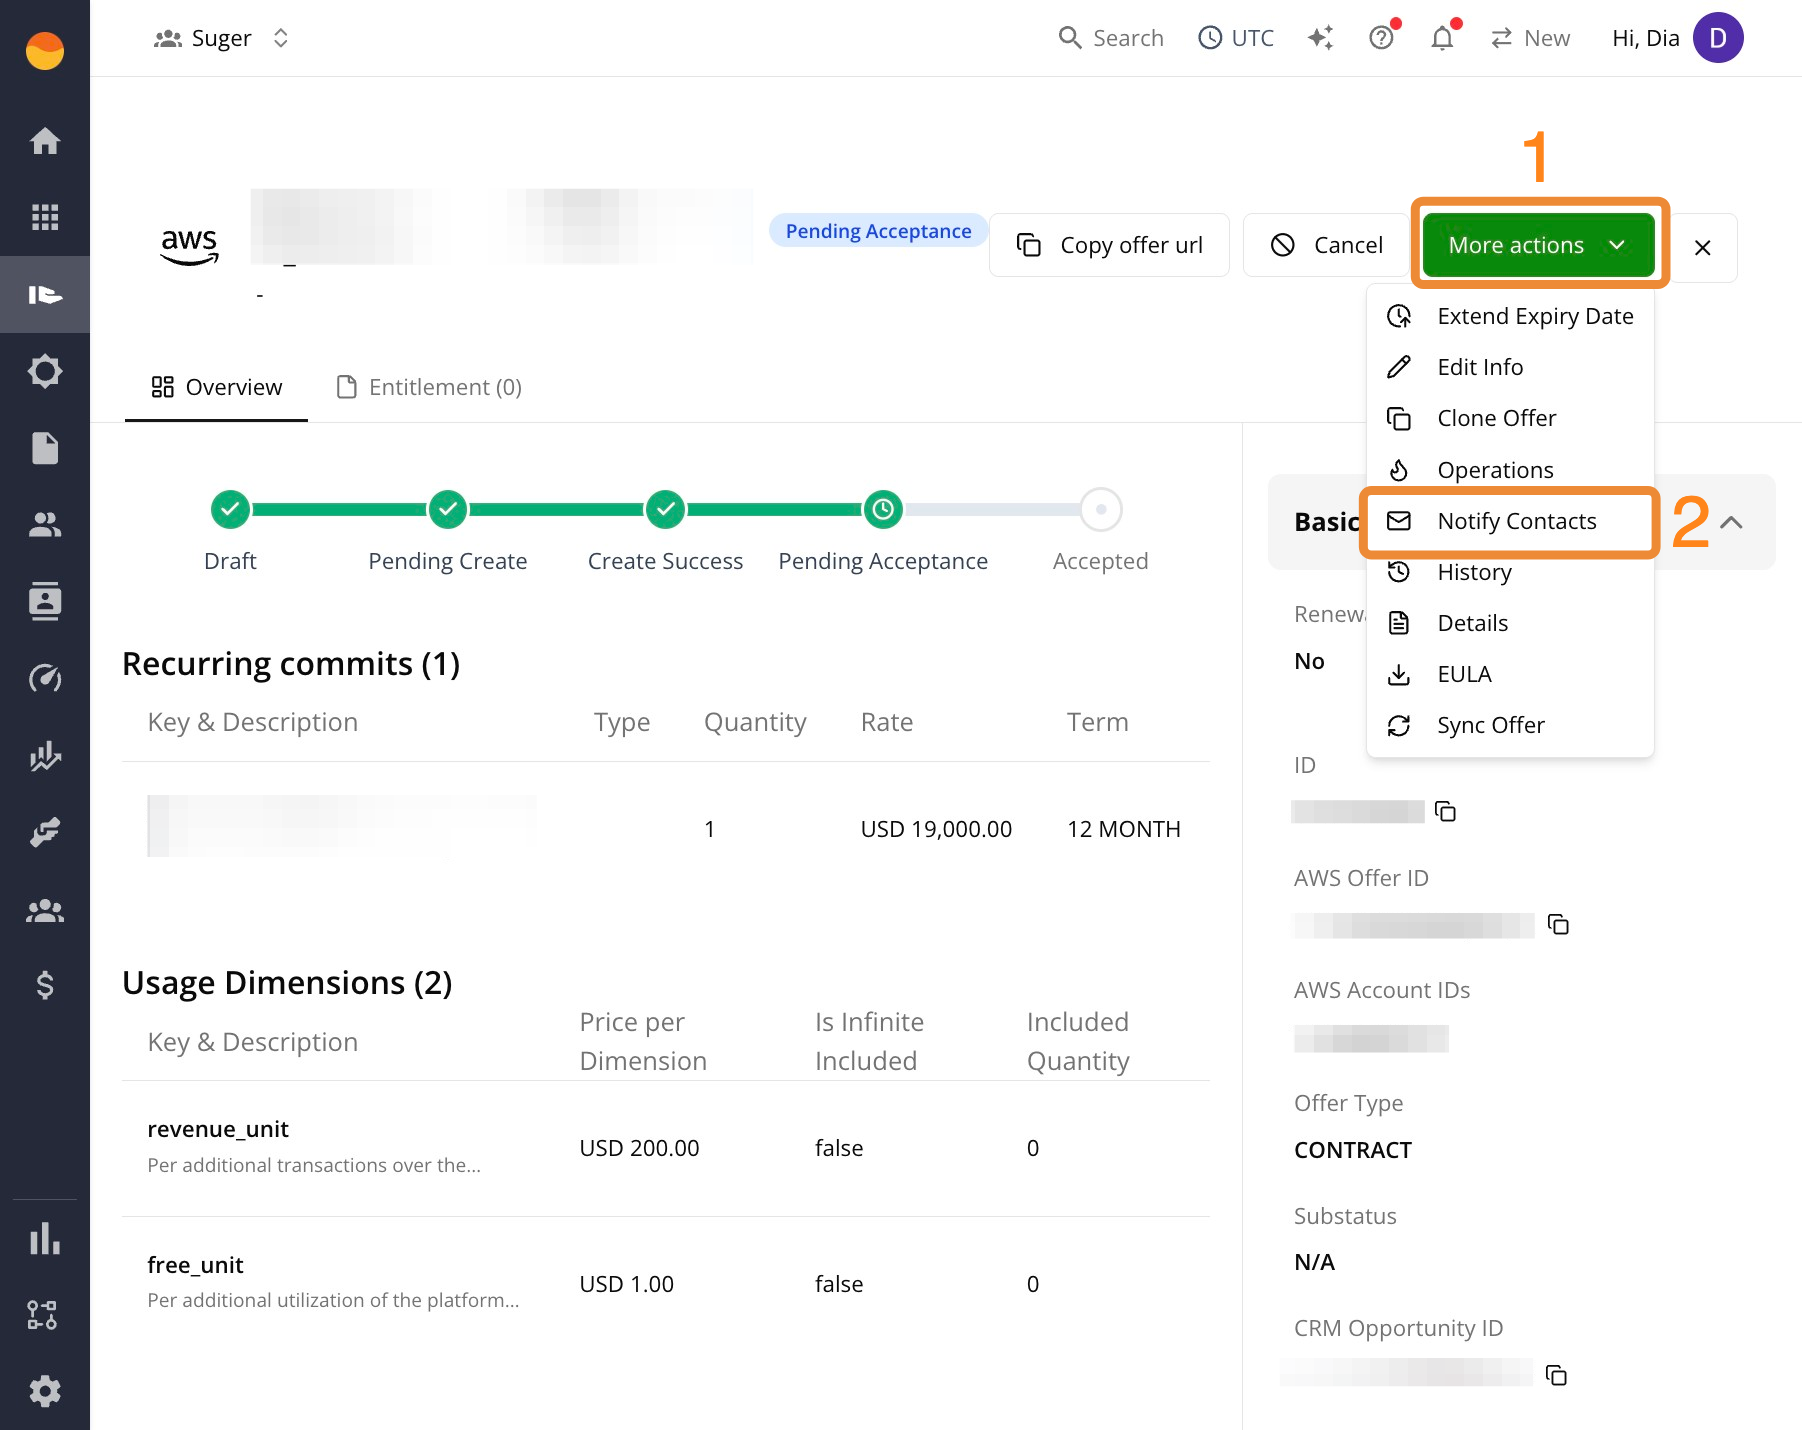
- Click More actions, then select Notify Contacts.
- If the person you need to notify isn’t listed yet, add them first using Add Existing Contacts or Create New Contact.
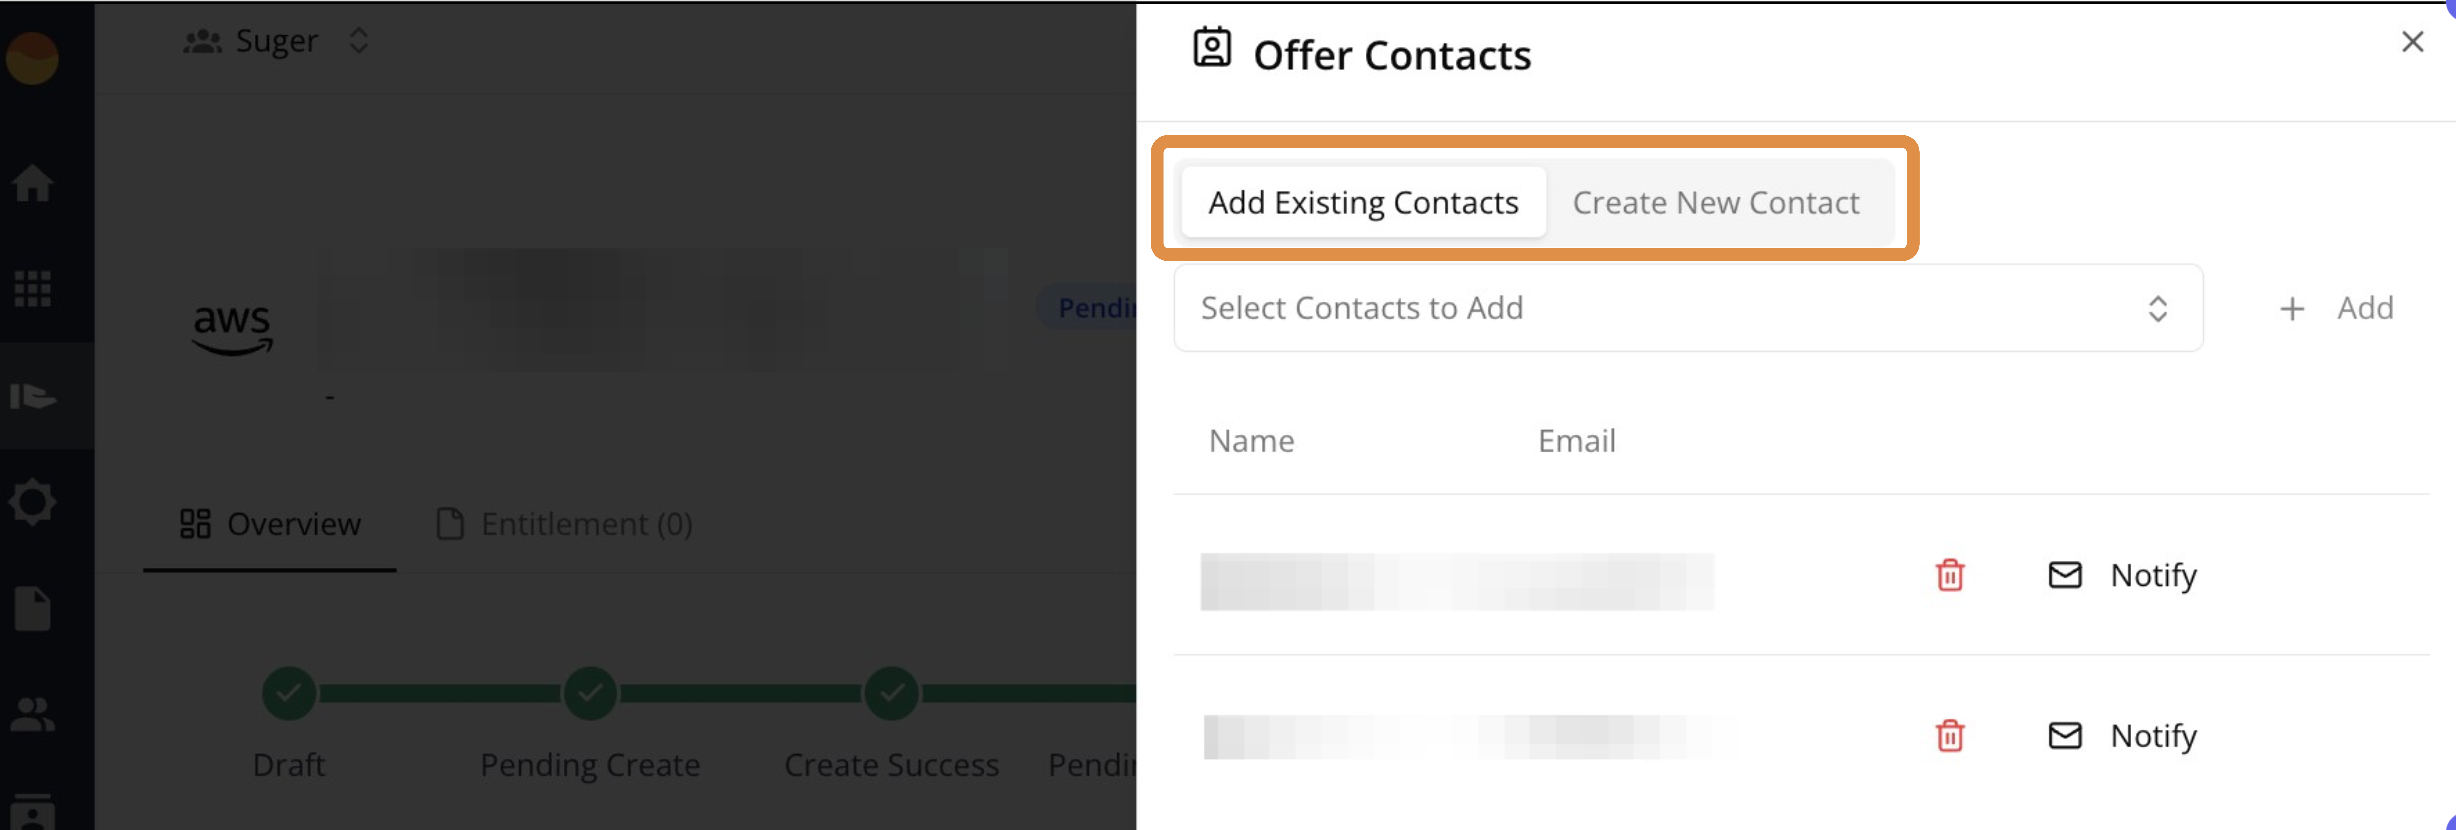
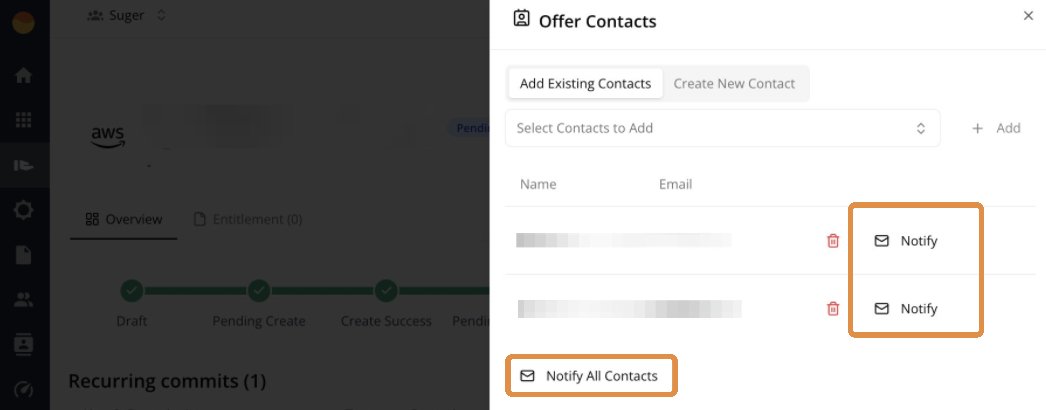
- Click Notify next to a specific contact, or click Notify All Contacts to send to everyone on the list at once.
- Check the Notification Events section at the bottom.
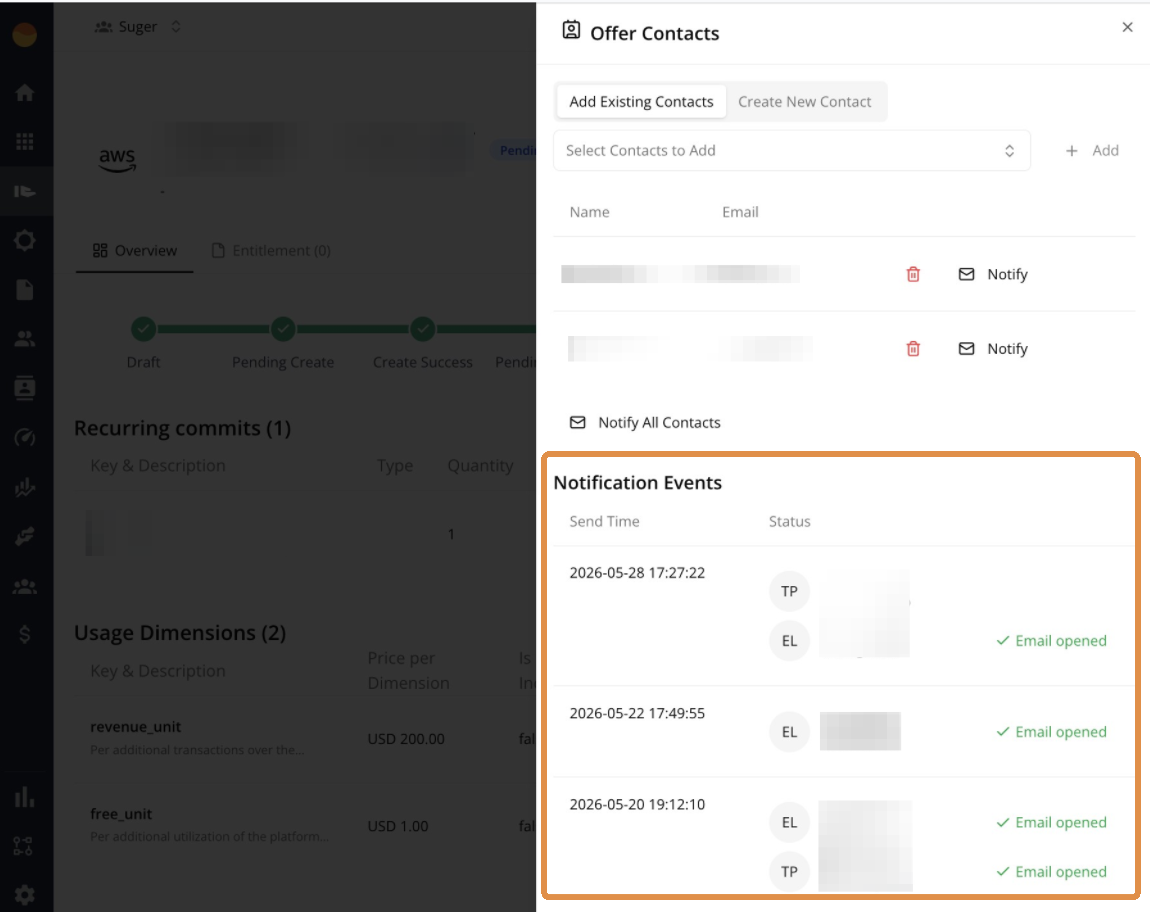
- It lists every Notify Contacts request and the contacts it was addressed to, including requests your email settings then stopped from sending.
- Contacts notified together share one email, so an open shows against the first contact listed.
- Emails Suger sends automatically, such as the ready-to-accept email, aren’t listed here.
When to use Notify Contacts
- To remind a buyer that a private offer is pending acceptance.
- To alert internal stakeholders that an offer has been created, extended, or canceled.
- To follow up during negotiations or renewal discussions.
Download EULA
The EULA action downloads a PDF copy of the End User License Agreement (EULA) attached to a private offer. Depending on the offer setup, Suger downloads either the custom EULA (the exact file uploaded for that offer) or the standard marketplace contract (the default agreement provided by the marketplace).
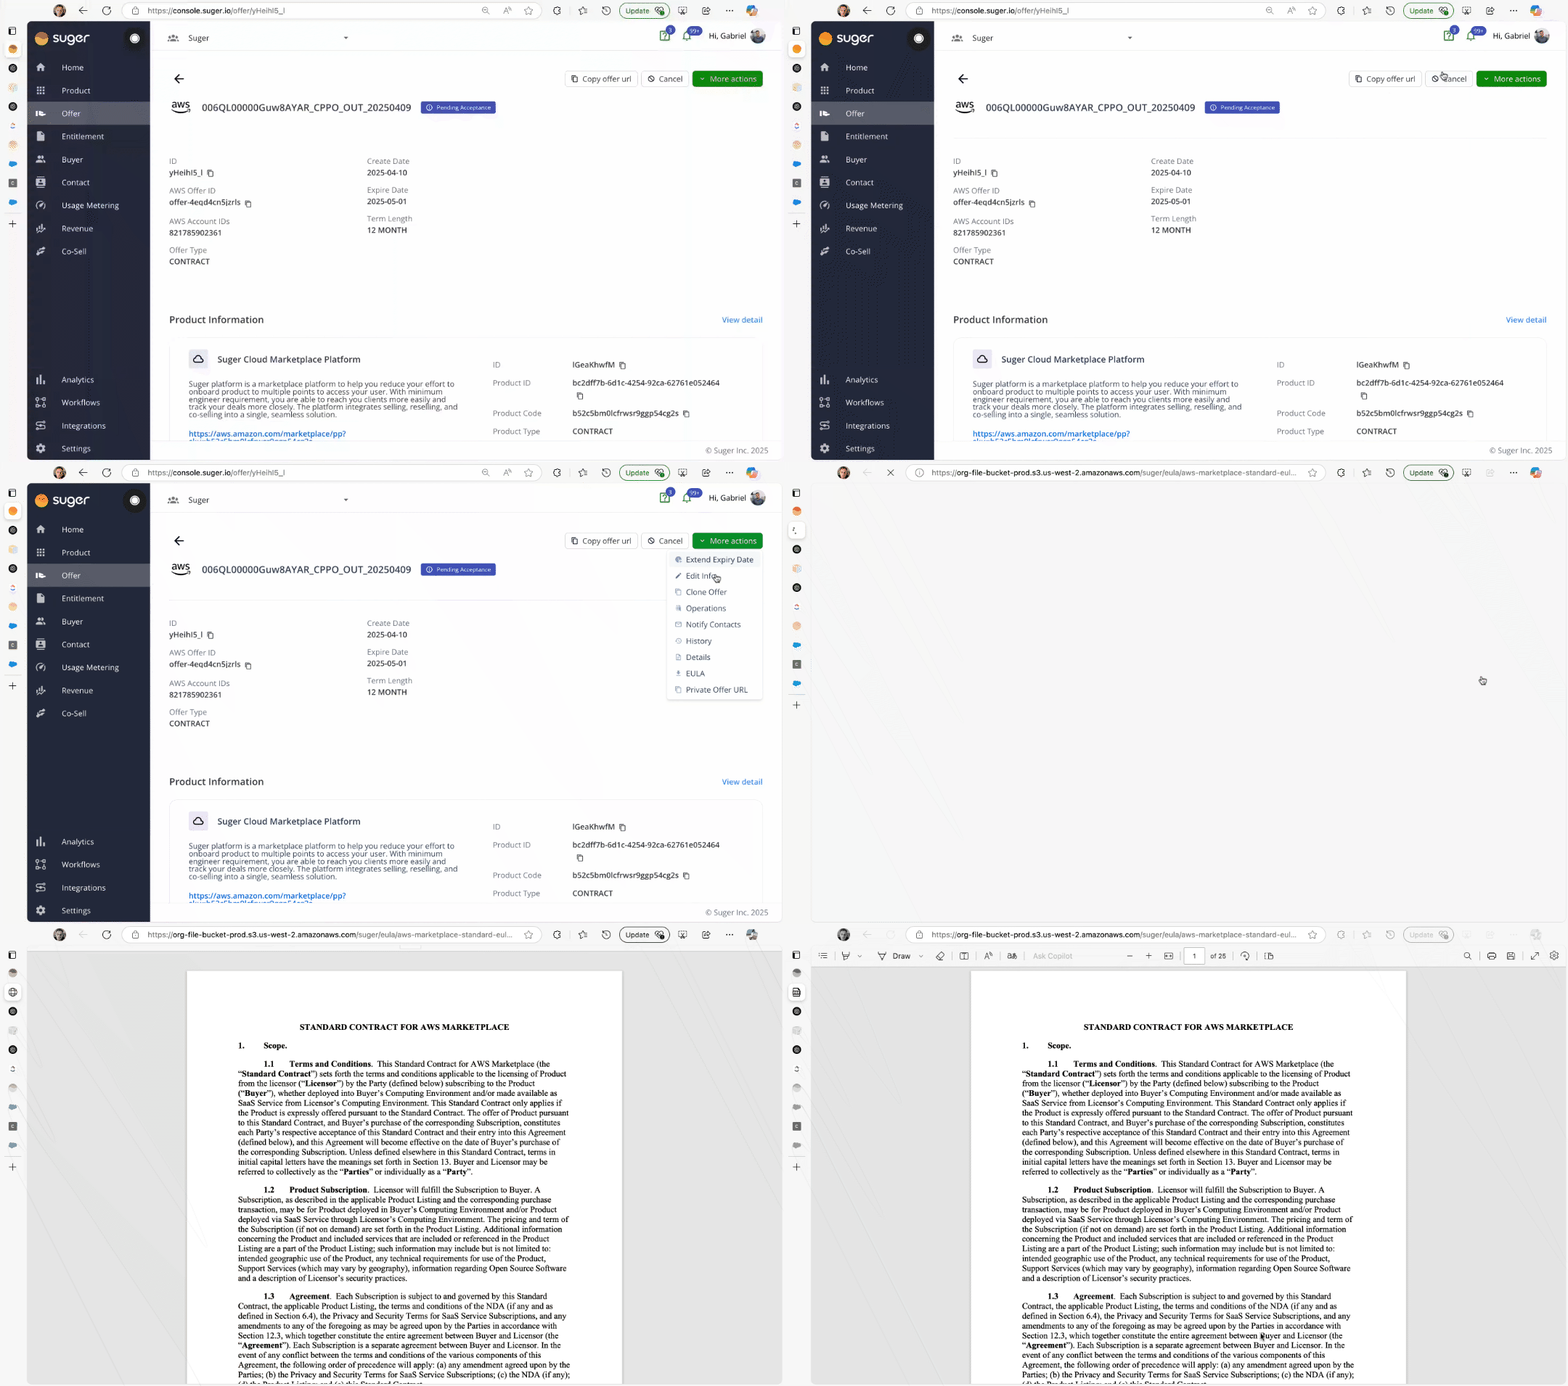
- Go to the Offers page in Suger Console.
- Open the relevant offer.
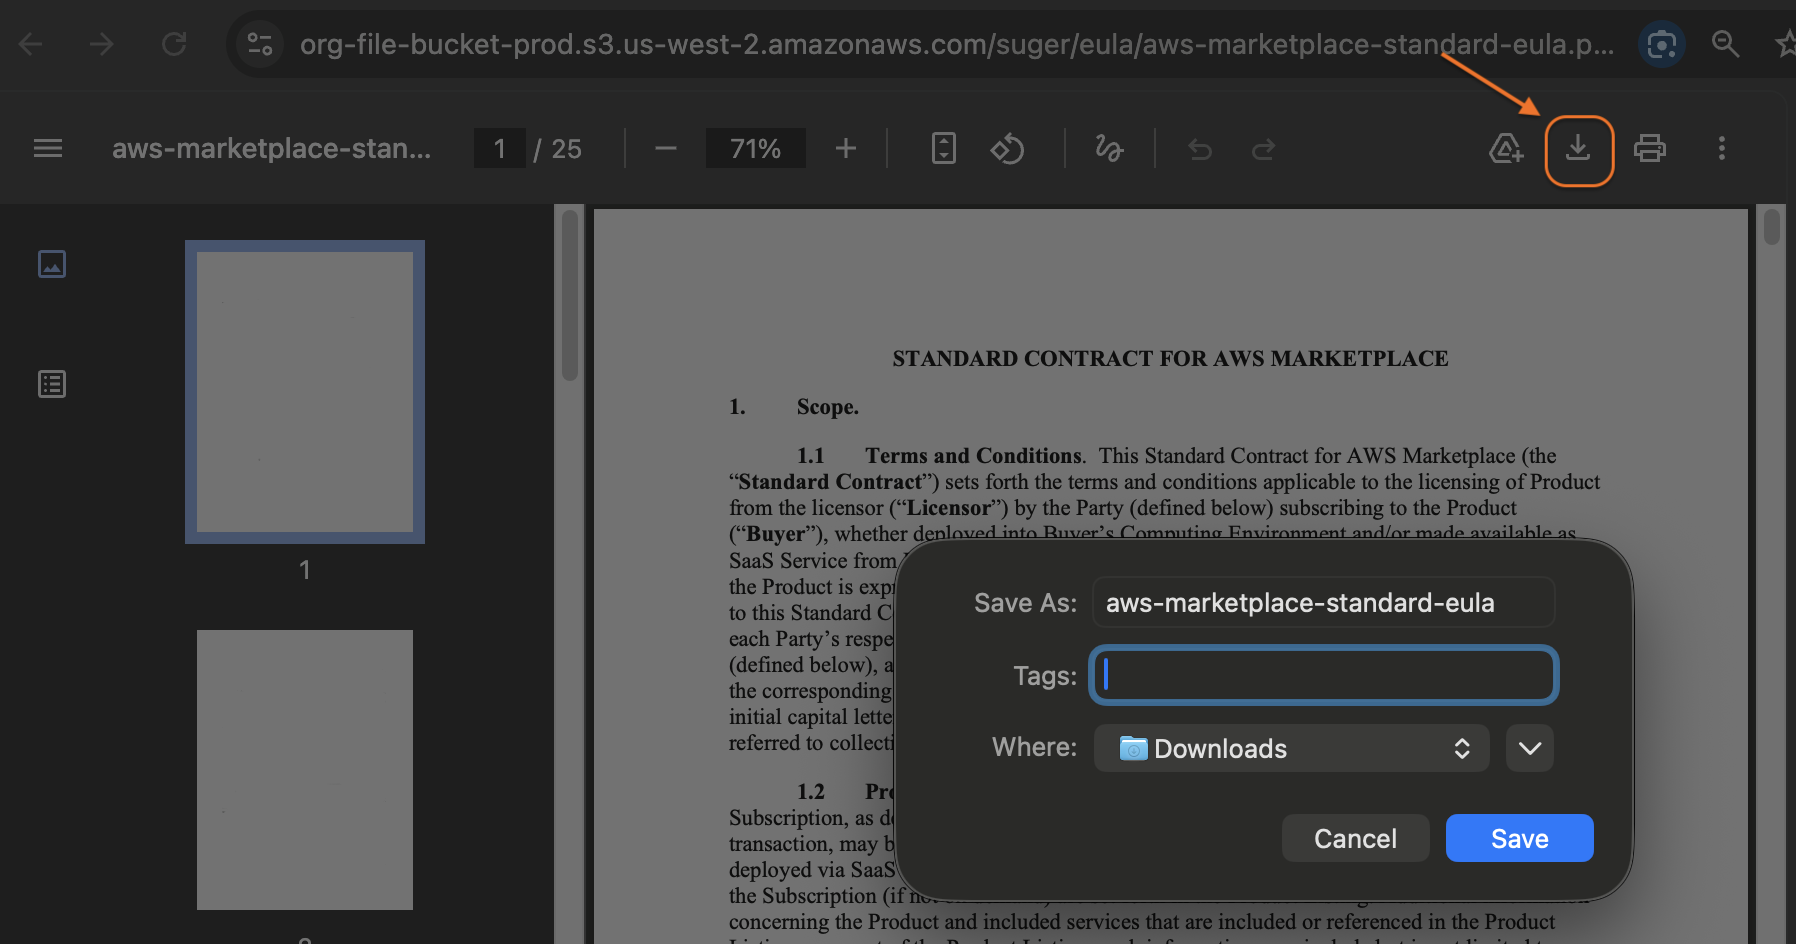
- Click More actions, then select EULA. This opens the EULA in a new browser tab.
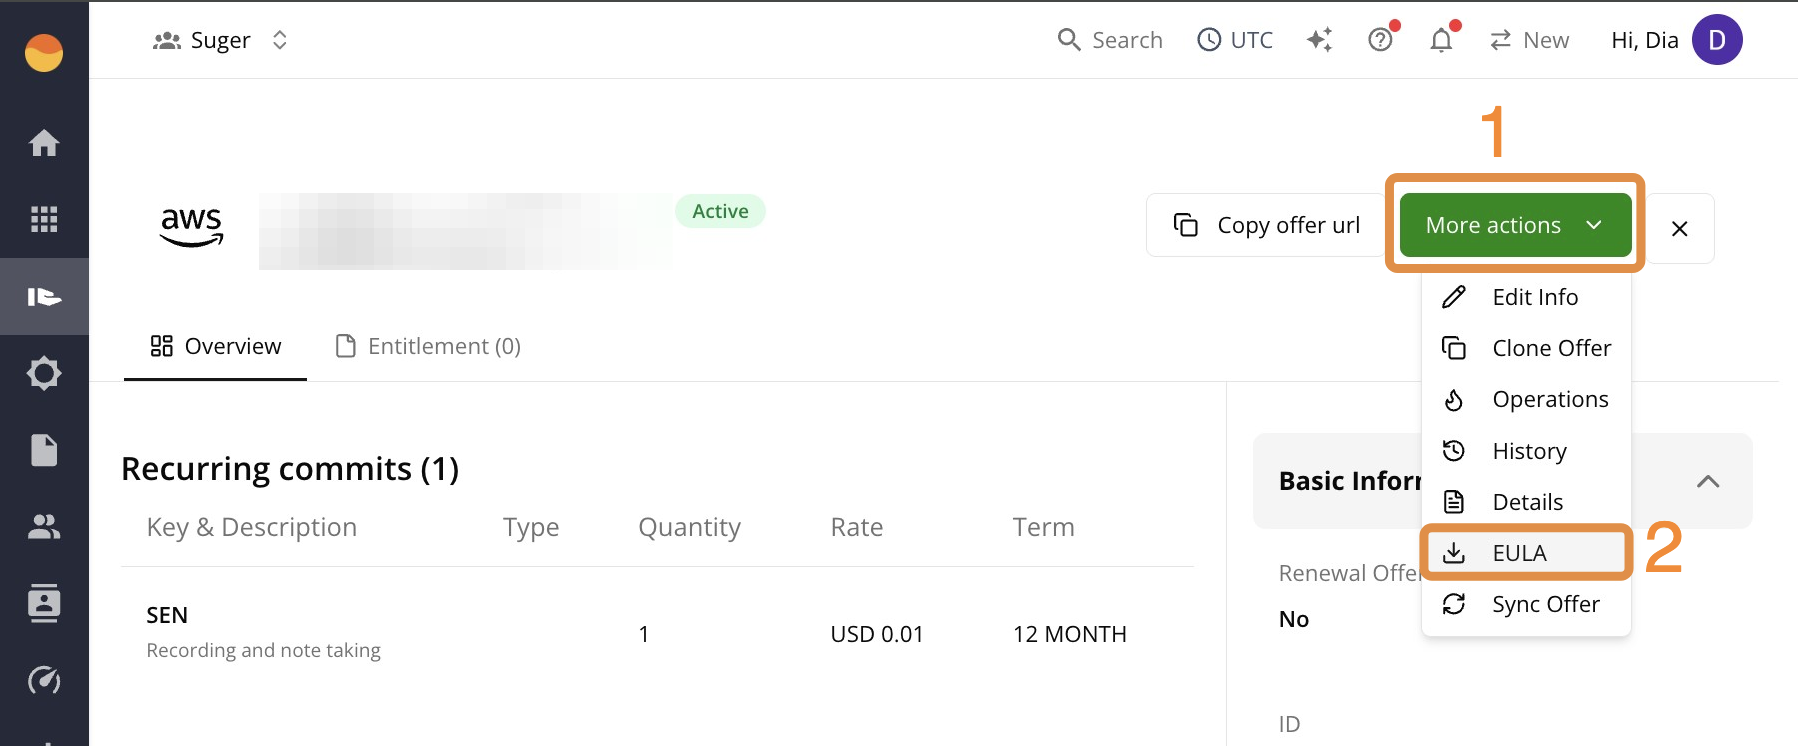
- Click the Download icon on the page.
Suger looks up the document each time you click EULA. If it no longer has a working copy of an AWS offer’s document, it tries to recover one first — from AWS Marketplace or, for a CPPO, from the resale authorization the CPPO is linked to.
- If your browser blocks the new tab, the console shows Allow popups, then try downloading the EULA again. Allow pop-ups for the Suger Console and click EULA again.
- If the document can’t be retrieved, the new tab closes and the console shows Unable to download EULA. Please try again.
When you might need it
- To review the terms included in the offer.
- To share the EULA with the buyer outside of AWS.
- To keep a copy for internal record-keeping or legal review.
Review an offer’s history
The Offer History panel lists the events Suger has recorded about an offer, newest first — up to the latest 1,000.
- Go to the Offers page in Suger Console.
- Open the offer.
- Click More actions, then select History.
Each entry shows when it happened and what happened, followed — where Suger recorded them — by:
- By: — who made the change. It is left off an offer acceptance, because the buyer who accepted isn’t a member of your organization.
- Source: — where the change came from: User, Salesforce, HubSpot, API client, Suger AI, or Suger backend. See what each one means under Products → History. Entries recorded before Suger began tracking the source have no Source: line.
When you submit, cancel, or extend an AWS, Azure, Oracle, or Snowflake offer from the console, the status changes Suger records while it carries that out — starting with Pending_Create for a new offer — name you on the By: line, with Source: User. On Google Cloud offers, the status changes Suger records after your request finishes don’t name anyone yet. Entries nobody on your team caused, such as the offer expiring, show Source: Suger backend and no By: line. For an AWS example, see See who made each change.
A failed AWS change also carries the Why AWS rejected this panel described under Extend the expiry date of an offer.
Create an AWS Marketplace offer set
An offer set groups multiple AWS private offers (up to 7) into a single bundle that the buyer accepts in one checkout flow. Use it when you’re selling a multi-product solution in AWS Marketplace.
Prerequisites
Make sure the following are in place before creating an offer set.
AWS Marketplace
- Active AWS Marketplace seller account with a published seller profile. See Register and create your seller profile.
- At least one active public listing. You must have a published product before you can create private offers to include in an offer set.
Suger
- Admin access to the Suger Console. If you don’t have access yet, ask your company admin to invite you to the organization. See Manage Users and Roles.
Offer alignment
AWS enforces the following rules across all offers in a set. Mismatches block you from publishing. Before you start building, confirm that every offer you plan to include will share:
- The same currency
- The same buyer AWS account ID
- The same expiration date
Supported offer types
Only the following offer types can be included in an offer set:
| Offer type | Supported in offer sets? | Description |
|---|---|---|
| Marketplace Private Offer (MPPO) | ✅ Yes | Direct private offers created by the product owner (ISV) for the buyer |
| Channel Partner Private Offer (CPPO) | ✅ Yes | Private offers extended by an authorized channel partner using a resale authorization |
| Standard Private Offer features | ✅ Yes | Includes flexible payment schedules and local currency support |
| Public & Trial offers | ❌ No | Standard public listings and promotional free trials can’t be bundled |
| Replacement offers (amendments) | ❌ No | Agreement-based offers meant to renew or upsell an existing active entitlement |
Step 1: Set up offer set details (container)
Start by filling out the container details in order:
- Go to the Suger Console, then Offer.
- Click the Offer Set tab in the upper-left corner, then + New Offer Set.
- Enter the Offer set name. Use something that helps you and the buyer identify the deal easily.
- Add a Customer note — context for the buyer or internal team.
- Select or enter the Buyer(s) AWS account ID.
- Set the Expiry Date for when the buyer can accept the offer set. Every individual offer you add later must share this exact same expiration date.
- (Optional) Use the Solution associate field if you already have a related AWS solution listing and want to connect them. A solution is a Marketplace page that explains how multiple products work together; linking it gives buyers additional context and documentation during the purchase flow.
Step 2: Add private offers to the offer set
Attach the actual private offers inside the offer set container. You must add at least 2 offers and up to 7 offers per offer set.
- Click + Create private offer to add your first offer.
- Choose the Product you want to include. Each offer in the set must target a different product ID — you can’t include the same product twice in one offer set.
- Fill in the Basic information section.
- Set up the Offer terms.
- Add the Pricing information.
- Attach the End User License Agreement (EULA) for this product.
- Once everything is correct, click Add.
Repeat until you have added all required offers.
Step 3: Review and publish the offer set
- Check everything you configured. Make sure:
- All offers are included correctly.
- Every offer targets the same buyer AWS account.
- All offers use the same currency.
- All offers share the same expiration date.
- Each offer has a different product ID.
- Pricing, terms, and EULAs are correct.
- Click Create offer set to publish.
Step 4: What happens after you publish
- Buyer notification (automatic). After you click Create offer set, AWS Marketplace automatically sends the buyer a single email — this replaces individual private offer emails. The email includes the Offer Set ID, expiry date, the list of included products, and one link to review and accept the full offer set.
- Separate agreements (after acceptance). Once the buyer accepts the offer set, each product becomes its own separate agreement, so you can manage renewals, changes, or cancellations per product independently.
- Invoicing and payments. Even though the buyer completes one checkout flow, billing is split per product. The buyer receives separate invoices for each product based on its own terms and agreement.
Track offer statuses
Status labels in Suger may differ slightly from what you see in the native AWS, Azure, or GCP consoles. Where this applies, the difference is called out below.
Suger Console / CRM status reference
Use the table below to interpret the offer statuses shown in the Suger Console or your CRM.
| Status | Meaning |
|---|---|
Pending_Create | The offer is being submitted to AWS. |
Create_Success | AWS has accepted the offer, but it hasn’t been made visible to the buyer yet. |
Pending_Acceptance | The offer has been successfully pushed to AWS and is waiting for the buyer to accept it. |
Accepted | The buyer has accepted the offer. An entitlement is created automatically. |
Pending_Cancel | The offer cancellation request has been submitted but not yet confirmed by AWS. |
Canceled | The offer has been successfully canceled. It is no longer visible to the buyer. |
Expired | The buyer did not accept the offer before the expiry date. The offer is no longer valid. |
Active | The offer originated from a public purchase via the Marketplace. |
Three statuses mean the offer never reached the marketplace, and all three stay editable — open the offer, correct it, and resubmit rather than starting again:
| Status | Meaning |
|---|---|
Draft | Saved in Suger and never submitted. |
Create_Failed | Suger couldn’t create the offer — for example, the marketplace refused it, or, for a Google Cloud offer, Suger’s own pre-flight checks refused it before anything was sent. |
Invalid | Suger’s own pre-flight checks refused it, so nothing was sent to the marketplace. Suger no longer sets this status, so you’ll only see it on older offers; a Google Cloud offer that the pre-flight checks refuse now lands in Create_Failed. |
The offer page explains the failure in a Create Offer Failed alert. It shows the latest reason — in plain language where Suger can rewrite the marketplace’s error, word for word otherwise — and, when the offer has failed before, a Show n earlier attempts link that lists the previous reasons.
AWS Marketplace offer statuses
AWS private offers follow a straightforward lifecycle: Draft → Active → Accepted. If the buyer doesn’t act in time, the offer moves to Expired instead.
| Status | What it means | What to do |
|---|---|---|
Draft | The offer is incomplete. | Finish filling in all required fields, then publish to send it to the buyer. |
Active | The offer has been published and is available to the buyer. | Share the offer link with the buyer if you haven’t already. See Share the offer with your buyer. |
Accepted | The buyer subscribed and an agreement (entitlement) has been created. | Go to the Entitlement menu in the Suger Console to track the deal going forward. |
Expired | The offer reached its deadline before the buyer accepted. | Extend the expiration date or create a new offer. |
Pending Cancel | The buyer requested to cancel their subscription. This status applies to public offers and usually lasts about one hour. | No immediate action needed. Wait for the status to move to Cancelled. |
Cancelled | The agreement was cancelled, either by the buyer or the seller. | If the cancellation was unintended, contact AWS support. To continue the deal, create a new private offer. |
Source: AWS Marketplace Seller Guide – Creating and managing private offers
Key things to know about AWS offers
- Private offers renew automatically only if they carry renewal terms. A Contract, Professional Services, or Container offer with committed pricing can include pre-authorized auto-renewal terms, which the buyer accepts along with the offer; resale (CPPO) and agreement-based offers can’t. Without renewal terms, create a new private offer to renew when the contract ends.
Pending CancelandCancelledare Suger-specific events. You won’t see these labels in the AWS console. In AWS, a seller-initiated cancellation changes the offer’s expiration date so it appears asExpired.- Buyers receive both a
PENDING_CANCELand aCANCELwebhook event when they unsubscribe, typically about one hour apart. This is normal behavior.
Azure Marketplace offer statuses
Azure requires two separate actions from the buyer: accepting the offer terms and then completing the purchase. This means a deal can show as Accepted while the subscription is still pending.
| Status | What it means | What to do |
|---|---|---|
Draft | You have started creating the offer but haven’t submitted it yet. | Complete all required fields and submit. |
In Progress | The offer is being published. This typically takes up to 15 minutes. | Wait for the status to update before contacting the buyer. |
Pending Acceptance | The offer is live and waiting for the buyer to accept. | Make sure you have shared the offer link with the buyer. See Share the offer with your buyer. |
Accepted | The buyer accepted the offer terms. | Check the sub-status (below) to see if the purchase step is still pending. |
Expired | The offer deadline passed before the buyer accepted. | Withdraw the offer, make any needed edits, and resubmit. |
Ended | The offer passed its end date. | Create a new offer if you need to continue the deal. |
Withdrawn | You recalled the offer before the buyer accepted it. | Edit and resubmit when ready. |
Source: Microsoft Learn – Manage ISV-to-customer private offers
Purchase sub-statuses (after acceptance)
After the buyer accepts, these sub-statuses track whether they have completed the purchase step.
| Status | What it means | What to do |
|---|---|---|
Pending Purchase | The buyer accepted the terms but hasn’t completed the purchase yet. | It can take 15–60 minutes for the Purchase button to become available. Let the buyer know to check back. |
Subscribed | The buyer subscribed and you activated the SaaS subscription. | No action needed. The deal is active. |
Purchased | For VM software reservations, the buyer completed the purchase. | No action needed. |
Cancelled | The subscription was cancelled due to a buyer request or non-payment. | Reach out to the buyer to resolve, or create a new offer if needed. |
Expired (subscription) | The subscription has expired. | Create a new offer to renew. |
For multiparty (channel partner) offers
| Status | What it means | What to do |
|---|---|---|
Pending Partner Action | The offer is ready for the channel partner to review and send to the buyer. | Follow up with the channel partner to confirm they have received and reviewed the offer. |
Source: Microsoft Learn – Multiparty private offers for ISVs
GCP Marketplace offer statuses
GCP has the most granular status lifecycle of the three marketplaces. After a buyer accepts an offer, you (the seller) may need to manually approve it before it activates. GCP also distinguishes between an offer expiring before the buyer acts and an order expiring after the contract ends.
Offer statuses (Producer Portal)
| Status | What it means | What to do |
|---|---|---|
Draft | The offer is created but not finalized. | Continue editing, then submit. |
Pending Google Approval | Google is reviewing the offer before it can be sent to the buyer. | Wait for approval. This is a Google-controlled step. |
Created | The offer URL is ready. | Send the offer link to the buyer. See Share the offer with your buyer. |
Pending Acceptance | The offer has been sent but the buyer hasn’t accepted yet. | Follow up with the buyer if needed. |
Account Pending Approval | The buyer’s account needs to be approved before the offer can proceed. | Review and approve the account in your GCP settings. |
Account Rejected | The buyer’s account was rejected. | Contact the buyer if the rejection was unintended. |
Needs Your Approval | The buyer accepted and is waiting for you to confirm. | Go to the GCP Producer Portal and approve the offer. |
Approving | Your approval is being processed. This takes a few minutes. | Wait for the status to update. |
Approval Failed | An error occurred during approval. | Wait for the status to reset, then re-approve. |
Activating | The offer is nearly ready. It will activate at its scheduled start time. | No action needed. |
Scheduled | A replacement offer was approved and will activate on the contract start date. | No action needed until the start date. |
Active | The buyer is actively using the offer. | No action needed. |
Offer Expired | The buyer did not accept before the deadline. | Create a new offer if you want to continue the deal. |
Order Expired | The contract end date has passed. | Create a renewal offer if needed. |
Cancelled | You withdrew the offer before the buyer accepted. | Create a new offer if the deal should continue. |
Rejected | You declined an offer the buyer had already accepted. | Contact the buyer and create a new offer if the deal should proceed. |
Unavailable | This is a legacy offer that is no longer supported. | Migrate to a current offer type if needed. |
Reseller offer statuses (Partner Sales Console)
If an offer is managed through a GCP reseller, you’ll see this simplified set of statuses instead.
| Status | What it means | What to do |
|---|---|---|
Published | The reseller published the offer; the buyer hasn’t accepted yet. | Follow up with the buyer or reseller if there is no response. |
Accepted | The buyer accepted but the contract hasn’t started yet. | Wait for the contract start date. |
Active | The contract is in effect. | No action needed. |
Ended | The contract passed its end date. | Create a renewal offer if needed. |
Expired | The buyer didn’t accept before the deadline. | Work with the reseller to reissue the offer. |
Canceled | The reseller withdrew the offer. | Coordinate with the reseller to reissue if needed. |
Key things to know about GCP offers
- SaaS offers require manual approval by default unless you have enabled automatic offer approval. Check your GCP settings to avoid deal delays.
- Replacement offers (for renewals or upsells) follow the same status lifecycle but can’t change the product, plan, or pricing model of the original offer.
- As of April 2025, GCP supports multiple active flat-fee offers for the same buyer.
Cross-cloud status comparison
Use this table to quickly compare where a deal stands across all three marketplaces.
| Lifecycle stage | AWS | Azure | GCP |
|---|---|---|---|
| Being created | Draft | Draft | Draft |
| Publishing | — (immediate) | In Progress | Pending Google Approval |
| Awaiting buyer | Active | Pending Acceptance | Created / Pending Acceptance |
| Buyer agreed | Accepted | Accepted | Needs Your Approval |
| Fully active | Agreement active | Subscribed / Purchased | Active |
| Not accepted in time | Expired | Expired | Offer Expired |
| Contract ended | Agreement ended | Ended | Order Expired |
| Seller withdrew | Cancelled (pre-accept) | Withdrawn | Cancelled |
Spotted something wrong or out of date on this page? Tell us and we'll correct it.