
Invite Partners
Invite a single partner or bring in many at once from a CSV file, with Suger drafting the outreach email for you based on the purpose, tone, and context you provide.
Overview
You can invite partners into your network one at a time or in bulk using a CSV file. In either case, Suger can generate the outreach email for you from the purpose, tone, and context you supply — the more specific you are, the less editing you’ll need afterward.
Invite a single partner
The invitation wizard runs in four steps — Choose, Purpose, Email, and Review — listed across the top so you can always see where you are and move back with Back.
Open the wizard
- Go to Suger Console, then click Partners.
- Click + Invite Partners, then choose Single partner.
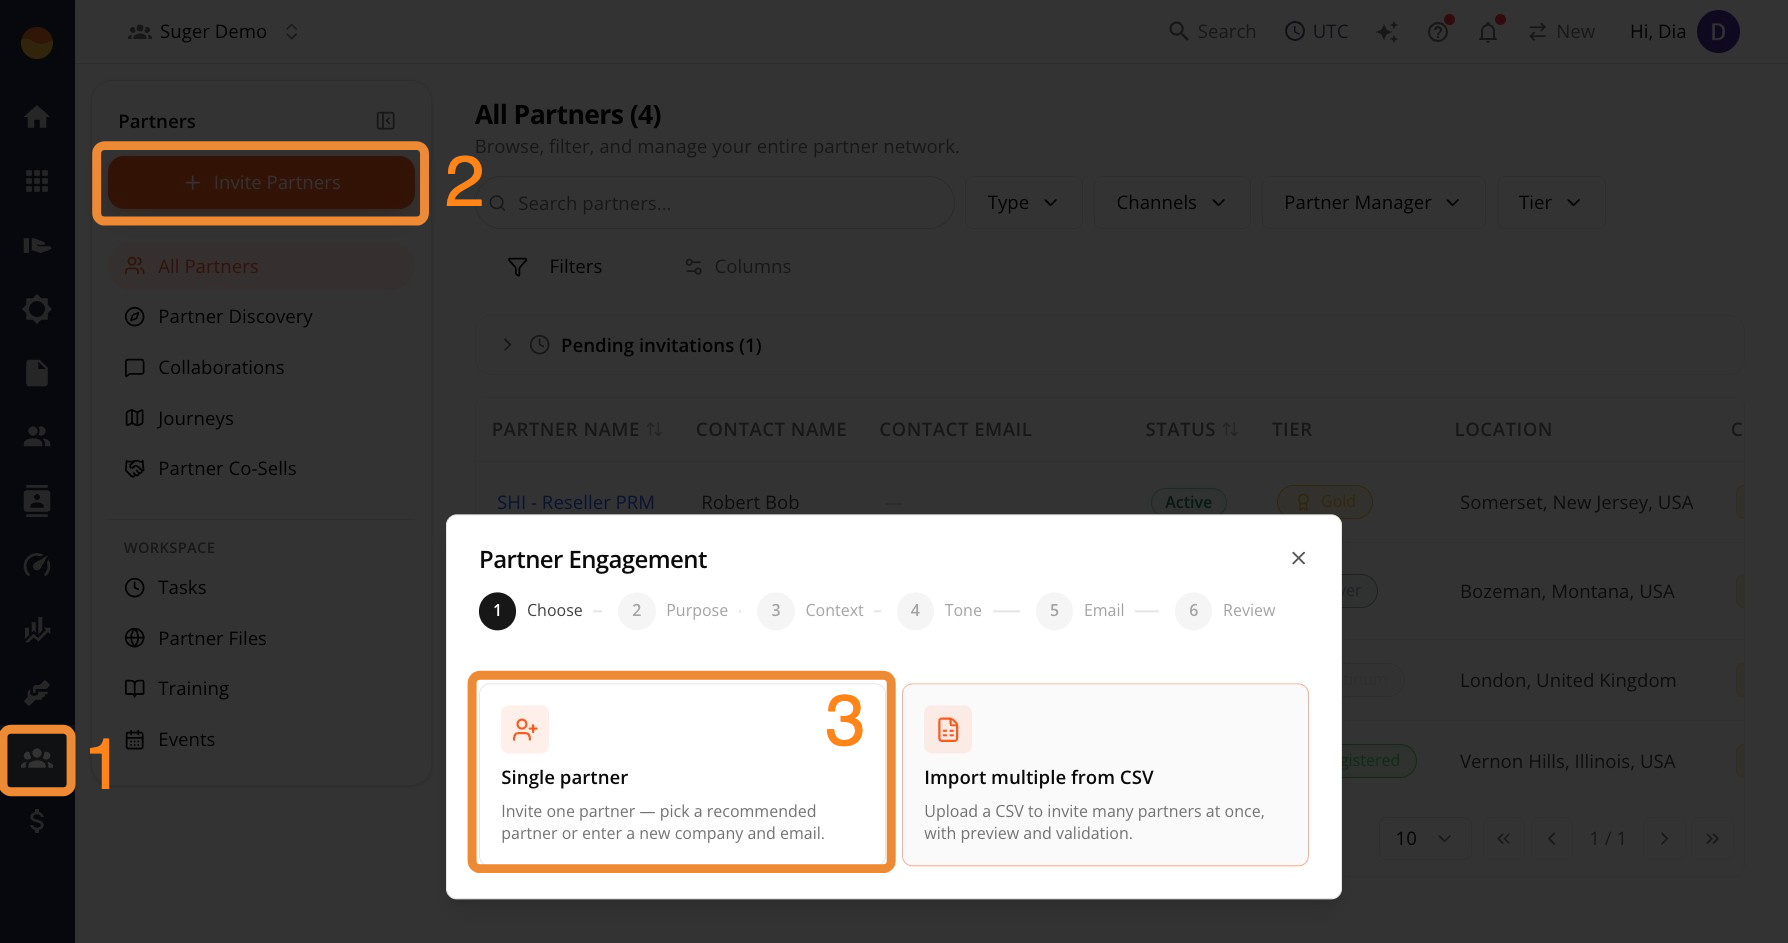
Step 1: Choose
Choose who you’re inviting.
If the partner is already known to Suger:
- Click Select recommended partner.
- Use the Select a partner dropdown to choose their name.
If the partner is brand new:
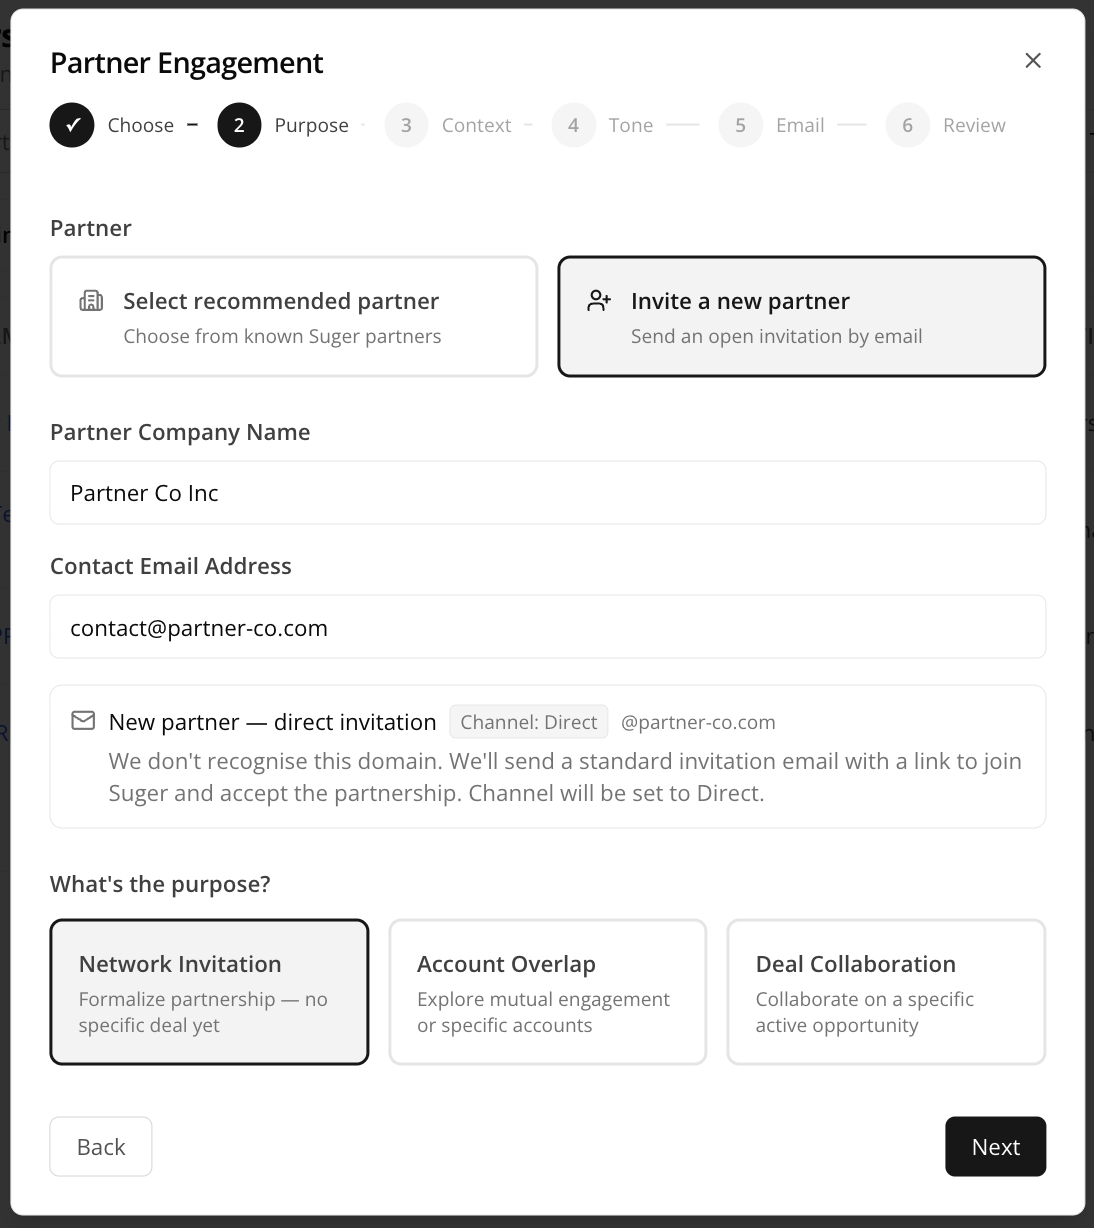
- Click Invite a new partner.
- Enter their company name under Partner Company Name.
- Enter their contact under Contact Email Address.
As you type the contact’s email, Suger checks whether your organization already has an open invitation or application with that company. If it does, a notice appears under the field in place of the usual preview, and Next stays disabled. See One Open Invitation per Company.
Click Next.
Step 2: Purpose
Under What’s the purpose?, select the option that matches this outreach:
- Network Invitation — Formalize a partnership, with no specific deal yet.
- Account Overlap — Explore mutual engagement or specific accounts.
- Deal Collaboration — Collaborate on a specific, active opportunity.
Then click Next.
Step 3: Email
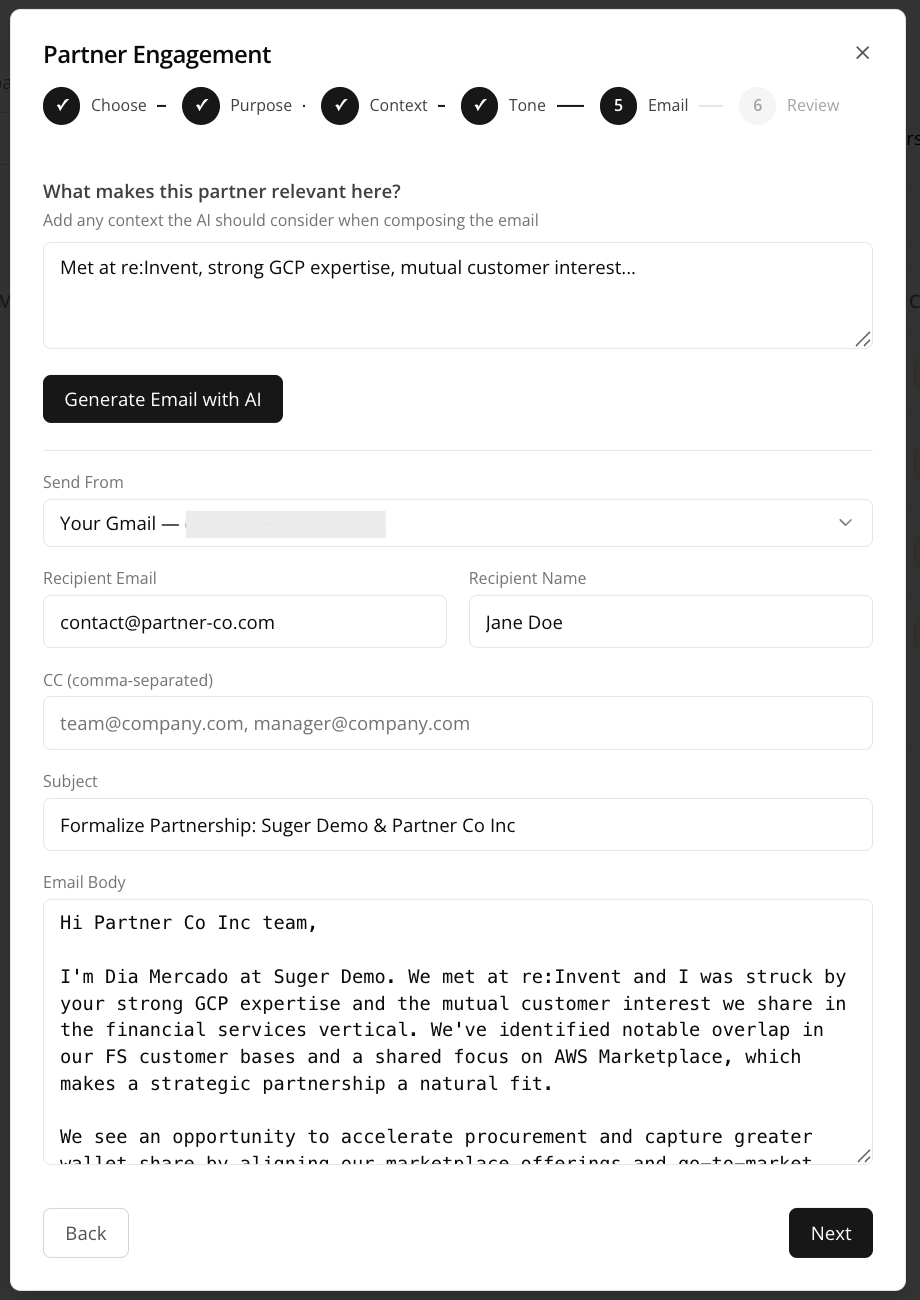
Context and tone are fields on this step, sitting next to the Generate Email with AI button they feed. They used to be two pages of their own; a single field occupying a whole page made it genuinely unclear whether what you typed reached the partner, and at least one customer skipped both pages and wrote the email by hand. Keeping them beside the button makes the connection obvious.
- Describe why this partner is relevant under What makes this partner relevant here? — the more specific you are, the less editing you’ll need afterward.
- Pick a tone from the dropdown. Tone only seeds the generated draft, so it does not block Next.
- (Optional) Link a document, such as your NDA or partner agreement, with Insert file under Attach file link. See Link a file from the email below.
- Click Generate Email with AI and wait a few seconds while Suger generates a subject and body.
- Confirm the sending account under Send From.
- Fill in Recipient Email and Recipient Name.
- (Optional) Add anyone who should be copied under CC.
- Review the generated Subject and Email Body, and edit either if needed.
- Click Next.
Link a file from the email
A prospective partner may not have a Suger login yet, so an invitation can link documents they can read before they accept, without signing in. The Attach file link panel sits above Generate Email with AI, so the files you add go into the generated email too.
- Under Attach file link, click Insert file.
- In the Insert file link dialog, search or pick a category, then tick the files to link.
- Click Insert link. With several files ticked, the button reads Insert N links.
Each file appears as a chip under Attach file link. Suger also adds a sentence to the email body, such as “Before we get started, you can review Partner NDA here:”, followed by a {{document:…}} placeholder that becomes a link named after the file when the email is sent. You can move or reword the sentence. Keep the placeholder where you want the link. To unlink a file, remove its chip or delete that line. Generating the email with AI keeps your links.
Which files you can link
- Only Partner Files shared with All Partners that allow download. The dialog’s Sharing: All Partners chip is fixed, and its Not seeing a file? note explains why: a new partner can’t open Private or Specific Partners files. To link an NDA or agreement, add it to Partner Files and share it with all partners.
- Up to 10 files per invitation.
What the recipient gets
- A link, not an attachment. It opens without signing in to Suger.
- The link works while the invitation is pending (
Sent) or accepted. It stops working once the invitation is declined, expires, or is cancelled. - The file is checked again on every click. If you stop sharing it with all partners, or turn off its download, links already in inboxes stop working.
- Resending the invitation keeps its links.
File links are available in the single-partner wizard only. The CSV and bulk invitation flows don’t offer them.
Continue with Send From, the recipient, and the rest of the steps above.
Step 4: Review
Confirm the partner, purpose, recipient, and email content are all correct, then click Send Invitation.
Once sent, the partner appears under Pending invitations on the All Partners page until they accept.
What Sending an Invitation Actually Does
Sending an invitation doesn’t just queue an email. Suger creates your side of the partnership straight away, with the status PENDING.
That means an invited company is a real record from the moment you click send — you can open it, assign it a partner manager, attach notes, and register a co-sell against it without waiting for a reply.
All Partners lists ACTIVE and PENDING partners together by default, so invited companies sit alongside accepted ones rather than hiding in a separate queue. SUGGESTED and INACTIVE partners stay out of that default view.
A few consequences worth knowing:
- You can’t set
PENDINGby hand. It’s set by sending an invitation and nothing else. Editing a partner’s status toPENDINGis refused. - One open invitation per company. While an invitation to a company is waiting for an answer, you can’t send another to anyone there. See One Open Invitation per Company.
- A later invitation reuses the existing record. Once the first invitation has been answered, cancelled, or has expired, a new one to the same company reuses its partner record rather than creating a duplicate. An already-
ACTIVEpartner is never demoted back toPENDINGfor it either. - A
PENDINGpartner can’t be shared with. Files and courses only go toACTIVEpartners, so an invited company can’t be a share target until they accept. - Accepting isn’t the only route to
ACTIVE. If you register a co-sell on a partner’s behalf and they confirm it, that confirmation is the acceptance — the partnership flipsPENDING→ACTIVE.
One Open Invitation per Company
Your organization can have only one open request with a company at a time, whichever side started it. Suger matches companies by email domain, so a colleague at the same company counts too. This keeps two requests for one company from crossing — for example, your invitation going out while that company’s application sits in your queue — where accepting one would leave the other pending with nothing able to clear it.
A company has an open request with you while it has any of these:
- an invitation you sent that is still
Sent, waiting for an answer; - an application from your sign-up form that is still Pending;
- a deal registration from your public deal registration link held for your review.
Accepted, declined, cancelled, and expired invitations and applications don’t count, so an old request never stops a new one. An invitation another Suger organization sends you in the app isn’t checked either.
What the invite wizard shows
When you choose Invite a new partner, the notice under Contact Email Address says which kind of request is open, and shows the company’s email domain so you can check it’s the company you meant:
| Notice | What it means | What to do |
|---|---|---|
| Already applied · Pending application | The company applied, or registered a deal through your public link, on the date shown, and is waiting on you. | Click Review their application. The wizard closes and Partners → Applications opens on Pending, with that application highlighted. |
| Invitation already sent · Pending invitation | Your invitation to the address shown, sent on the date shown, hasn’t been accepted yet. | Click Resend that invitation, or wait for a reply. |
Next stays disabled while the notice is showing.
If you choose Select recommended partner instead, the wizard doesn’t check ahead of time, and the send is refused when you click Send Invitation.
In a bulk invitation
A row whose company already has an open request isn’t sent. It’s listed as Invitation pending on the confirmation screen, and the rest of the batch still goes out. See Step 7: Confirmation.
When the company applies instead
The rule works from the other side too. Someone at a company with an open invitation from you can’t apply through your sign-up form: the form tells them to accept the invitation you sent. See One Open Application per Company.
Invitation Status and Expiry
Every invitation carries its own status, separate from the partnership status above:
| Status | Meaning |
|---|---|
Sent | Delivered and awaiting a response. The only state that can still be accepted, declined, or cancelled. |
Accepted | The recipient accepted. |
Declined | The recipient declined. |
Expired | Nobody responded before the deadline. |
Cancelled | You withdrew it. |
Invitations expire 15 days after they’re sent. A daily sweep moves anything still Sent past its deadline to Expired. Past that point the link no longer works — the recipient can neither accept nor decline until you resend the invitation.
Cancel a pending invitation
Cancelling is the only change you can make to an invitation after sending it.
- Open Pending Invitations.
- Click the ⋯ menu on the invitation and choose Cancel invitation.
- Confirm on Cancel this invitation? — the dialog warns that the partner will no longer be able to accept, and that this can’t be undone. Click Keep invitation to back out.
The invitation stays visible with a Cancelled status for the record.
Resend a pending invitation
A pending invitation carries a Resend invitation action, so a partner who lost the email does not need a fresh invitation record — the same one is sent again, and its 15-day window starts over.
An expired invitation can be resent too. It no longer appears under Pending invitations, so open the partner’s record instead: while the partnership is still PENDING, the banner there offers Resend invitation. Resending brings the invitation back to Sent with a fresh 15-day window.
A resend is refused while the company has another open request with you — for example, if a colleague there has applied in the meantime, or you’ve since invited someone else at the company. See One Open Invitation per Company. Right after a resend, wait a few minutes before resending the same invitation again.
A cancelled invitation can’t be resent. Send a new one instead; the partner record you already created is reused rather than duplicated, so nothing is lost by starting again.
A pending invitation reports what actually happened to it, rather than sitting at “Pending” whatever the outcome:
- Signup started — the partner opened the invitation and began signing up, but has not finished. This is its own status because “Pending” made a half-finished signup look identical to an email nobody opened.
- Delivery failures are shown per invitation, with guidance for that specific failure, so a bounced address is distinguishable from an unread email.
Invite multiple partners at once
The bulk invitation modal opens in one of two modes, depending on how you reach it:
| Mode | How you get there | Steps |
|---|---|---|
| CSV | + Invite Partners → Import multiple from CSV | Choose, Upload, Preview, Compose, Review, Confirmation |
| Pre-selected recipients | Select rows in Partner Discovery — on the Recommended Partners, From Your Marketplace, or From Your CRM tab — and click Invite Selected (N) | Recipients, Compose, Review, Confirmation |
Both end in the same place: one composed message, a recipients table to check, and a confirmation. The pre-selected mode skips the upload and preview steps because Suger already knows exactly who you picked.
The CSV walkthrough below covers the longer of the two paths.
Step 1: Start the invitation
- Go to Suger Console, then click Partners.
- Click + Invite Partners, then choose Import multiple from CSV.
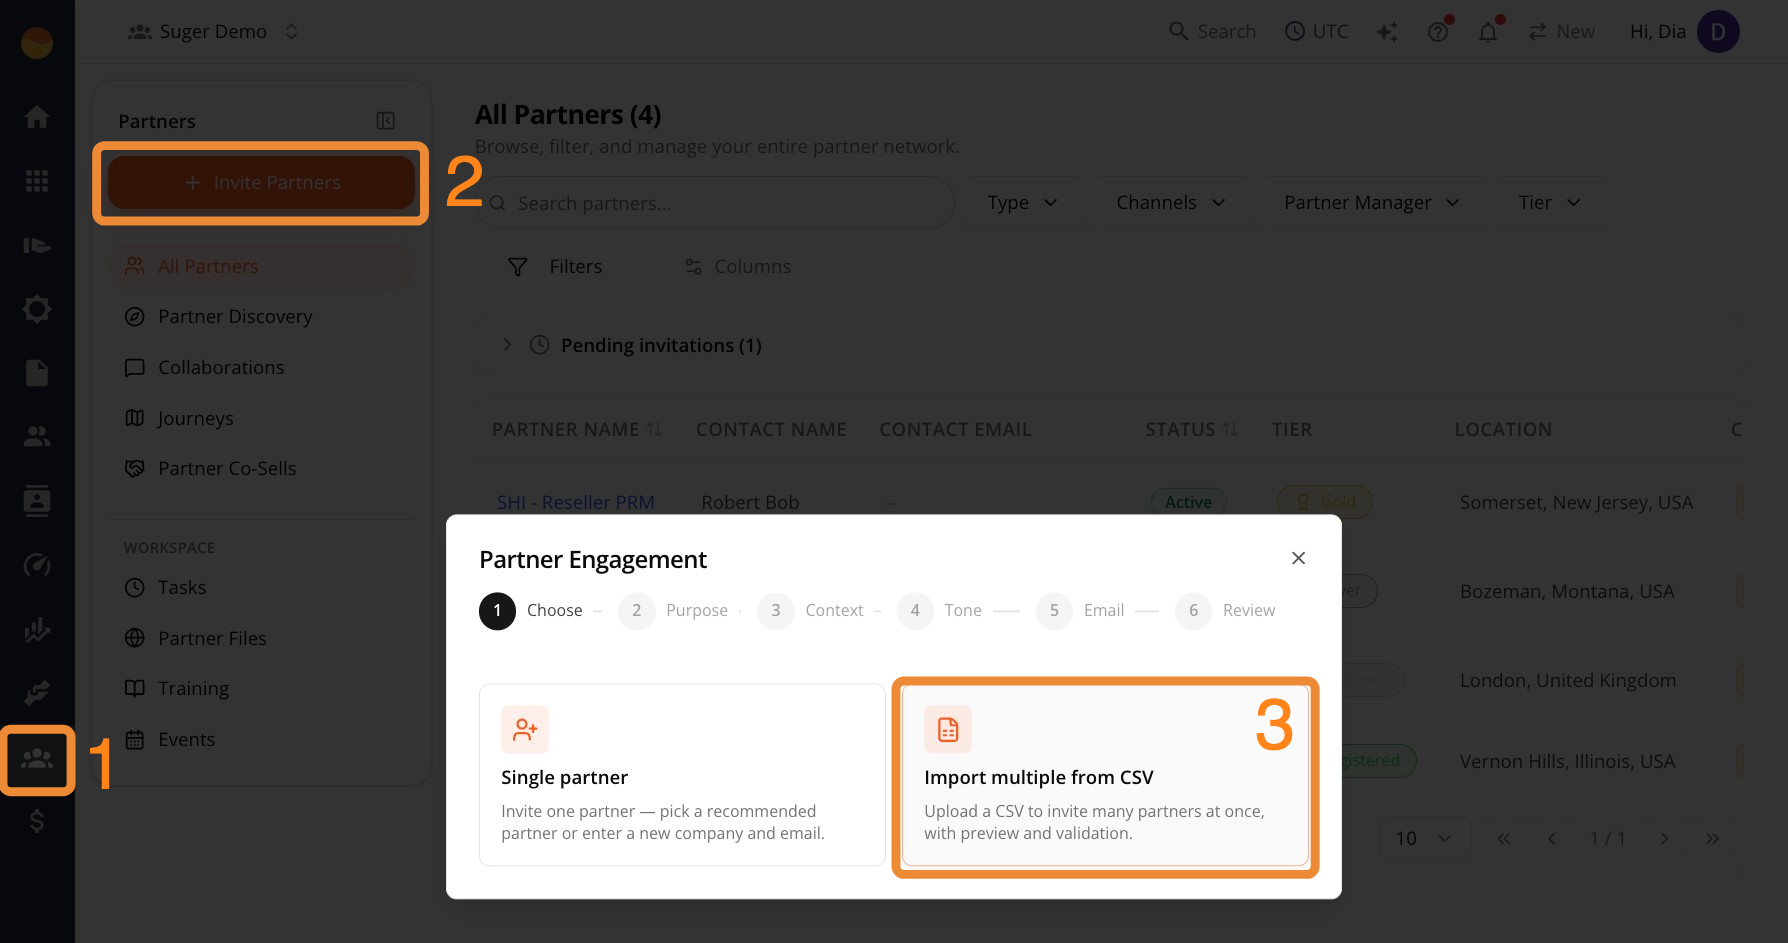
Step 2: Download and prepare your CSV
-
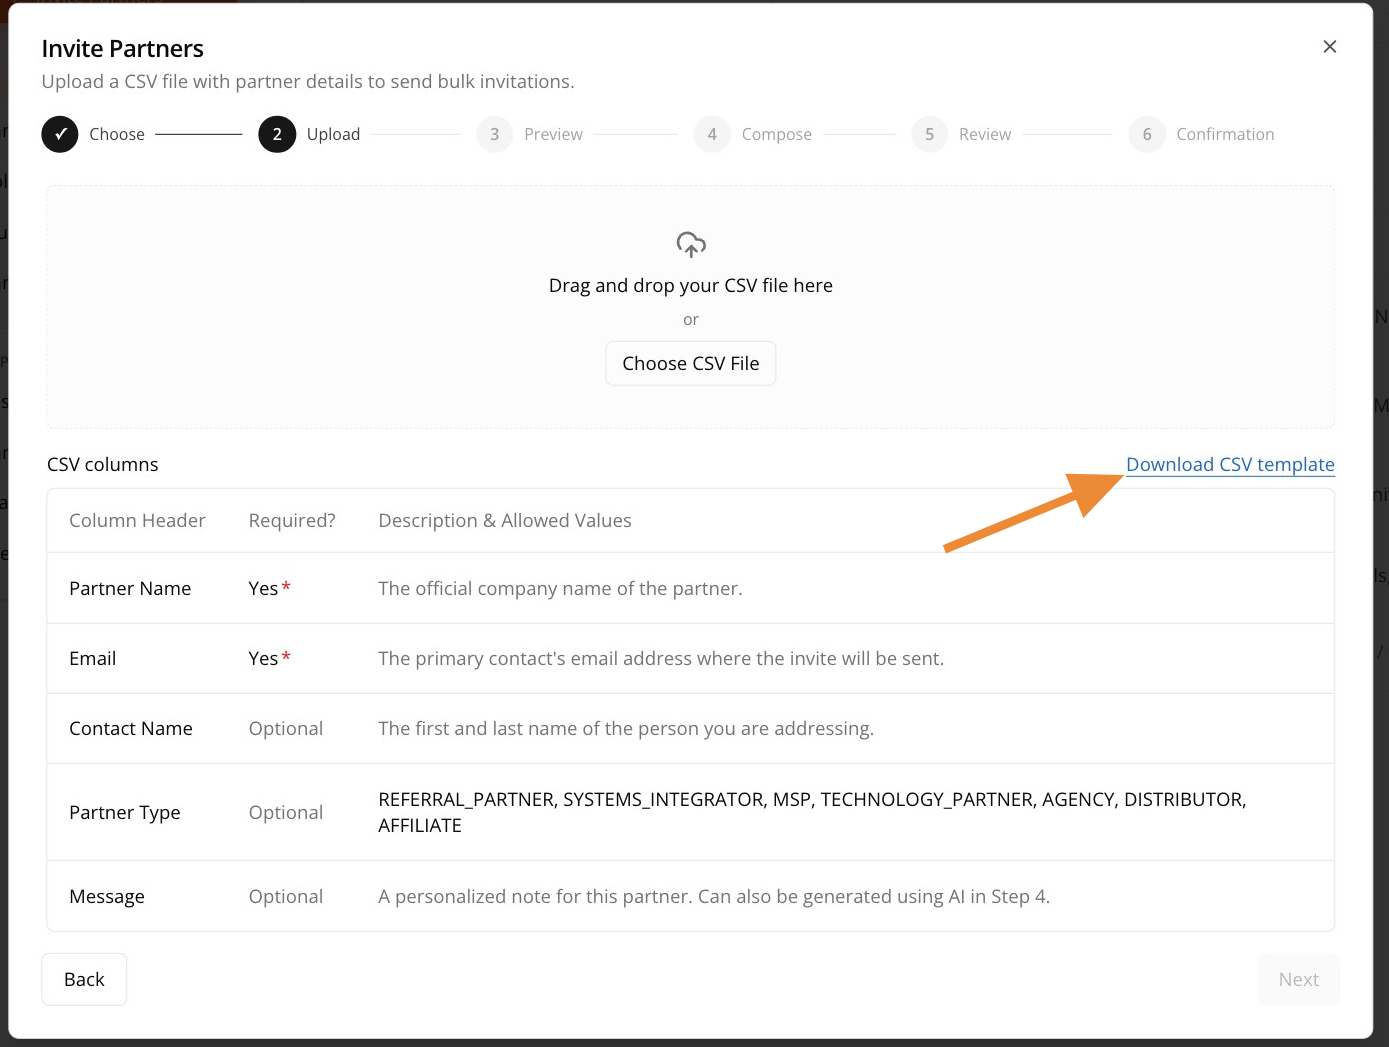
Click Download CSV template to save a blank file with the correct column headers.
-
Open the file in a spreadsheet program, like Excel, Google Sheets, or Numbers.
-
Fill in one row per partner. Don’t change, rename, or reorder the column headers in row 1 — Suger reads the file based on those exact headers.
-
Leave a cell blank if that column doesn’t apply to a partner (Contact Name, Partner Type, and Message are optional).
-
Once every row is filled in, save the file.
Partner Type values
The Partner Type column takes the same set of engagement types the rest of PRM uses:
| Code | Label |
|---|---|
RESELLER | Reseller |
VAR | Value Added Reseller |
REFERRAL_PARTNER | Referral Partner |
SYSTEMS_INTEGRATOR | Systems Integrator |
MSP | MSP (Managed Service Provider) |
TECHNOLOGY_PARTNER | Technology Partner |
AGENCY | Agency |
DISTRIBUTOR | Distributor |
AFFILIATE | Affiliate |
You can write either the code or the label — Suger matches case-insensitively and normalizes to the code. An unrecognized value passes through unchanged rather than failing the row, since the field is advisory.
A single send takes at most 200 partners, so split a longer list across several files.
Step 3: Upload your CSV
- Click Choose CSV File, or drag and drop your file onto the upload area.
- Click Next.
Step 4: Preview and validate
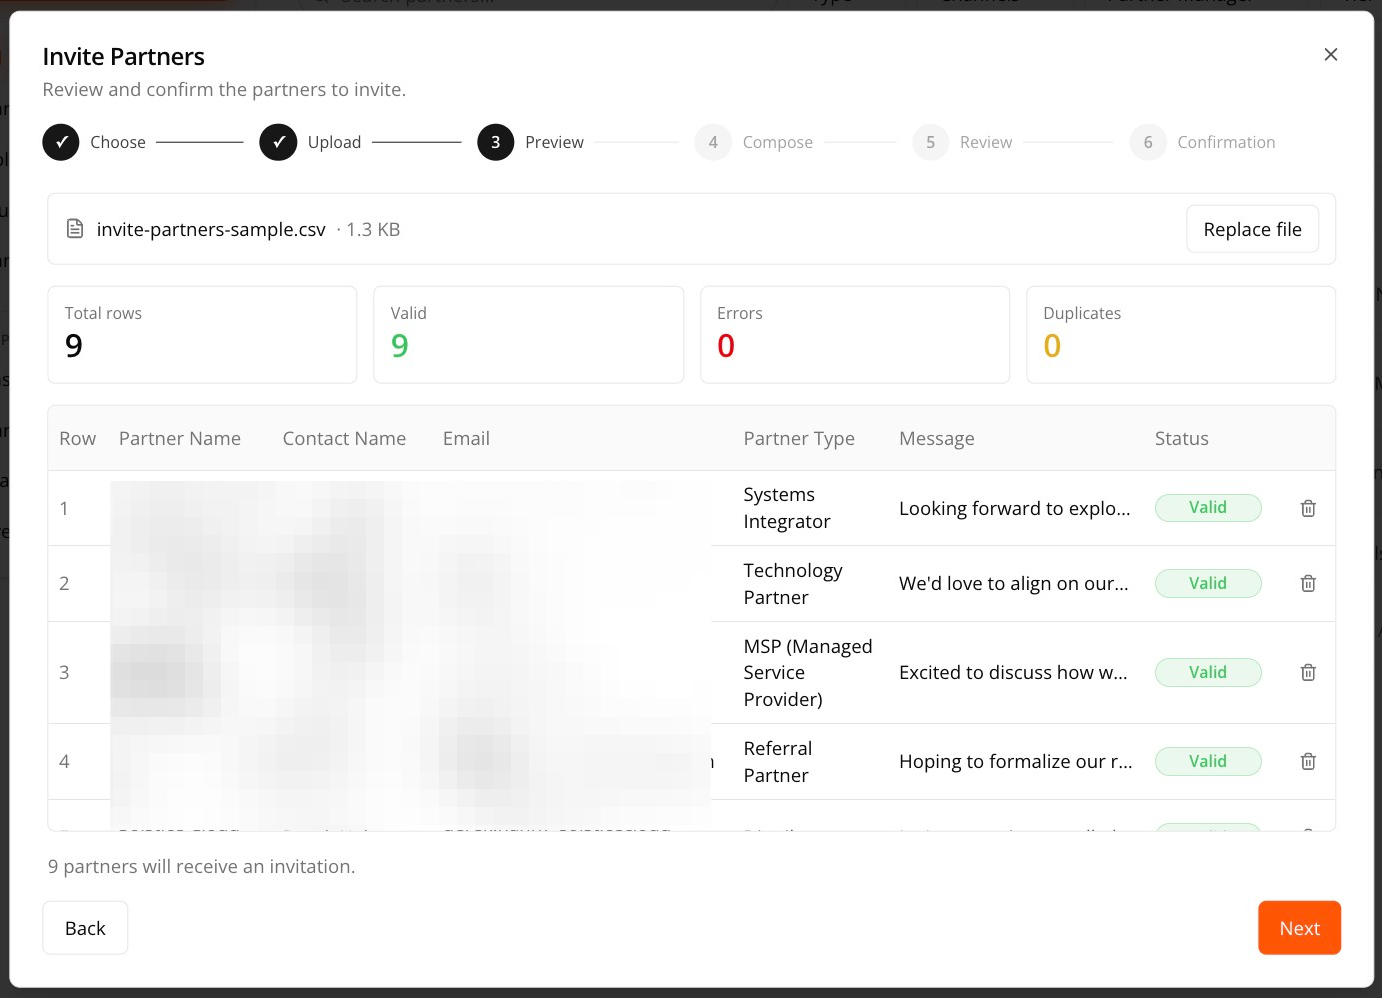
Suger checks your file and shows a summary of Total rows, Valid rows, Errors, and Duplicates, along with a row-by-row breakdown.
- Fix any rows marked with errors before continuing. Click the trash icon next to a row to remove it from the batch.
- Correct a row’s Partner Type in place if the CSV got it wrong. The column is a dropdown here, offering the same nine types listed above plus a blank choice for no type.
- Click Next once you’re ready to proceed.
Step 5: Compose your message
- Confirm the account under Send from.
- Select an Email tone from the dropdown: Executive, Sales, Technical, Alliance-Focused, or Short & Tactical.
- Select a Purpose: Network Invitation, Account Overlap, or Deal Collaboration.
- Click Generate with AI to draft a subject and message body, or write your own.
- Click Next.
Step 6: Review and send
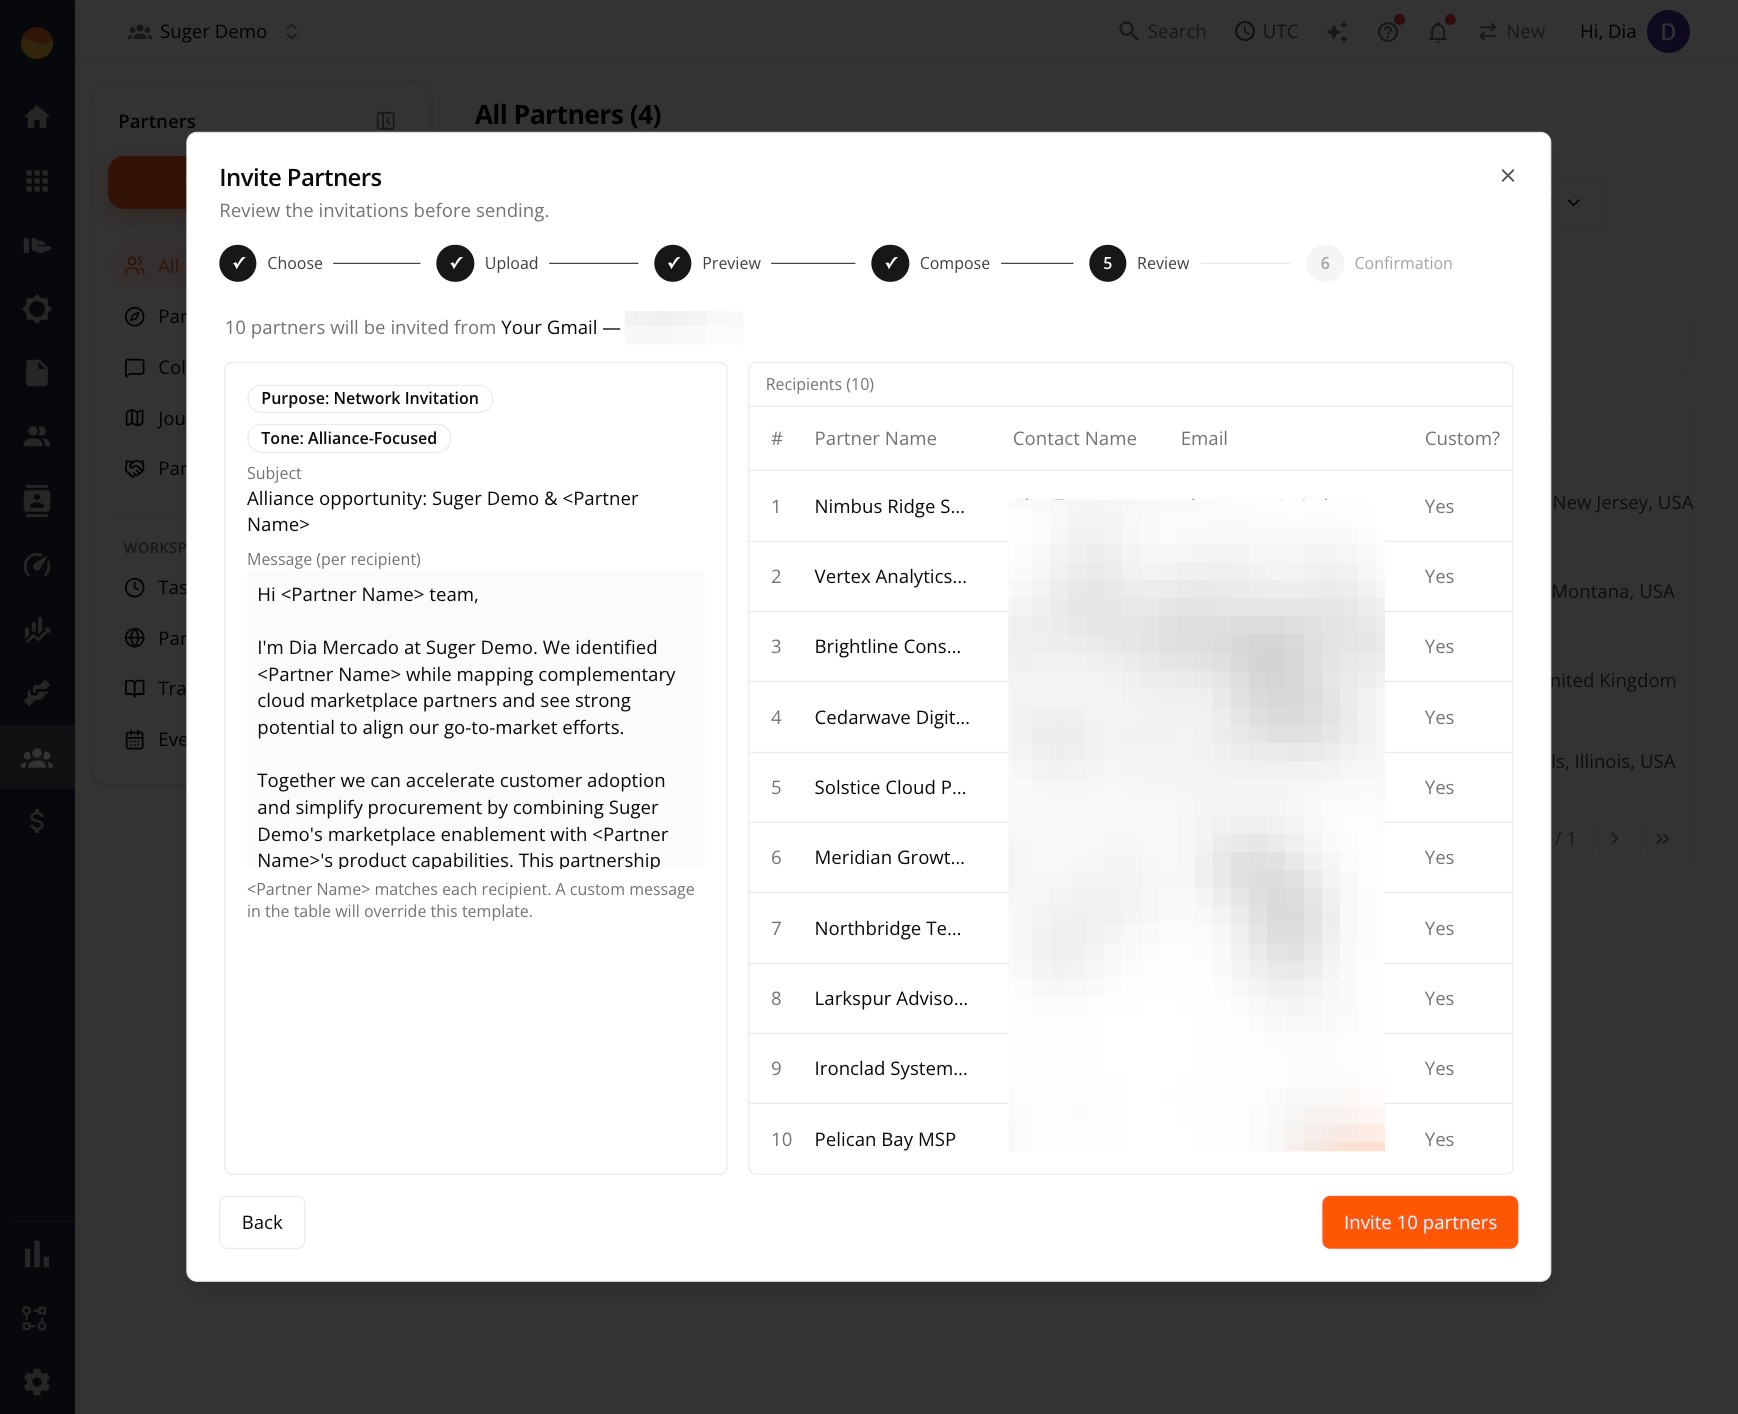
- Review the Purpose, Tone, Subject, and message template.
- Check the Recipients table to confirm every partner and email address is correct. The Custom? column shows Yes for any partner using their own CSV message instead of the shared template.
- Click Invite [number] partners to send.
Step 7: Confirmation
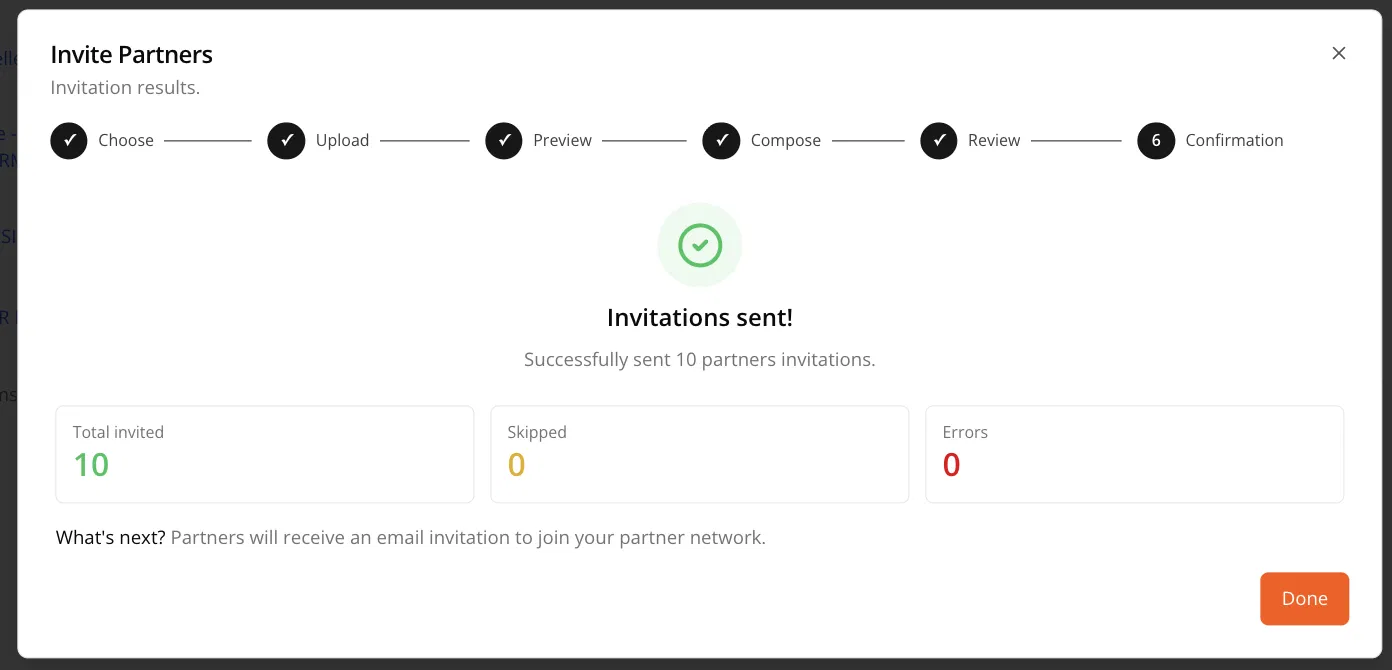
Suger shows how many invitations were sent, along with counts for Skipped and Errors. Each partner that wasn’t sent is listed underneath with its email, a status, and the reason:
- Invitation pending — the company already has an open invitation or application with you, including one that an earlier row of the same file has just sent. See One Open Invitation per Company.
- Skipped — the company is already one of your linked partners.
- Failed — anything else. The reason says what went wrong.
The rest of the batch still goes out. Click Done to close the wizard.
Once sent, all invited partners appear under Pending invitations on the All Partners page until they accept.
Next step
Once you’ve sent your invitations, see Track Partner Collaborations to follow their status and know when to follow up on ones that have gone quiet.
Spotted something wrong or out of date on this page? Tell us and we'll correct it.