
AWS Support Cases
Open AWS support cases and follow up on AWS’s replies from the Suger Console, without switching to the AWS Support Center.
Overview
Once you connect the AWS Support integration, Suger can talk to the AWS Support API on your behalf. From the Suger Console you can:
- Open a case with AWS — pick the service and category, set a severity, and write the subject and description.
- Open a case in context — start a pre-filled case directly from an AWS offer, entitlement, or product.
- Attach files — add up to 3 files, 5 MB each, to a new case or to a reply.
- CC colleagues — copy up to 10 email addresses on the case correspondence.
- Read the correspondence — the messages AWS and your team have exchanged on the case.
- Reply to AWS — add a message to an existing case.
What the console does not do yet
| Not available in Suger | Where to do it instead |
|---|---|
| Resolving, closing, or reopening a case | AWS Support Center |
Cases you open through Suger are ordinary AWS support cases, so they are also visible and fully manageable in the AWS Support Center under the same AWS account.
Prerequisites
An eligible AWS Support plan
The AWS Support API is only available on Business, Enterprise On-Ramp, and Enterprise Support plans. On a Basic or Developer plan the integration cannot be verified, and Suger reports:
AWS account does not have a Business, Enterprise On-Ramp, or Enterprise Support plan required to use the AWS Support API
Suger permissions
| Suger role | Connect or edit the integration | Read cases | Open a case | Reply to a case |
|---|---|---|---|---|
| Admin | Yes | Yes | Yes | Yes |
| Editor | No | Yes | Yes | Yes |
| Viewer | No | Yes | No | No |
Cases are visible to your whole organization, not only to the person who opened them — anyone with read access sees the same list and the same correspondence.
Connect the AWS Support integration
The integration is separate from your AWS Marketplace integration — connecting AWS Marketplace does not grant Suger access to the AWS Support API. You grant that access with an IAM role that Suger assumes. Connecting it requires the Suger Admin role.
-
In the Suger Console, go to Settings → Integrations and find the AWS Support card.
-
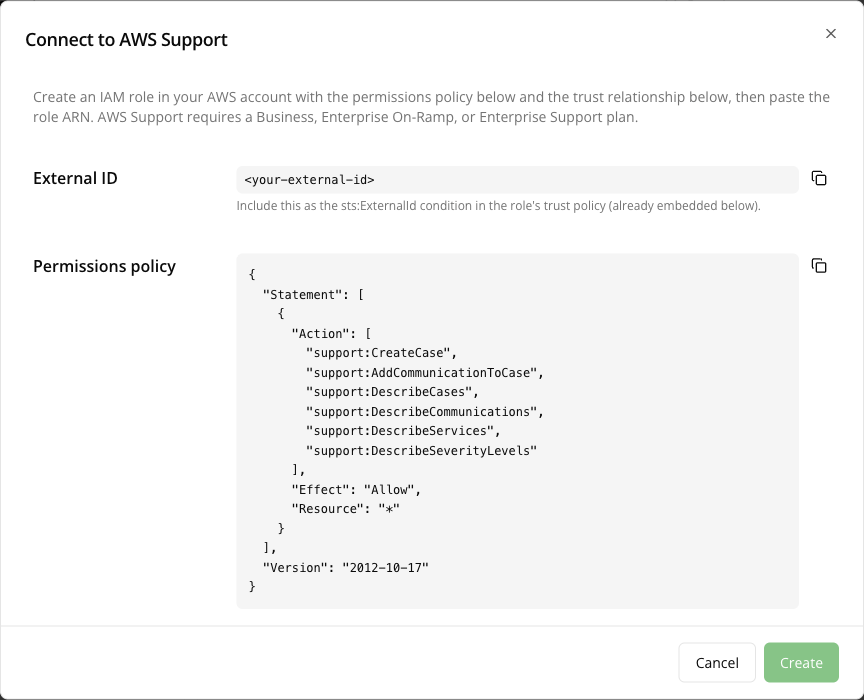
Click Connect. The Connect to AWS Support dialog shows everything you need to create the role: your External ID, a Permissions policy, and a Trust relationship.
-
In the AWS IAM console, create a role in the AWS account that holds your Support plan. Any role name works; the dialog’s example uses
SugerAwsSupportAccess. Paste the Permissions policy as an inline policy and the Trust relationship as the role’s trust policy, copying both from the dialog.The permissions policy grants exactly the AWS Support API actions Suger uses, and nothing more:
Action Used for support:DescribeServicesThe service and category pickers on the create form support:DescribeSeverityLevelsThe severity picker, and the integration’s Verify check support:CreateCaseOpening a case support:DescribeCasesRefreshing a case’s status support:DescribeCommunicationsReading the correspondence on a case support:AddCommunicationToCaseReplying to a case support:AddAttachmentsToSetUploading file attachments on a case or a reply -
Copy the new role’s ARN, paste it into IAM Role ARN, and click Create. The ARN must be a commercial-partition IAM role ARN in the form
arn:aws:iam::<account-id>:role/<role-name>; AWS China (aws-cn) and GovCloud (aws-us-gov) ARNs are rejected. -
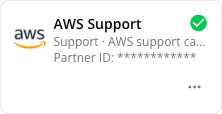
Suger verifies the connection by assuming the role and calling the Support API. Once the card shows the integration as verified, the AWS Support tab is ready.
Open a support case
-
In the Suger Console, click the help icon in the top bar to reach the Support page, then select the AWS Support tab.
-
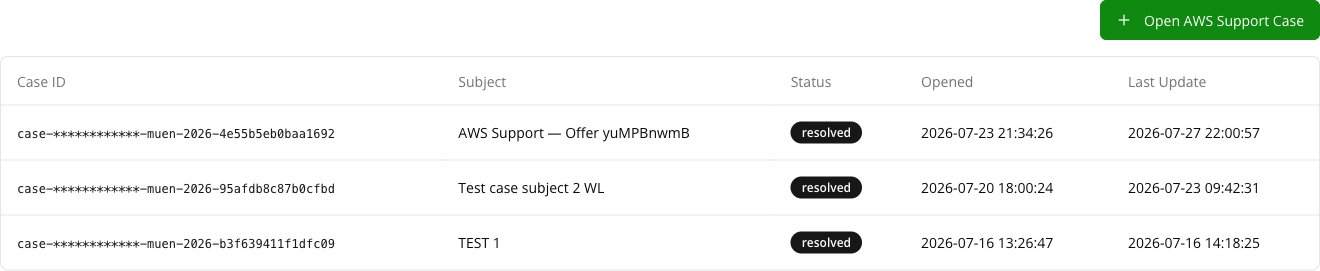
Click Open AWS Support Case.
-
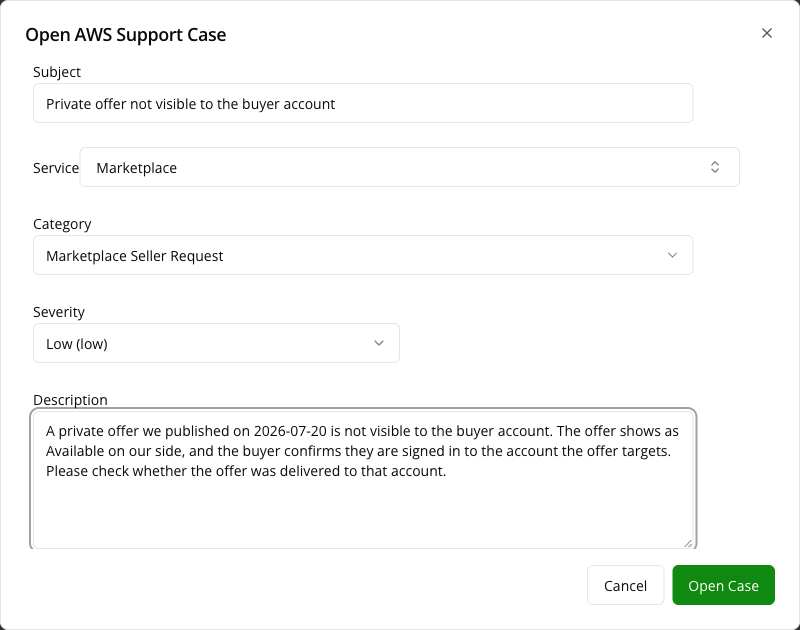
Fill in the case. The first five fields are required; Attachments and CC are optional:
- Subject — a short summary, up to 300 characters.
- Service — the AWS service the case is about. The list is read live from your AWS account, so it matches what the AWS Support Center offers. Suger preselects AWS Marketplace, because that is what most cases opened through Suger are about — change it if your case is about something else.
- Category — the case category. The options depend on the service, so pick the service first.
- Severity — the severity levels your Support plan entitles you to, shown as name and code. Suger preselects the first level in the list.
- Description — the details AWS needs, up to 8,000 characters.
- Attachments — up to 3 files, 5 MB each. Click Attach files to pick them; files beyond either limit are dropped with a message saying why.
- CC — up to 10 email addresses to copy on the case correspondence. Over the limit, the field reports “At most 10 cc addresses are allowed.”
-
Click Open Case. Suger creates the case in AWS and it appears in the list with its AWS Case ID.
Both limits are enforced by Suger’s API as well as by the form, so a case created through the Suger API is held to the same 3 files, 5 MB each, and 10 CC addresses.
Find a service quickly
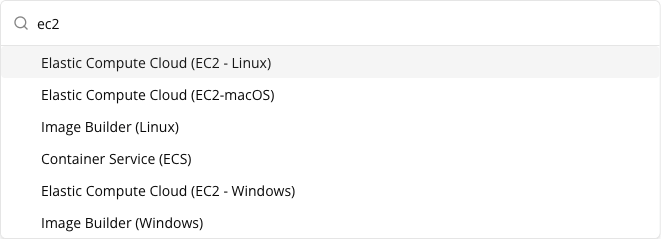
The service list is long, so the Service picker has a search box. The search is case-insensitive and matches on both the service name and its service code:
- Type any fragment that appears in the name or the code —
ec2finds every Elastic Compute Cloud entry. - Type several words in any order and each one has to appear somewhere —
linux ec2narrows to the Linux-specific EC2 entry. - Clear the box to get the full list back.
Open a case from an offer, entitlement, or product
When a case is about a specific record, start it from that record so the case is linked and pre-filled:
- Open an AWS offer, entitlement, or product detail page.
- In the ⋯ menu, click Create AWS Support Case.
- The dialog opens with the record’s identifiers already in the subject and description, and a banner naming the linked record. Adjust the text, pick the service, category, and severity, then click Open Case.
From an offer, the subject arrives as AWS Support — Offer <offer name>. AWS caps a case subject at 300 bytes, so a long offer name is truncated to fit rather than being rejected on submit. You can edit the prefilled subject before you send it.
The menu item appears only on AWS records, only once the AWS Support integration is verified, and only for users who can open cases — Viewers don’t see it.
Track and reply to a case
The AWS Support tab lists every case your organization has opened through Suger, newest first, with its Case ID, Subject, Status, Opened date, and Last Update.
Click a Case ID to open the case. Suger fetches the current status and the correspondence from AWS, then shows the messages oldest-first, each with its author and timestamp.
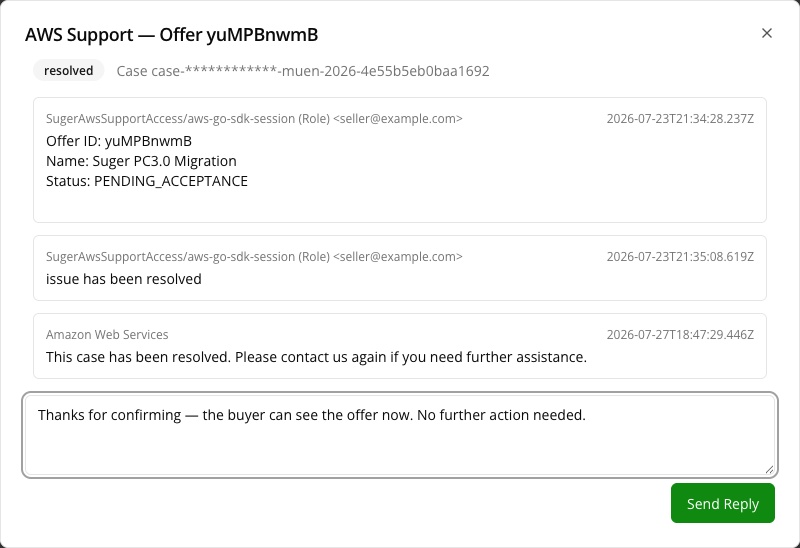
To respond, type in the reply box and click Send Reply — up to 8,000 characters. A reply takes the same Attachments (up to 3 files, 5 MB each) and CC (up to 10 addresses) as a new case. AWS adds your message to the case correspondence, exactly as if you had replied in the AWS Support Center. Admins and Editors can reply; Viewers can only read.
Who sent each message
Every message in the thread is labeled with its sender:
| Message | Shown as |
|---|---|
| Sent from Suger | The email address of the person who sent it |
| Sent from Suger before per-user attribution shipped | Suger |
| Sent by an AWS support agent | Whatever AWS reports, unchanged |
Because AWS records the case against the IAM role Suger assumes, older messages cannot be attributed to an individual after the fact — they keep the generic Suger label. New messages carry the sender’s email from the moment they are posted.
Use AWS Support in the new console
If your team works in the new console — the desktop you switch to with New in the console top bar — AWS Support is also an app there. It is the same feature, not a second integration: the same verified AWS Support integration, the same AWS account, and the same cases, so a case opened in one view appears in the other, and in the AWS Support Center.
AWS Support is not pinned to the Dock. Open it from the Search apps… launcher in the System Bar — click it, or press Cmd/Ctrl + Space — then type AWS Support.
Until your organization has a verified AWS Support integration, the app shows AWS Support is not connected and names the support plans it requires. Connect it as described in Connect the AWS Support integration.

The case list, the create form, and the reply thread work as described above, with four differences:
- The create button is labeled Open Case, at the top right of the window.
- The controls follow your permissions. Opening a case and replying are permissioned separately, so a role that can read cases but not open them sees no Open Case button, and one that cannot reply sees no reply box — rather than hitting a permission error after filling in a form.
- The Service, Category, and Severity lists load live from your AWS account. If they fail to load, the dialog says so and offers Retry; the form cannot be submitted until they load, because a case needs a real service and category code.
- A case opened from an offer shows the offer’s name in its header, with the identifier on the line beneath it, so a case titled after an offer ID is still readable months later.
FAQ
The AWS Support tab says the integration is not connected. What now?
The tab needs a verified AWS Support integration, which is separate from your AWS Marketplace integration. Follow Connect the AWS Support integration. If you just created it and verification failed, confirm the AWS account has a Business, Enterprise On-Ramp, or Enterprise Support plan.
The service dropdown is empty or shows an error.
Suger reads the service catalog live from AWS through the assumed role. If it can’t, check that the IAM role still exists, that its trust policy is unchanged, and that the permissions policy includes support:DescribeServices. Suger tells you when it can no longer assume the role — reconnect the integration in that case.
Why can’t I see all the severity levels AWS documents?
The list is read from your AWS account, so it shows exactly the levels your Support plan entitles you to — higher plans include more levels.
Can I attach a file or CC a colleague?
Yes, on both a new case and a reply. Attachments are limited to 3 files of 5 MB each, and CC takes up to 10 email addresses — AWS’s own limits, which Suger enforces before calling AWS so you get a clear message instead of a raw AWS validation error.
My attachment upload was denied. Why?
The IAM role Suger assumes needs support:AddAttachmentsToSet, which was added to the permissions policy when attachments shipped. A role created before then lacks it. Re-apply the current Permissions policy from the AWS Support integration card to the role — see Connect the AWS Support integration.
How do I resolve or close a case?
Close it in the AWS Support Center. Suger shows the resolved status the next time you open the case.
Why doesn’t my case appear right after I click Open Case?
A case shows up once AWS has accepted it and returned a case ID. If it doesn’t appear, check the error message on the dialog — AWS rejects requests that exceed its case-creation limit or fail its own validation, and Suger passes that message through.
Is this the same as a Suger support ticket?
No. The Support Tickets tab reaches the Suger team; the AWS Support tab reaches AWS. For questions about Suger itself, use Support Tickets or email Suger Support.
Related Documentation
- AWS Marketplace Integration
- Refunds and Cancellations
- AWS Support Center — the AWS-side view of the same cases
- AWS Support API reference
Spotted something wrong or out of date on this page? Tell us and we'll correct it.