
List Product
Create, test, and publish your AWS Marketplace listing for SaaS, Professional Services, AMI, and Container products.
Overview
AWS Marketplace allows buyers to purchase products using their AWS committed spend, streamlining procurement and accelerating sales. With Suger, you can list and manage your products effortlessly — we handle the complexity, so you can focus on growth.
Product vs Listing
- In Suger, a Product is the configuration object you manage in the Suger Console, including pricing, fulfillment, and marketplace settings.
- In AWS Marketplace, a Product is the listing that buyers see and purchase.
One Suger Product maps to one AWS Marketplace listing.
Prerequisites
Make sure the following are in place before creating your listing in Suger:
- AWS Marketplace — you must be a registered seller on AWS Marketplace. See Register as an AWS Marketplace seller.
- Suger — you need Admin access to the Suger Console. If you don’t have access yet, ask your company admin to invite you to the organization. See Manage Users and Roles.
Create the AWS Marketplace Product
Step 1: Start a new product draft
-
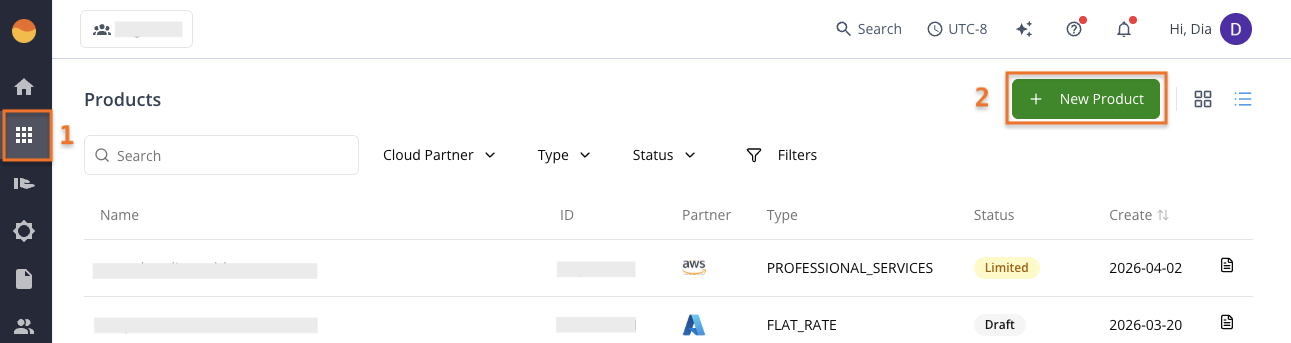
Go to the Product menu in the Suger Console, then click + New Product.
-
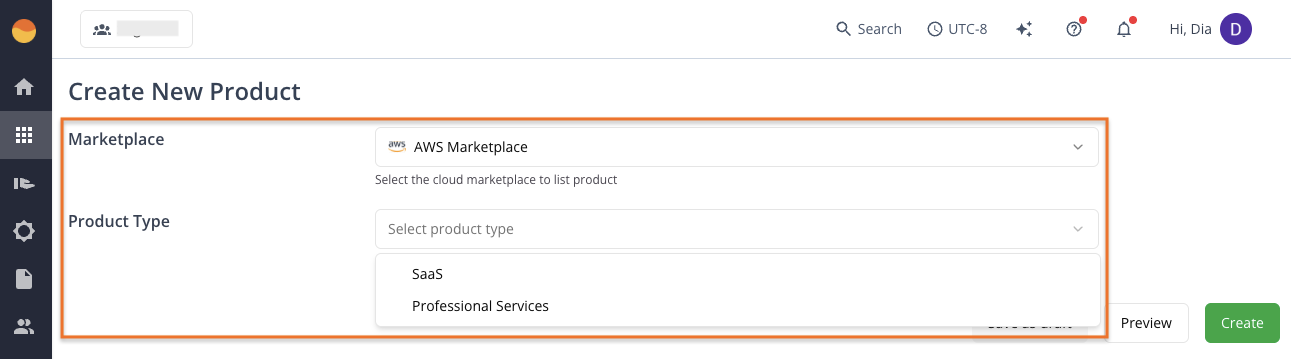
Select AWS Marketplace as the Marketplace.
-
Choose your Product Type:
- SaaS (Software as a Service) — software hosted on your infrastructure where buyers are granted access. This is the most common product type.
- Professional Services — consulting services related to AWS products, such as implementation, premium support, or training.
Step 2: Complete Basic Information
Review and complete the following fields:
- AWS Marketplace Integration — appears only when your organization has more than one AWS seller account connected (see Multiple Integrations). Choose the account to list the product under; the product, and the offers you create for it, belong to that account.
- Company Name — must exactly match the name registered in your AWS Public Profile. Mismatches can cause your listing to be rejected.
- Product Title — the public name buyers see. Use title case, keep it descriptive, and avoid marketing superlatives like “the best” or “the only.”
- Product Category — select up to 3 relevant categories to help buyers discover your product. See the AWS product categories; the full list is in the Suger Console dropdown.
- Short Description — 1–2 clear sentences focused on core value and keywords. Up to 1,000 characters is allowed, but anything past ~188 characters is hidden behind “Show more”, so put important info upfront.
- Long Description — short, readable paragraphs covering the customer problem, your solution, key features, and any technical prerequisites (integrations, compliance certifications, system requirements). Up to 5,000 characters, but only the first ~188 show before collapsing under “Show more”.
- Company Logo — upload in
.pngor.jpgwith a white or transparent background, between 120 and 640 pixels, in a square (1:1) or wide (2:1) aspect ratio, matching the branding in your AWS Marketplace seller profile. - Highlights 1–3 (at least 1 required) — short, punchy bullet points focused on your product’s primary benefits and differentiators. Each highlight can be up to 500 characters and is formatted as a single bullet.
- Search Keywords (up to 15) — keywords or short phrases buyers might use when searching. Each can be up to 50 characters. Press Enter, comma (,), or semicolon (;) after each keyword to add it. Mix broad and specific terms.
- Resources (up to 3 files, required) — link to content that helps buyers evaluate and deploy your product, such as user guides, API documentation, FAQs, or video tutorials. These appear under “Additional Support” on your listing.
- Support Details (required) — include your support email, available hours (with time zone), and expected response time so buyers know how to reach you after purchase.
- EULA — the legal contract between you and the buyer. Every AWS Marketplace listing must have one:
- AWS Standard Contract (SCMP) — a pre-written contract widely accepted by enterprise legal teams. Choosing this speeds up procurement since many buyers have already pre-approved the SCMP internally. Learn more in the AWS standardized license terms guide.
- Custom EULA — your own agreement uploaded as a PDF. Choose this if your legal team requires specific contract language. Every buyer’s legal team must review it from scratch, which can add weeks to procurement.
- For private offers, you always have the option to attach a specific agreement for that buyer.
AI API Products
Only enable the AI API Product toggle if you are listing an AI Agent, MCP Server, Knowledge Base, or Guardrail. When enabled, additional fields appear:
- Endpoint URL — the public URL where your API receives requests. Must use HTTPS and be publicly accessible (e.g.
https://api.yourproduct.com/v1). For MCP servers, use your MCP endpoint URL. - Authorization Method — how buyers authenticate. Choose API Keys for simplicity, or OAuth for enterprise buyers who need SSO or fine-grained access control.
- Type — the category that best describes your product: AI Agent, MCP Server, Knowledge Base, Guardrail, or Other. See the AWS AI agent products overview for definitions.
- API Usage Instructions — a plain-English guide telling buyers how to start using your API after subscribing (authentication steps, endpoints, rate limits, error codes, and a link to your full documentation). Supports Markdown.
- API Specification — optional but recommended. Upload or link to your OpenAPI spec (YAML or JSON). Required if you want your product to integrate with Amazon Bedrock AgentCore.
- API Integration Protocols — optional. Select MCP if your product is an MCP server, or A2A if your agent communicates with other AI agents. Leave blank for a standard REST API.
Step 3: Complete Pricing Information
Pricing differs depending on product type.
SaaS
AWS offers three pricing models for SaaS listings: Subscription, Contract, and Contract + Subscription Combined. We recommend the Contract + Subscription Combined model for most SaaS listings, even if you only plan to sell fixed contracts today. In the Suger Console this means filling out both the Contract Commitment and Usage Metering sections.
There are two types of dimensions:
- Commit dimensions — fixed packages buyers pay for upfront (e.g. a “Pro Plan” for 12 months).
- Usage dimensions — pay-as-you-go charges based on consumption (e.g. extra hosts beyond their plan).
Set up the following fields:
Contract Duration Options — choose which contract lengths (1, 12, 24, or 36 months) are visible to buyers on your public AWS storefront. To sell annual contracts only, select just the 12-month option. The durations you select here determine which price fields appear when you add a commit dimension.
Contract Commitment — a commit dimension is a fixed package or tier a buyer can purchase. You can add up to 200 dimensions per SaaS listing (see Pricing for SaaS subscriptions). For each dimension, click + Add dimension and fill in:
- API Identifier — an internal code that identifies the dimension in the billing system. Buyers never see it. Must be unique, all lowercase, no spaces, and 15 characters or less (e.g.
premium_tieroradmin_user). You can’t change this once published. - Display Name — the name buyers see at checkout. Keep it under 24 characters (e.g. “Premium User Seat”).
- Description — a short explanation of what this dimension includes. Keep it under 70 characters (e.g. “Access for one administrator user”).
- 1 / 12 / 24 / 36 month price (one per duration you selected) — don’t enter your real prices yet. Leave all price fields at $0.01 for now.
Purchasing Options — controls how buyers interact with your dimensions at checkout:
- Allow buyers to purchase multiple dimensions — buyers can select more than one dimension and set quantities in a single purchase. Choose this for a-la-carte or seat-based models. Example: a buyer purchases 5 Admin Seats and 50 Read-Only Seats at once.
- Restrict buyers to a single dimension — buyers must choose exactly one dimension per purchase. Choose this for strict, mutually exclusive tiers. Example: a buyer must choose either the Basic Plan or the Pro Plan.
Usage Metering — usage dimensions define the pay-as-you-go charges for anything a buyer consumes beyond their base plan. Click + Add dimension for each and fill in:
- API Identifier — the internal code your software sends to AWS when reporting metered usage. Same rules as commit dimensions: lowercase, no spaces, unique (e.g.
extra_storageoroverage_fee). Only visible in billing reports, so it doesn’t need to be reader-friendly, and it can’t be changed after publishing. - Display Name — what buyers see on billing reports (e.g. “Extra Storage (GB)”, “Additional Usage Fee”).
- Price Per Unit — the amount charged each time one unit is consumed. Leave all price fields at $0.01 for now (same test-purchase reasoning as above).
- Description — a short, user-friendly explanation of what triggers the charge (e.g. “Storage consumed beyond the base plan limit”).
Professional Services
Professional Services listings work differently — you don’t set public pricing. Instead, you define the service packages or tiers you offer (dimensions), then attach custom pricing to those dimensions when creating a private offer for a specific buyer. All Professional Services products are sold through private offers, so pricing is always negotiated directly with the buyer.
For each service package, click + Add dimension (see Pricing dimensions) and fill in:
- API Identifier — an internal code that identifies the dimension. Buyers never see it. Must be unique, all lowercase, no spaces, and 15 characters or less (e.g.
migrationorconsulting_10h). You can’t change this once published. - Display Name — the name buyers see on the private offer checkout page (e.g. “Cloud Migration Assessment”, “10 Hours Consulting”).
- Description — a short explanation of what this service includes.
Repeat for each service package you want to offer.
Step 4: Save, Preview, and Create
- Save as Draft — saves your progress in the Suger Console without submitting anything to AWS.
- Preview — see exactly how your listing will appear on AWS Marketplace.
- Create — submits your product draft to AWS. Your listing’s status transitions from
DrafttoPending Create, and finally toLimitedvisibility once AWS validation succeeds.
Test and Publish Your SaaS Listing
Once you click Create, your product enters Limited visibility. The listing is live on AWS but hidden from the public — only you and any allowlisted accounts can access it for testing. Add your test buyer accounts from the listing’s More actions → Manage Allowlisted Accounts (see Allowlist AWS accounts on a Limited listing).
Set up your fulfillment URL
When a buyer purchases your product on AWS, their browser is sent to Suger through the fulfillment URL. Suger receives the purchase information from AWS, syncs the entitlement, and immediately redirects the buyer to your signup experience. Two fulfillment URLs are involved:
| Location | Purpose |
|---|---|
| AWS Marketplace | Sends the buyer to Suger after purchase |
| Suger Console | Configures the signup URL where buyers are redirected after Suger processes |
Step 1: Choose your signup experience
-
Option 1: Use your own signup page — choose this if you already have a dedicated page where new users register or log in. Copy the link to your existing registration or login page. Example:
https://your-company.com/signup. -
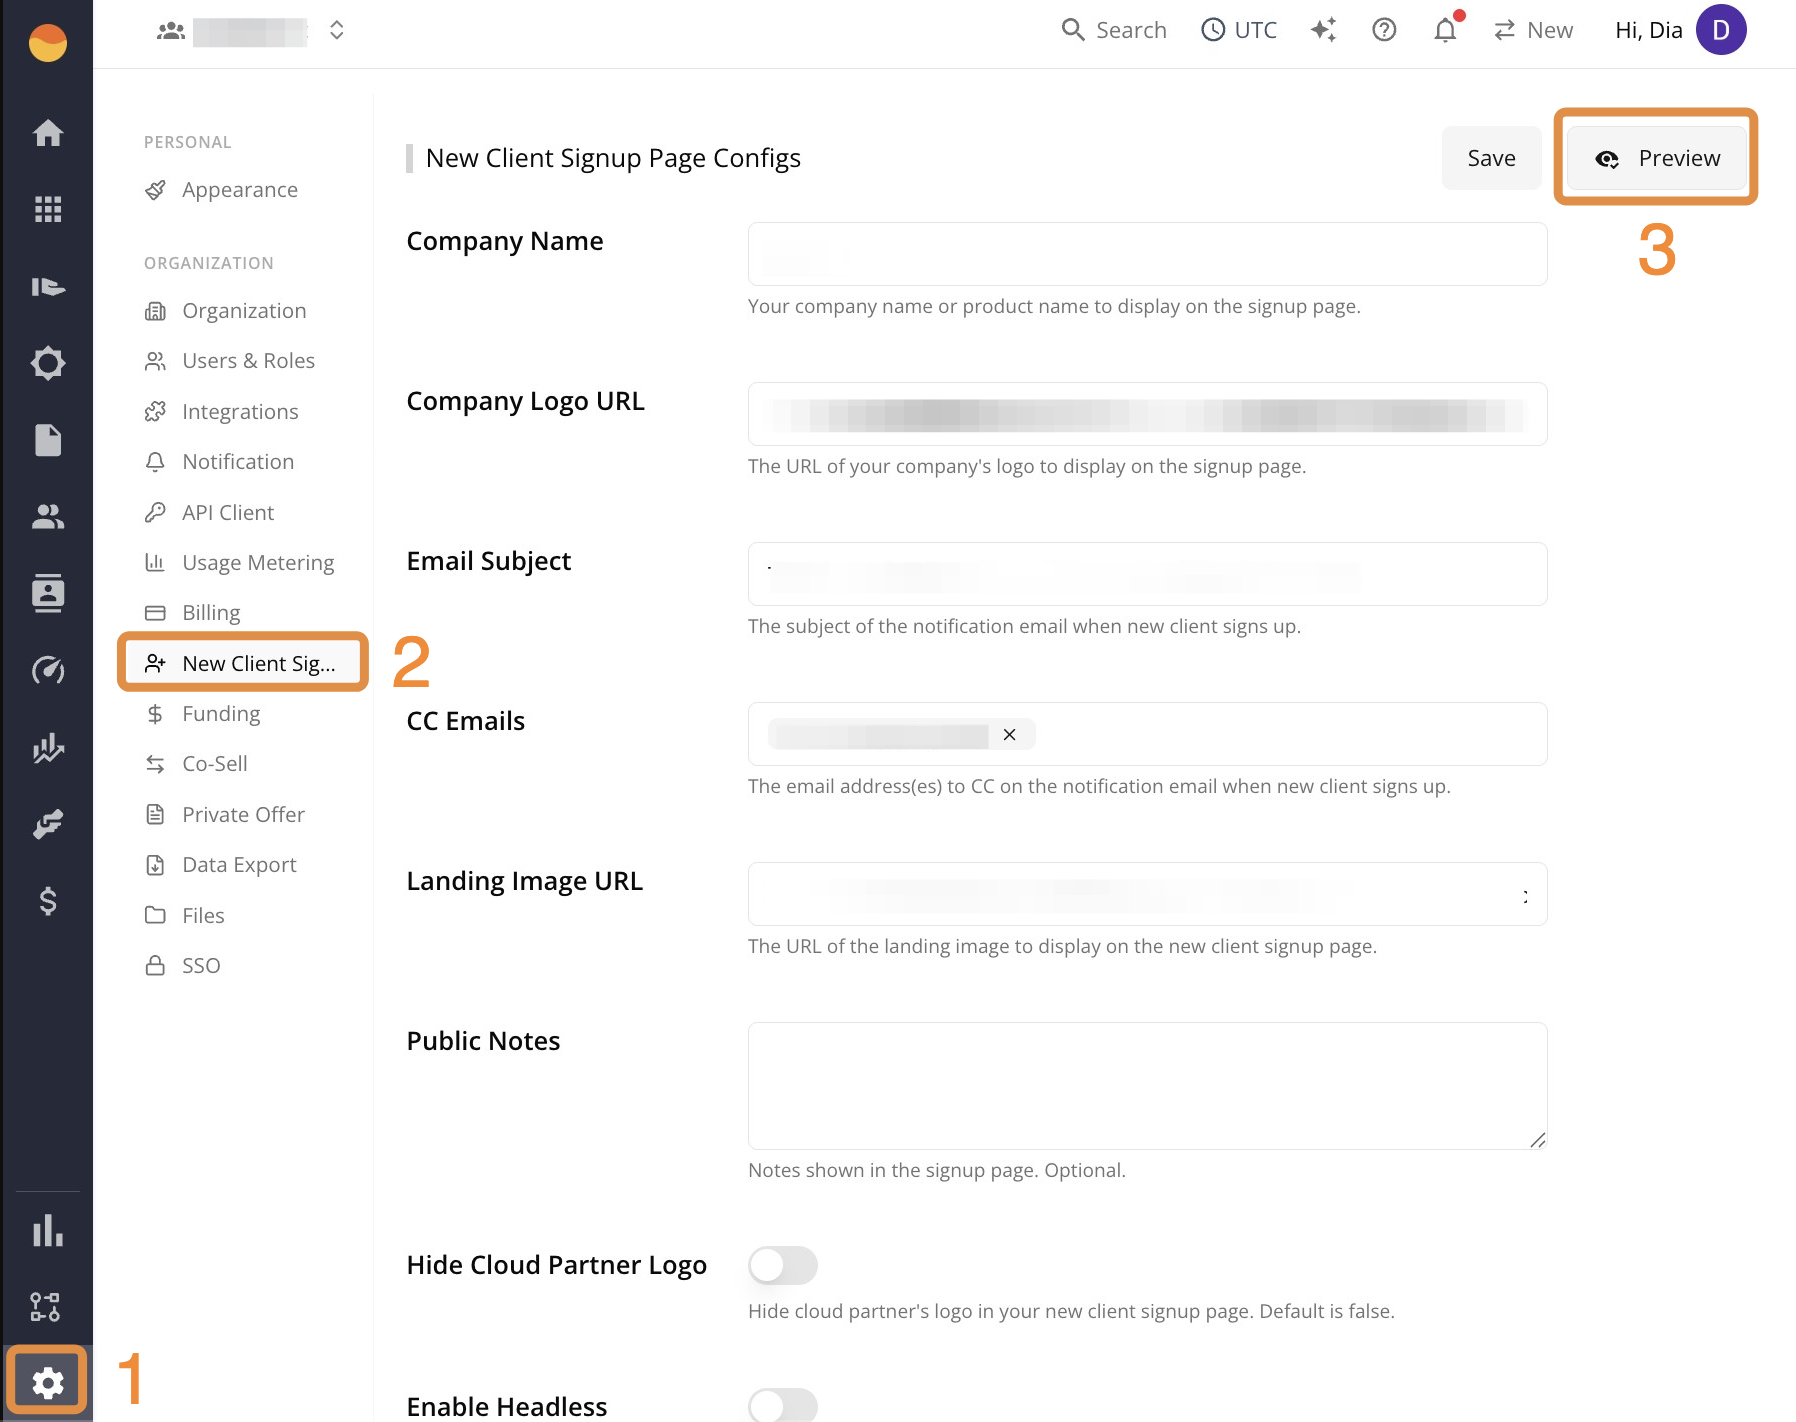
Option 2: Use Suger’s hosted signup form — if you don’t have a custom signup page yet. First configure it in the Suger Console under Settings → New Client Signup, then click Preview and copy the URL from the browser address bar.
Example:
https://api.suger.cloud/public/signup/newclient/YOUR_UNIQUE_ID.
Step 2: Add the fulfillment URL to your product in Suger
-
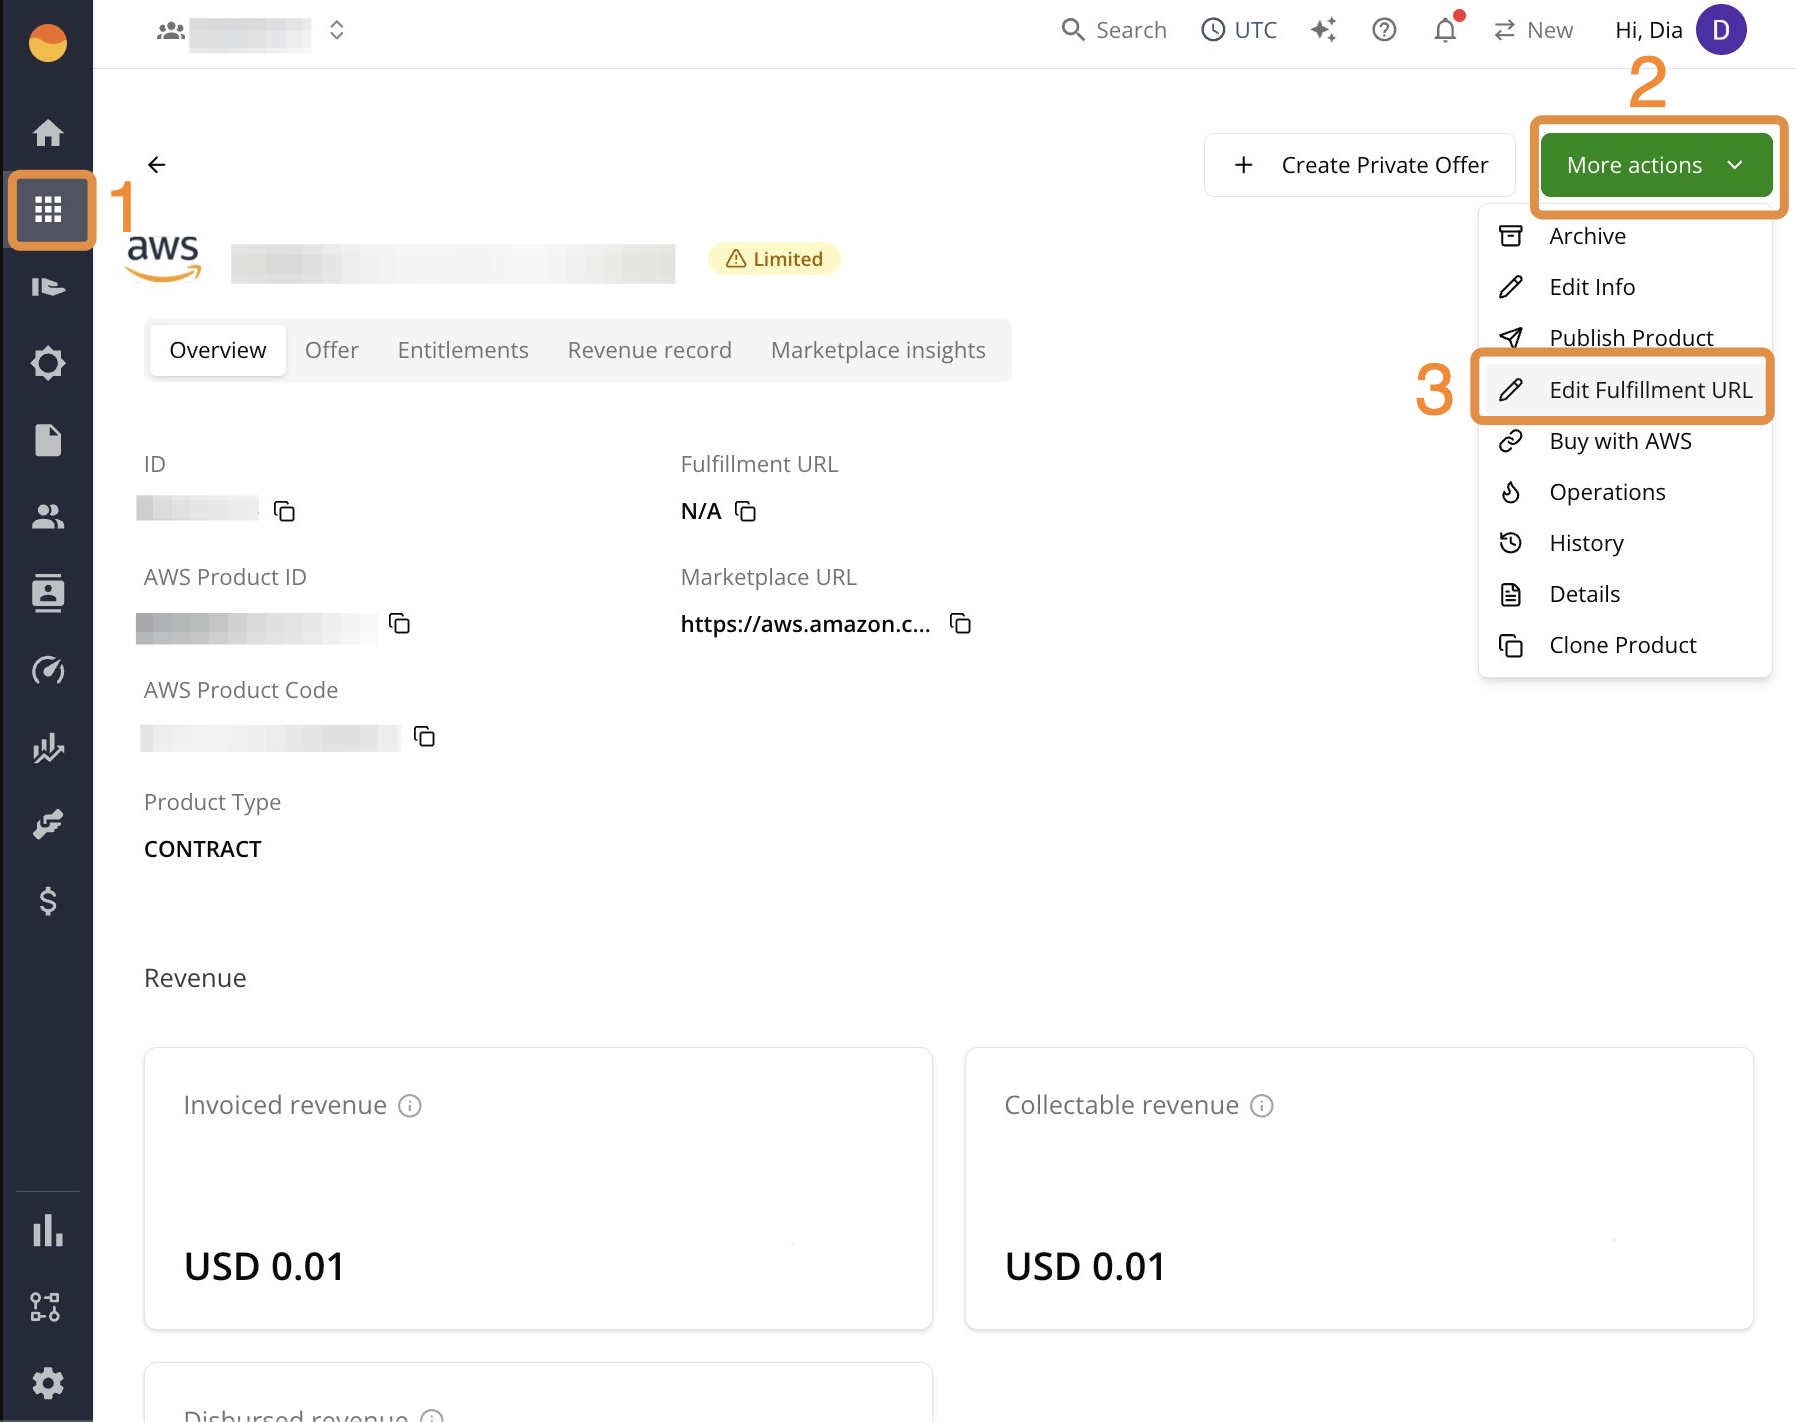
Go to the Products page and open your AWS product.
-
Click More actions, then Edit Fulfillment URL.
-
Paste the URL from Step 1, then click Save.
Step 3: Verify the AWS fulfillment URL
When you create a product in Suger, the AWS fulfillment URL may be configured automatically in your AWS Marketplace listing. If it’s not set correctly, update it manually using this format:
https://api.suger.cloud/public/signup/aws/orgId/YOUR_SUGER_ORG_ID?partnerId=
If the link doesn’t work, try removing the ?partnerId= suffix.
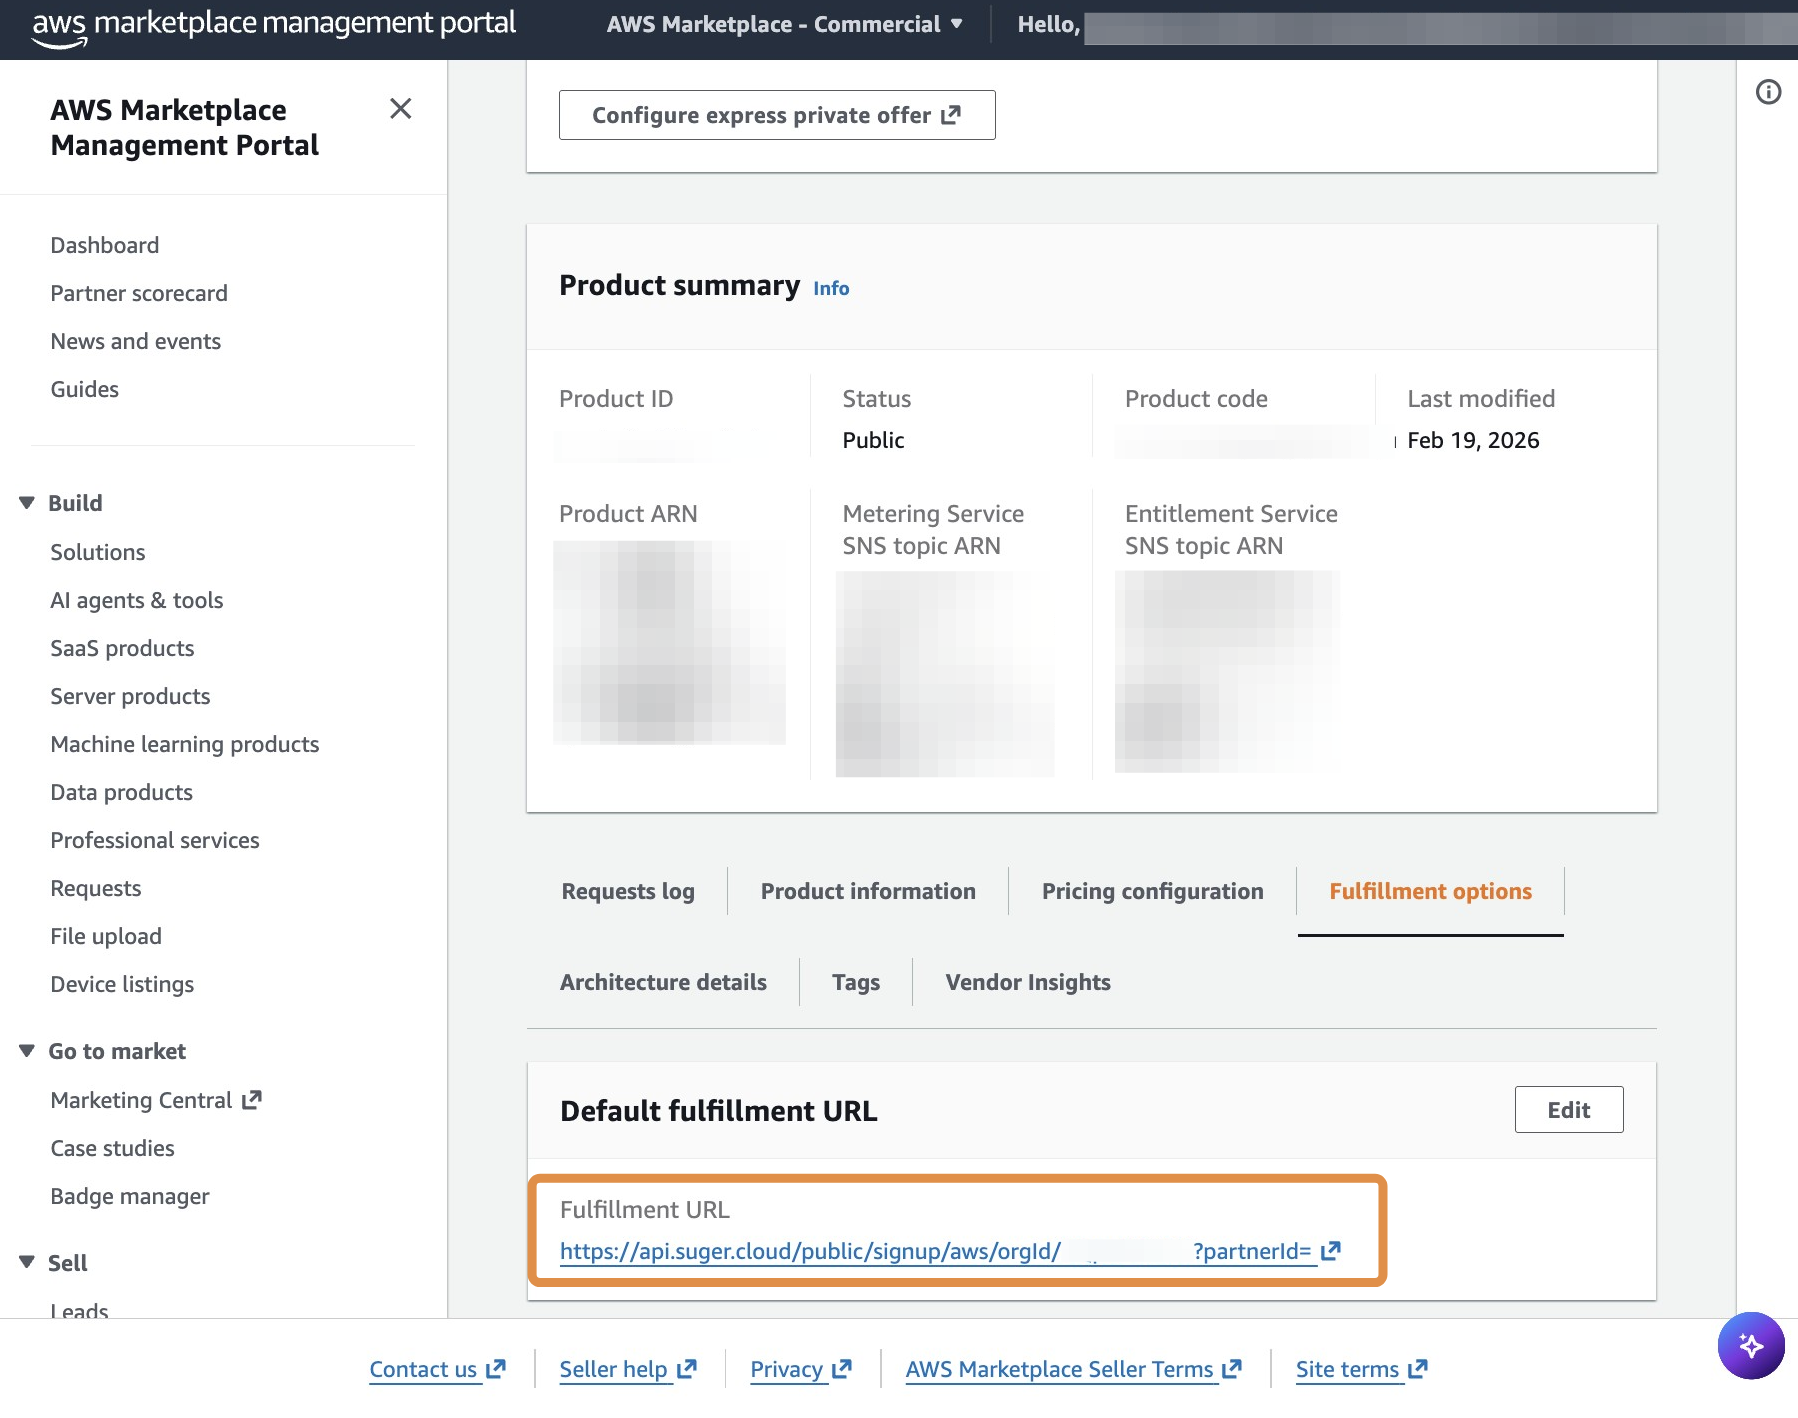
To locate the fulfillment URL field in AWS Marketplace, see AWS’s documentation on updating fulfillment options.
If the URL was not added automatically:
-
Go to Suger, then click Settings.
-
Select Organization. Your Organization ID is displayed there.
-
Replace
YOUR_SUGER_ORG_IDin the URL with that value, then copy it.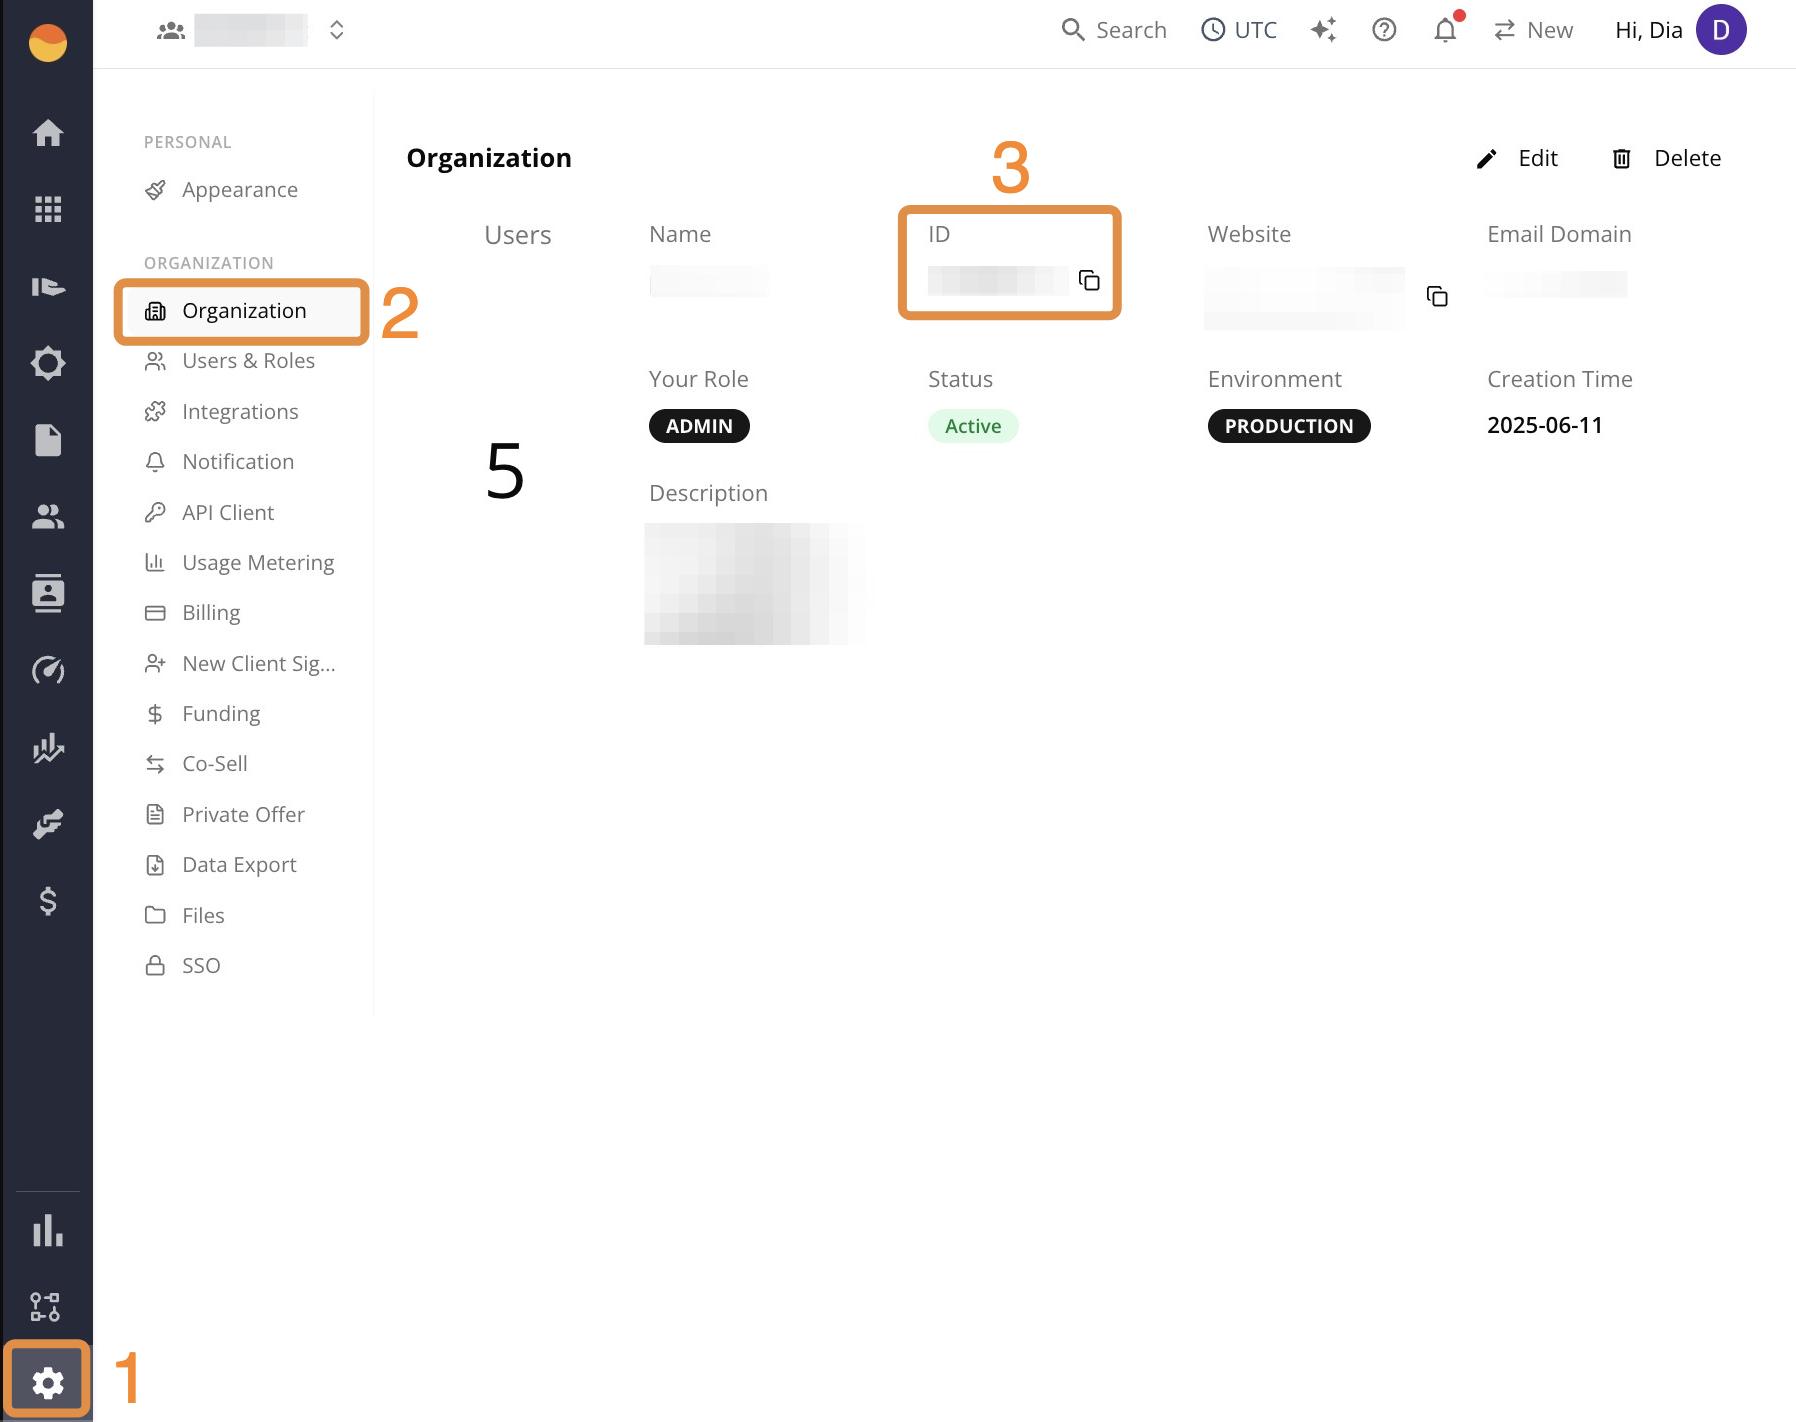
Step 4: Capture the entitlement ID (custom signup pages only)
If you’re using your own signup page, Suger appends a sugerEntitlementId parameter to the redirect URL. Your application must capture and store this value so the buyer account can be associated with the AWS Marketplace entitlement. See Signup URL Redirect for implementation details.
Run a test purchase
While your listing is in Limited visibility, AWS requires a full test purchase before you can submit for publishing approval. This validates your end-to-end fulfillment flow, confirms your fulfillment URL, and generates the active entitlement required for AWS listing approval.
Step 1: Access AWS Marketplace
-
Open Suger, then click the Settings menu.
-
Go to the Integrations tab.
-
Click Console on the AWS Marketplace card.
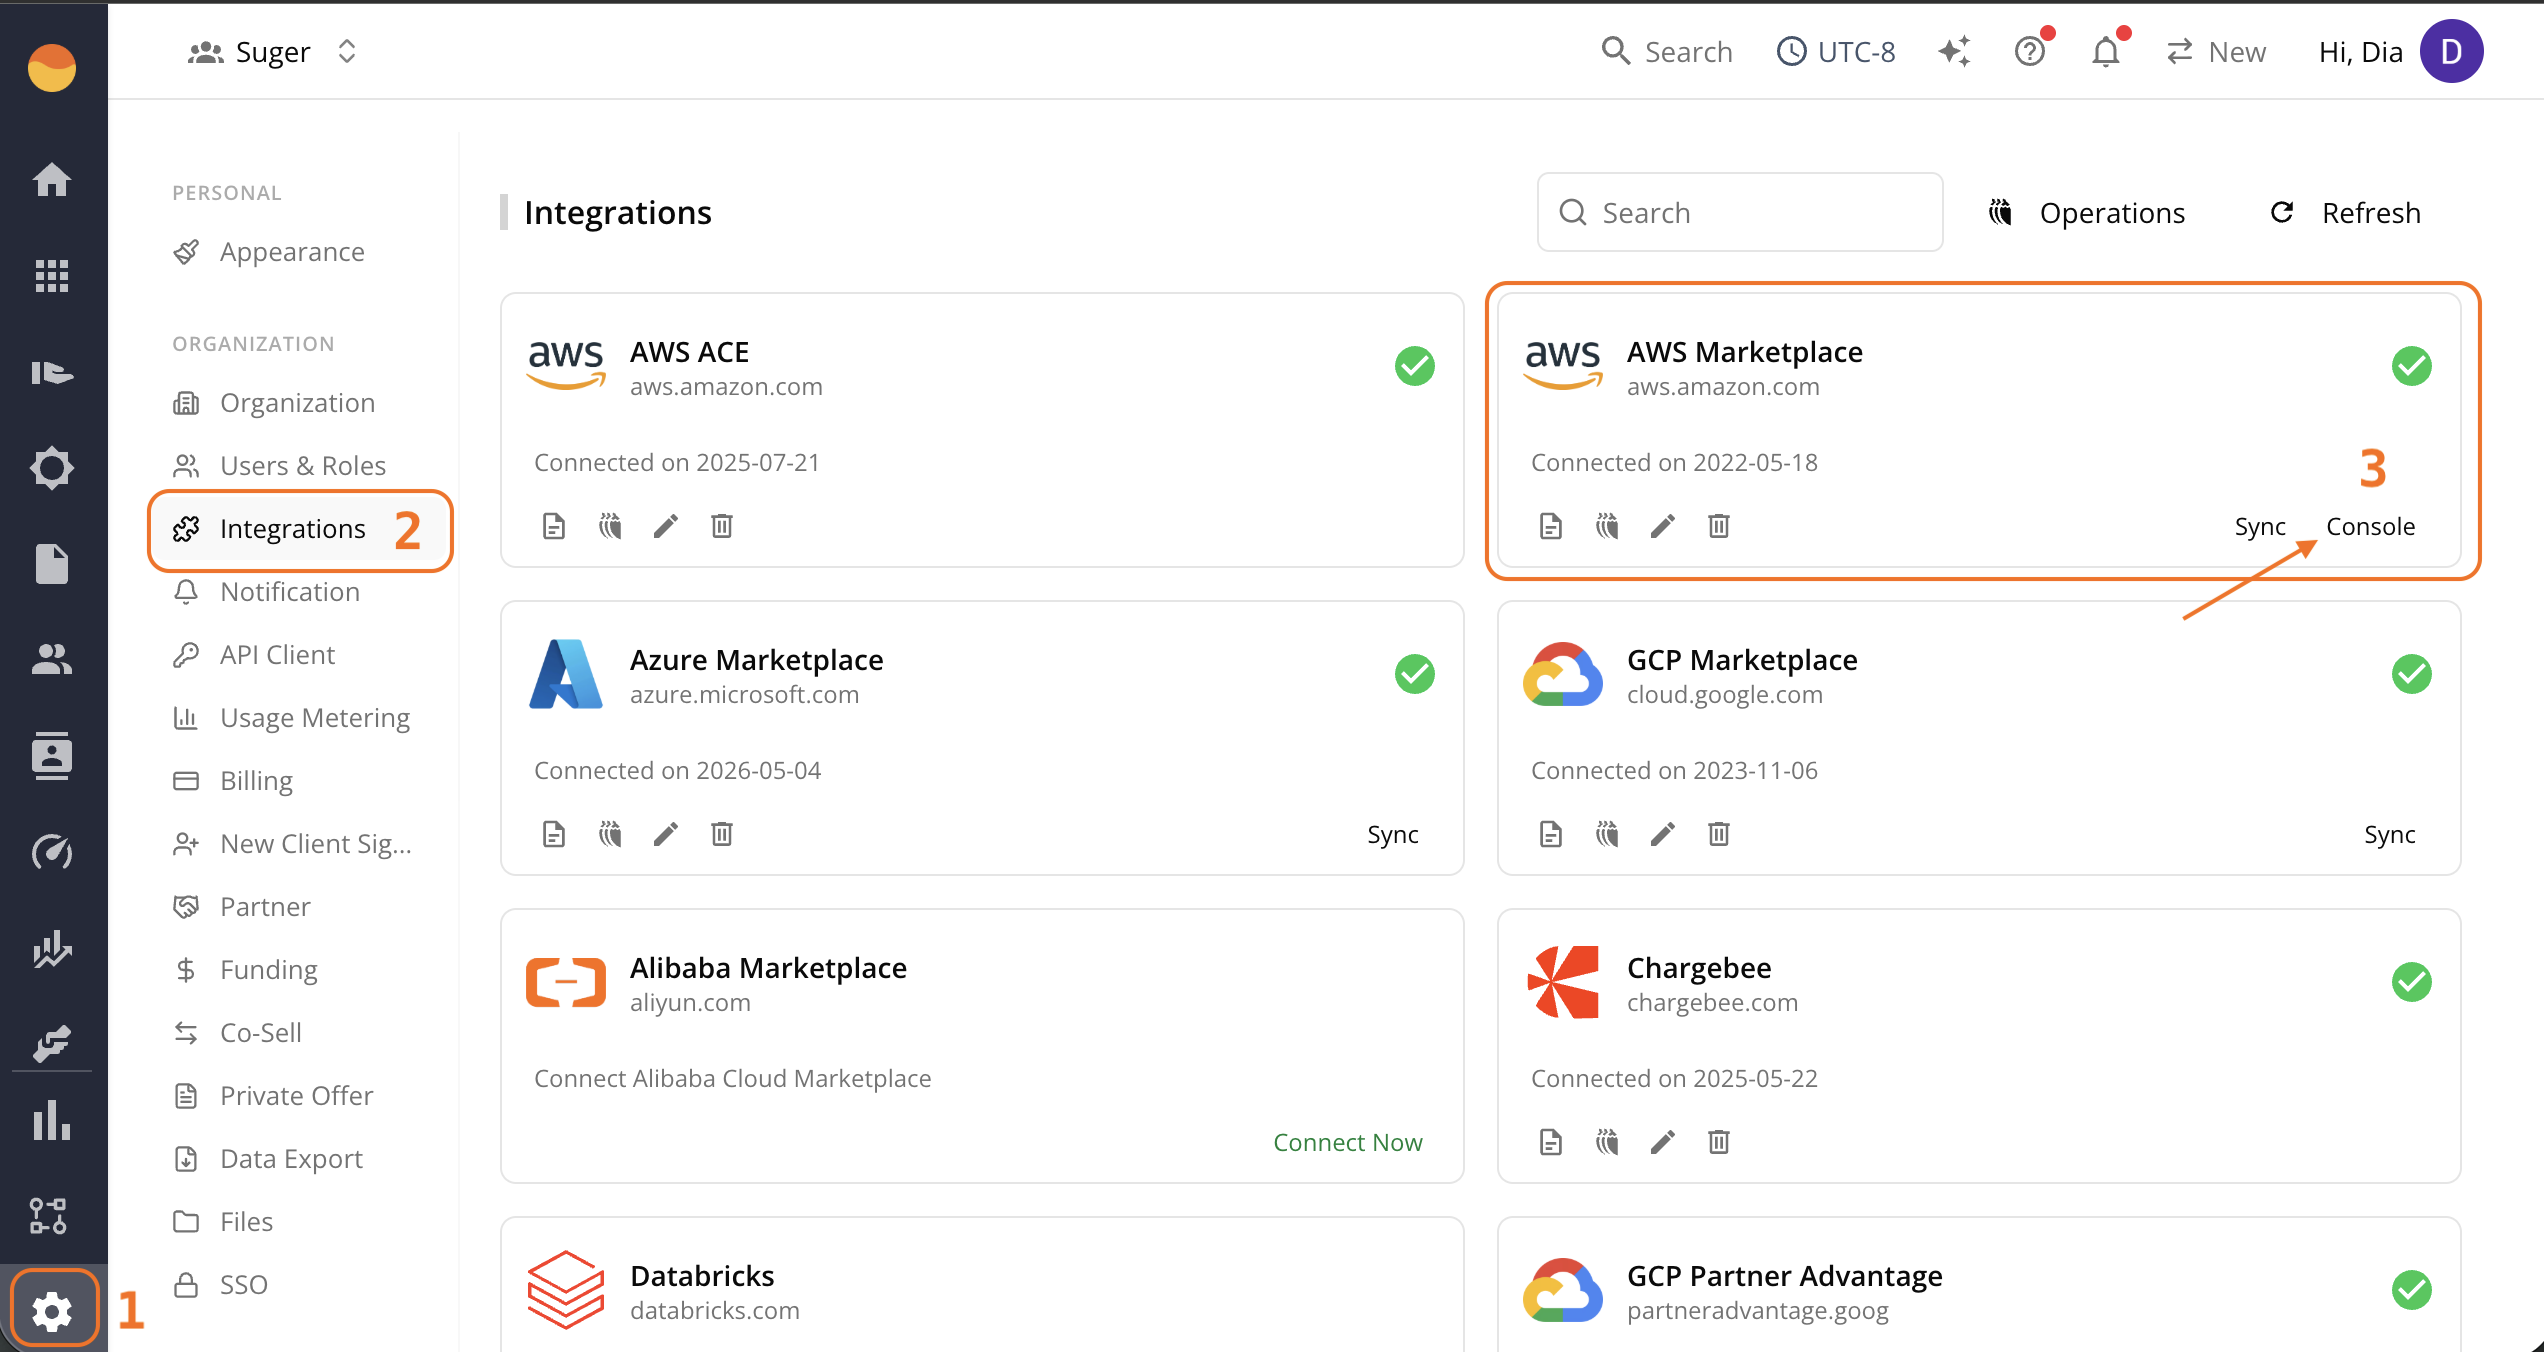
-
Open AWS Marketplace.
Step 2: Subscribe to the listing
-
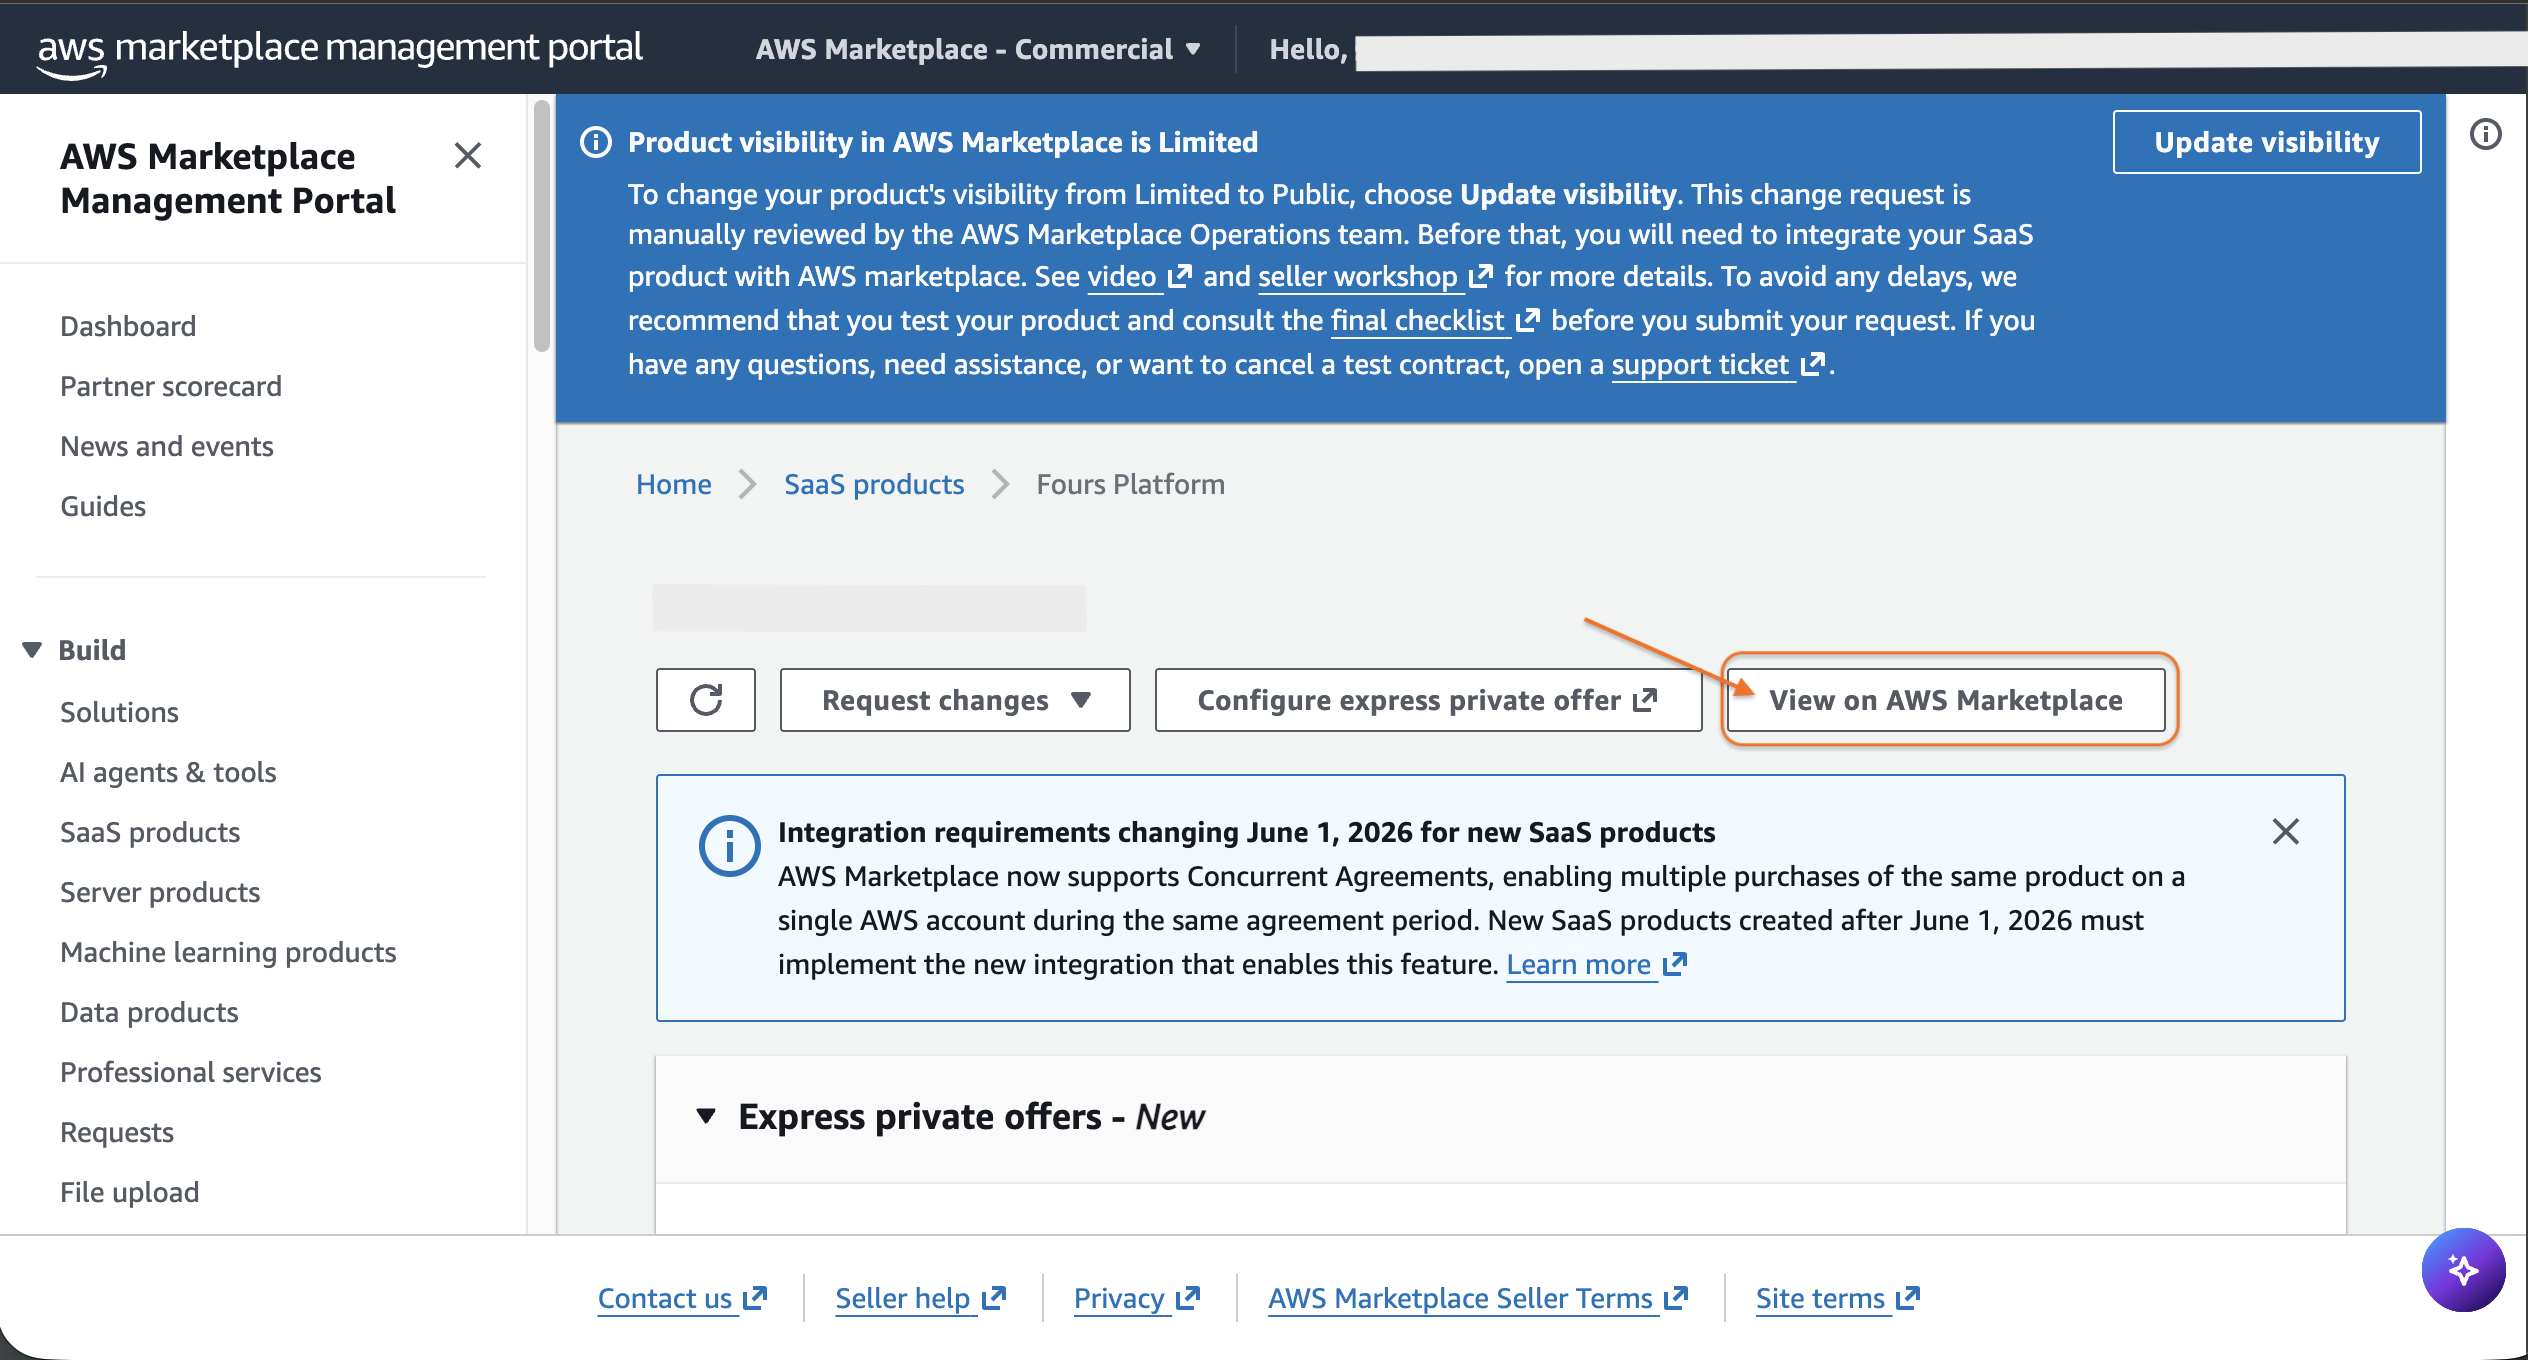
Click SaaS products from the Build menu.
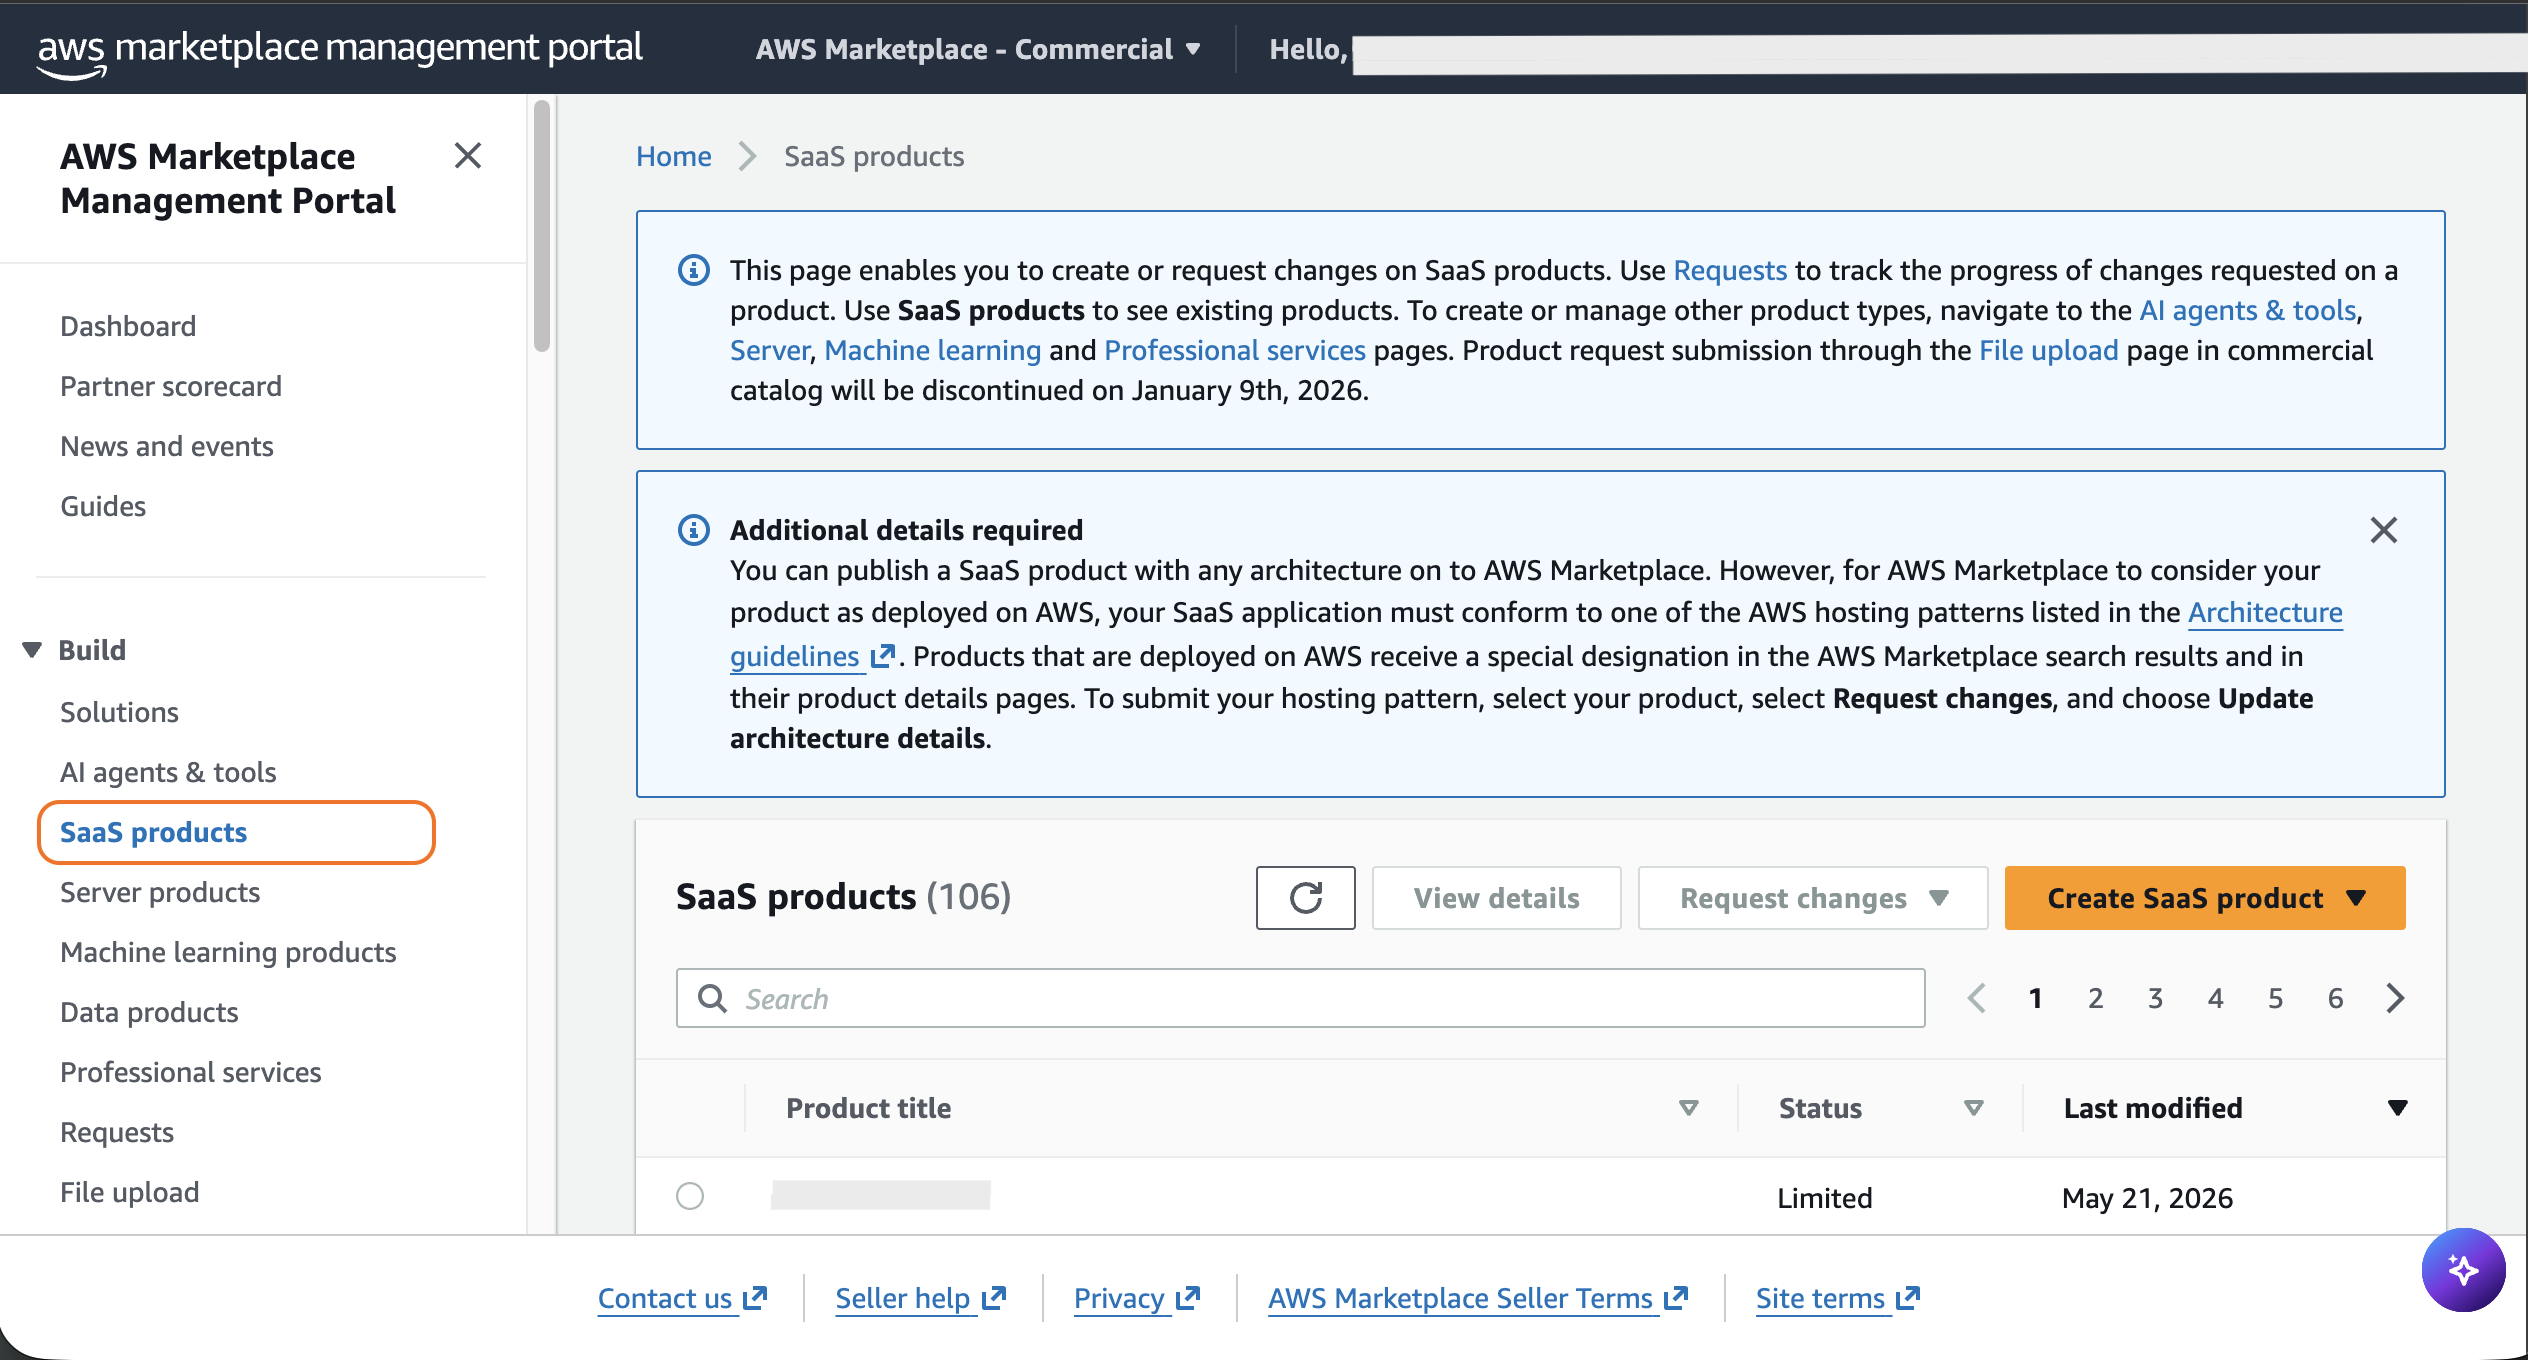
-
Find and open the SaaS listing you need to test.
-
Click View on AWS Marketplace.
-
Click View purchase options to open the subscription page.
-
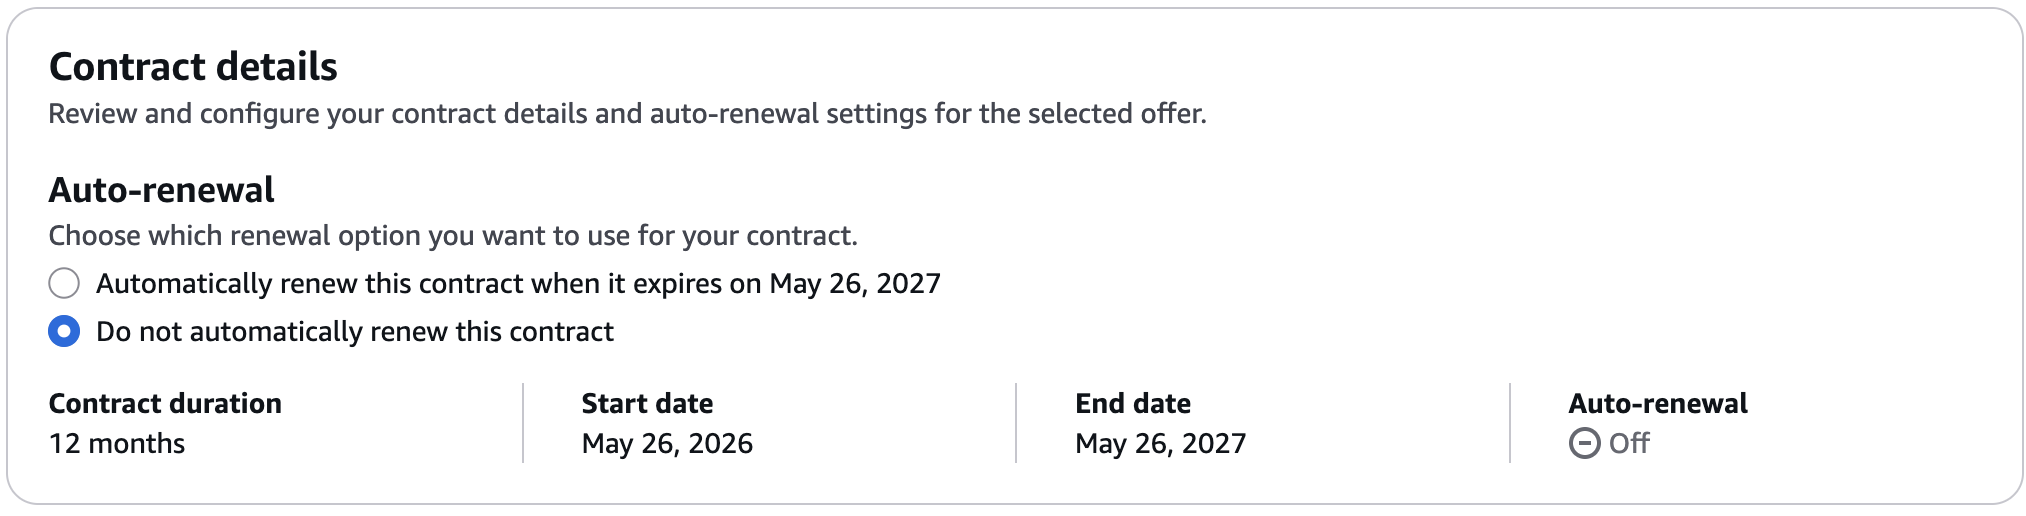
Under Contract details → Auto-renewal, select Do not automatically renew this contract.
-
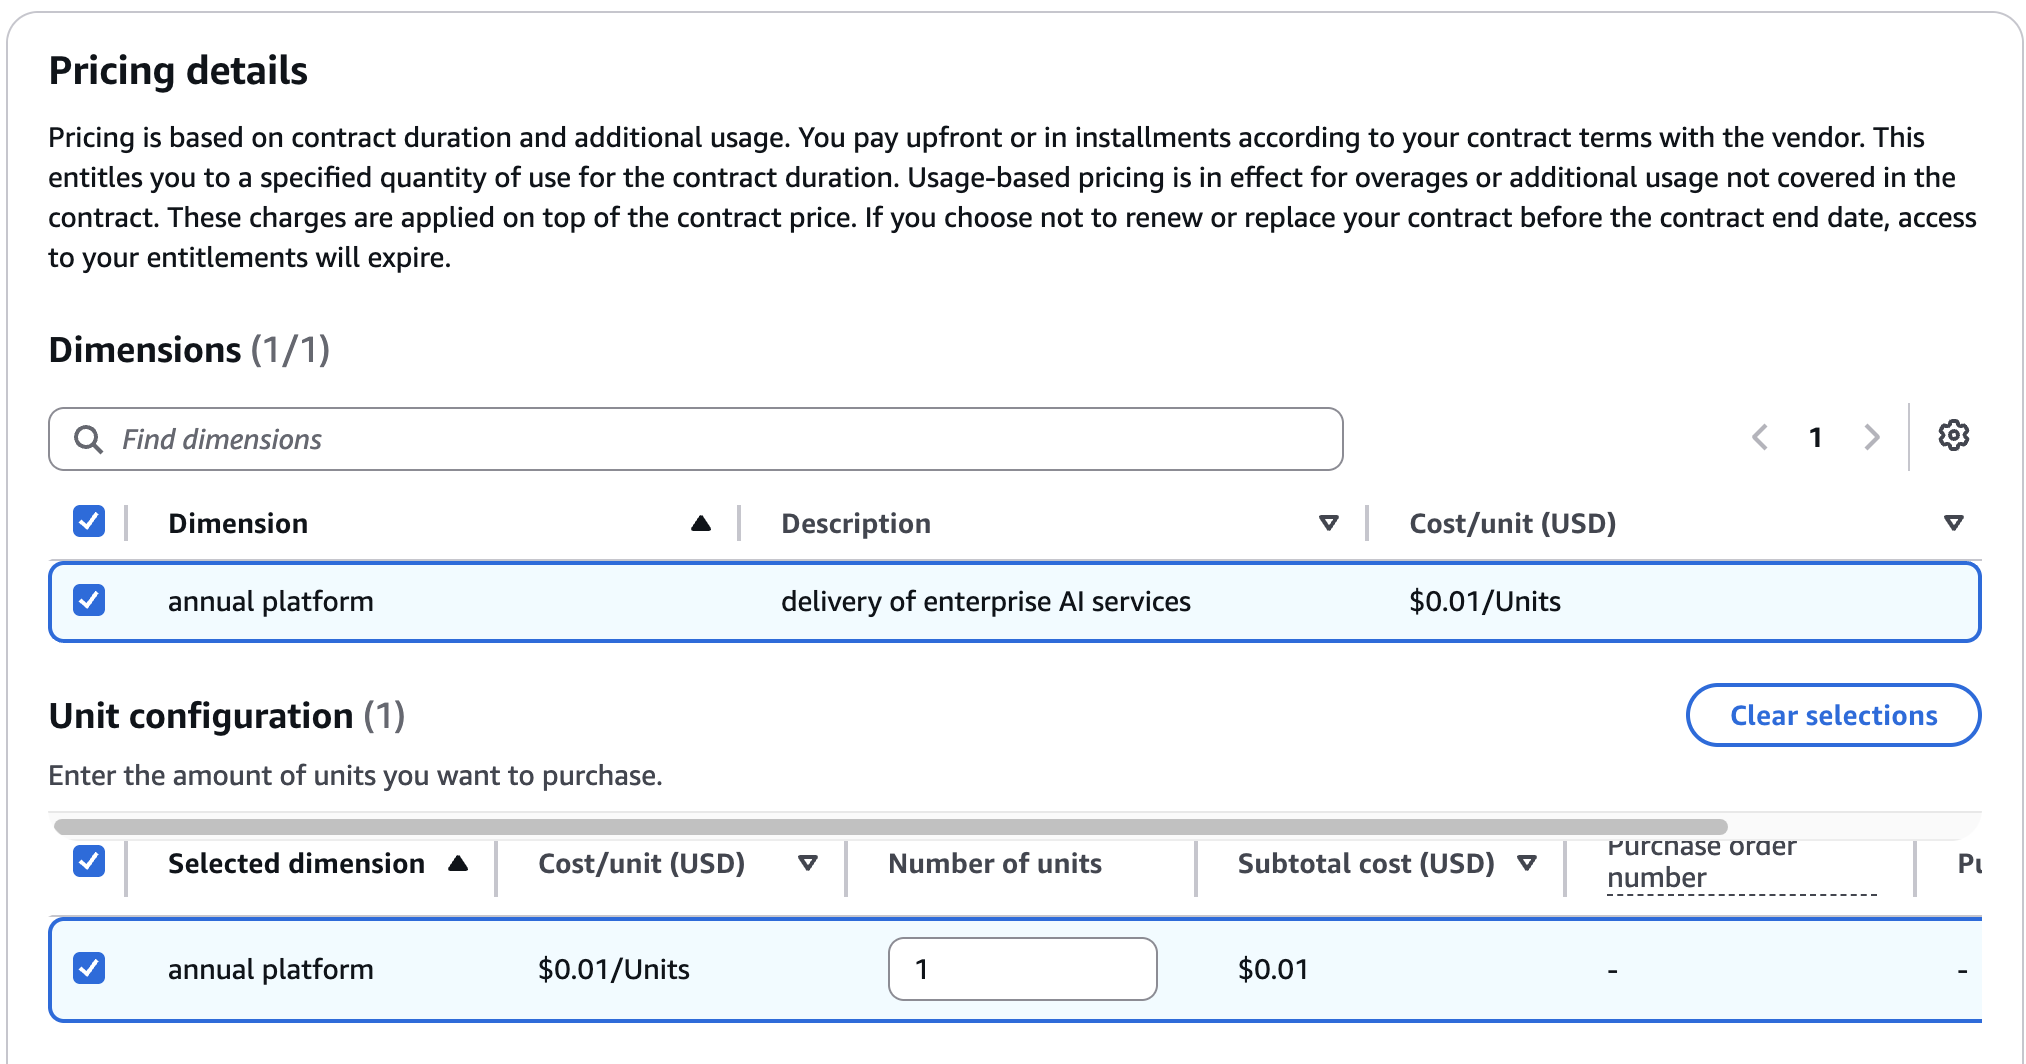
Under Pricing details, select the required dimensions for the listing.
-
Click Subscribe. AWS shows a confirmation screen.
-
Click Set Up Your Account. You should be redirected to your signup page or the Suger-hosted New Client Signup form, confirming the fulfillment redirect works. For details on how this redirect works, see Onboarding customers to your SaaS product.
-
Verify that you receive a confirmation email to create your account.
Step 3: Check the entitlement
AWS will not approve your listing without a successful test transaction on record.
-
Go to the Suger Console and open the product.
-
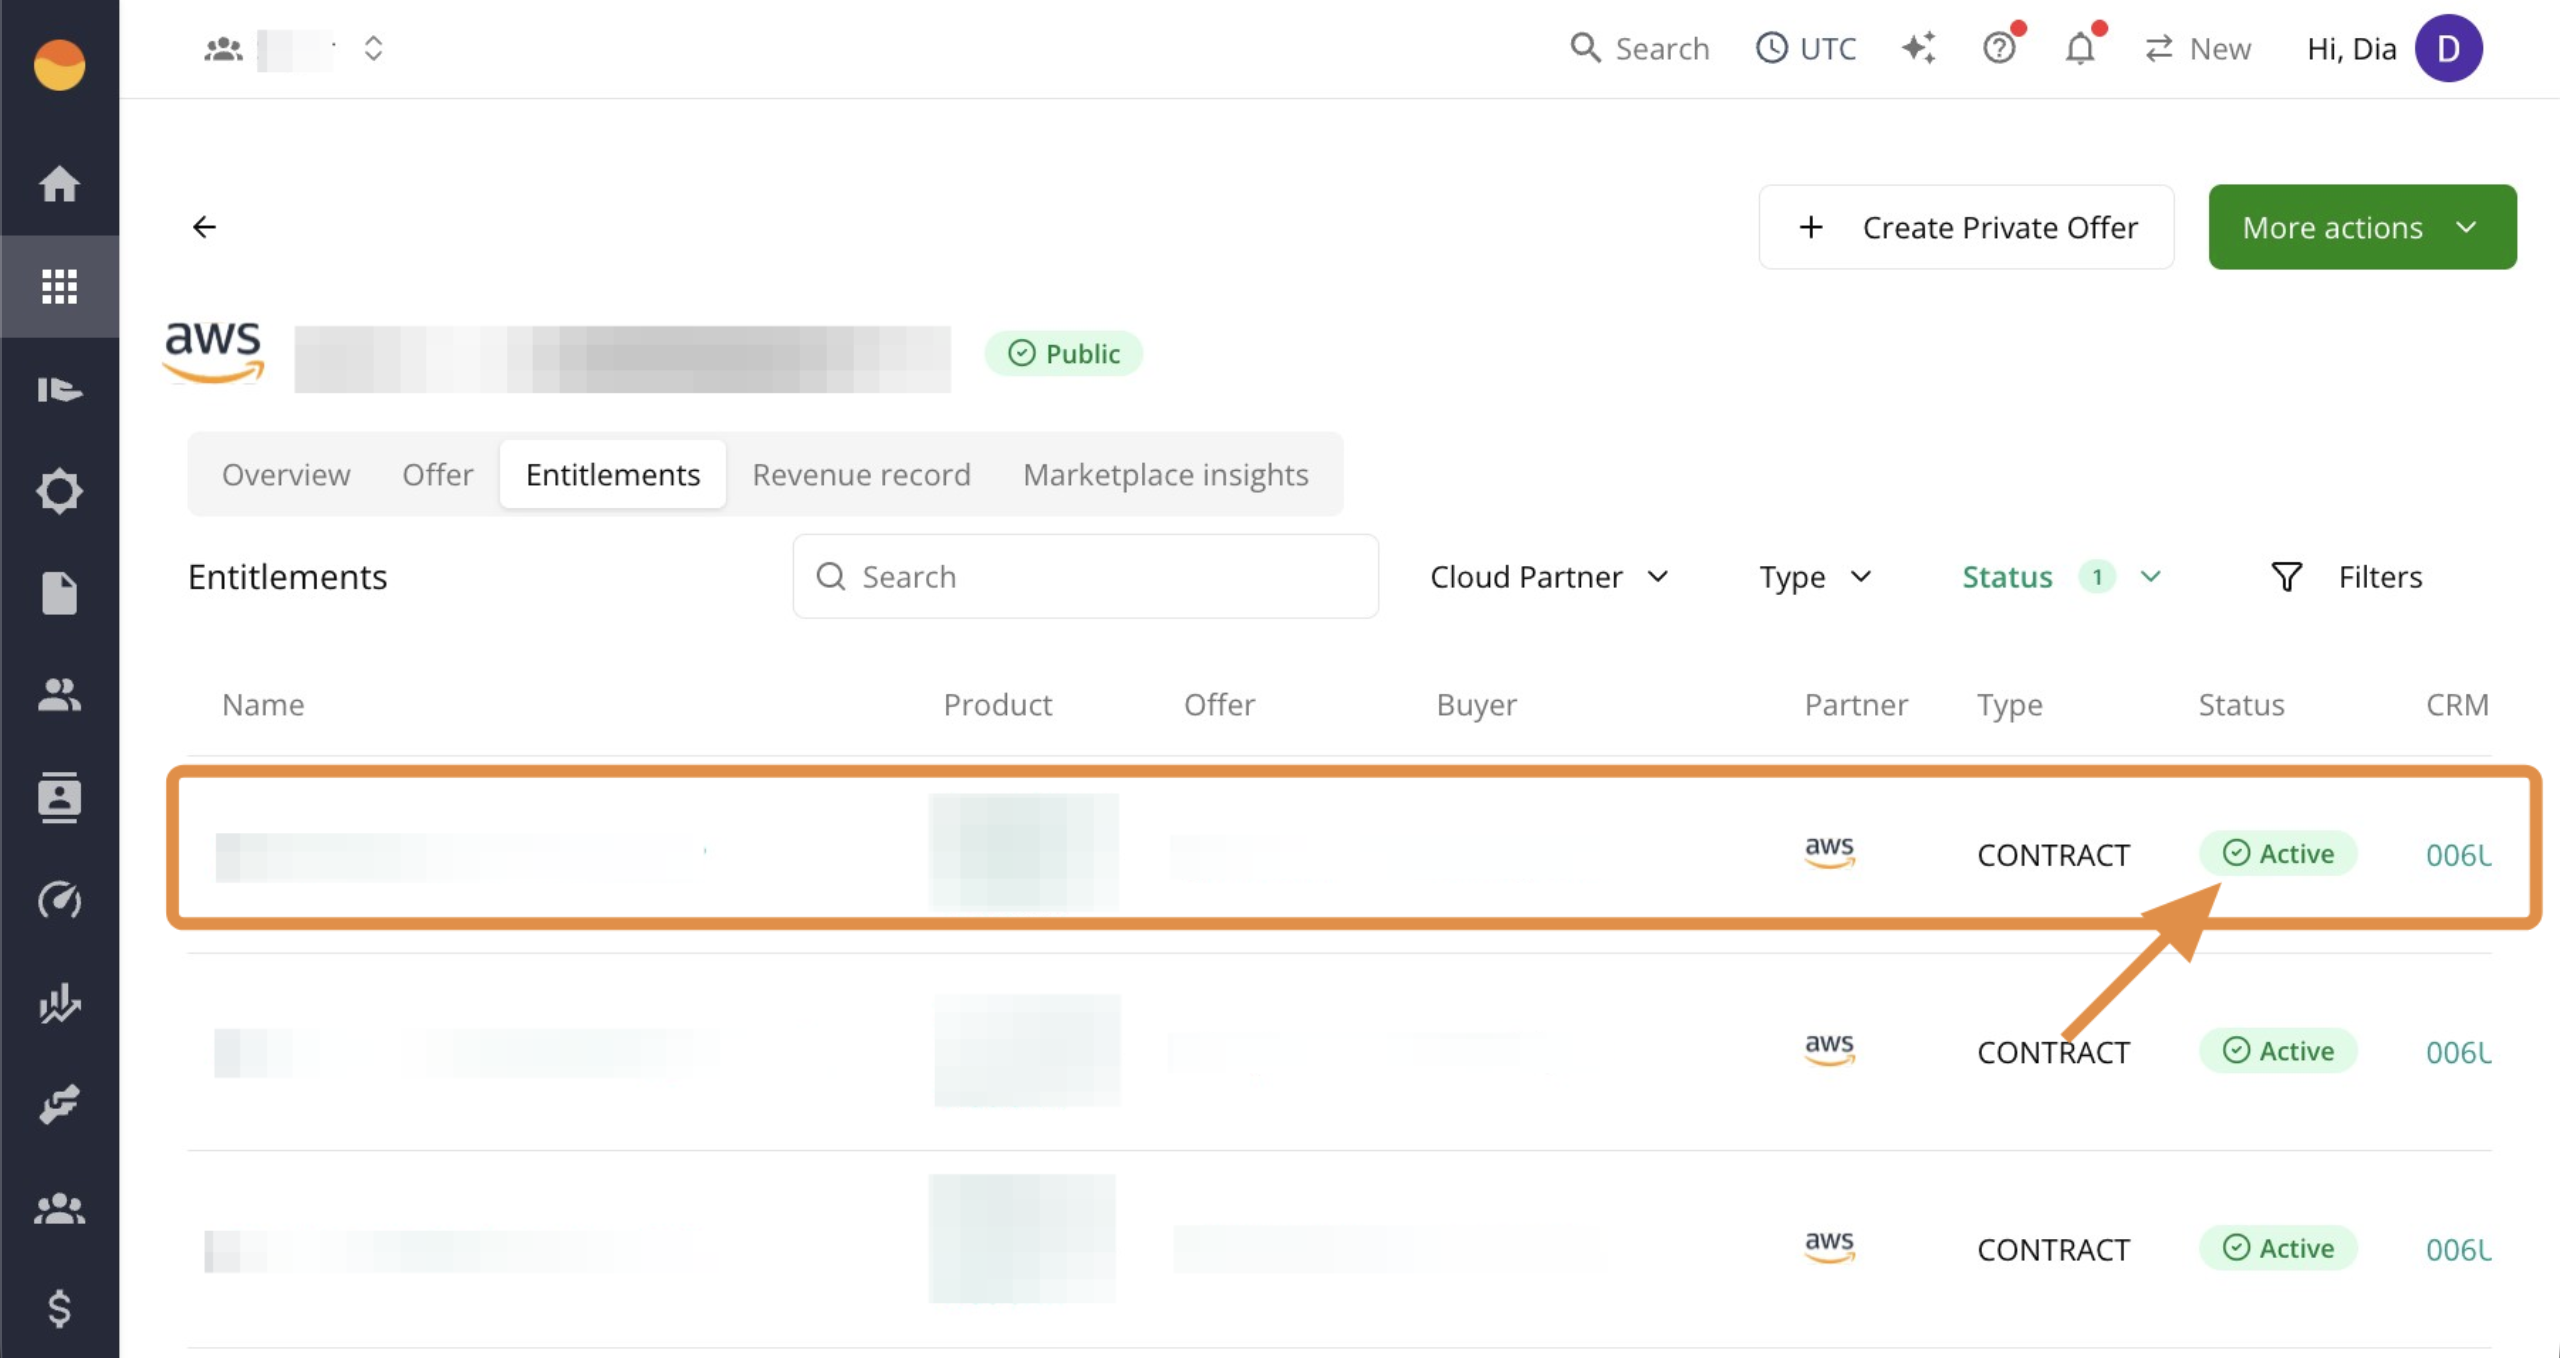
Go to the Entitlements tab.
-
Verify the test purchase generated an active entitlement.
Step 4: Report usage (usage-based products only)
If your product includes usage-based pricing, AWS requires a test usage record before approval to prove your metering integration works.
- From the Entitlements tab, click the active test entitlement.
- Go to the Usage Metering tab, then + Report Usage.
- Select the $0.01 generic test usage dimension you configured earlier, then enter a Quantity of
1. - Click Report. This generates exactly $0.01 in usage to validate the metering connection.
Publish the product and monitor review status
Step 1: Update the pricing terms and publish
-
Go back to your product in the Suger Console.
-
Click More actions, then Publish Product.
-
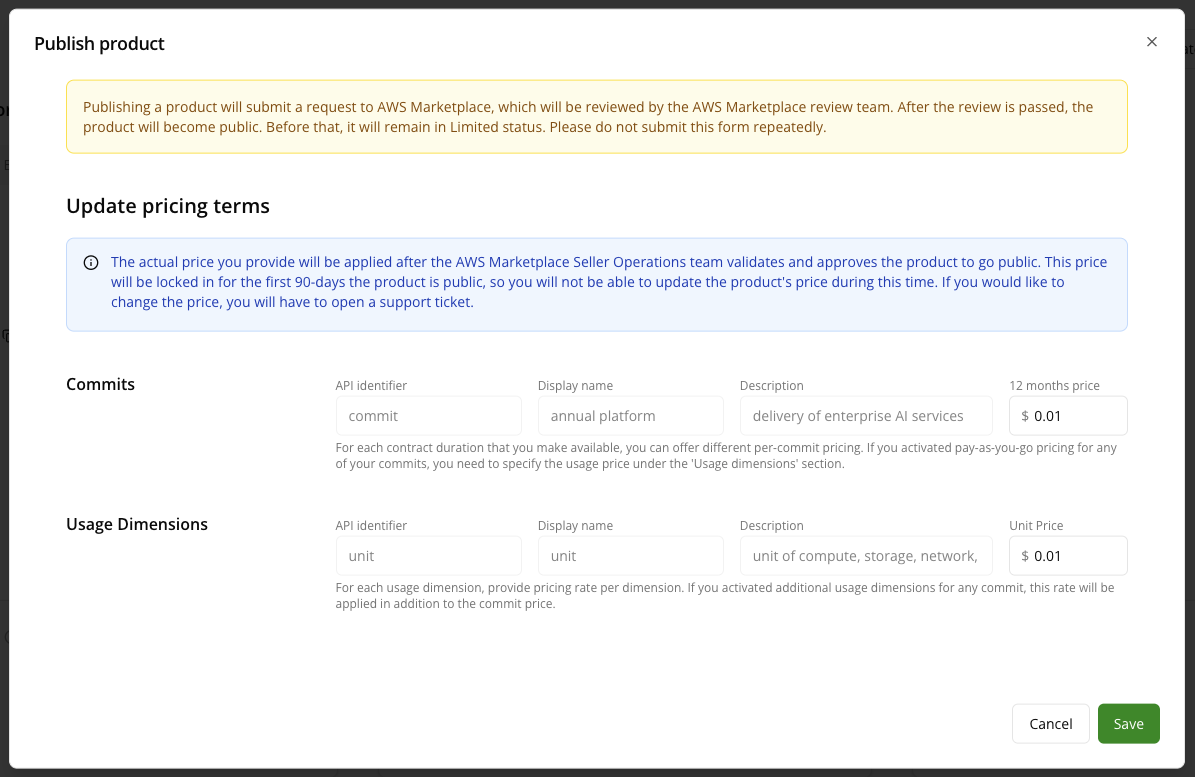
Update your pricing terms — replace the $0.01 test prices with your actual retail prices.
-
Click Save. AWS reviews your listing for publication, which typically takes 2–4 weeks.
Step 2: Monitor the review status
-
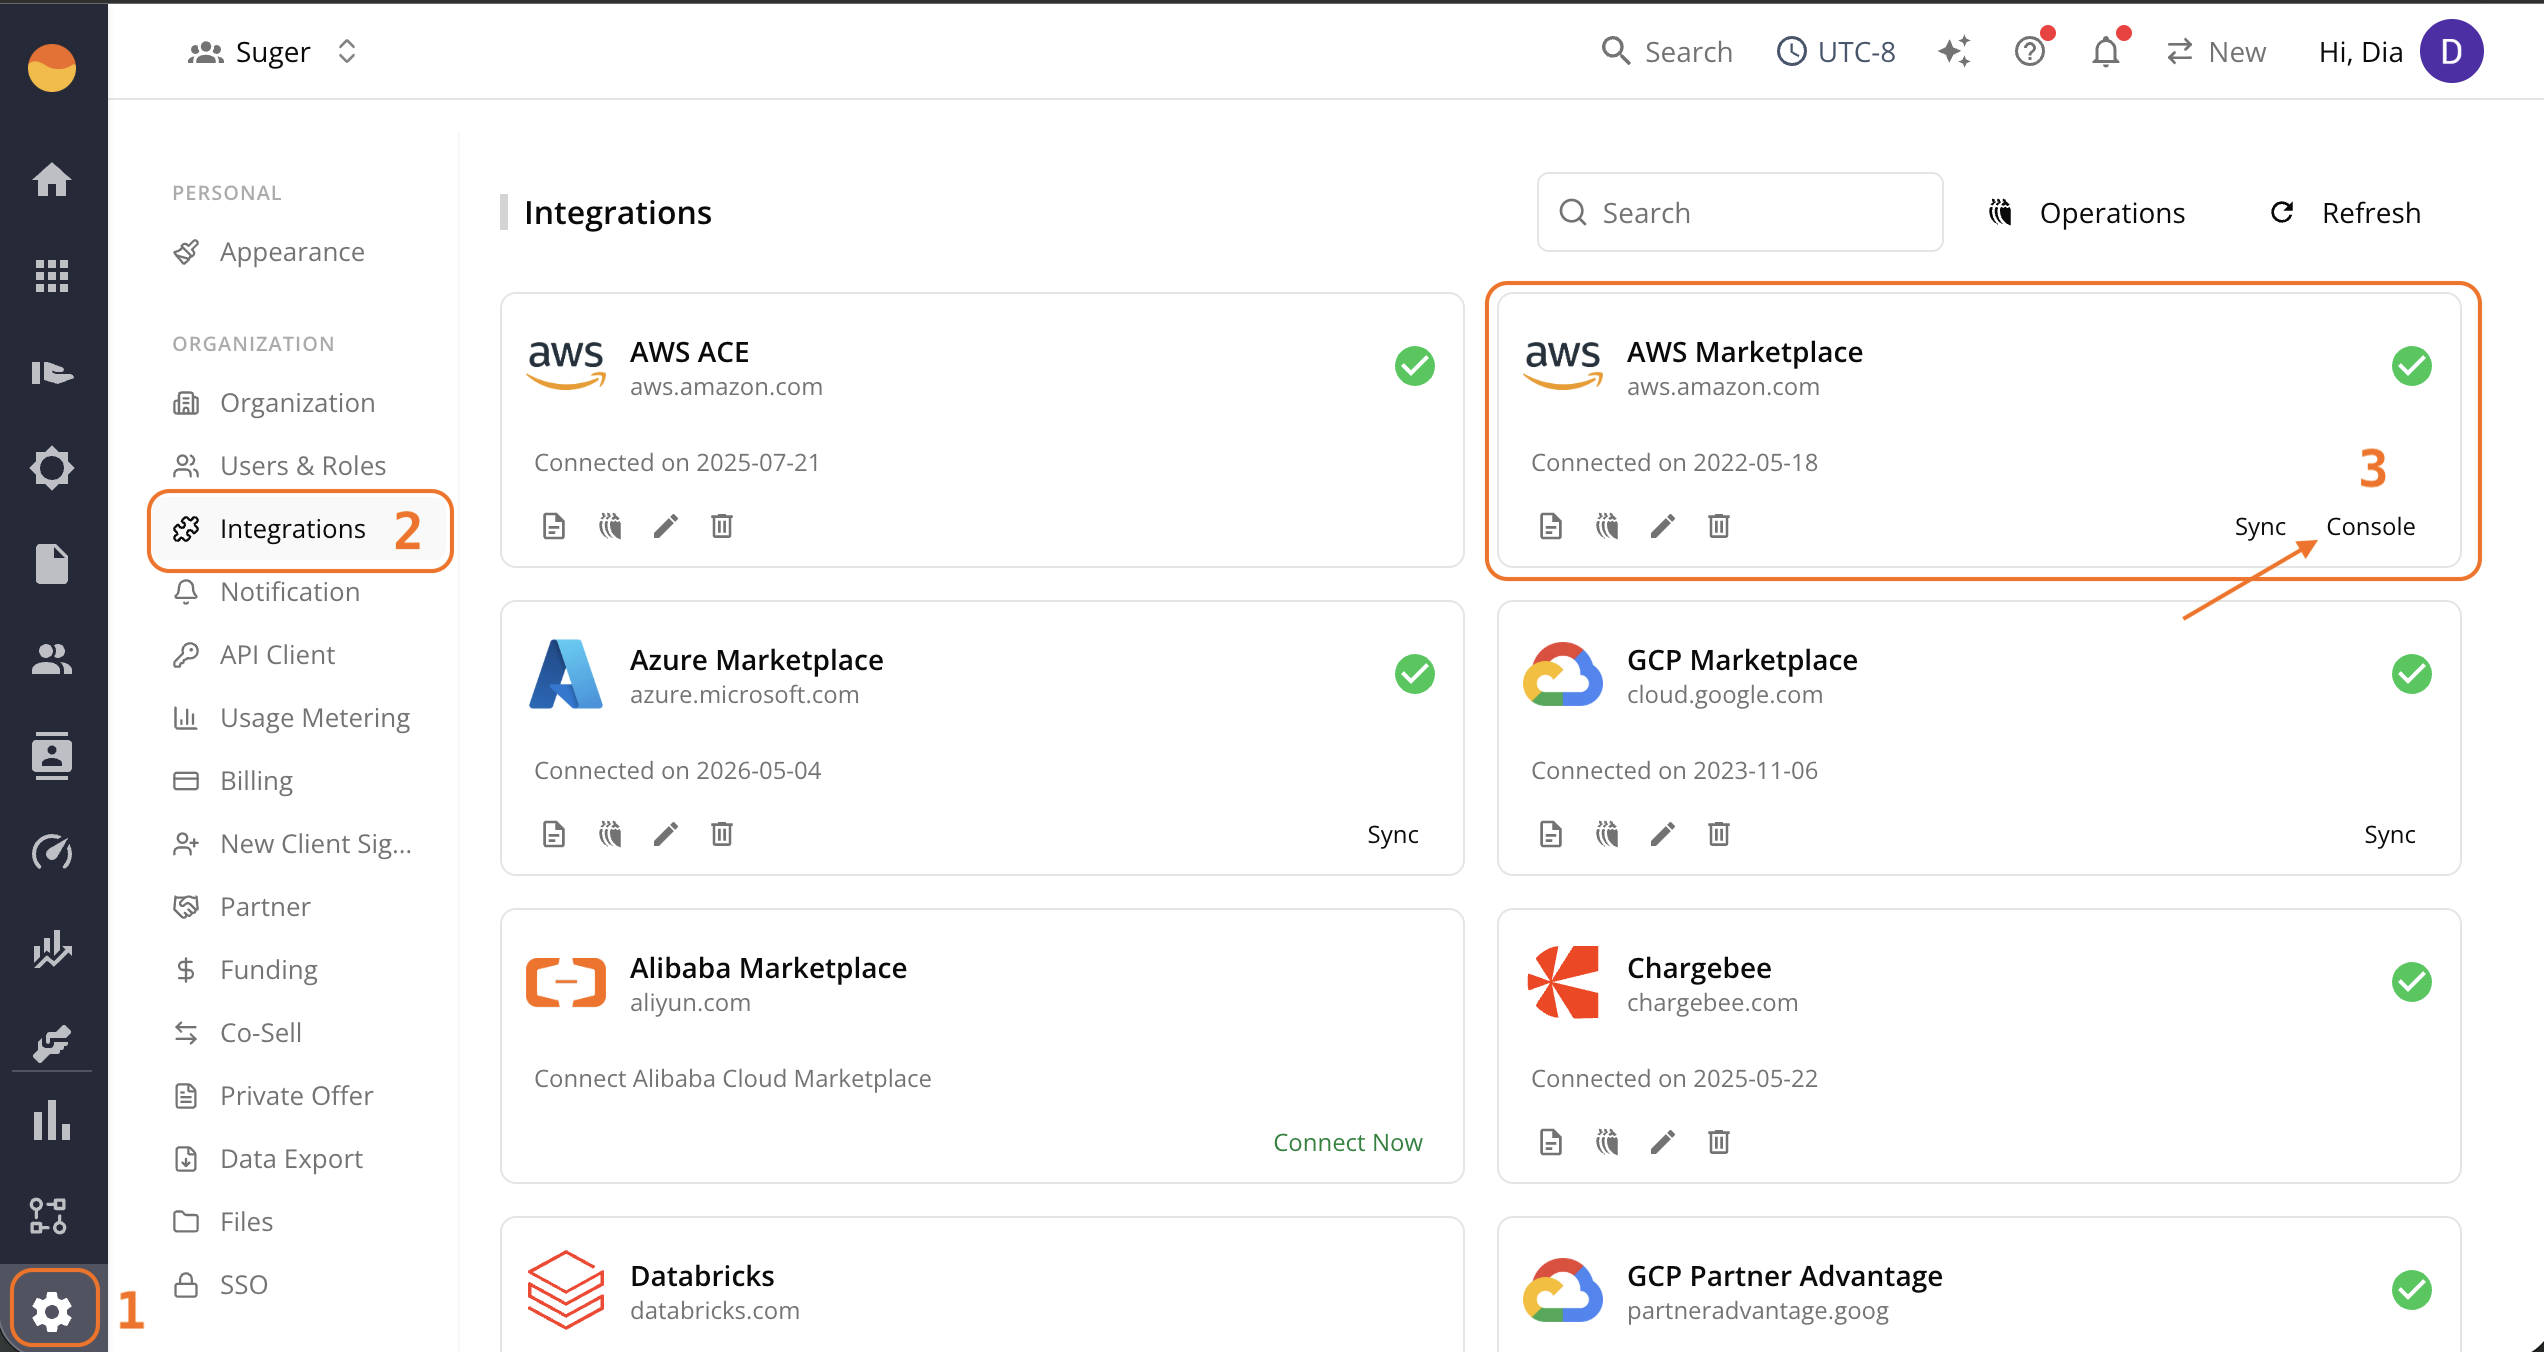
Open Suger, click the Settings menu, and go to the Integrations tab.
-
Click Console on the AWS Marketplace card.
-
Open AWS Marketplace and click SaaS products from the Build menu.
-
Find and open the SaaS product, then click the Requests log tab to view your submission history and status. To learn what each status means, see managing change requests.
Step 3: Confirm your listing is live
Once AWS approves your listing and sets it to Public:
-
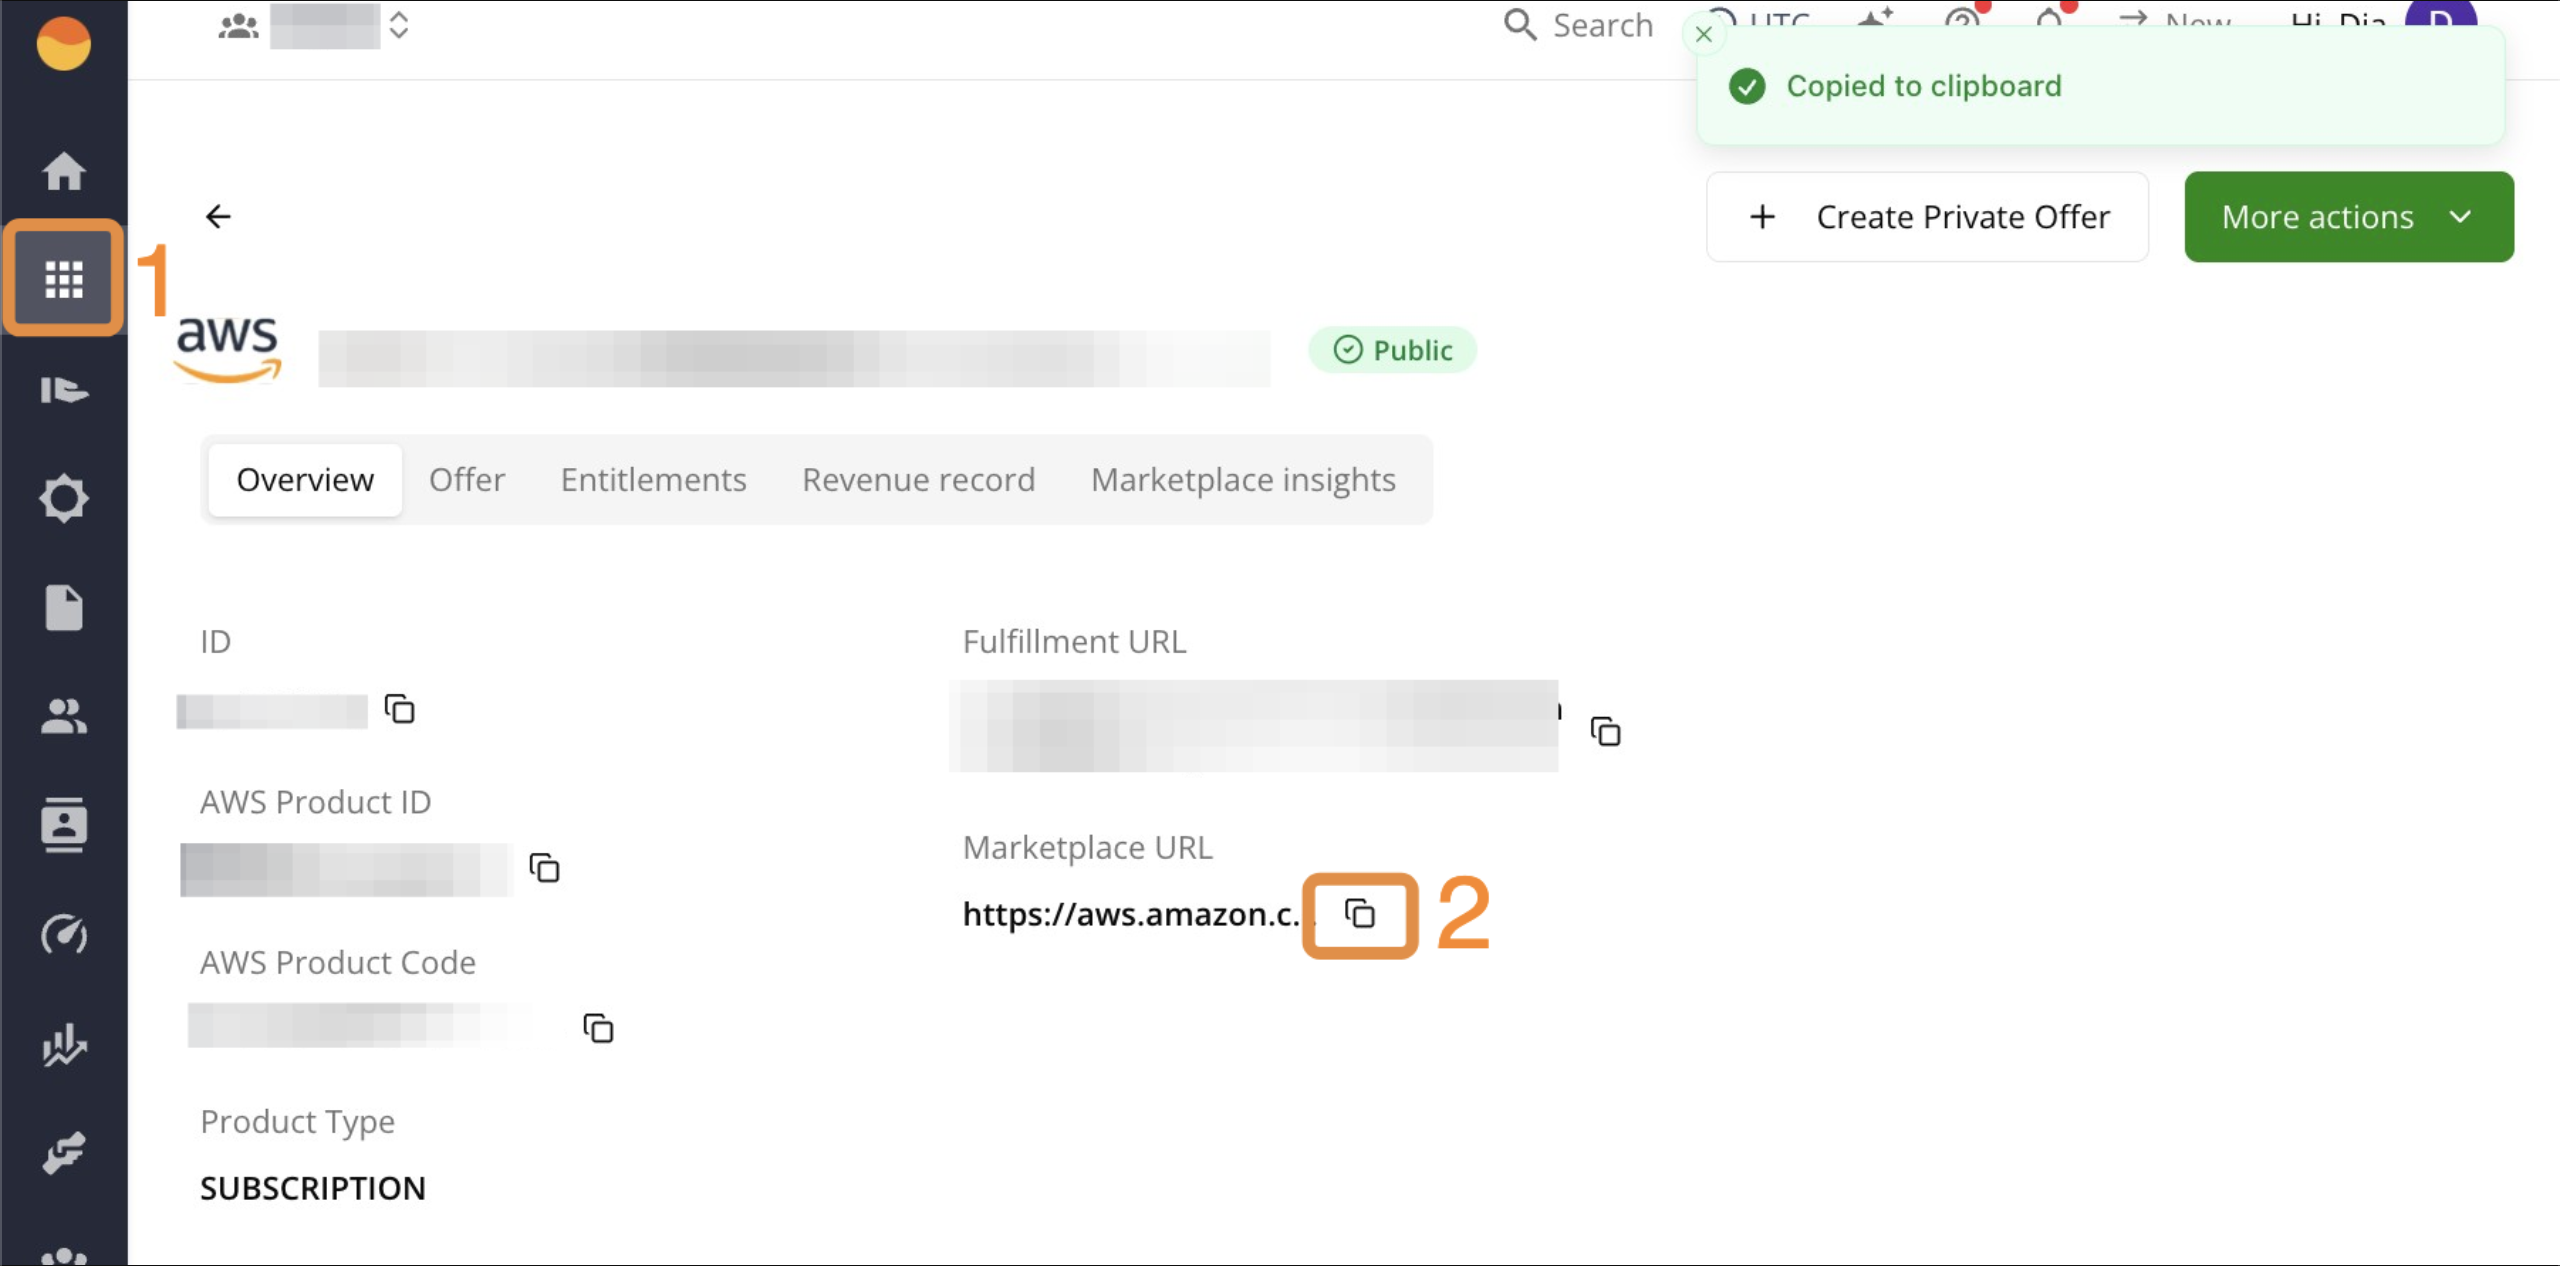
The direct listing URL is available immediately. Confirm it’s live by copying the URL from your product in Suger and opening it in an incognito window.
-
Search results may take up to a day to update. If your listing still doesn’t appear after a day, contact AWS Marketplace Seller Support.
Step 4: Cancel the test entitlement
Once your listing is live, cancel the test agreement to stop ongoing charges, prevent it from skewing your revenue reports, and keep your active entitlements clean. See Handle AWS Marketplace refunds and cancellations.
Test and Publish Your Professional Services Listing
Review your listing
Double-check all details, descriptions, and service tiers (dimensions) for accuracy. Remember, you can’t change your API Identifiers once the listing is published.
Publish the product and monitor review status
-
Go back to the Suger Console and open the product.
-
Click More actions, then Publish Product. AWS reviews the listing against its marketplace guidelines, which typically takes 7 to 10 business days.
-
To monitor status, open Suger → Settings → Integrations, click Console on the AWS Marketplace card.
-
Open AWS Marketplace, click Professional services from the Build menu, find and open your product, then check the Requests log tab.
Listing AMI Products
As an AWS Marketplace seller, you can deliver your products to buyers with Amazon Machine Images (AMIs). An AMI provides the information required to launch an Amazon Elastic Compute Cloud (Amazon EC2) instance.
Delivery Method
You can deliver AMI-based products in one of two ways:
- Single AMI — buyers select and use the AMI as a template for an EC2 instance. Buyers find these products using the Amazon Machine Image delivery method filter. See Creating single-AMI products.
- AWS CloudFormation templates — templates that let buyers install a system of multiple instances with different roles as a single unit. Buyers find these using the CloudFormation delivery method filter. See Delivering your AMI-based product using AWS CloudFormation.
Listing Process
1. Build AMI
- Select OS (Linux/Unix/Windows) & Architecture (64 bit Arm, 64 bit x86, 64 bit Mac, 64 bit Mac-Arm).
- Disable root login.
- Ensure all AMIs start with a public AMI that uses hardware virtual machine (HVM) virtualization and 64-bit architecture.
- Create the AMI in the US East (N. Virginia) Region.
- Use a consistent operating system (OS) user name across all versions and products. AWS recommends ec2-user.
- For Linux-based AMIs — ensure a valid SSH port is open. The default SSH port is 22.
- For Windows-based AMIs — ensure an RDP port is open. The default RDP port is 3389. The WinRM port (5985 by default) must be open to 10.0.0.0/16 and 10.2.0.0/16.
- See other AMI requirements for AWS Marketplace.
2. Scan AMI
Open the Assets - Amazon Machine Image page, set up the AWS Marketplace Ingest IAM role, and wait for the Scan status of your AMI to reach the Completed state.
3. Create a single-AMI product
- Open the AWS Marketplace Management Portal and sign in to your seller account.
- From the Products menu, choose Server, or go directly to the Server Products page.
- From the Server products tab, select Create server product, select Amazon Machine Image (AMI), and choose one of the licensing types for single-AMI products.
4. Review and Submit
After entering the required information for all change request steps, choose Submit. This creates a request to the AWS Marketplace catalog system to validate the information and release the product to a Limited state if validation passes.
5. Test your AMI
Test your product in the Limited state and make sure it follows AWS Marketplace AMI-based product requirements and the product checklist. Then, to publish to Public, choose Update visibility.
Listing Container Products
AWS Marketplace supports software products that use Docker containers. Container products consist of delivery options that are a set of container images and deployment templates that go together.
Delivery Method/Option
The delivery option specifies the deployment options available to the buyer. Select one of:
- Container image — upload all the container images required for the product installation into the Amazon Elastic Container Registry (Amazon ECR) repository created in the AWS Marketplace console.
- Helm chart — upload both the Helm chart and container images into the Amazon ECR repository created in the AWS Marketplace console.
- Amazon EKS console add-on — upload both the Helm chart and container images into the Amazon ECR repository created in the AWS Marketplace console.
Listing Process
1. Build Docker Container
Requirements for building a Docker container for AWS Marketplace:
- Must be configured to run with non-root privileges by default.
- Must use an initial randomized password. No initial fixed or blank passwords for external administrative access.
- Any outside access to the application must be explicitly agreed to and enabled by customers.
- Provide detailed instructions including all steps to deploy container-based products.
- Source container images must be pushed to the Amazon Elastic Container Registry (Amazon ECR) repository owned by AWS Marketplace.
- Must be based on Linux.
2. Create Container Listing
After generating the product ID, product code, and public key, use the wizard to create an initial listing:
- Provide product information for your listing.
- Determine the pricing model for your product.
- Provide additional offer information, including a refund policy, EULA, and offer availability.
- Add an initial repository for your container product.
- Choose Submit on the last step to move the product to
Limitedvisibility.
3. Add an initial version of your product
Each product version has a set of container images specific to that version. To add an initial version, see Adding a new version of your container product on AWS Marketplace.
Please contact us at support@suger.io to get started. Our team will walk you through the tailored listing and deployment process for AMI and Container products on AWS Marketplace.
Edit a Product Listing
You can update existing AWS product listings directly in the Suger Console. (For non-AWS listings, a support ticket is required.)
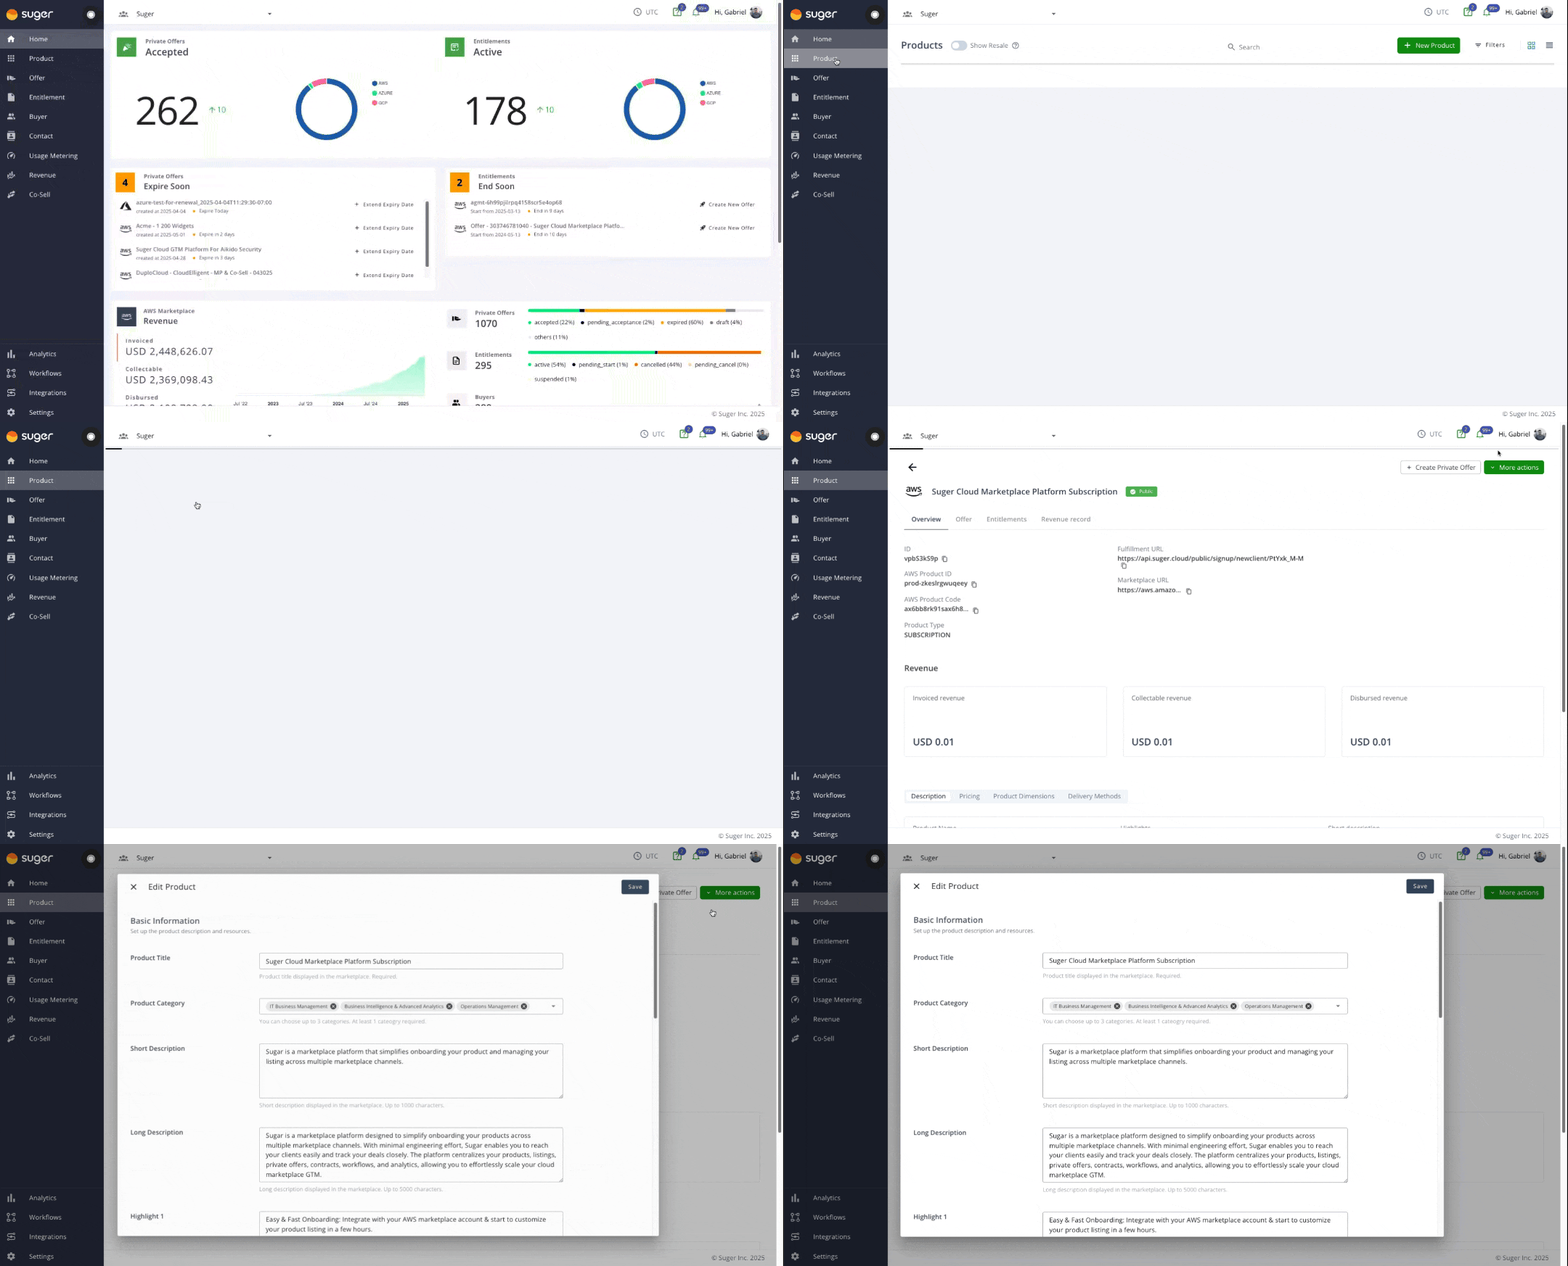
- Log in to the Suger Console.
- Click the Products tab.
- Open the product listing you want to edit.
- Click More Actions, then choose:
- Edit Info — update your marketplace listing language, such as descriptions, title, and highlights.
- Edit Pricing — update the public pricing of your listing dimensions.
- Click Save.
Enable “Request a Demo” and “Request a Private Offer” Buttons
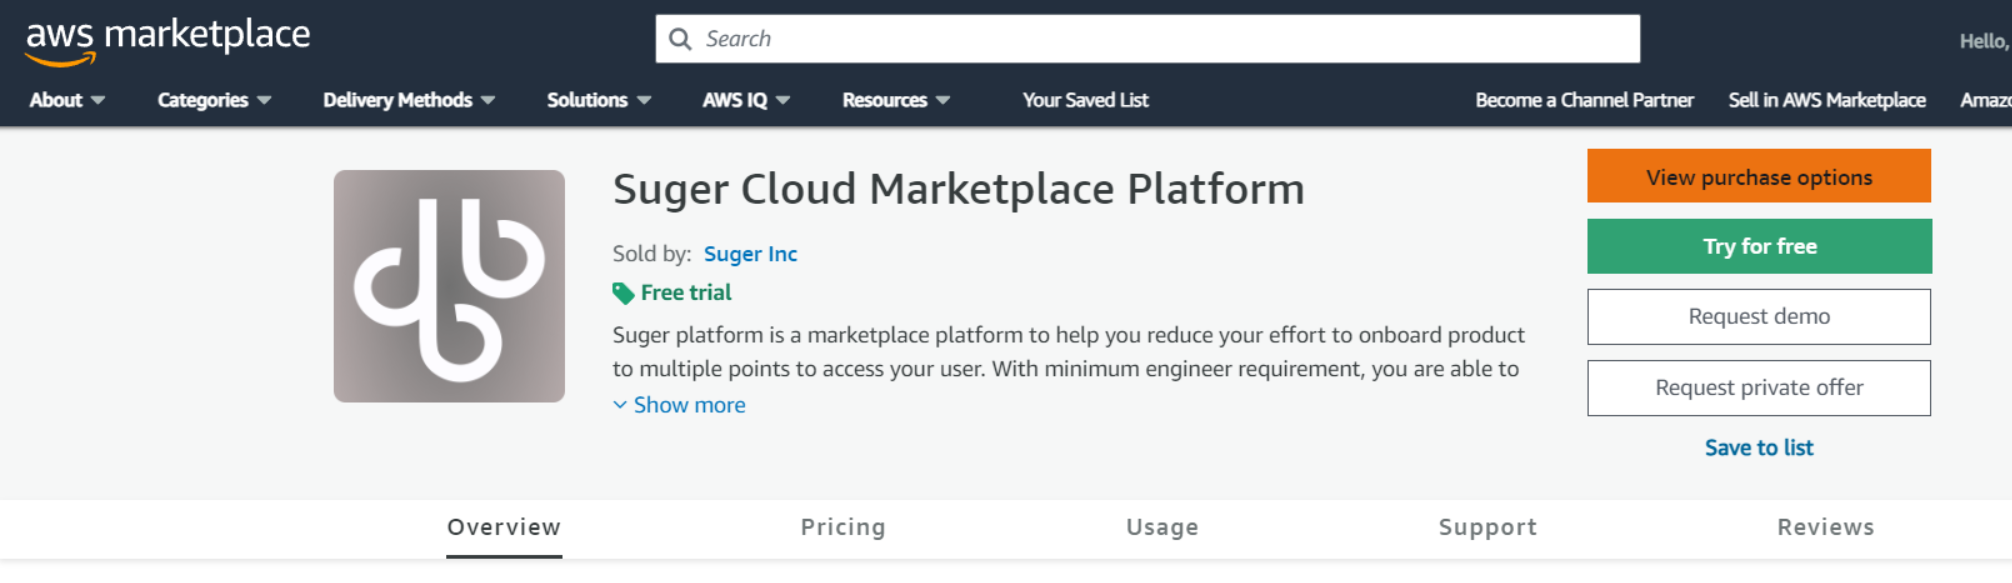
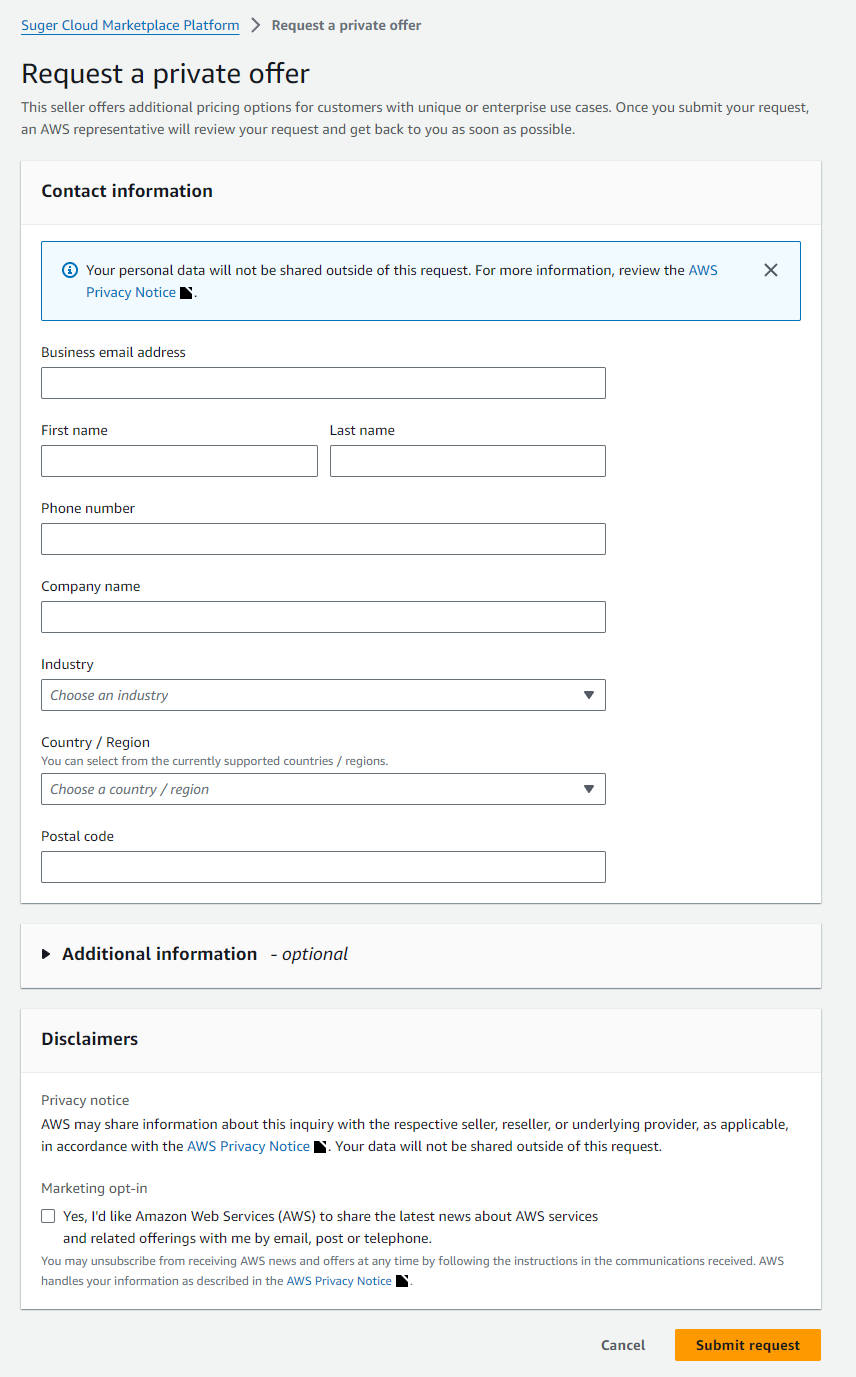
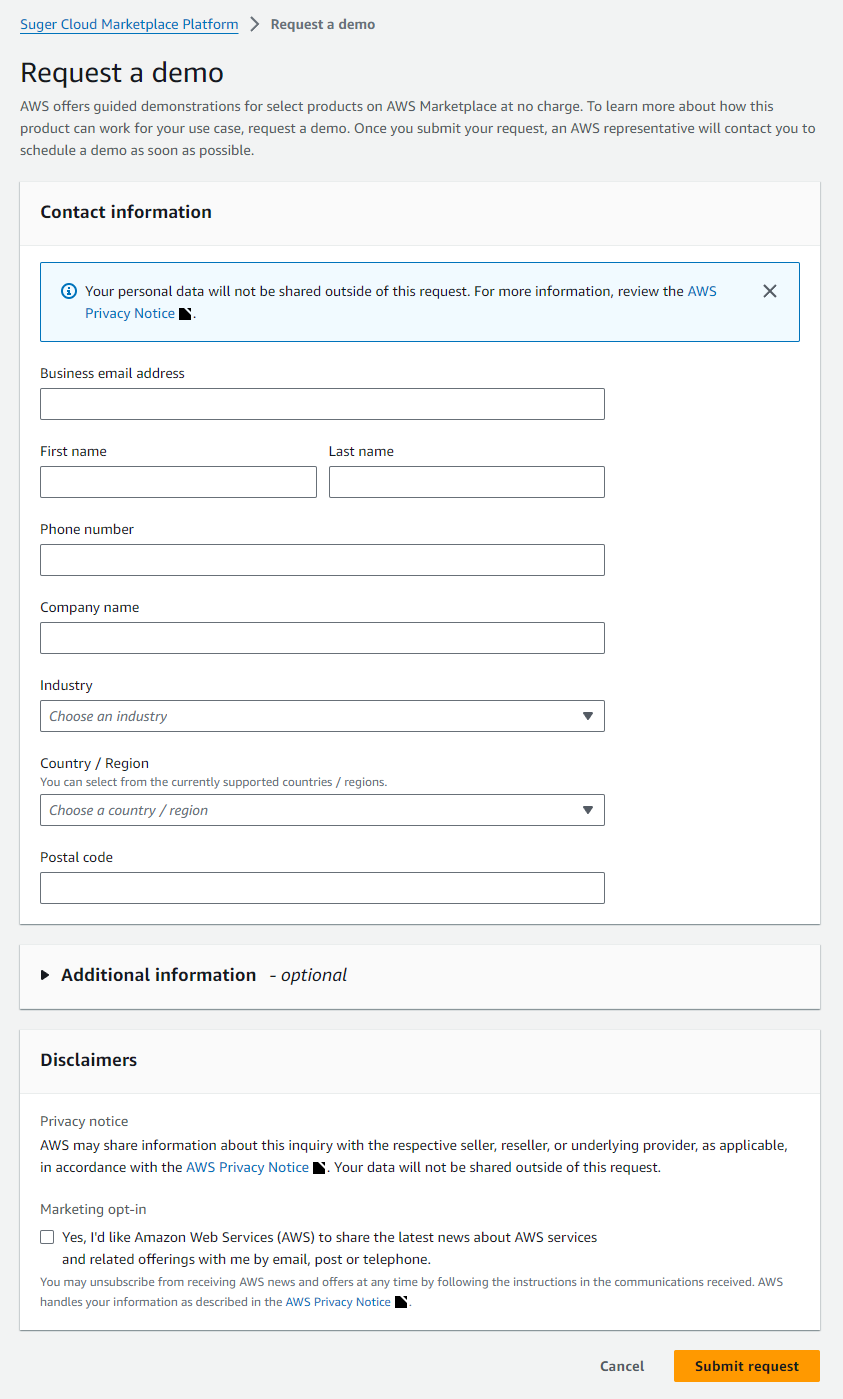
AWS Marketplace lets customers request product demos and private offers directly from your listing page. A buyer fills out a form on your listing, an AWS representative discusses their needs, and the request is passed to you so you can give a demo or start a private offer discussion. This shortens the buying process and improves the customer experience by removing the need to search for your contact details.
Here is how the buttons and forms appear on AWS Marketplace:
Add External Reviews (G2)
You can add G2 reviews to your AWS Marketplace listing.
Prerequisites: an existing AWS Marketplace product listing, a live G2 product profile, and access to your AWS and G2 accounts.
Step 1: Collect the required information
- AWS Product Title — in your AWS Marketplace Management Portal (AMMP), open your listed product and copy the title exactly as it appears.
- AWS Product ID — in the same product view, locate the Product ID (typically starts with
prod-). - G2 Product ID — in your G2 admin dashboard, go to product settings and find the internal Product ID (usually in the URL or metadata).
- G2 Profile URL — the full URL of your public product page on G2.
- G2 UUID — in your G2 admin dashboard, go to product settings and find the UUID.
Step 2: Submit the request to AWS
Send the following message to AWS Support via the AWS Marketplace Management Portal (Support → Create Case → Marketplace):
Hi AWS Support Team,

I am writing to request the addition of G2 reviews to our product listing on the AWS Marketplace. Below are the necessary details:

AWS Product Title: [Insert AWS Product Title]
AWS Product ID: [Insert AWS Product ID]
G2 Product ID: [Insert G2 Product ID]
G2 Profile URL: [Insert G2 Profile URL]
G2 UUID: [Insert G2 UUID]

Please let me know if you need any additional information or documentation to process this request. I appreciate your assistance in helping us integrate G2 reviews into our listing.Architecture Details
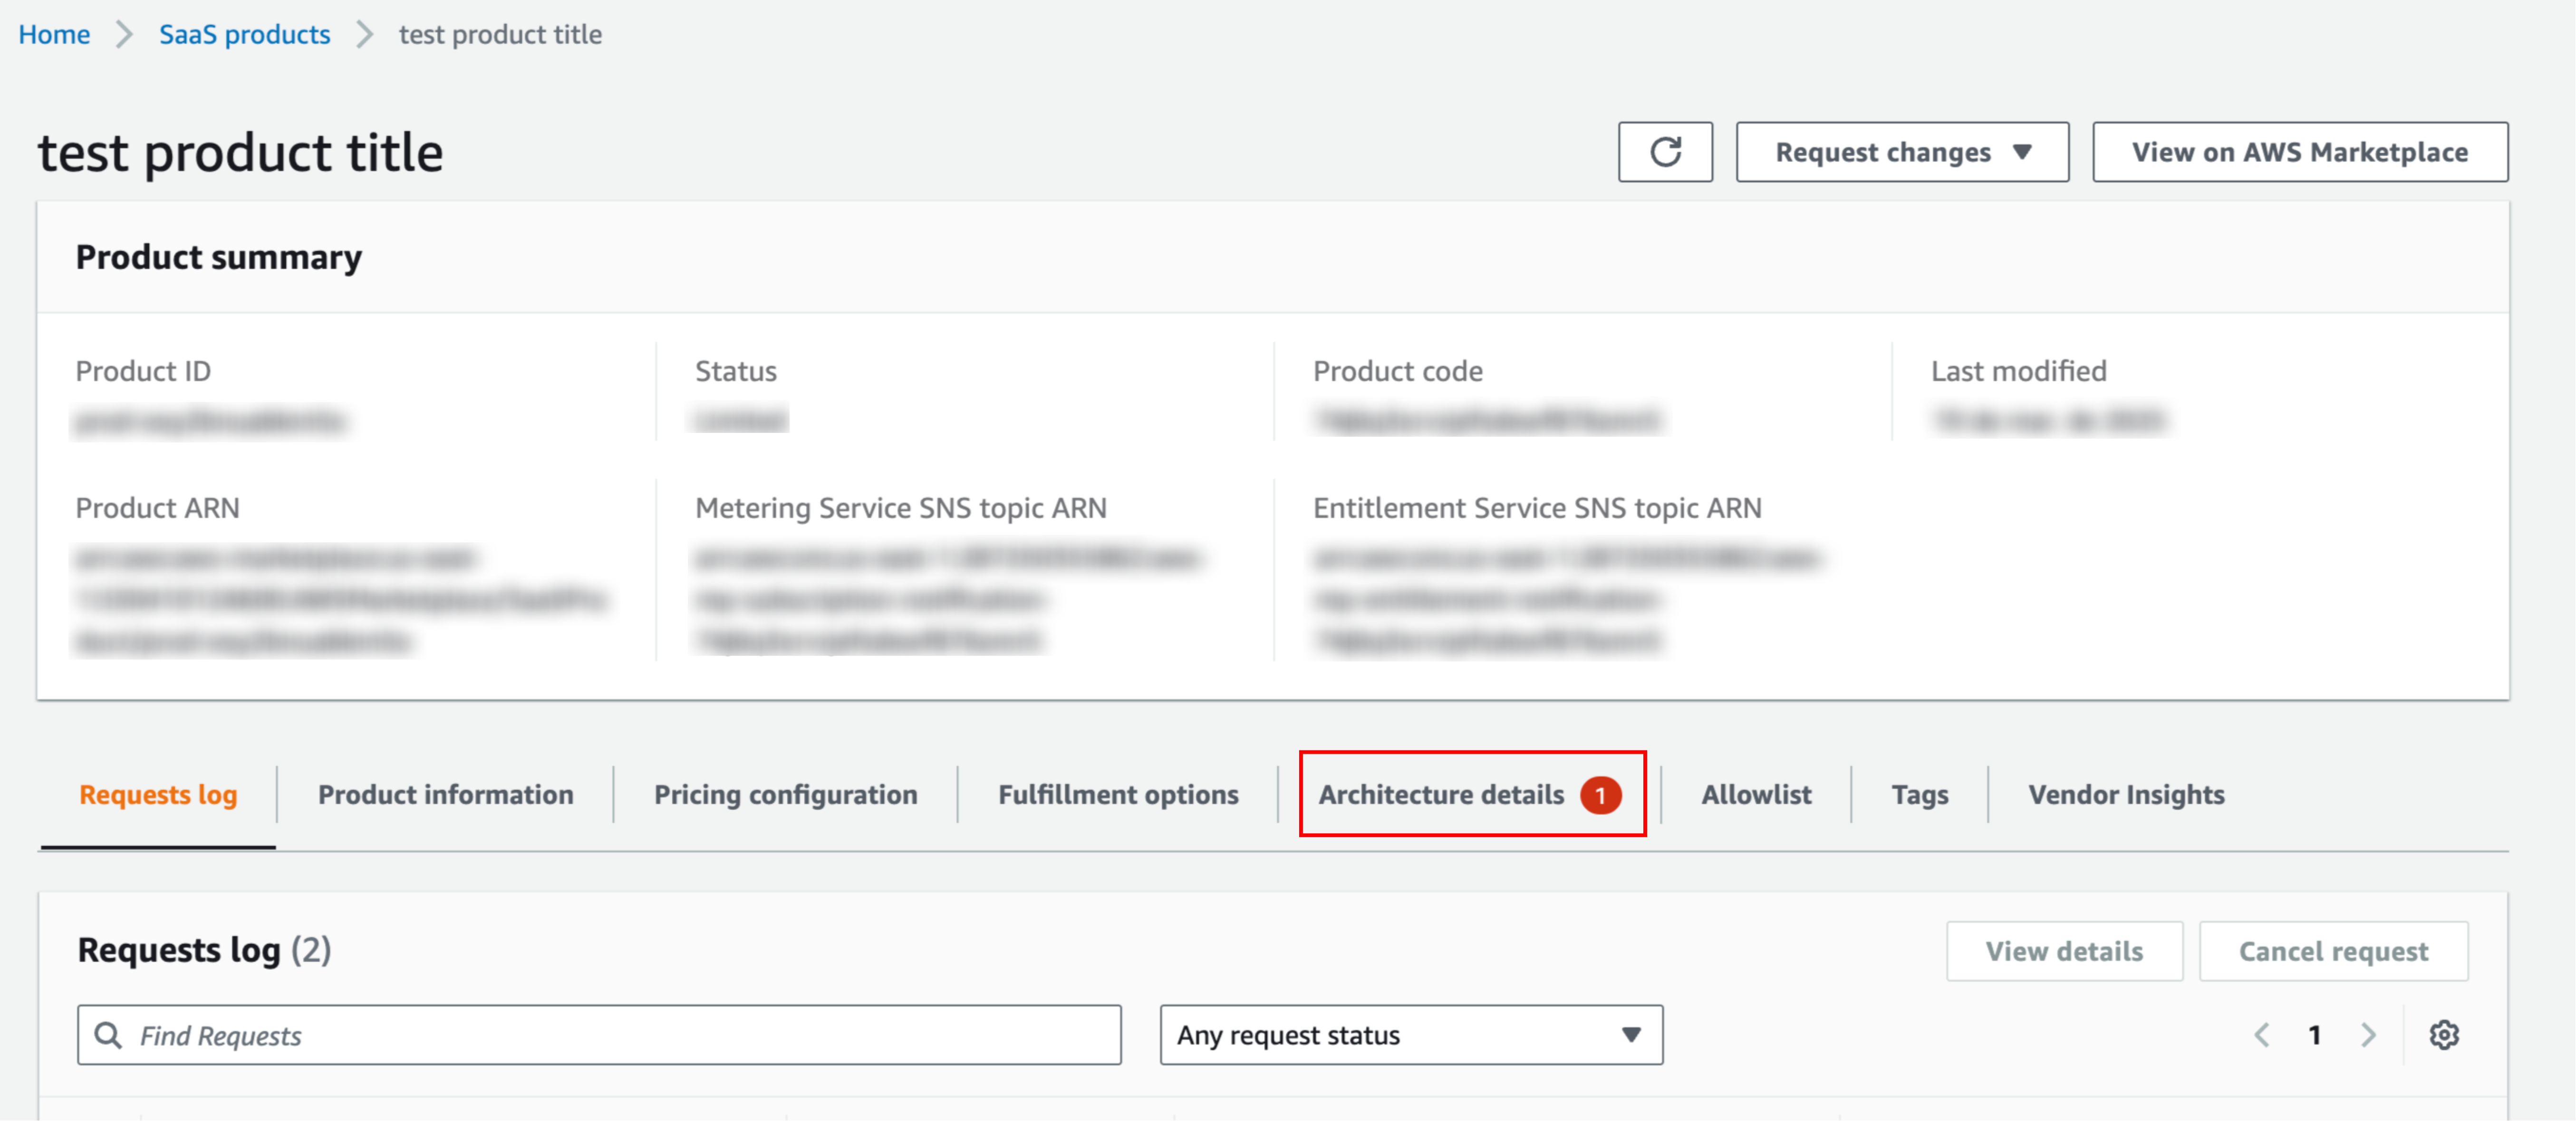
As of May 1, 2025, AWS requires all products seeking to qualify for PPA (Partner Private Offer) credit drawdown to complete an Architecture Review. This review ensures your product meets AWS’s technical and operational standards and is fully deployed on AWS infrastructure. If your product is not hosted on AWS or the architecture review has not been completed, your customers will not be able to use their PPA credits when purchasing your solution via AWS Marketplace.
-
Go to the AWS Marketplace Management Portal (AMMP).
-
Select your SaaS product.
-
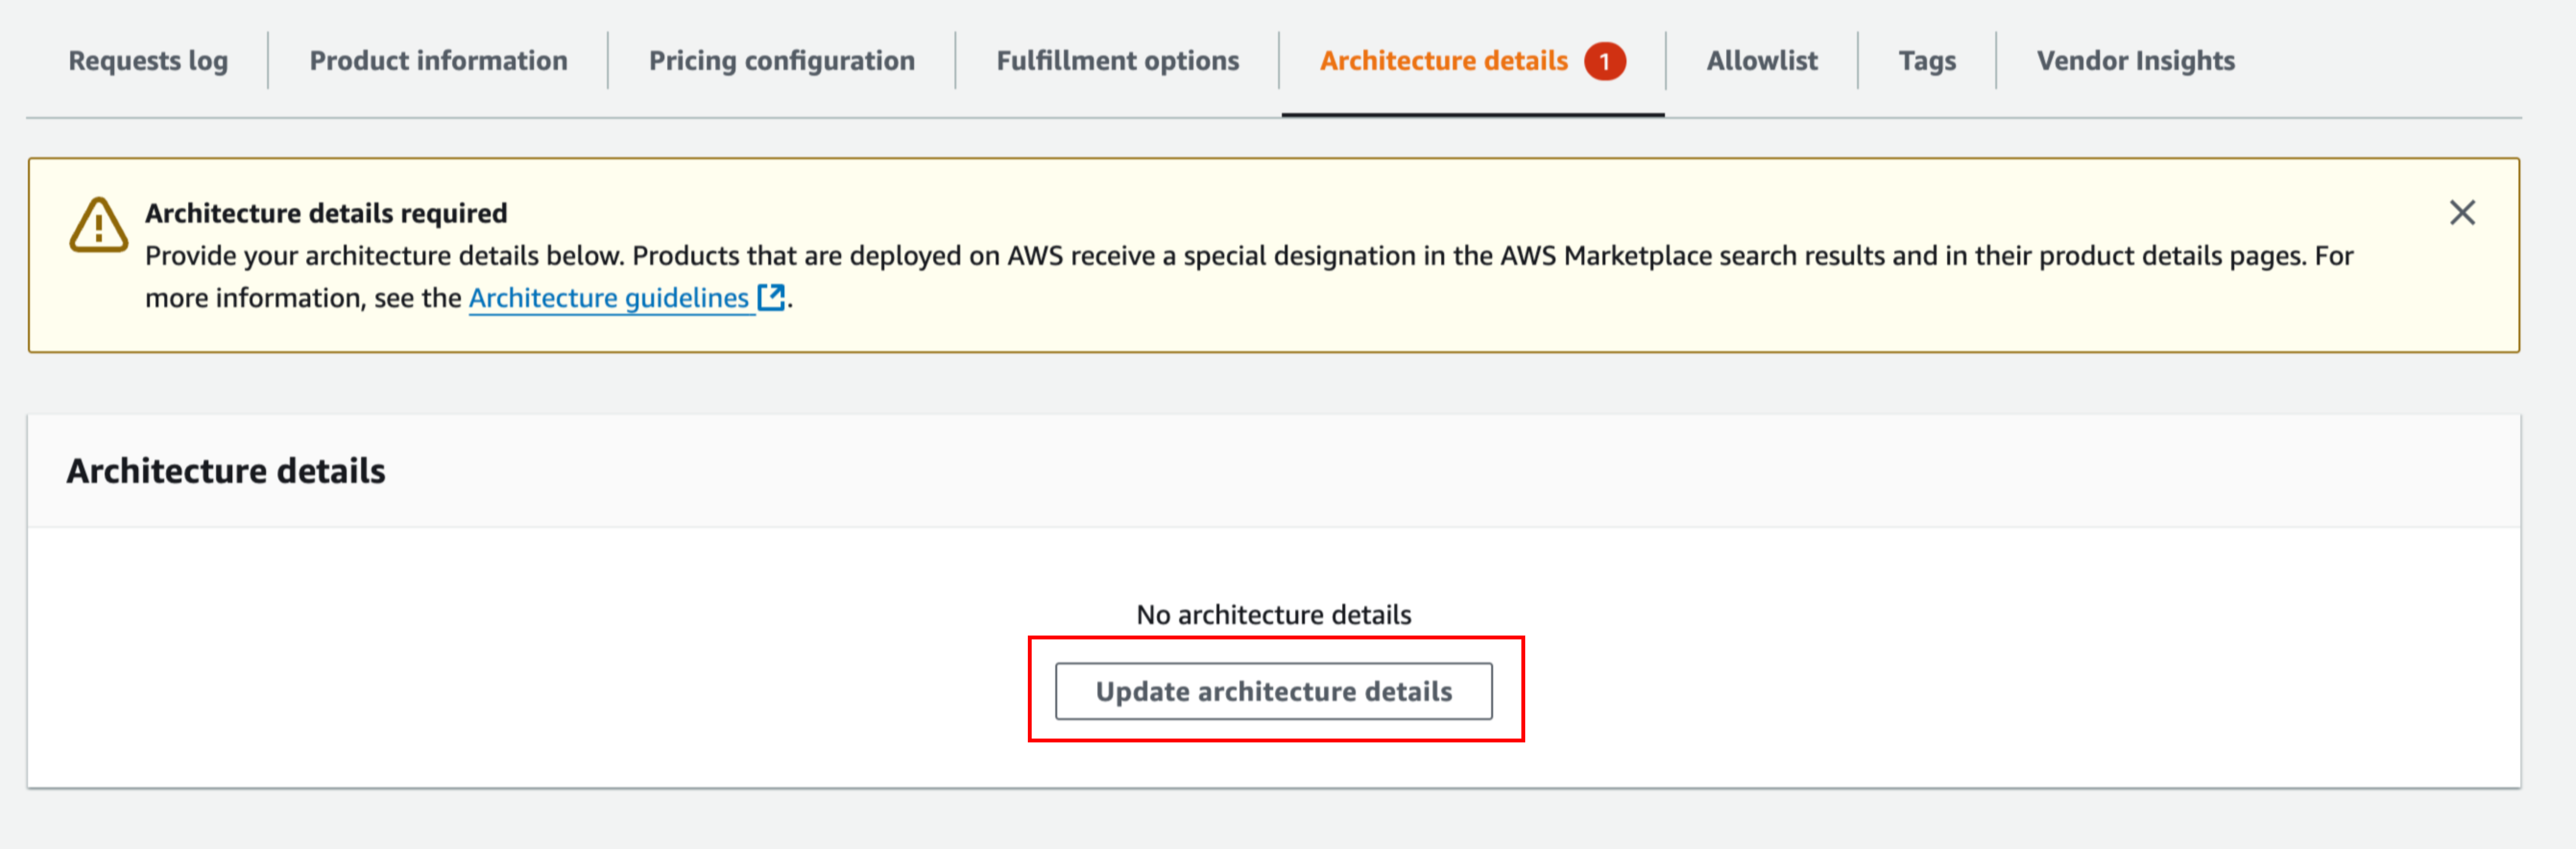
Go to Architecture Details.
-
Click Update Architecture Details.
-
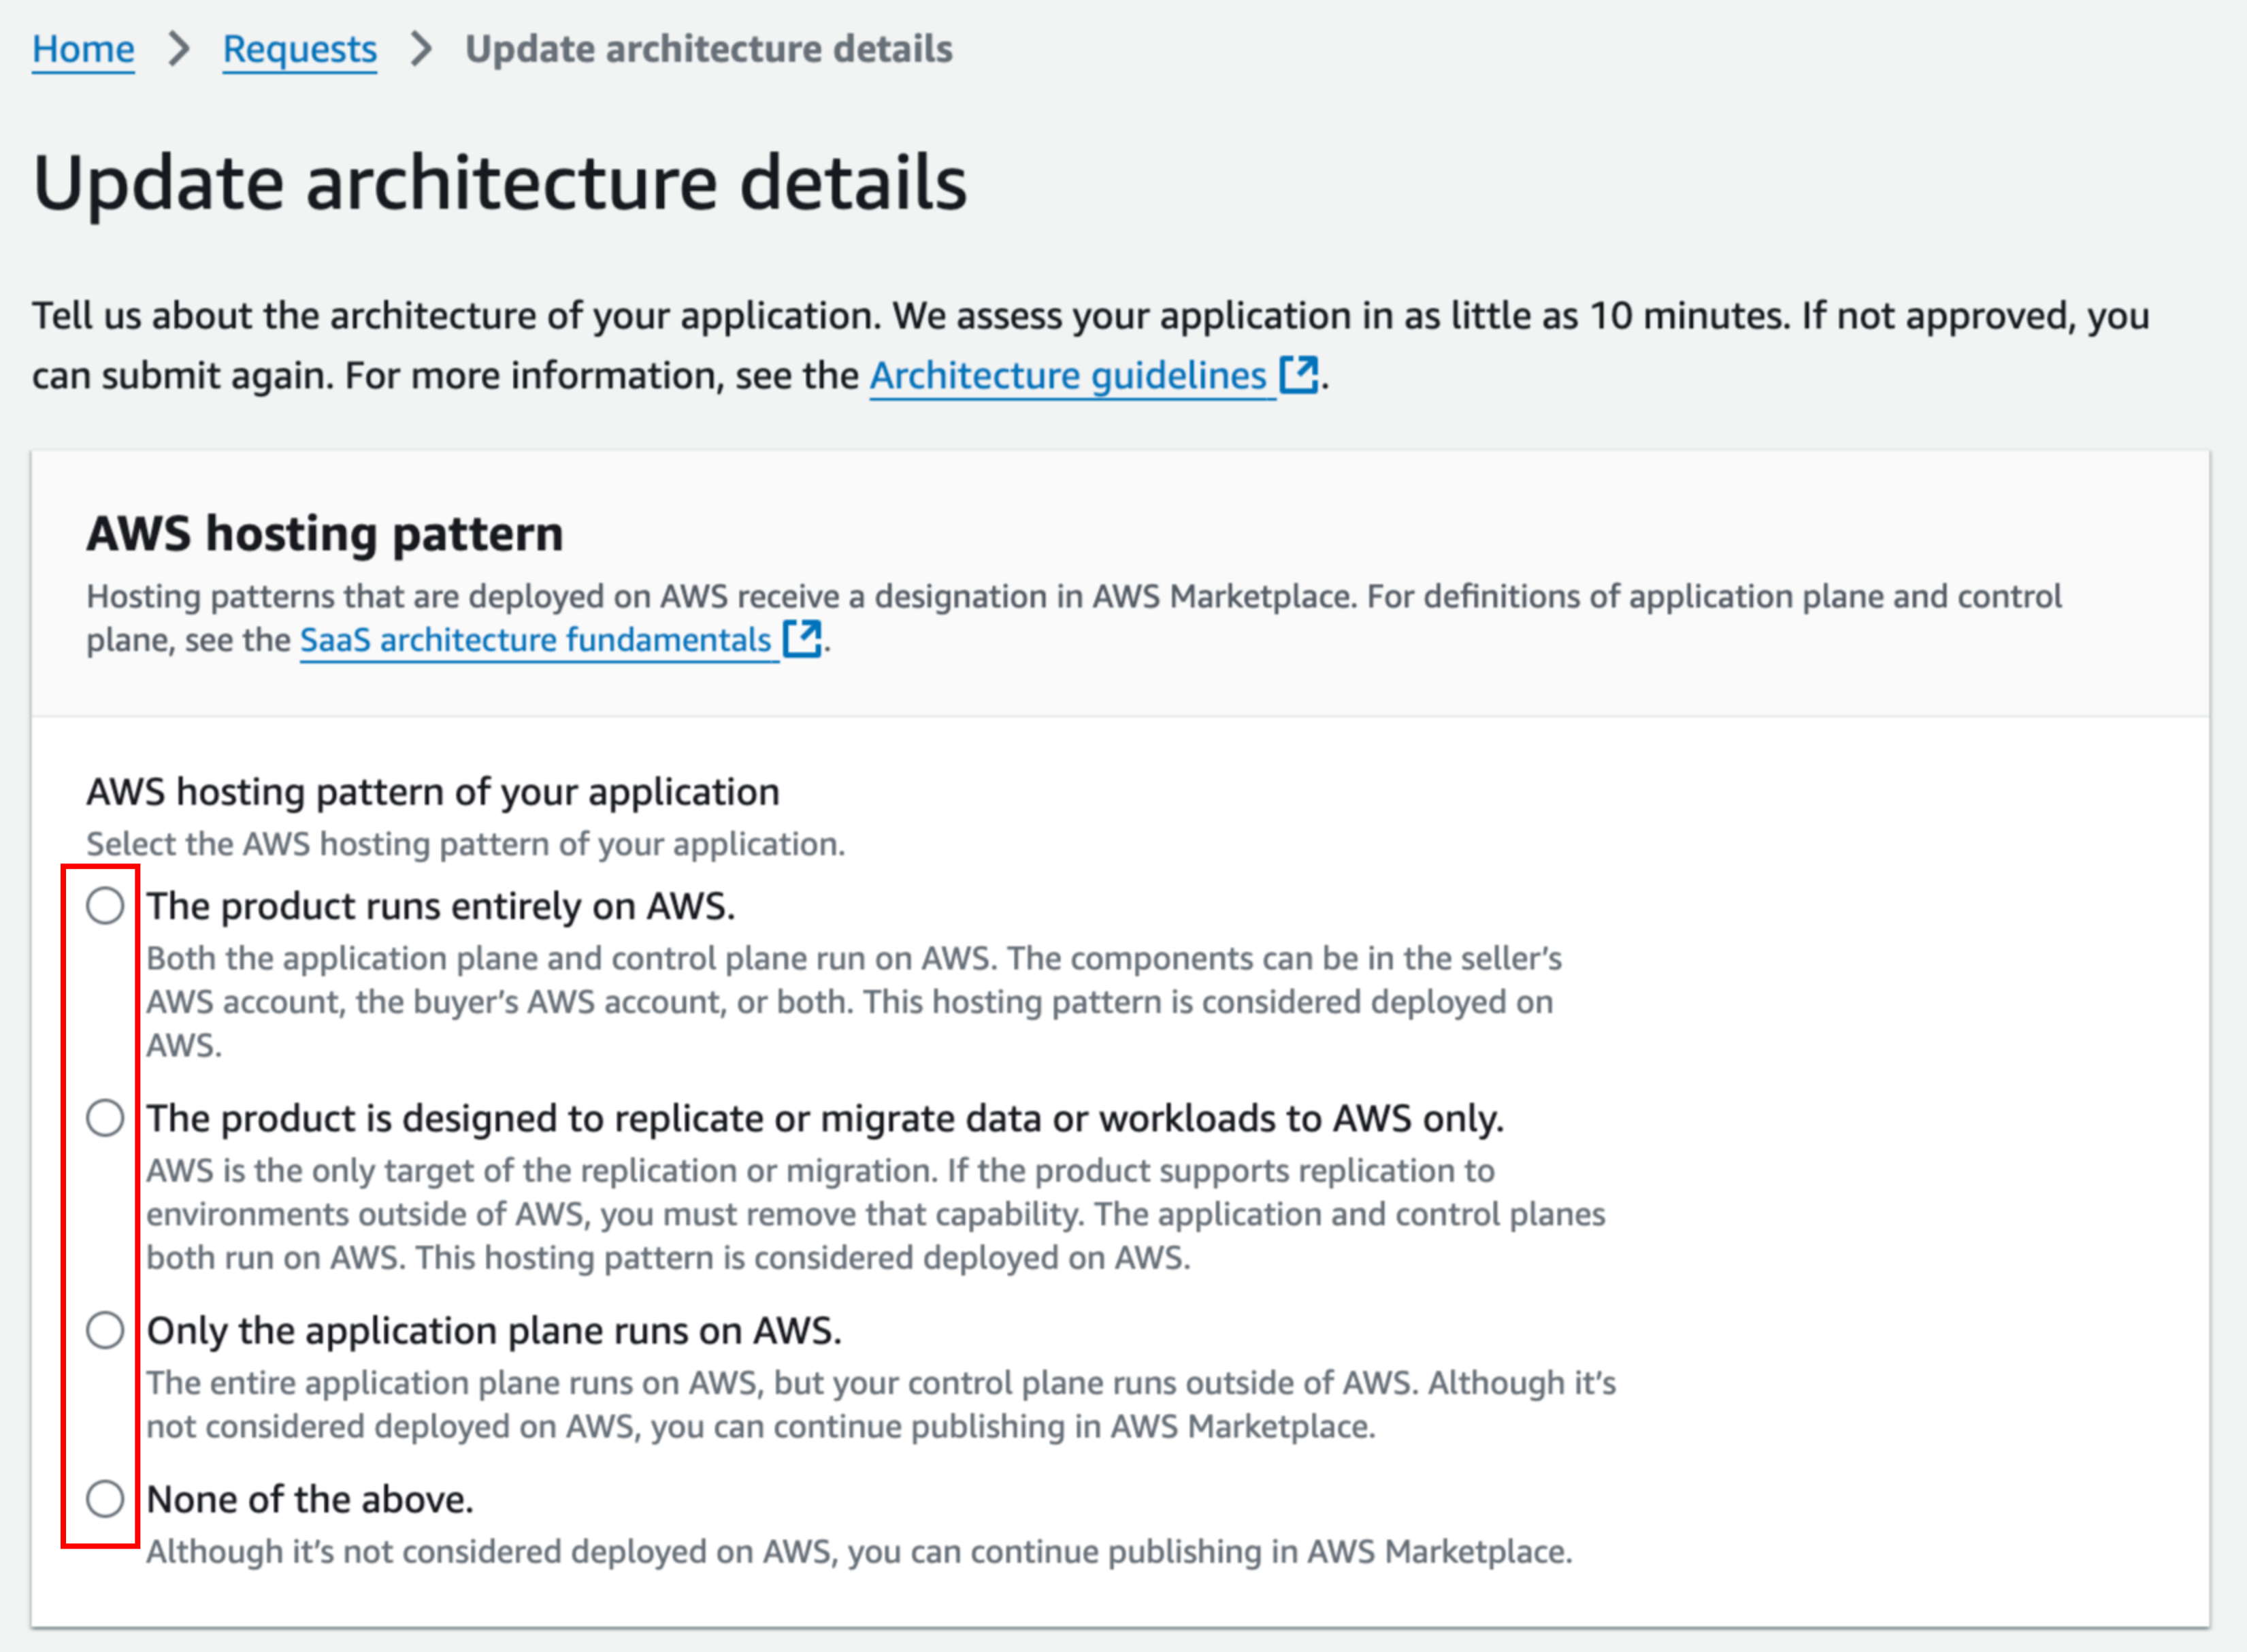
Select the correct AWS Hosting Pattern option.
-
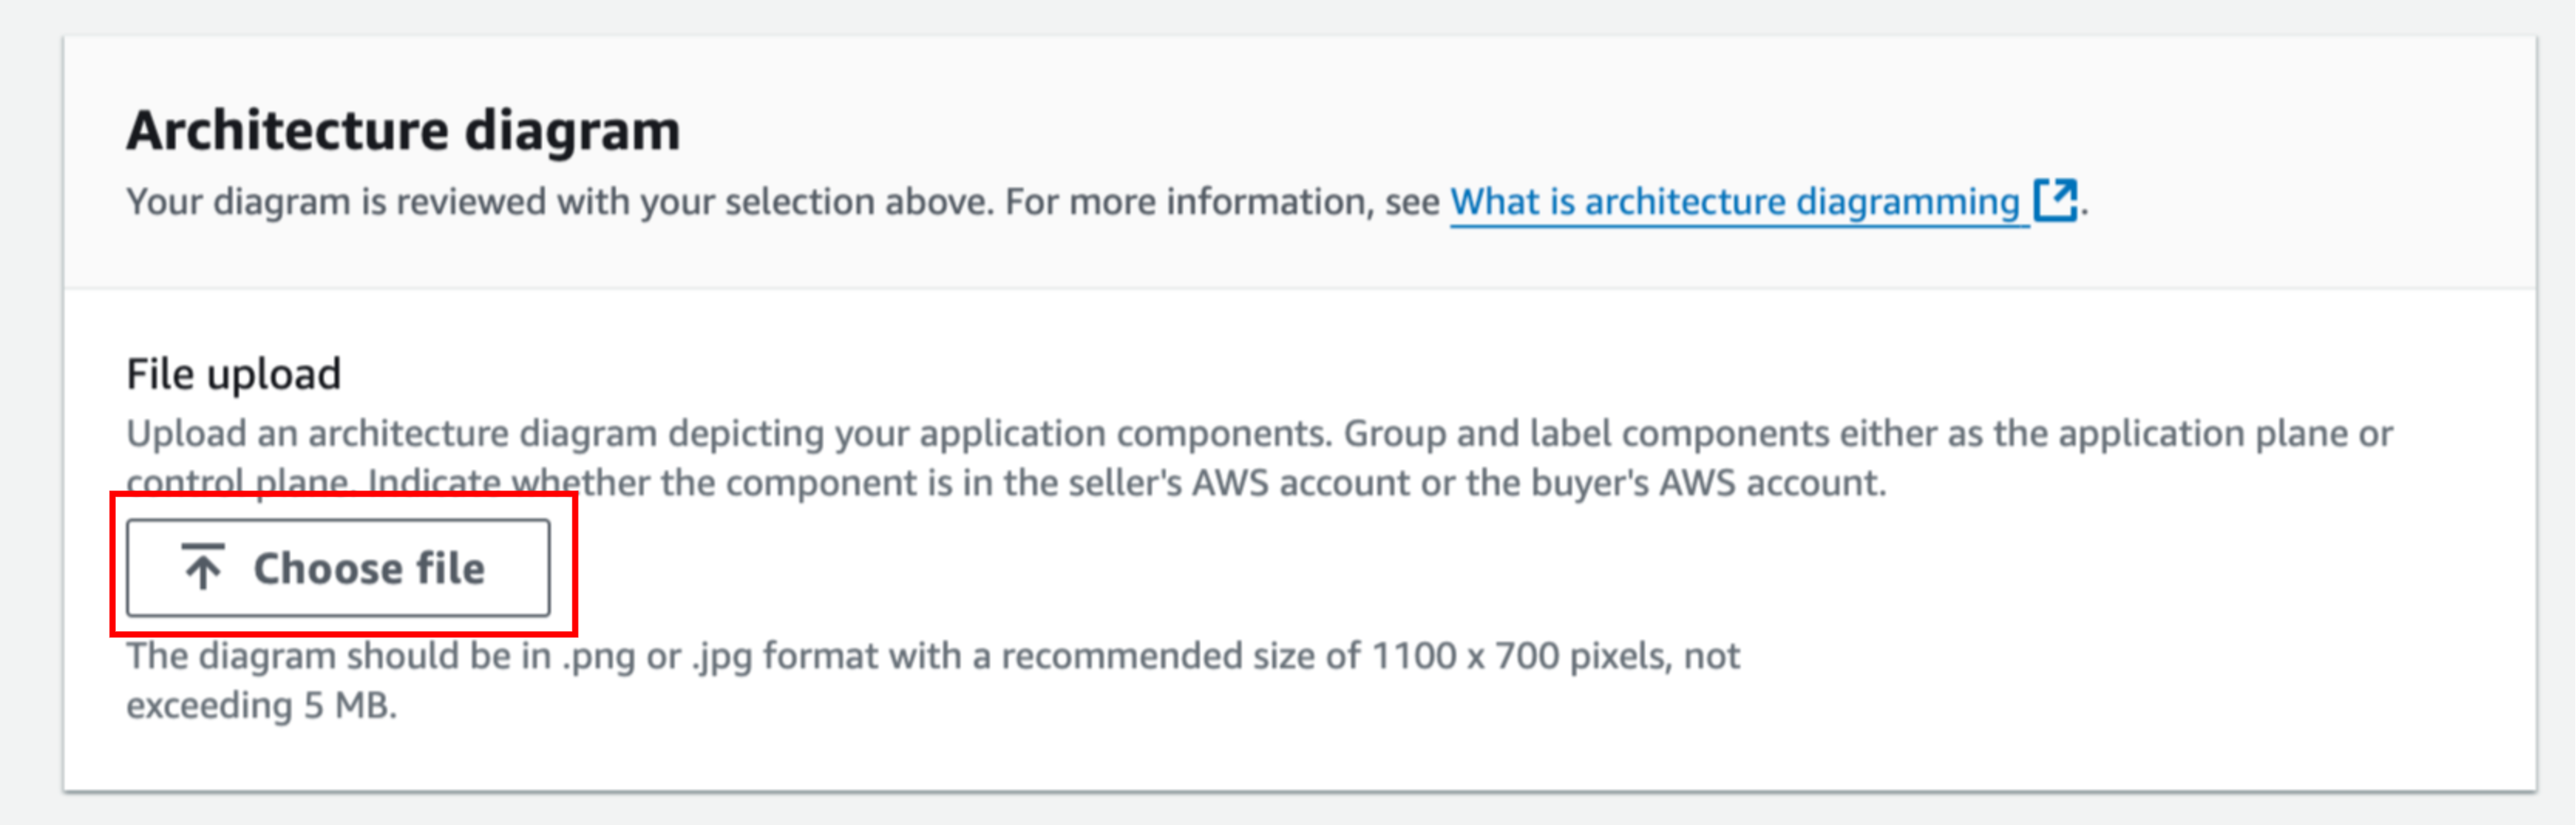
Upload your diagram file.
-
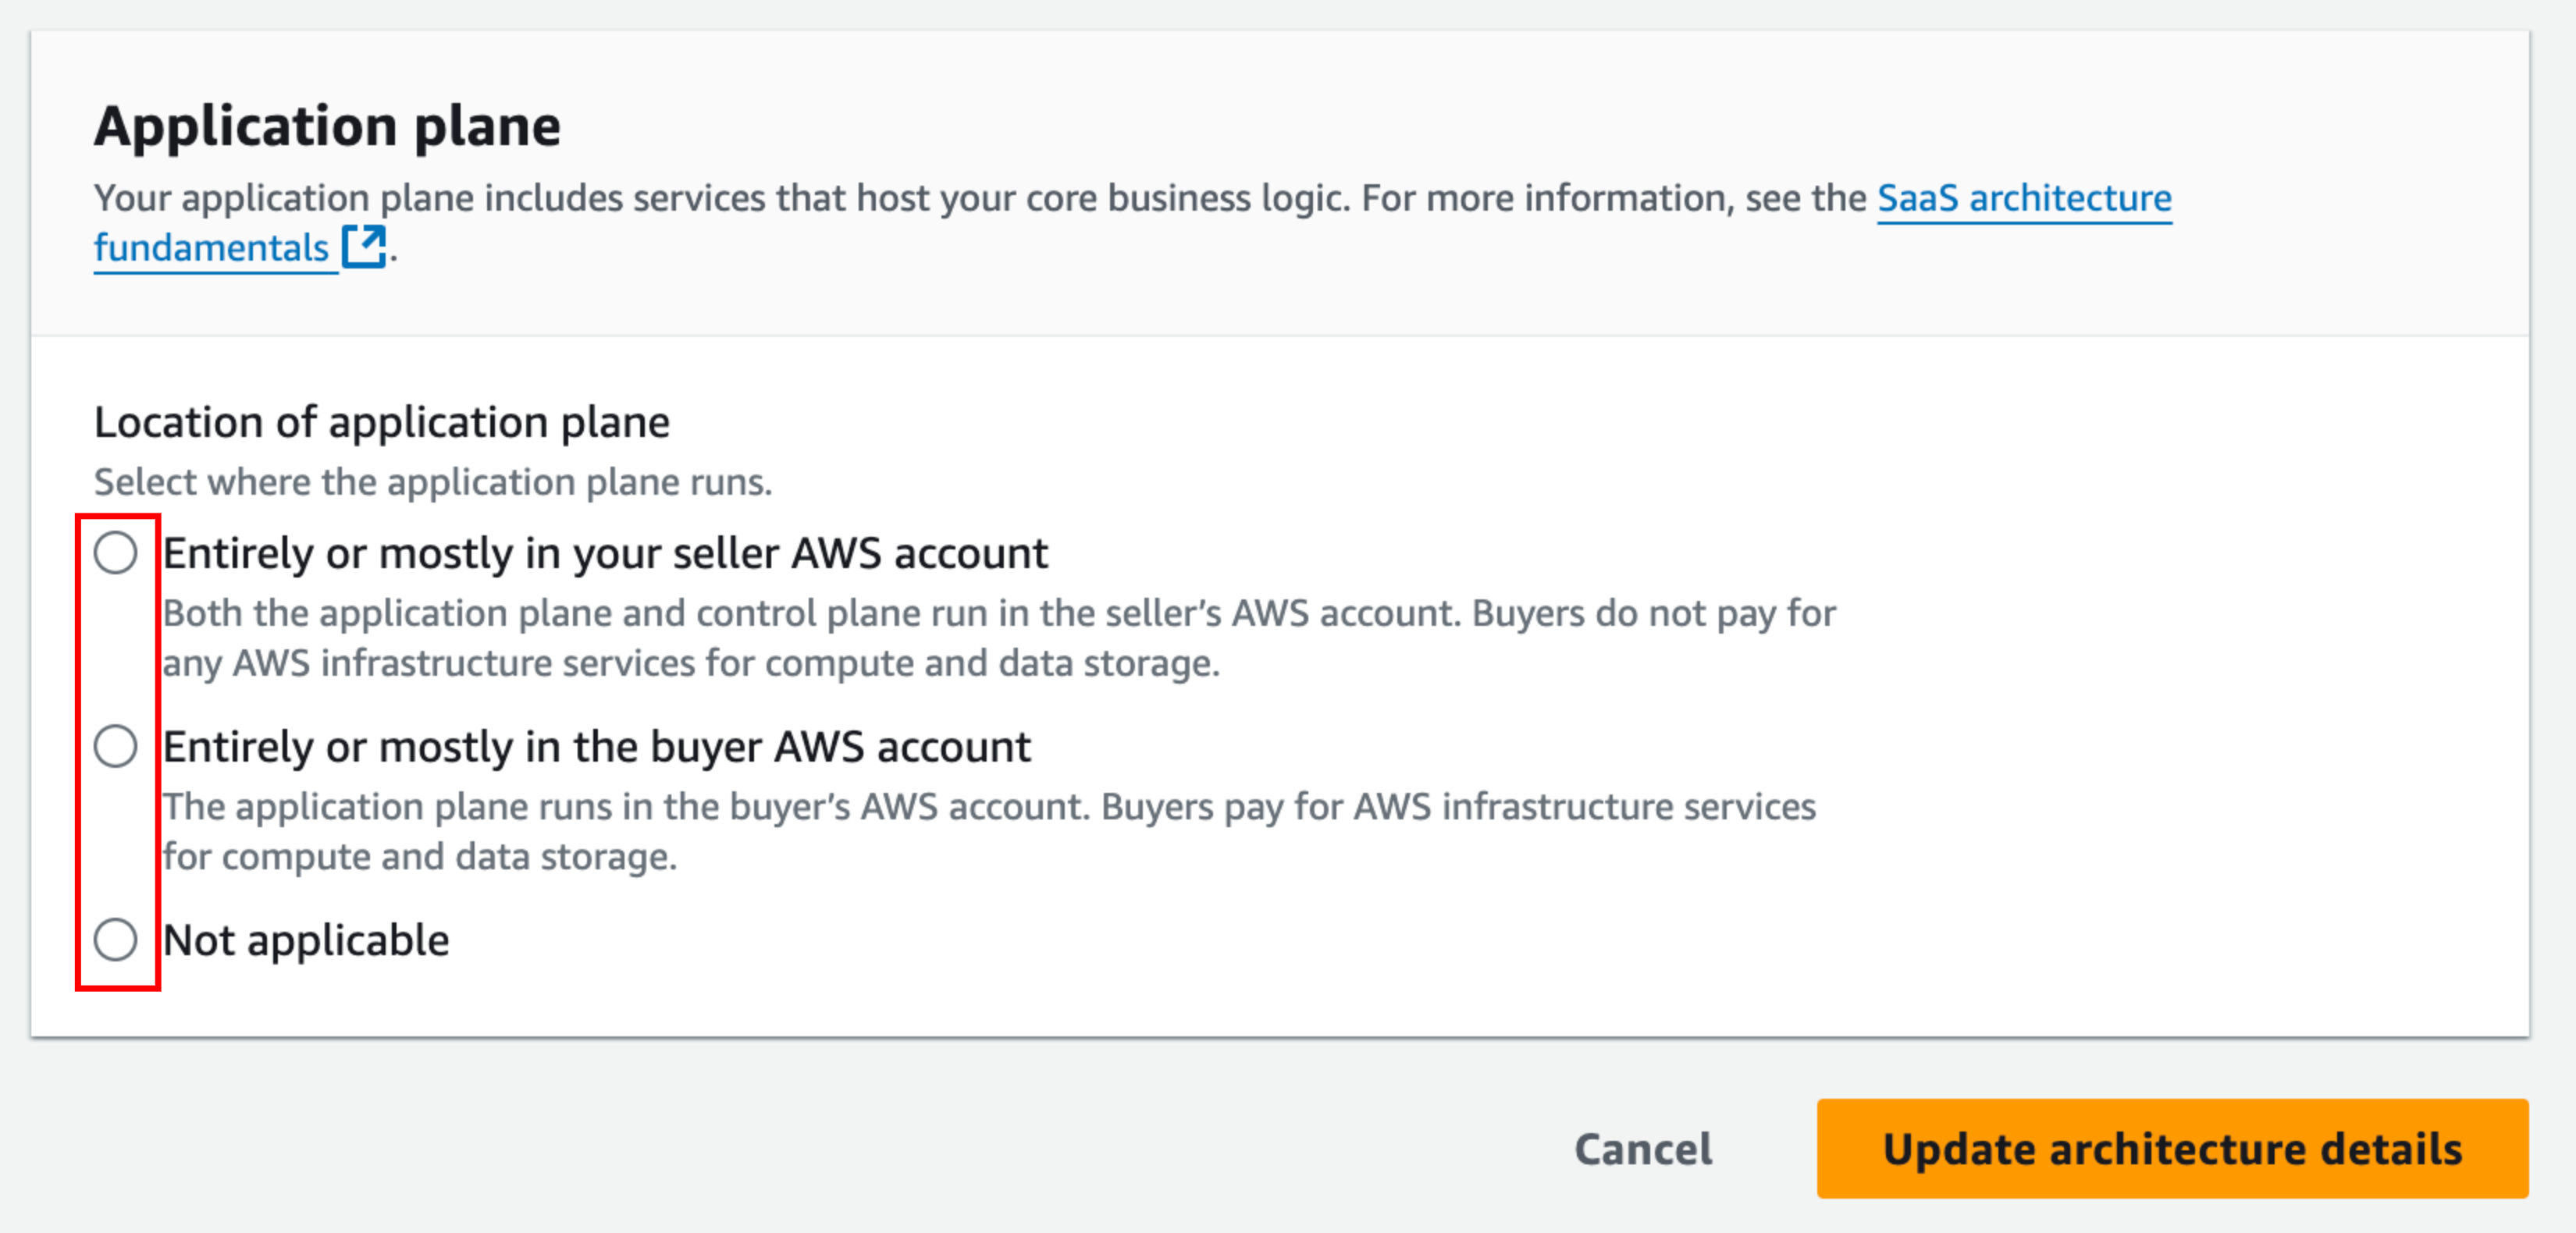
Choose your Application plane.
-
Click Update Architecture Details to finish.
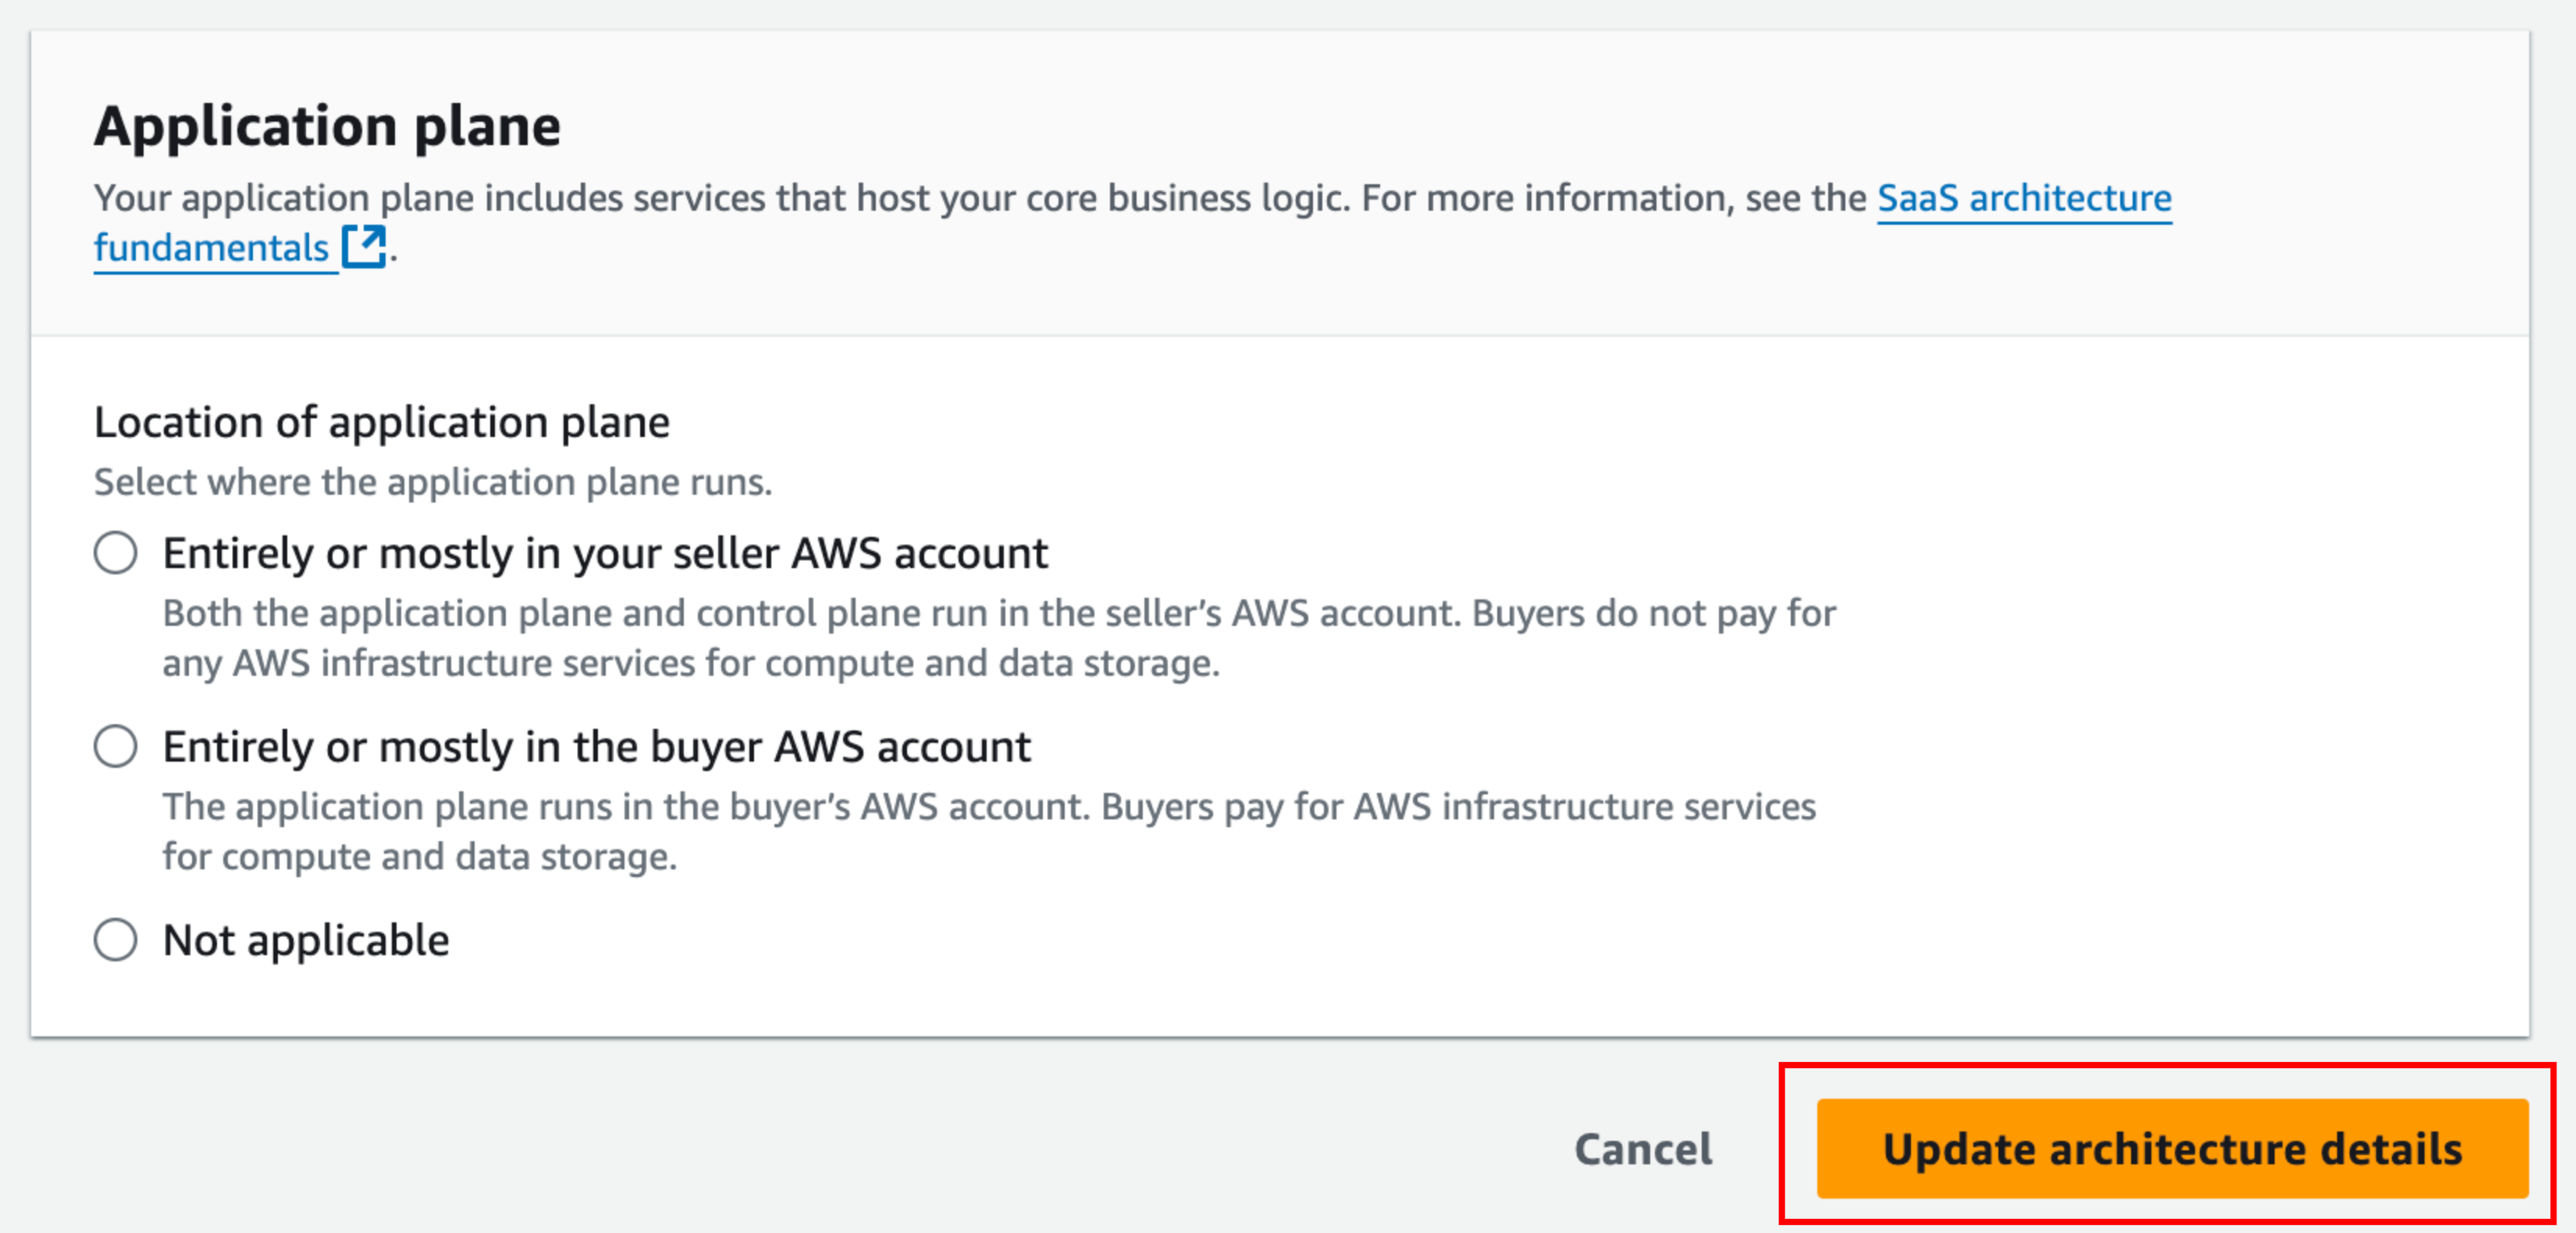
See also the AWS Architecture Guidelines.
Set Product Signup URL
Suger automatically syncs with AWS Marketplace and pulls all your listed product info. You can see all your products on the Suger Console Product page. Select a product, click EDIT in the Product Info section, fill in your product Signup URL in the Fulfillment URL field, and click SAVE.

Signup URL Redirect
- After purchasing the product, your buyer is directed to
https://api.suger.cloud/public/signup/aws/orgId/your-suger-organization-ID?partnerId=your-suger-integration-partner-IDfirst. - Then they are redirected to your product Signup URL with two query parameters,
sugerEntitlementId&partner— for example,https://your-product-signup-url?sugerEntitlementId=1234abcd&partner=aws. - Your service needs to collect this
sugerEntitlementIdand save it with the account created by the buyer. - More details can be found on the how it works page.
Marketing Insights
Suger automatically syncs marketing insights from AWS Partner Central and displays them on the product detail page.
Insights Metrics
-
Buy with AWS (AWS Partner Central): Monitor web traffic, engagement, and conversion metrics for your Buy with AWS experience.
- Total button clicks: The total clicks on the call-to-action buttons on the seller website.
- Page views: The total page visits to the Buy with AWS procurement page.
- Total agreements: The total agreements created on the Buy with AWS procurement page.
- Sign in drop-off-rate: AWS sign in page drop-off-rate.
- Procurement page unique visitors: The total unique procurement page users.
- Procurement page bounce rate: The ratio of users who create agreements to the users who just sign-in.
- Procurement page average dwell time: The time between user sign-in and that user leaving the page in minutes.
-
Customer Agreements (AWS Partner Central): View and analyze your product’s customer agreements, including both public and private offers.
- Public Offer Agreements: The total number of agreements from public offers.
- Private Offer Agreements: The total number of agreements from private offers.
- New Public Offer Agreements: The number of new agreements from public offers in the period.
- New Private Offer Agreements: The number of new agreements from private offers in the period.
- Active Customers: The number of currently active customers.
- New Paying Customers: The number of new paying customers in the period.
-
Listing Performance (AWS Partner Central): Monitor and analyze your product listing’s performance metrics.
- Unique Visitors: The total number of unique visitors to the listing.
- New Public Offer Agreements: The number of new agreements from public offers.
- New Unique Visitors: The number of first-time visitors to the listing.
- Returning Unique Visitors: The number of returning unique visitors to the listing.
- Seller Organic Discovery: The number of visitors who discovered the listing organically through seller channels.
- Seller Led Marketing Campaigns: The number of visitors from seller-led marketing campaigns.
- AWS Organic Discovery: The number of visitors who discovered the listing organically through AWS.
- AWS Led Marketing Campaigns: The number of visitors from AWS-led marketing campaigns.
-
Search Performance (AWS Partner Central): Analyze your product’s search visibility and performance in AWS Marketplace.
- Impressions: The number of times the listing appeared in search results.
- Clicks: The number of clicks on the listing in search results.
- Click Through Rate: The percentage of impressions that resulted in a click.
Preview
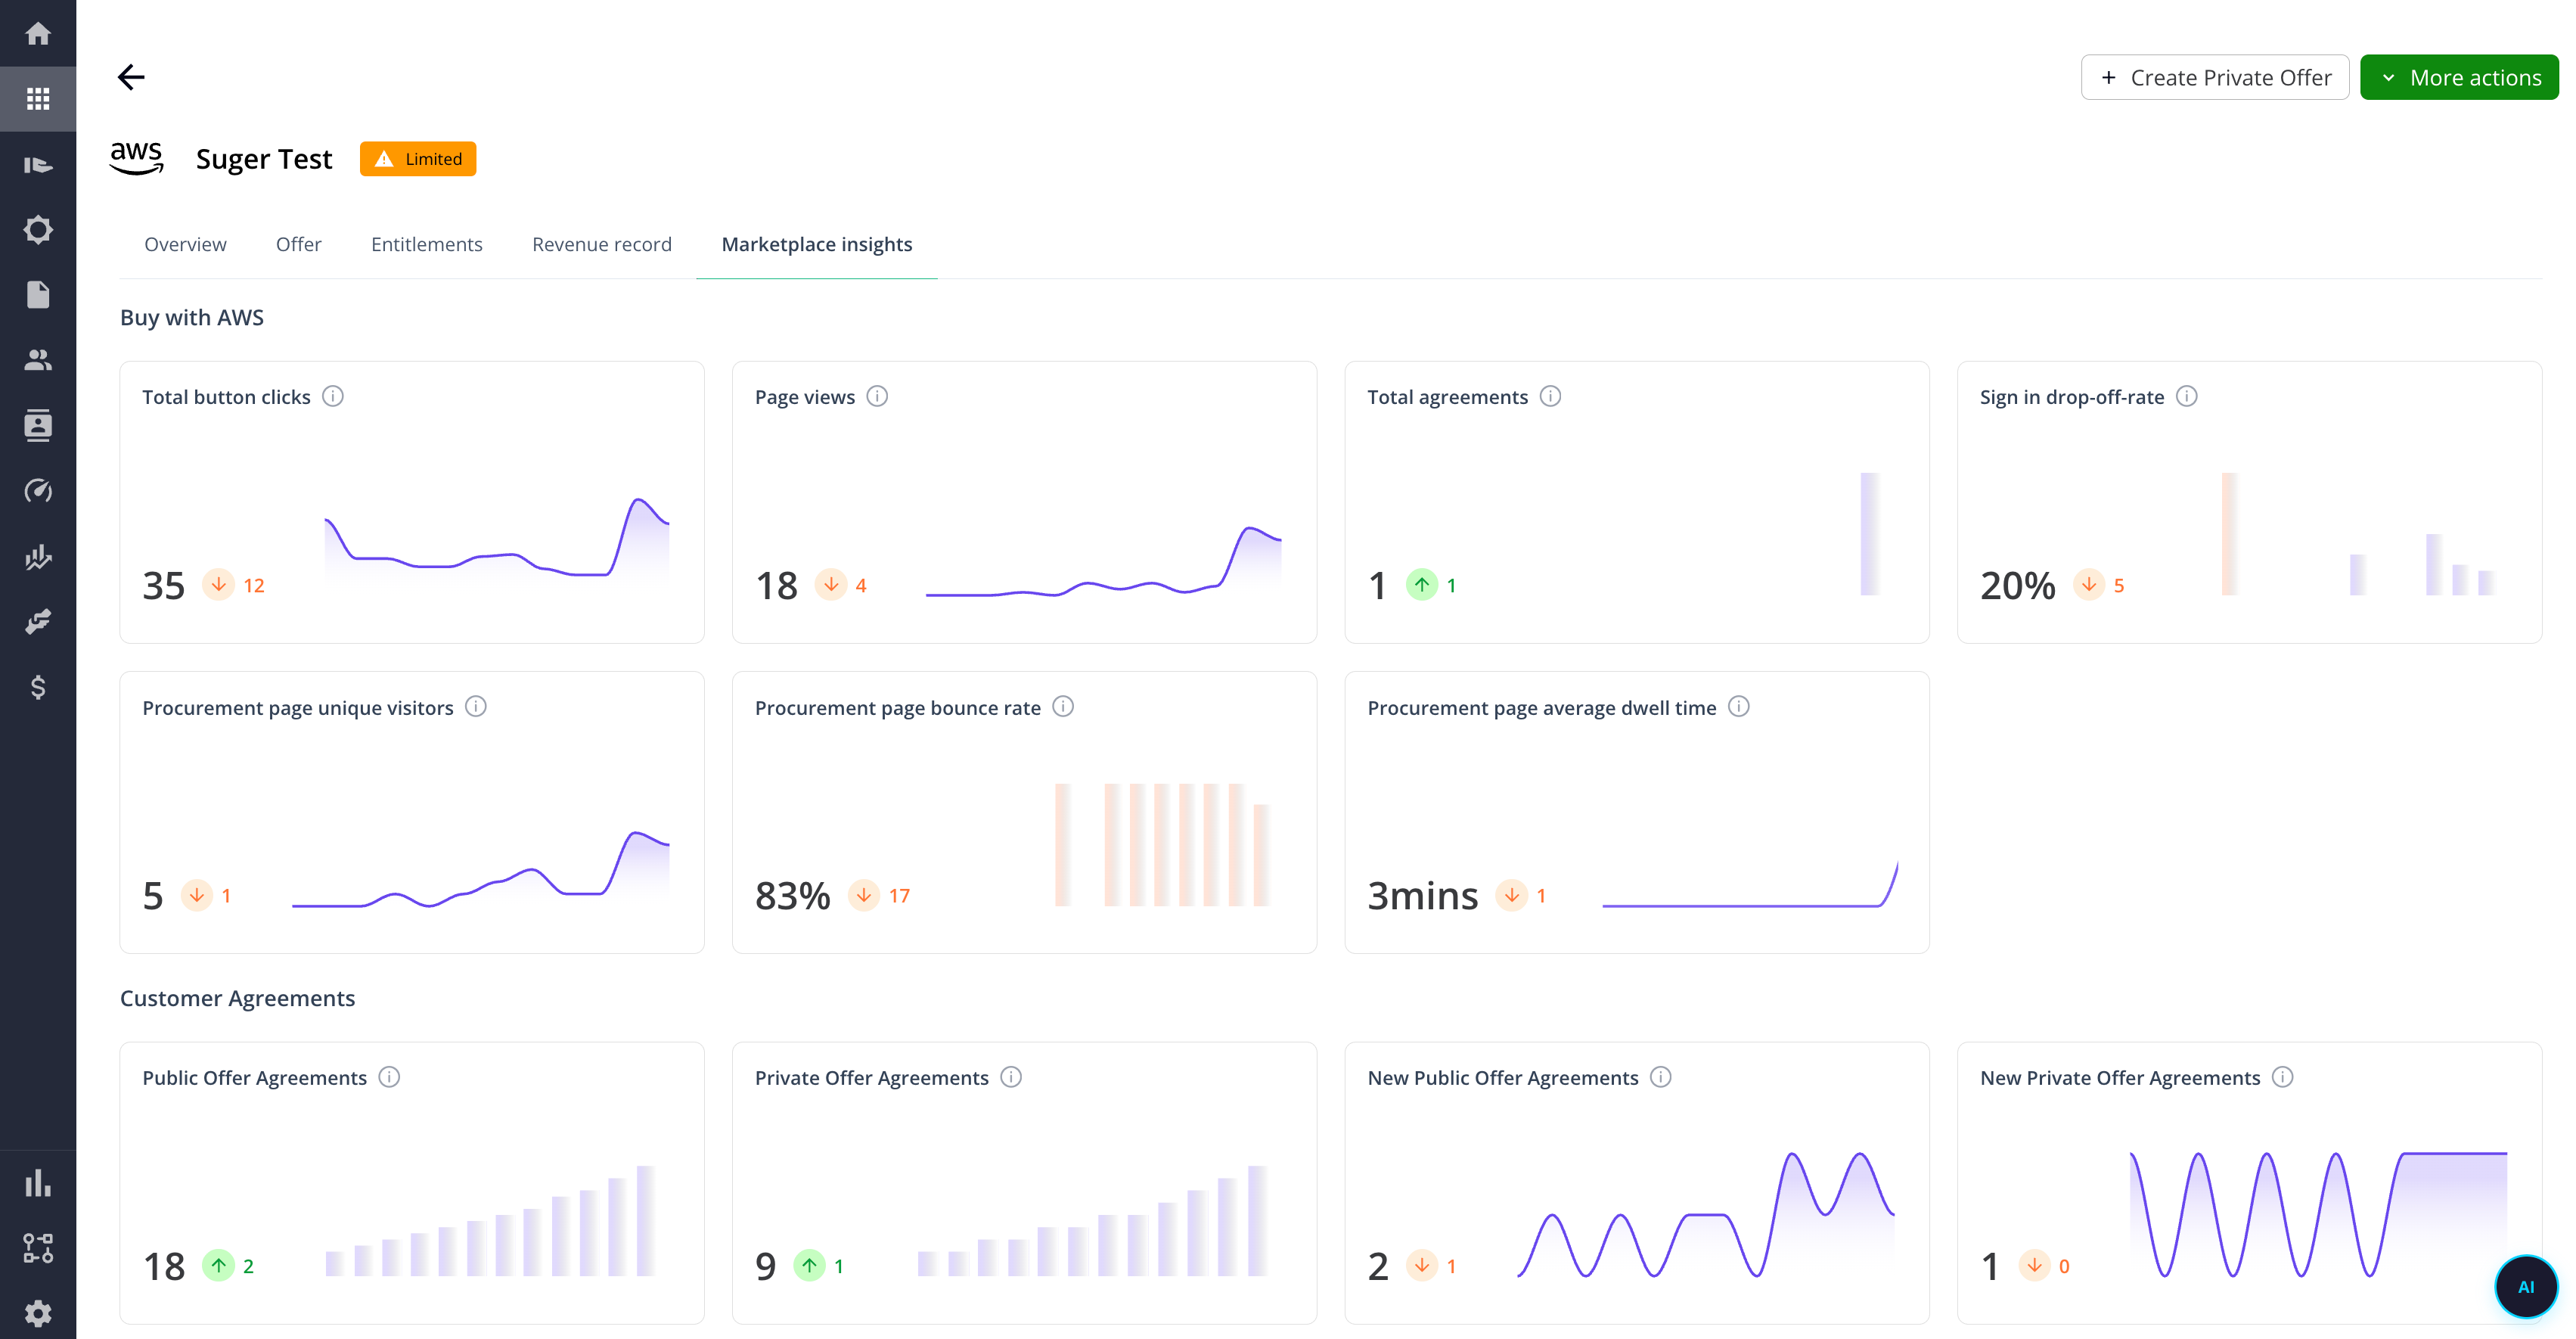
Each metric card displays two pieces of information:
- Bottom-left number: The metric’s aggregated value for the current month.
- Chart (right side): A series or bar chart showing the last 12 months of data.
All metric data is aggregated monthly and updated daily.
Data Availability
Why is the insight blank?
To unlock the Buy with AWS insight, you must have placed CTA (call to action) buttons on your website; follow the Suger doc Buy with AWS.
To unlock the Customer Agreements, Listing Performance, and Search Performance insights, you must enroll in the AWS Marketplace Seller Prime program.
Verify the data
If the data of an insight is not available, check it on AWS Partner Central. Contact us if the data is available on AWS Partner Central but not on Suger.
Related Documents
AWS Marketplace Seller Guide: Dashboards for marketing
Understanding Buy with AWS as a seller
AWS Marketplace Seller Prime - Intro
5 things you should know about AWS Marketplace Seller Prime
FAQ
Why do I need public pricing if I only want to sell private offers?
AWS requires at least one pricing dimension above $0.00 on your public listing — dimensions can’t be limited to private offers only. A common practice is to set a high placeholder price (like $100,000/year) and direct buyers to your support contact for custom pricing. When a buyer accepts your private offer, they transact at the offer price, not the public rate.
How long does AWS approval actually take, and what causes delays?
SaaS approval usually takes 2 to 4 weeks; Professional Services usually takes 7 to 10 business days. Delays can happen if required testing isn’t done, descriptions don’t meet AWS guidelines, or due to AWS review volume. Plan for at least 2–3 weeks and avoid tying critical deals to approval dates.
What does Limited status mean, and when will my listing go public?
Limited status is a secure testing sandbox where your listing is only visible to your account and allowlisted test accounts. It will never go public automatically. Once you finish testing, you must manually click Publish Product to send an “Update visibility” request to AWS. The listing becomes Public only after AWS audits and approves that request.
Why was my product description rejected, and how do I fix it?
AWS is strict about marketing language and listing metadata. Common reasons for rejection:
- Hyperbolic language — avoid unprovable claims like “the best,” “number one,” or “revolutionary.” Focus on factual descriptions of features and outcomes.
- Off-platform redirects — don’t include URLs or language that redirects buyers to other platforms, external payment gateways, or upsell services outside AWS Marketplace.
- Poor formatting — avoid excessive capitalization, extra punctuation, and grammar issues.
- Unclear pricing dimensions — each dimension must clearly explain what the customer gets, including scope or access.
Can everything on the listing be changed at any point? How long would it take for the changes to take effect?
Everything can be changed at any time except pricing, which can only be changed every 120 days and requires an AWS support ticket.
We have two products. Can we create two listings simultaneously?
Yes.
If we remove a plan from our listing, how will it impact our existing customers?
It depends on your listing type. It should not impact customers on a flat-fee contract, but customers on a subscription might be affected. In that case, open a ticket with AWS to confirm whether the dimension can be removed.
Do we need to include the tax value in the price?
No — AWS handles all the taxes.
Spotted something wrong or out of date on this page? Tell us and we'll correct it.