
Stripe
Allow Suger to manage your Stripe seamlessly, including customers, payments.
Overview
Stripe is a popular online payment processing platform that allows businesses and individuals to accept payments over the internet. It provides a range of tools and services that simplify the process of setting up and managing online payments, including online payment gateway integration, merchant account services, and developer-friendly APIs.
By connecting Suger to your stripe, we can build customized automation workflow in manage of customer, coupon and payment.
How the integration works
| Direction | Two-way. Suger writes to Stripe when it acts on a buyer’s behalf (customers, payment methods, PaymentIntents, invoice charges) and reads from Stripe when it pulls usage for marketplace reporting. Stripe pushes state changes back over webhooks. |
| Source of truth | Stripe owns customers, payment methods, charges and disputes. Suger owns the buyer↔customer link, the mapping to marketplace dimensions, and the usage records it reports onward. |
| Scope | Organization-level for billing and metering. A separate user-level connection exists for the Suger AI tools — see Create User Integration (MCP) below. |
| Schedule | When Enable Auto Report Usage is on, an hourly job at 25 minutes past the hour pulls meter records and reports them as usage record groups. |
| Credentials | A Stripe API key (a restricted key is recommended — see Use Restricted Keys). Suger stores it in a secret manager, not in the integration record. The publishable key is stored separately for the embedded checkout form. |
Webhook events
Suger registers a webhook endpoint in your Stripe account when the integration is created — that is why the restricted key needs Webhook Endpoints-Write. Deleting the integration removes the endpoint again.
It subscribes to exactly these events:
| Event | Why Suger listens |
|---|---|
charge.updated | Charge state changed after capture |
charge.refund.updated | A refund progressed or failed |
charge.dispute.created | A dispute was opened |
charge.dispute.closed | A dispute was resolved |
customer.updated | Customer details changed in Stripe |
payment_intent.succeeded | A payment completed |
payment_intent.payment_failed | A payment attempt failed |
payment_method.attached | A payment method was added to a customer |
payment_method.detached | A payment method was removed |
payment_method.updated | Payment method details changed |
payment_method.automatically_updated | The card network pushed updated card details |
setup_intent.requires_action | Saving a payment method needs customer action (for example 3-D Secure) |
The endpoint is pinned to the Stripe API version Suger’s client uses, so a new event type appearing in Stripe does not silently change what Suger receives.
Prerequisites
Before connecting, get the following credentials from your Stripe Dashboard:
- Public Key: Your standard identifiable key.
- Secret Key or Restricted Key: A standard Secret Key works, but Suger strongly recommends using a Restricted Key so you can grant least-privilege access scoped specifically to marketplace operations. See Use Restricted Keys for the required permissions.
Create Integration
In your Suger Console Integration, you will see the Stripe integration connection. Click the Connect button to create an integration with your stripe instance. This will open an dialog for you to input.
The Public Key and Secret Key can be found in the stripe dashboard apikeys.
Stripe Test Mode
If you want to use stripe in your test environment with stripe test mode, use keys in stripe test mode dashboard test apikeys.
You may need a test suger organization to build a complete test environment. Or you can create the integration with test mode keys and then switch to live mode keys after the test is finished.
Use Restricted Keys
You can use stripe restricted keys with specific access limits and permissions for greater security. The Restricted key provided to the suger must have the following permissions.
- Core resources
- Balance - Read
- Charges - Write
- Customers - Write
- Customer session - Write
- Disputes - Write
- Events - Read
- PaymentIntents - Write
- PaymentMethods - Write
- Products - Write
- SetupIntents - Write
- Sources - Write
- All Checkout resources - Write
- All Billing resources - Write
- All Order resources - Write
- Webhook resources
- Webhook Endpoints-Write
See more about stripe keys stripe docs.
Once the integration process is finished, you can proceed by clicking the VERIFY button. This action triggers the Suger service to test the connection to the APIs of your stripe instance. If everything is configured correctly, the integration status will be updated as VERIFIED.
Manage Buyers & Customers
When you use Suger’s metering and billing with Stripe, each of your customers is represented by a Suger buyer that is linked to a customer in your Stripe account. Suger stores the Stripe customer ID on the buyer and uses it for every Stripe operation on that buyer’s behalf — collecting payment methods, charging via PaymentIntents, applying charges to invoices, and matching incoming Stripe webhooks.
How the link is established
The link between a Suger buyer and a Stripe customer is established when the buyer is created, based on the optional Stripe Customer ID field:
- Stripe Customer ID provided — Suger connects the buyer to that existing Stripe customer. It verifies the customer exists, tags it with a
sugerBuyerIdmetadata entry pointing back to the Suger buyer, and imports the customer’s saved payment methods into the buyer’s wallet. No new Stripe customer is created. - Stripe Customer ID left blank — Suger automatically creates a new Stripe customer, populated from the buyer’s name, description, and company address, and tagged with the same
sugerBuyerIdmetadata.
Duplicate protection: If another buyer in your organization is already linked to the Stripe Customer ID you provide, buyer creation is rejected. This prevents two Suger buyers from pointing at the same Stripe customer.
The link is set only at creation
The Stripe Customer ID cannot be changed after the buyer is created. Editing a buyer does not re-connect it to a different Stripe customer or create a new one — only the create step performs the connect-or-create logic. To link a buyer to a different Stripe customer, create a new buyer.
Payment methods and wallets
Payment methods are collected securely through the Stripe SDK; sensitive card details are never stored in Suger. A buyer’s wallet supports the following types, which map to Stripe payment methods:
| Wallet type | Stripe payment method | Typical currency |
|---|---|---|
| Card | Card | All |
| ACH Debit | US bank account | USD |
| SEPA Debit | SEPA debit | EUR |
| BACS Debit | BACS debit | GBP |
| Credit | — (managed by Suger) | Buyer’s currency |
Credit is a Suger-managed balance rather than a Stripe object; it functions like store credit and is applied automatically during invoice payment. A default payment method can be set for a buyer to prioritize it when paying invoices.
Create User Integration (MCP)
This integration acts on behalf of the individual user (a member of the Stripe account), not the organization. Each team member connects their own Stripe account so that Suger AI operates with their personal permissions. See Stripe MCP documentation for details.
The Stripe MCP integration uses a dedicated OAuth 2.1 app registered with Stripe. The token it issues is scoped exclusively to mcp.stripe.com and is the credential used by Suger AI.
Prerequisites
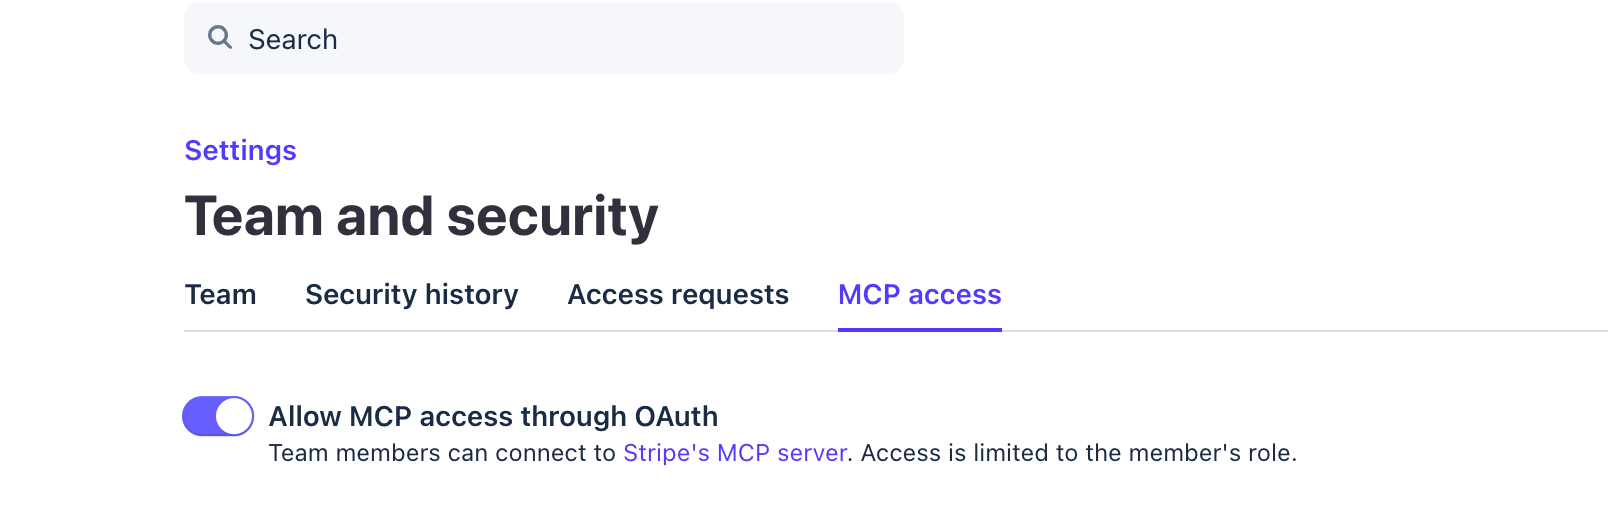
Enable MCP access for your Stripe account before connecting:
- Go to your Stripe Dashboard → Settings → Team and security.
- Under the MCP access section, enable MCP access for your account.
Connect
- In the User Integrations section, find Stripe MCP (User) and click Connect Stripe Account.
- You will be redirected to Stripe to authorize the MCP-scoped application.
- After authorization, you will be redirected back to Suger. The integration status is set to
Verifiedautomatically.
Create User Integration (OAuth)
Connect your personal Stripe account to Suger via Stripe Connect OAuth.
- In the User Integrations section, find Stripe (User) and click Connect Stripe.
- You will be redirected to Stripe’s authorization page. Review the permissions and click Connect.
- After authorization, you will be redirected back to Suger with the integration connected.
Note: If your Stripe account is already controlled by another platform, this connection will fail. Since June 2021, Stripe does not allow a second platform using
read_writeOAuth scope to connect to a controlled account. You must disconnect from the controlling platform first. See Stripe’s OAuth reference for details.
Suger AI Tools
Suger AI connects to Stripe’s MCP server using the integration’s credentials.
MCP server URL:
https://mcp.stripe.comTwo integration levels are supported. The user-level MCP token takes precedence when both are connected.
Integration Level Auth Stripe Org API key Stripe MCP (User) User OAuth (PKCE) See Stripe MCP documentation for the full list of available tools.
Edit Integration
Open the Stripe integration from Settings → Integrations and click Edit. The dialog covers four settings:
- Enable Auto Report Usage: When enabled, an hourly cron job fetches usage metering records from Stripe and reports them to Suger as usage record groups. Leave it off if you meter somewhere other than Stripe.
- Billing Mode: How usage is measured for that report.
quantityis the mode Suger can run today. - Billing Source: Where in Stripe the usage is read from. For
quantity, the source isusage_record. - Enable Entitlement End Soon Notification: When enabled, specify the number of days (10-60) before an entitlement ends to trigger notifications. Suger will send an initial notification when Stripe Marketplace entitlements approach ending, followed by reminders every 5 days. To configure recipients, follow the email notification configuration guide and add the scope
END_SOON.ENTITLEMENT.
The org-level Stripe card also reports when its stored API key has stopped working — for example after the key is rolled or revoked in Stripe. See Connection health.
Delete Integration
The stripe integration can be deleted like all other integrations. Once the deletion is triggered, no time window or methods to recover.
Spotted something wrong or out of date on this page? Tell us and we'll correct it.