Configuration
This guide outlines the necessary configuration steps within your Salesforce environment to manage the Suger App.
For configurations related to the external Suger Integration platform (such as API credentials or mapping rules), please refer to the Suger Integration Setup Guide.
Permission Sets & Access Control
Suger uses Salesforce Permission Sets to strictly control user access. These permission sets determine which Suger Tabs are visible to a user and which Action Buttons (e.g., Create Private Offer) appear on their record pages.
Admin Privileges:
Suger Permission Sets do not restrict users with System Administrator privileges. Admins inherently possess full Read/Write access to all Suger features and Cloud Partners, regardless of the specific permission set assigned to them.
How to Access Permission Sets
To view or assign these permissions in your Salesforce environment:
-
Click the Gear Icon (⚙️) in the top-right corner of the screen and select Setup.
-
In the Quick Find box on the left sidebar, type
Permission Sets. -
Select Permission Sets from the results to view the list of available Suger permissions.
-
All Suger-related permission sets begin with the prefix
Suger. Assign the appropriate set based on the user's role in your sales cycle.
Suger provides granular Permission Sets to control access based on Role (Admin vs. User), Module (Marketplace vs. Co-sell), and Cloud Partner (AWS, Azure, GCP).
Use the table below to assign the correct permissions to your users.
Core Roles & Admin Permissions
These permission sets provide high-level access control.
| Permission Set Name | Description & Capabilities |
|---|---|
| Suger Approver | Grants access to the Approve and Reject action buttons on records. (Note: The Enable Approval Process toggle must be active in Settings). |
| Suger Integrator | System Admin Access. Grants full Read/Write access to all Suger objects, including the Settings page and configurations. |
| Suger Integrator (Salesforce Integration License) | API User Only. Grants full system access specifically for users holding the Salesforce Integration License. Do not assign this to standard human users. |
| Suger User | Standard Power User. Grants full Read/Write access to all Suger objects (Offers, Referrals, etc.) across all clouds. Excludes access to the Settings page. |
| Suger User - Read Only | Global View-Only. Grants view-only access to all Suger data. Users cannot create or edit records. |
| Suger User - Cosell | Grants Read/Write access specifically to Co-sell Referrals for all cloud partners. |
| Suger User - Marketplace | Grants Read/Write access to Offers, Entitlements, Products, Buyers, and Companies for all cloud partners (Excludes access to Co-sell Referrals). |
Co-Sell Cloud-Specific Permissions
Use these permissions to restrict a user's Referral access to a specific Cloud Provider. These permissions do not grant access to Offers, Entitlements, Products, or Companies(Buyers).
| Permission Set Name | Description |
|---|---|
| Suger Cosell (Read Only) | View-only access to Co-sell Referrals for all cloud partners. |
| Suger Cosell - AWS | Read/Write access to Co-sell Referrals for AWS only. |
| Suger Cosell - AWS(Read Only) | View-only access to Co-sell Referrals for AWS only. |
| Suger Cosell - Azure | Read/Write access to Co-sell Referrals for Azure only. |
| Suger Cosell - Azure (Read Only) | View-only access to Co-sell Referrals for Azure only. |
| Suger Cosell - GCP | Read/Write access to Co-sell Referrals for GCP only. |
| Suger Cosell - (Read Only) | View-only access to Co-sell Referrals for GCP only. |
Marketplace Cloud-Specific Permissions
Use these permissions to restrict a user's Offer & Entitlement access to a specific Cloud Provider. These permissions exclude access to Referrals.
Assigning any of the permission sets below automatically grants access to shared Marketplace objects, including Buyers, Companies, and Products. The "Cloud-Specific" restriction only applies to Offers and Entitlements.
| Permission Set Name | Description |
|---|---|
| Suger Marketplace (Read Only) | View-only access to Offers and Entitlements for all cloud partners. |
| Suger Marketplace - AWS | Read/Write access to AWS Offers and Entitlements. |
| Suger Marketplace - AWS (Read Only) | View-only access to AWS Offers and Entitlements. |
| Suger Marketplace - Azure | Read/Write access to Azure Offers and Entitlements. |
| Suger Marketplace - Azure (Read Only) | View-only access to Azure Offers and Entitlements. |
| Suger Marketplace - GCP | Read/Write access to GCP Offers and Entitlements. |
| Suger Marketplace - GCP (Read Only) | View-only access to GCP Offers and Entitlements. |
Controlling Record Visibility via Lookup Filters
When users link an Opportunity or Account to a Referral (or when accepting an AWS engagement invitation), you may want to restrict which records appear in the search results.
Unlike standard Salesforce field filters, Suger uses Custom Metadata to apply advanced filtering logic. This ensures users only see relevant records—for example, preventing them from linking a Referral to a "Closed Lost" Opportunity.
How to Configure
-
Click the Gear Icon (⚙️) > Setup.
-
In the Quick Find box on the left sidebar, type
Custom Metadata Types. -
Locate the row labeled Referral Lookup Filter (Namespace Prefix: SUGER) and click Manage Records.
-
Click New to define a new filter rule.
-
Fill in the fields and click Save.
Configuration Fields
| Field | Description |
|---|---|
| Label | A descriptive name for this filter (e.g., "Filter Closed Opportunities"). |
| Object Name | Select the object you want to filter, Opportunity or Account. |
| Filter Condition | Enter a SOQL filter condition to define the criteria. |
| Is Active | Check this box to enable the filter immediately. |
Filter Condition Example:
(StageName = 'Committed' AND Amount > 10000) OR (StageName = 'Closed Won')
Managing Tab Visibility
The Suger App may include tabs for both V1 and V2 features. To streamline the user experience and reduce clutter, Admins can hide unused or legacy tabs.
There are two methods to control tab visibility.
Method 1: Hide Tabs via App Manager
This method removes tabs from the default navigation bar for all users accessing the Suger App.
How to Configure
-
Click the Gear Icon (⚙️) > Setup.
-
In the Quick Find box, type
App Manager. -
Locate the
Sugerin the list. Click the dropdown arrow (🔽) on the right and select Edit. -
Select Navigation Items from the left-hand menu.
-
Select the tabs you wish to hide from the Selected Items list (right side) and use the Remove Arrow (⬅) to move them to the Available Items list (left side).
-
Click Save.
This method only removes tabs from the default navigation bar. It does not strictly remove permission. Users can still access these tabs via the App Launcher or global search if they look for them explicitly.
If you encounter a lock icon next to an item in the list, it indicates you do not have the necessary permissions to modify this setting. Please consult your organization's Salesforce System Administrator for assistance.
Method 2: Disable V2 Access via Suger Settings
Unlike Method 1, which removes the tab from the navigation bar, this method does not hide the tab. Instead, it functionally disables the page content.
If a user clicks on a disabled tab, the page will load, but they will see a "Feature Disabled" message and cannot interact with any data.
How to Configure
-
Open the Salesforce Suger App and navigate to the Suger tab.
-
In settings menu, scroll down to the Tabs Control section.
-
Locate the specific V2 page you wish to restrict.
-
Turn ON the toggle to disable the feature.
Configuring Action Buttons on Opportunities
To streamline sales workflows, you can add Suger Quick Actions directly to the Opportunity record's Highlights Panel. These buttons allow users to create offers or initiate co-sell referrals immediately without navigating away from the Opportunity.
Suger provides the following standard actions:
| Action Label |
|---|
| New Offer via Suger |
| Create Amendent Offer |
| Co-Sell via Suger |
| Co-Sell with AWS (Suger) |
| Co-Sell with Azure (Suger) |
| Co-Sell with GCP (Suger) |
How to Add Actions to the Highlights Panel
You can configure these buttons using the Salesforce Lightning App Builder.
-
Enter an Opportunity detail page.
-
Click the Gear Icon (⚙️) > Edit Page.
-
Click on the Highlights Panel component at the top of the canvas to select it.
-
In the right-hand properties panel, locate the Actions section.
-
Click Add Action.
-
In the search bar, type the specific action name (e.g., "New Offer via Suger").
-
Select the desired action and click Done.
-
Repeat for all other actions you wish to add.
-
Click Save and Activate to apply changes to your users.
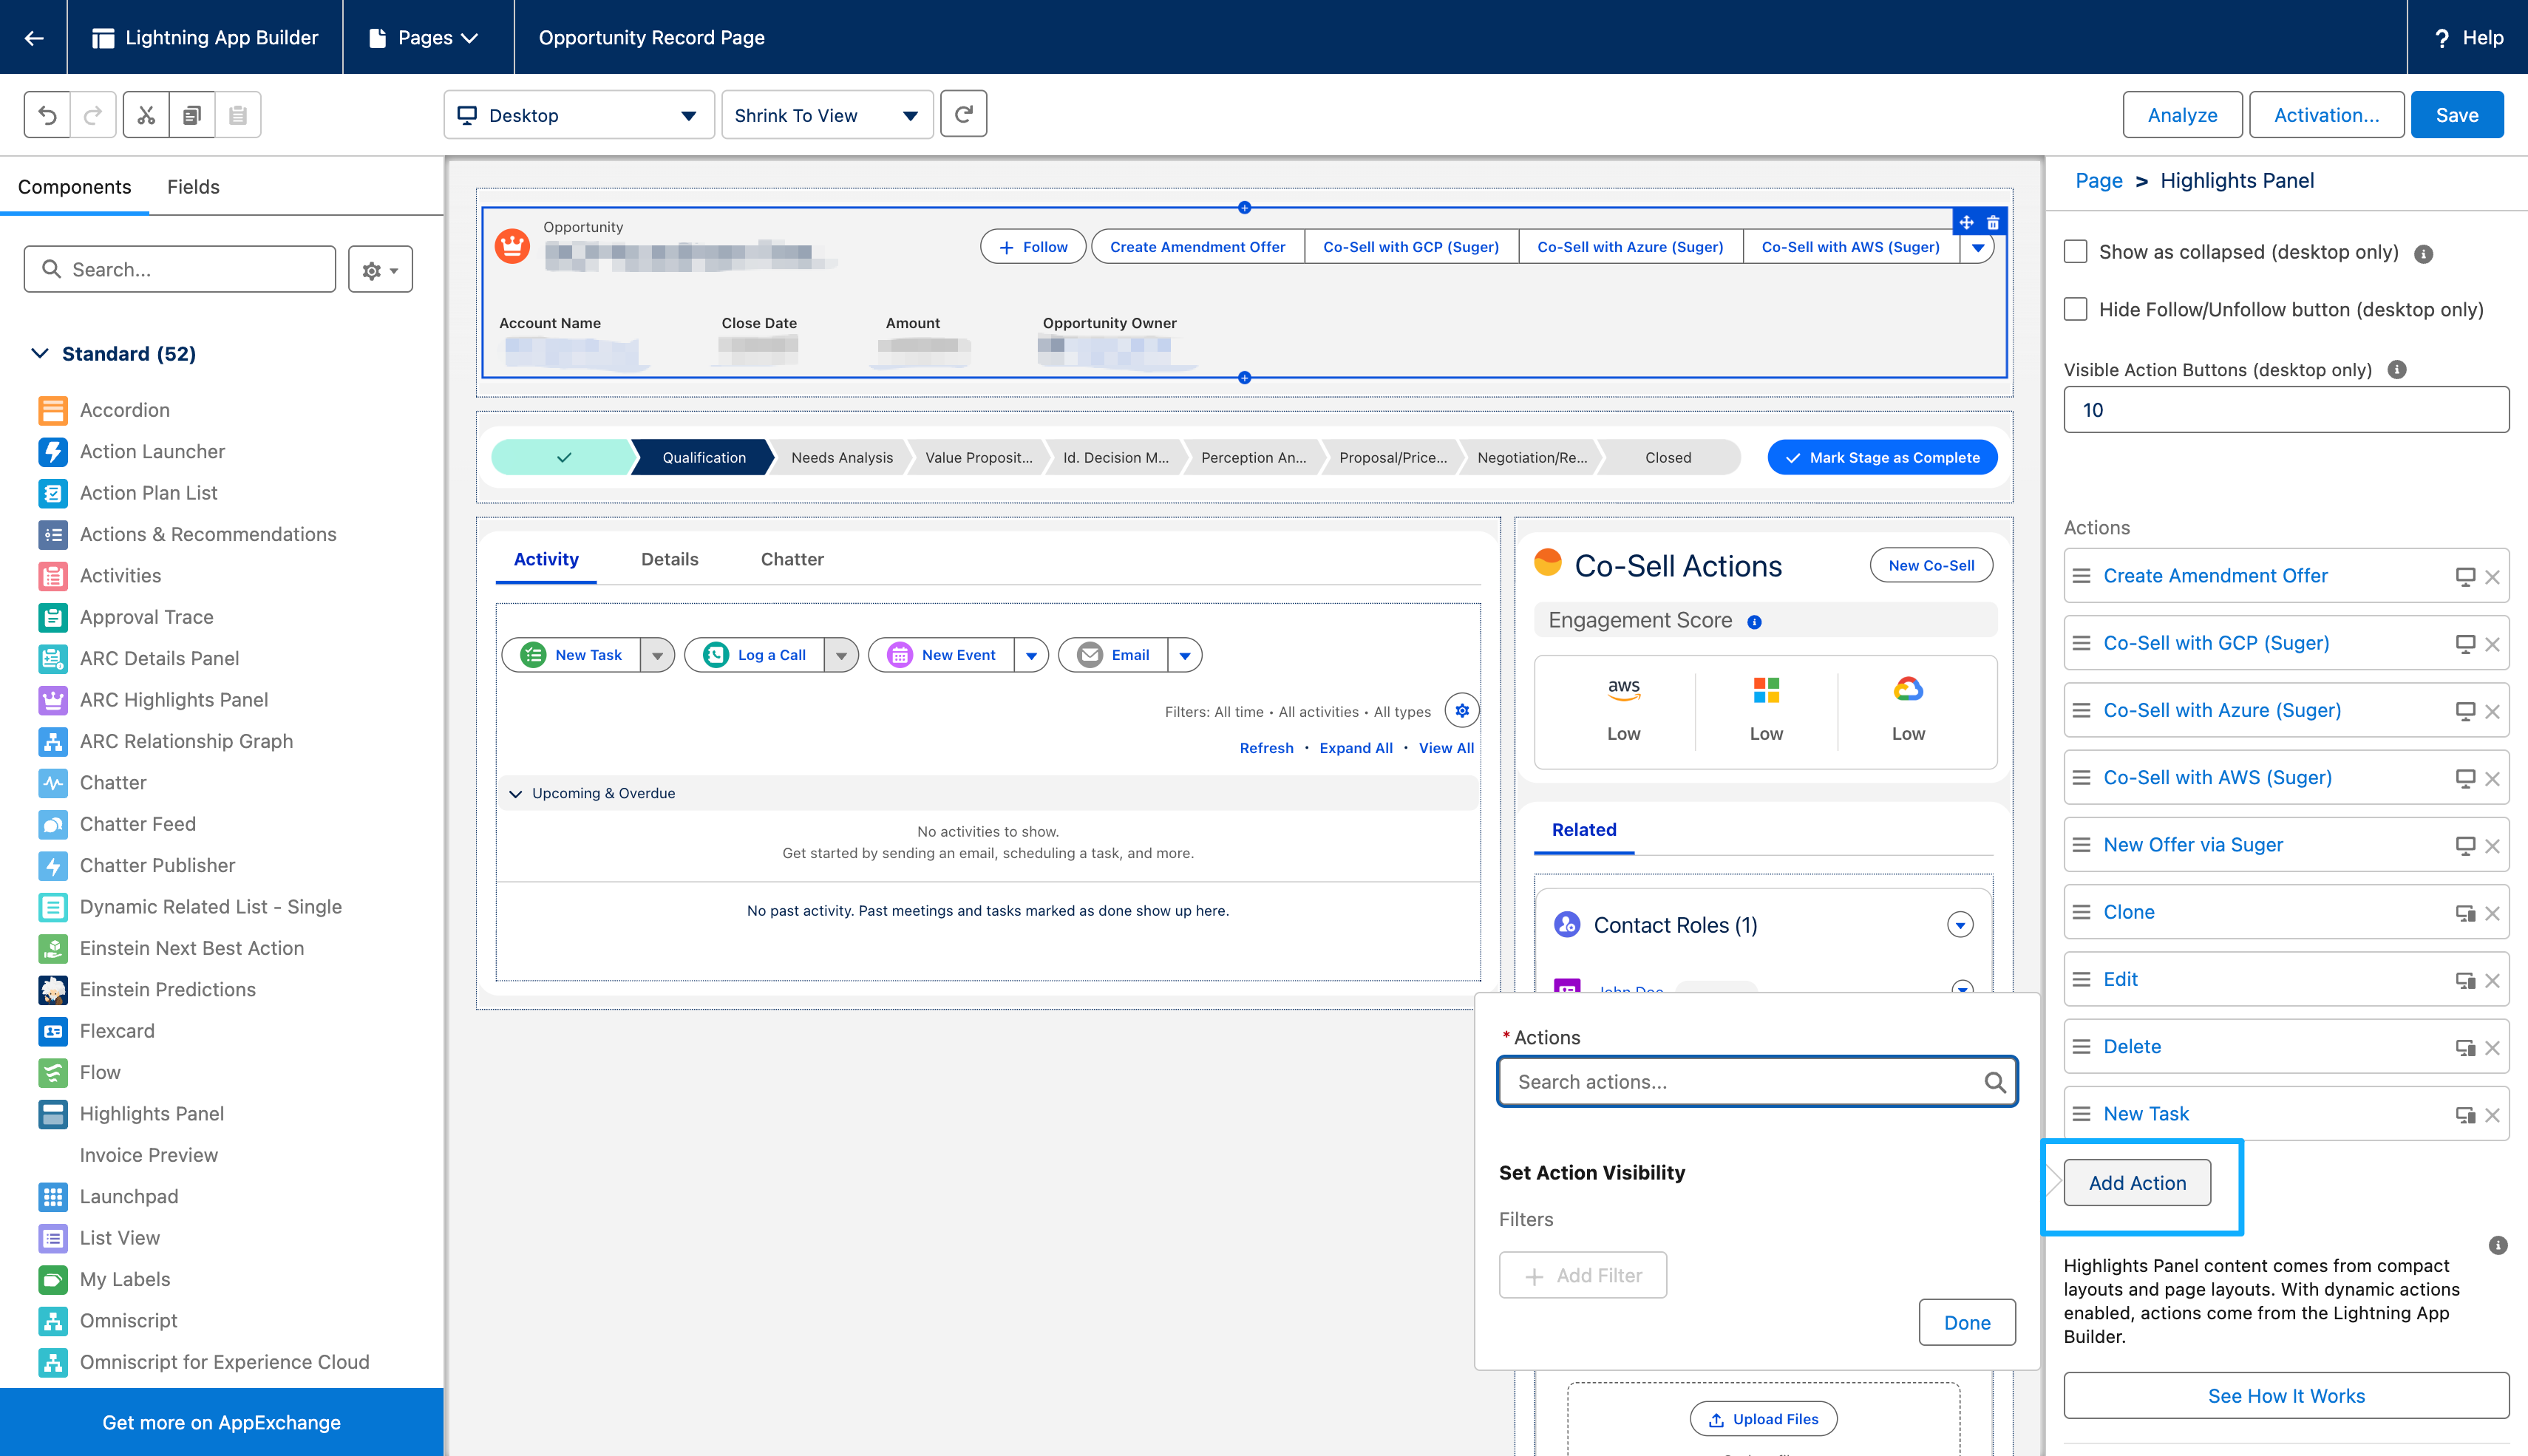
You can use Filters to control when these buttons appear. This ensures users only see relevant actions (e.g., hiding the "Co-Sell with AWS" button if the Opportunity is unrelated to AWS).