
Knowledge Bases
Knowledge bases are searchable collections of your own documents that agents can retrieve for grounded, trusted context.
What Are Knowledge Bases?
A knowledge base is a named collection of documents that agents can search when answering. Instead of relying only on the model’s general knowledge, an agent can pull in your product docs, runbooks, tickets, contracts, or notes and ground its response in your organization’s actual content.
Each knowledge base:
- Belongs to one organization and is owned by a user or the organization.
- Holds documents from three source types — uploaded or pasted files, crawled websites, and synced connectors (GitHub, ClickUp, Google Drive).
- Indexes every document so it can be searched with hybrid vector + keyword search.
Prefer video? Watch a quick overview:
Opening the Knowledge Base App
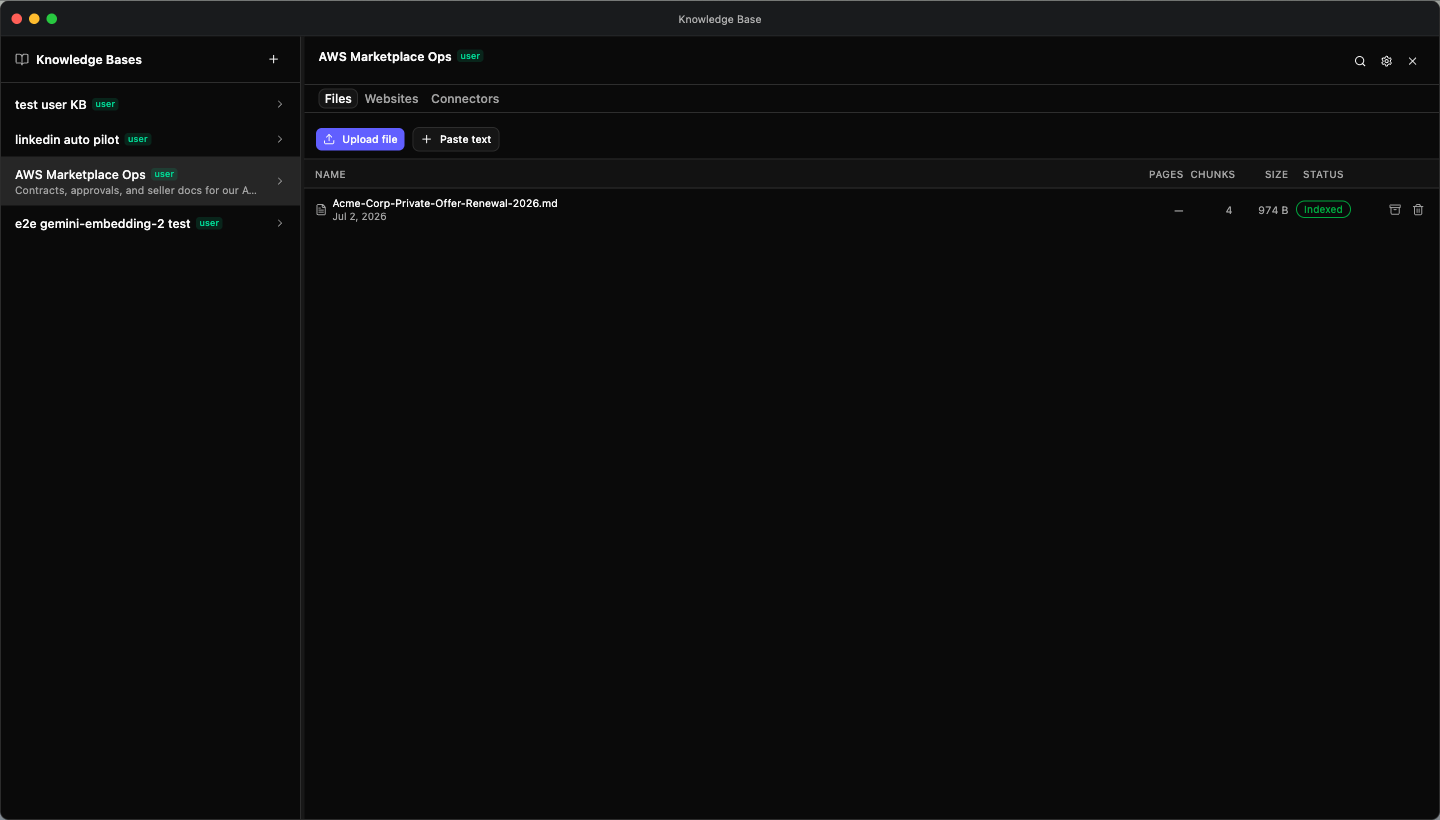
Knowledge Base is a built-in Insulin app. Open it from the Knowledge Base tile pinned to the desktop dock, or navigate directly to its window. Like other workspace apps, it opens as a resizable window with the knowledge base list on the left and a detail panel on the right.
Creating a Knowledge Base
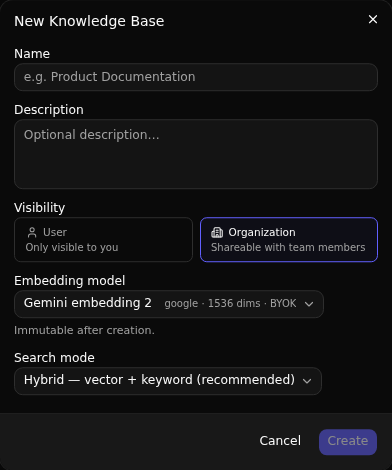
- Click the + button in the Knowledge Bases list (or Create one on the empty state)
- Configure the following:
| Field | Description |
|---|---|
| Name | A descriptive name for the knowledge base |
| Description | Optional summary of what it contains |
| Visibility | User (only visible to you) or Organization (shareable with your team). Creating an organization knowledge base requires org admin access. |
| Embedding model | The model used to index and search documents. The options depend on who owns the knowledge base — see Choosing an embedding model below. |
| Search mode | Hybrid (recommended), Vector only, or Keyword only |
- Click Create
Choosing an embedding model
Every document is embedded with the knowledge base’s embedding model, and searches use that same model. Which models you can pick depends on who owns the knowledge base:
Two kinds of model can appear in the picker, and each has its own condition.
Suger-hosted models — BGE-M3 or Qwen3 Embedding 0.6B — need no key of your own, and BGE-M3 is the default when you don’t pick one. They are offered to either visibility, but only while your organization allows Suger’s platform key (Settings → Organization → AI Model Policy → Allow Suger platform key, described in Getting Started). Turn that switch off and the hosted models leave the picker for everyone in the organization.
Your own providers’ models are added for each provider that scope has connected: OpenAI (text-embedding-3-small and -large), Gemini (Gemini embedding 2), OpenRouter (BGE-M3), DeepInfra (BGE-M3, Qwen3 Embedding 0.6B), Fireworks (Nomic Embed v1.5), and Together (multilingual-e5-large-instruct).
- Organization knowledge bases add the providers the organization has connected.
- User (personal) knowledge bases add the providers you have personally connected, never the organization’s.
Each option is labelled with its provider, vector size, and hosting — for example openai · 1536 dims · BYOK or deepinfra · 1024 dims · Suger-hosted.
Adding Content
Open a knowledge base to reach its detail panel, which has three tabs: Files, Websites, and Connectors.
Files
Upload documents directly or paste text.
- Upload file — Select files, or drag and drop them onto the panel. Supported formats: PDF, DOCX, and text formats including
.txt,.md,.csv,.tsv,.log,.json,.html,.xml, and.yaml. Maximum 25 MB per file. - Paste text — Paste raw content and give it a name. Maximum 2 MB of text.
Uploading a file with the same name replaces the existing document in place. The file list shows each document’s Name, Pages, Chunks, Size, and Status.
Previewing a document
Double-click a file row to open it in the Preview app. There is no button for this — the row itself is the control, and hovering it says “Double-click to open a preview.”
Preview is offered for uploaded and pasted files only. Website and connector documents have no single original file behind them, so their rows do not open.
Two things a preview can answer with instead of the document:
| Response | When | What to do |
|---|---|---|
| Document is too large to preview | The stored file is over 25 MB | Nothing — the document is still indexed and searchable; only the preview is refused |
| Too many document reads in flight; please retry | More than 4 document reads are already in flight | Your request waits for a slot and is only refused if none frees up within about 10 seconds; retry after that |
Websites
Add a public URL to crawl its pages into the knowledge base.
- Enter a URL (for example,
https://docs.example.com) - Set the Depth — how many link levels to follow (1–10, default 3). Depth 1 is the start page only; depth 3 follows links three levels deep.
- Click Add
The crawler imports up to 100 pages of main content as documents. Websites re-crawl only when you trigger a Re-sync manually — they do not sync automatically. The list shows URL, Docs, Depth, Last Sync, and Status, with per-row sync and remove actions. While a site is indexing, its row shows a progress bar and a percentage (see Watching indexing progress).
Adding many websites at once
Adding sites one at a time doesn’t scale past a handful. Click Bulk add on the Websites tab to open the Bulk add websites dialog, which reads a spreadsheet of URLs and creates one website per row.
- Click Bulk add
- Click Choose file and pick an
.xlsx,.xls, or.csvfile. The sheet needs aurlcolumn;depthis optional and defaults to 3. A header row is not required — a bare column of links works, and header names are matched loosely (for example, Website URL and Max Depth are both understood). - Review the preview. Every row is listed with its URL and Depth, and a summary line above the table counts what was found — for example 42 rows · 39 to add · 2 invalid · 1 duplicate. Rows that can’t be imported are flagged in place with the reason why (see the table below).
- Click Add N websites to import. Only the valid, non-duplicate rows are sent — nothing is written until you confirm this counted list.
A progress bar runs while the import works through the rows one at a time, and the result reads Added N, or Added N · M failed when some rows didn’t take, so a partial import is never silent.
Reasons a row is skipped:
| Reason shown on the row | What it means |
|---|---|
| Missing URL | The row has no URL in it. |
| Not a valid URL | The value isn’t a URL. |
| Must be an http or https URL | Only http:// and https:// addresses can be crawled. |
| Must be a public address — internal and private hosts can’t be crawled | The host is internal or private. |
| Depth must be a whole number from 1 to 10 | The depth value is outside the allowed range. |
| Already added | The knowledge base already has that URL, or the sheet lists it twice. |
Two more things to know:
- The cap is 500 rows per import. A larger file is refused, not truncated — the dialog reports how many rows it found and asks you to split the file and run it again, rather than quietly importing the first 500 and dropping the rest.
- Imported websites are added but not crawled. Start a sync when you’re ready.
Connectors
Connectors keep a knowledge base in sync with issues, tasks, and files from your connected integrations. You can add one connector per integration per knowledge base.
| Connector | What it syncs | What you configure |
|---|---|---|
| GitHub | Issues and pull requests as Markdown (no source code) | Repositories; toggle Issues and Pull requests; optional max items per repo |
| ClickUp | Tasks and Doc pages | Spaces; toggle Tasks and Docs; optional max tasks per list |
| Google Drive | Documents and files (Google-native docs exported to text) | Folders (synced recursively) and individual files, via search-as-you-type |
Notion is not yet available as of July 2026 (no target date committed).
To add a connector:
- Open the Connectors tab and pick a provider card
- If the underlying integration is not connected yet, the card shows Set up the integration first — connect it in Settings, then return
- Click Connect, select the scope (repositories, spaces, or folders/files)
- Choose whether to Auto-sync the connector
- Click Connect to start the first sync
A connected card shows a scope summary (for example, “3 repos”), an indexed count (Indexed items: X/Y), and the last sync time — plus, while it is indexing, a progress bar with a percentage (see Watching indexing progress). You can Re-sync, Stop sync, Edit scope, or Remove the connector.
Syncing and Indexing
Manual sync — Trigger a sync, stop an in-progress sync, or re-index a single document at any time from the tab actions.
Automatic sync — Only connectors with Auto-sync enabled are kept current automatically. Insulin sweeps due connectors about once an hour: it runs a full reconcile when the last full sync was more than 24 hours ago, and an incremental sync when the last sync was more than an hour ago. Websites and individual files do not auto-sync.
As documents are added, Insulin splits each one into chunks, generates embeddings, and stores them for search. Only documents that finish indexing become searchable. Each document and connector shows a status:
| Status | Meaning |
|---|---|
| Pending | Queued, not yet processed |
| Indexing | Being parsed and embedded (a progress bar shows percent complete) |
| Indexed | Successfully indexed and searchable |
| Failed | Indexing or sync failed — hover the alert icon for the error |
| Deprecated | Retired from search but not deleted — chunks are preserved and it can be restored |
| Deleted | Removed from the knowledge base |
Lists refresh automatically while anything is pending, indexing, or syncing.
Watching indexing progress
A status word alone doesn’t tell you whether a large crawl is nearly done or has barely started, so websites and connectors report their own progress while they index. Under the source’s name you get a progress bar with a percentage, alongside the running count of documents indexed out of the total discovered — 12/48 on a website row, or Indexed issues: 12/48 on a connector card.
The bar appears only while the source is actually Indexing. Once it finishes, the counters stay as a final tally and the bar goes away — a bar parked at 100% would read as still-working. The counts are read from the documents themselves each time the list loads, so the number you see is what has genuinely finished indexing at that moment, not an estimate or a cached tally.
A knowledge base also reports its own Re-indexing progress — distinct from the per-document statuses above — while it rebuilds embeddings after an embedding-model change. It counts the documents already searchable on the new model, 3 of 42 documents searchable, and calls out separately any that failed, because those need a re-index rather than more waiting. Search keeps working throughout, answering from the documents already rebuilt.
The spinner stops when nothing is moving any more, even if the knowledge base is not fully searchable — documents that only failed are reported as a warning with an Index them now button rather than as work in progress, because waiting will not clear them.
Retiring a document
You can retire an indexed file without deleting it. Use Deprecate on an indexed file to drop it from search results while keeping its document and chunks intact, then Restore it later to bring it back into search — no re-upload needed. Deprecate and Restore apply to files only; website and connector documents cannot be deprecated. Deprecate is offered only once a file has finished indexing.
A sync will not bring a deprecated document back. If a synced source still contains a document you deprecated, the next sync skips it rather than re-indexing it — deprecating is a decision, and a sweep that quietly undid it every hour would make the control useless. Restore is the only way back into search.
One thing to expect on the way back: restoring re-indexes the file. It returns as Pending and is searchable again once that finishes — usually about as long as indexing it took the first time, and needing nothing from you. The reason is that a retired file is skipped by an embedding-model change, so its stored embeddings may have been built with a model the knowledge base has since moved off, and putting those straight back into search would return poor matches rather than an error.
Testing Search
Use Test search in the detail panel to preview what an agent would retrieve before attaching the knowledge base. Enter a query, set the number of results (Top K, up to 20 here), pick a search mode, and adjust the vector weight. Results show the matching content, its source document, and a relevance score.
The Test-search cap of 20 applies only to this preview. The knowledge base’s persisted default Top K is set in Settings and can be as high as 50, and an agent searching at query time can request up to 100 results.
Settings
Open the Settings (gear) panel from a knowledge base’s detail view to adjust how it is described, chunked, and searched.
| Setting | What it controls |
|---|---|
| Name | The knowledge base’s display name |
| Description | Optional summary of its contents |
| Chunk strategy | Fixed size or Semantic — how new documents are split before indexing |
| Search mode | Hybrid (vector + keyword), Vector only, or Keyword only |
| Top K results | The persisted default number of results (1–50) |
| Vector weight | For hybrid search, how much to favor vector vs. keyword matches (0–1) |
| Embedding model | The knowledge base’s Current model, with a Change model control to switch to another eligible model (re-indexes every document — see Changing the embedding model) |
Changing the embedding model
The Embedding model section of Settings shows the knowledge base’s Current model. To switch it, choose another model under Change to and click Change model. The list offers only models other than the current one, scoped to the knowledge base’s owner (see Choosing an embedding model); if no other eligible model is available, the panel says so.
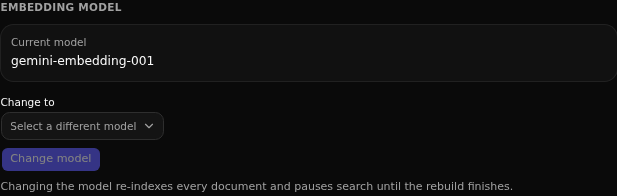
A knowledge base always has a model from the moment you create it — Insulin picks a Suger-hosted one when you don’t choose, and asks you to choose when your organization only allows its own providers. If you ever see a knowledge base with no model set (an older one, created before models were recorded), it can neither index nor be searched until you pick one here; documents wait as Pending and searches say so rather than returning nothing. Choosing a model starts indexing them.
Because switching is a heavy operation, Insulin asks you to confirm:
Change embedding model? Switching to <model> re-embeds all <N> documents in this knowledge base, which takes provider time and spend. Until a document has been re-embedded it will not appear in search results; the ones already done keep working throughout.
Once you confirm:
- The knowledge base re-embeds its documents onto the new model, one at a time, and the section shows how many are ready —
3 of 42 documents searchable. A document that can’t be processed is marked Failed and the rest continue; re-index it from the Documents tab once you have fixed the cause, or use Index them now in the progress panel to retry every outstanding document at once. - Search keeps working. It answers from the documents already on the new model and hides the rest, so results are never mixed across two models. An agent searching mid-rebuild is told how much of the knowledge base it actually covered, so a thin answer is never mistaken for an empty knowledge base.
- You can change the model again at any point, including mid-rebuild — the new choice supersedes the one in progress and re-queues the documents.
- The switch is complete when every document reports ready. Retired (deprecated) documents are skipped; each is re-indexed if you restore it later.
- If progress stops before every document is ready — a worker restart, an interrupted rebuild — Restart indexing in the same panel picks up exactly what is outstanding. It never re-embeds a document that already finished, so it is safe to use at any time.
The Danger Zone at the bottom of Settings holds Delete Knowledge Base, which removes the knowledge base and all of its documents, chunks, and embeddings. This cannot be undone.
Connecting a Knowledge Base to an Agent
Agents retrieve context by searching the knowledge bases available to them:
- Custom agents search the knowledge bases explicitly attached to them. In the agent’s create or edit form, the Knowledge Bases section lists eligible knowledge bases as checkboxes — select one or more. A user-level agent can attach your user-level knowledge bases; an org-level agent can attach organization knowledge bases.
- The built-in Insulin assistant searches your own knowledge bases automatically. You can also pick an explicit set — see Choosing which knowledge bases Insulin uses below.
At query time an agent can search up to three knowledge bases and cites the source document for each result. See Agents for how to create and configure custom agents.
Choosing which knowledge bases Insulin uses
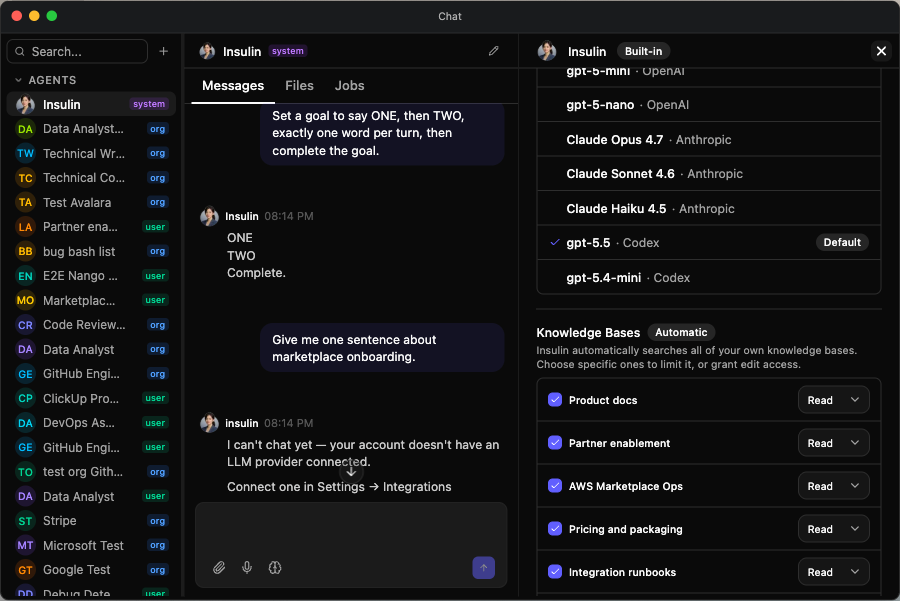
Open Chat, select the Insulin agent, and click the pencil button in the conversation header (labelled Insulin model settings). Its Knowledge Bases section controls what Insulin can search.
By default the section shows an Automatic badge and Insulin searches every knowledge base you own, read-only. Ticking or unticking any row switches to an explicit selection, which then takes over completely:
| Selection | What Insulin searches |
|---|---|
| Automatic (default) | Every knowledge base you own, read-only |
| One or more ticked | Exactly the ticked knowledge bases |
| Nothing ticked | No knowledge base at all |
The list covers every knowledge base you can reach — the ones you own, plus organization knowledge bases shared with you, each marked with a Shared badge. Grounding Insulin in an organization knowledge base no longer requires a custom agent.
Each ticked row also carries an access mode, Read or Edit, with the same meaning as for a custom agent (see Agents). Choosing Edit only expresses intent: Suger re-checks your own role on that knowledge base immediately before every write, so picking Edit on one you can only read grants you nothing, and access revoked mid-conversation stops the next write.
Select Reset to automatic to discard the selection and go back to the default.
Sharing and Roles
Knowledge bases follow Insulin’s role-based access control.
Your org role does not, by itself, grant access to any organization knowledge base. Access to an org knowledge base comes only from a per-knowledge-base share (added as Admin, Editor, or User) or from org-wide sharing (as Editor or User). Even an organization admin cannot open an org knowledge base they were not shared on. Org admin access is required only to create an organization knowledge base — not to open existing ones.
Knowledge base role — Each knowledge base grants members one of four roles:
| Role | Search & read | Add / sync content | Delete & manage sharing | Transfer ownership |
|---|---|---|---|---|
| Owner | Yes | Yes | Yes | Yes |
| Admin | Yes | Yes | Yes | No |
| Editor | Yes | Yes | No | No |
| User | Yes | No | No | No |
- User knowledge bases are private to their creator — even organization admins cannot access them unless the knowledge base is shared with them.
- Organization knowledge bases start visible only to their creator (the owner). They become reachable to others only through a per-KB share or org-wide sharing, as described above.
- Ownership of an organization knowledge base can be transferred by its owner to another active member of the organization.
When you open the Settings of a knowledge base shared with you, they show an owner-and-role banner, and a member below Editor (a User) sees them read-only — including the Change embedding model control, which is disabled. See Working with a Shared Resource.
See Getting Started for the overall Insulin roles and permissions model.
Limits
| Limit | Value |
|---|---|
| File upload size | 25 MB per file |
| Pasted text size | 2 MB |
| Website crawl depth | 1–10 (default 3) |
| Website pages per crawl | Up to 100 |
| Website rows per bulk import | 500 (a larger file is refused) |
| Connectors per knowledge base | One per integration type |
| Test-search results | Up to 20 |
| Persisted default Top K (Settings) | Up to 50 |
| Agent search results per query | Up to 100 |
| Knowledge bases searched per agent turn | Up to 3 |
| Knowledge bases selectable for Insulin | Up to 500 |
| Knowledge bases attached to Inbox drafting | Up to 100 |
| Knowledge bases searched per Inbox draft | Up to 3 |
| Results per knowledge base per Inbox draft | Up to 4 |
Use Cases
- Product support — Crawl your public docs site and let a support agent answer with grounded, cited responses.
- Engineering context — Connect GitHub repositories so a code or triage agent can reference open issues and pull request discussions.
- Project knowledge — Sync ClickUp spaces so a project agent can answer from current tasks and Docs.
- Team drive — Connect a Google Drive folder of playbooks, contracts, or reports so agents work from the same source of truth your team uses.
Spotted something wrong or out of date on this page? Tell us and we'll correct it.