# Okta SSO
Manage users with Okta OIDC SSO + SCIM provisioning.
---
## Overview
Suger is available on the Okta Integration Network (OIN), offering robust support for both **OIDC Single Sign-On (SSO)** and user provisioning via **SCIM (System for Cross-domain Identity Management)**. By integrating Suger with Okta, you can centralize user authentication and streamline user management across your organization.
This guide will walk you through configuring **OIDC SSO** for effortless, secure logins and setting up **SCIM provisioning** to automate user lifecycle management—all directly from your Okta environment.
**Supported Features:**
- **OIDC SSO:**
- Service Provider (SP)-Initiated SSO (logging in from Suger)
- Identity Provider (IdP)-Initiated SSO (logging in from Okta)
- **SCIM Provisioning:**
- **Create Users:** Automatically provision Okta users in Suger.
- **Update User Attributes:** Sync user profile changes (e.g., role).
- **Deactivate Users:** Automatically deactivate Suger users when they are unassigned in Okta.
:::note
During the setup phase, users will retain access to Suger via other login methods (e.g., Google SSO) until the full switch to Okta SSO is complete. This also provides a fallback access method if SSO encounters issues.
:::
---
## Configuration Steps
The configuration is a four-step process. SSO and SCIM can be set up entirely through self-service in the Suger Console.
:::info
**Prerequisites:** You must have administrative access to your organization's Okta account.
:::
### Step 1: Initial Okta Setup & Information Gathering
First, add the Suger application from the Okta Integration Network (OIN) and enter temporary placeholder values.
1. **Add the Suger App**:
- In your **Okta Admin Console**, navigate to **Applications** → **Browse App Catalog**, search for "Suger" and add it.
- Alternatively, visit the [Suger OIN App page](https://www.okta.com/integrations/suger/) directly.
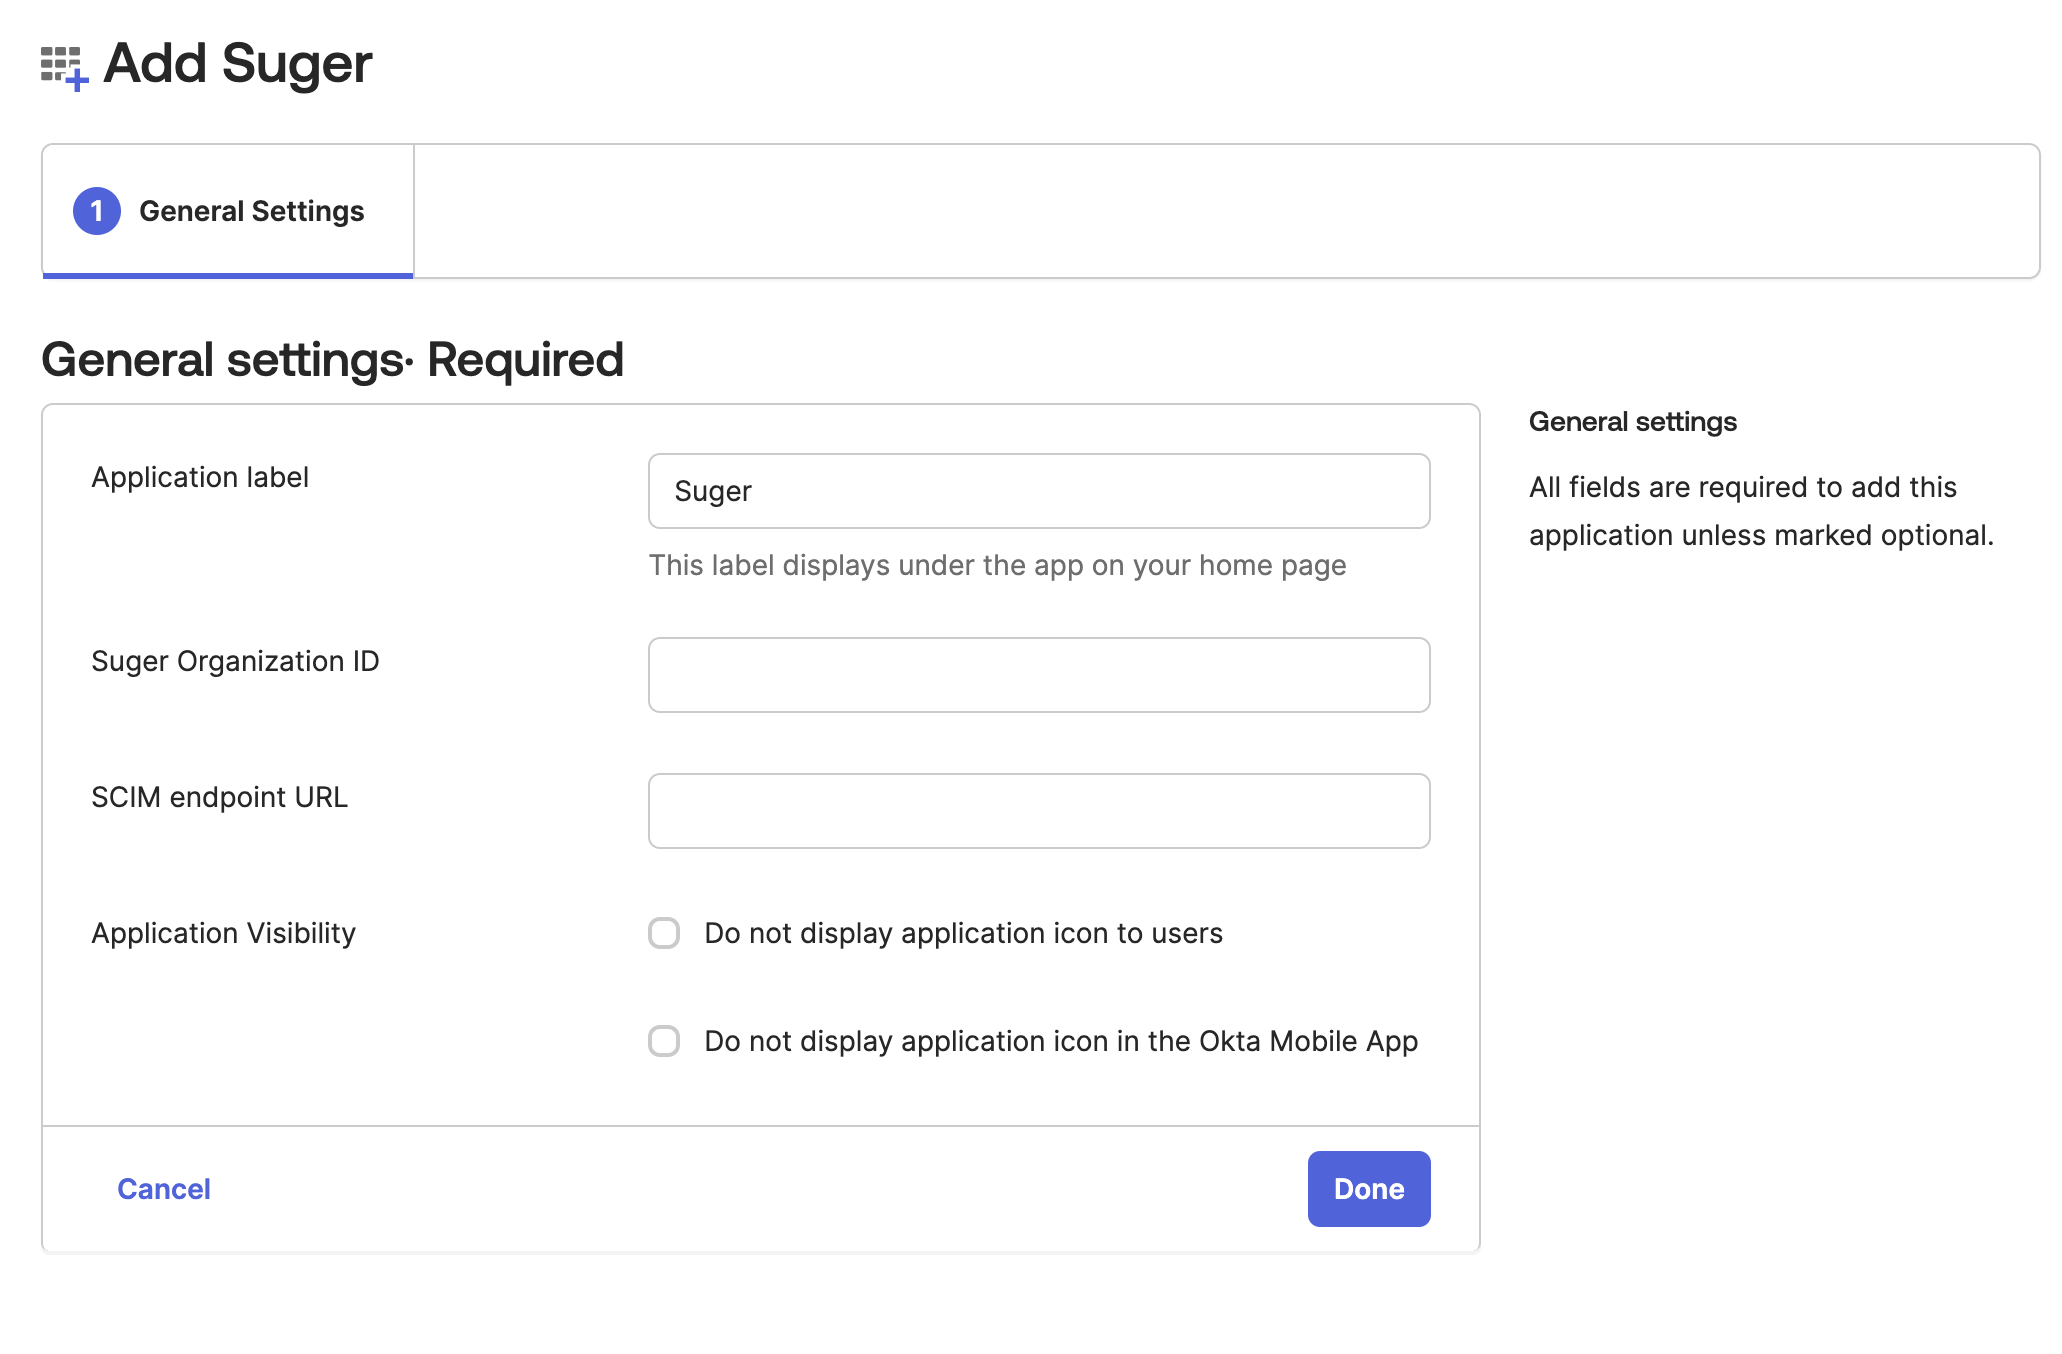
>  2. **Enter Placeholder Values**: On the "General Settings" screen, enter the following temporary values. These will be replaced with real values provided by Suger Support later.
- **Suger Organization ID**: `SugerOrg` (This is a fake organization ID. It will be updated to the your real Suger organization ID later)
- **SCIM endpoint URL**: `https://www.suger.io/`
- Click **Done**.
>
2. **Enter Placeholder Values**: On the "General Settings" screen, enter the following temporary values. These will be replaced with real values provided by Suger Support later.
- **Suger Organization ID**: `SugerOrg` (This is a fake organization ID. It will be updated to the your real Suger organization ID later)
- **SCIM endpoint URL**: `https://www.suger.io/`
- Click **Done**.
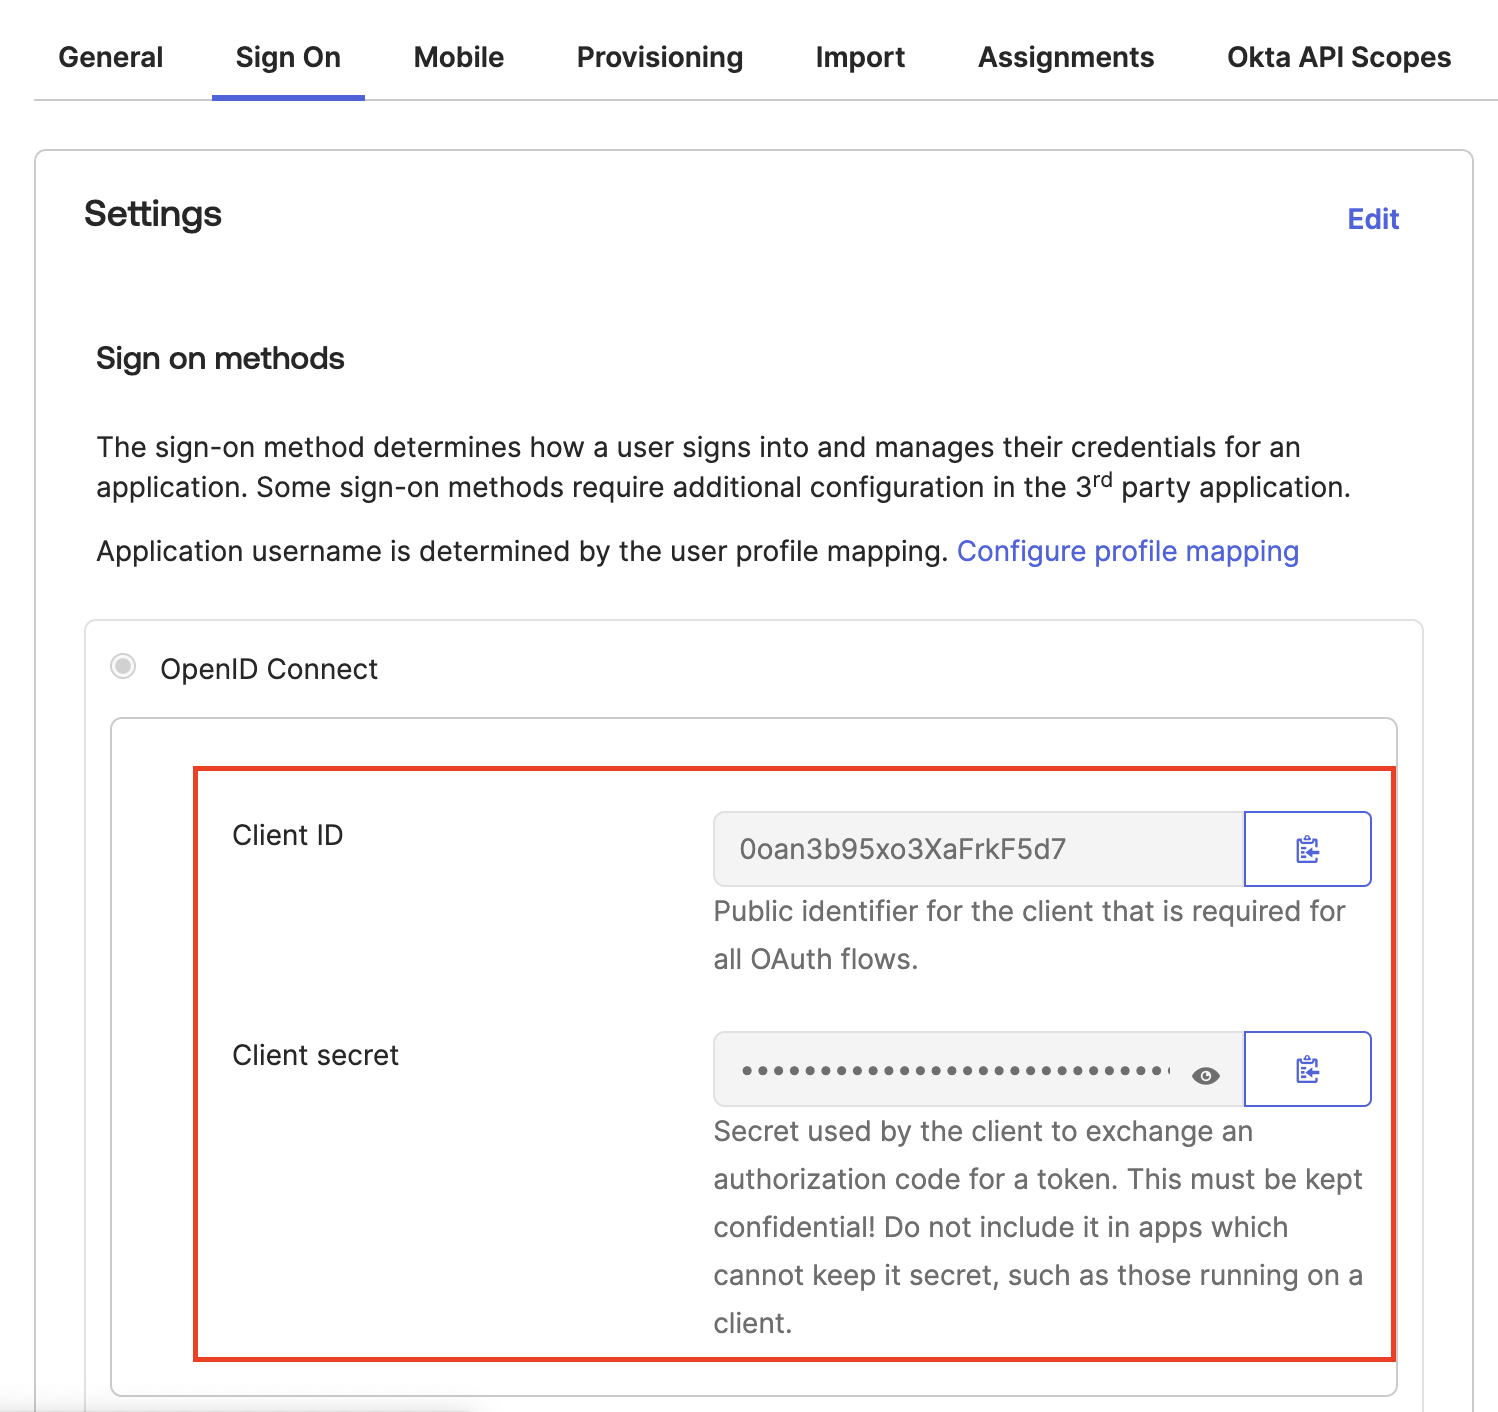
>  3. **Collect OIDC Credentials**:
- Open the Suger app in Okta and navigate to the **Sign On** tab.
- Copy the **Client ID** and **Client Secret**.
- Note your **Okta Domain** (e.g., `dev-12345678.okta.com`).
>
3. **Collect OIDC Credentials**:
- Open the Suger app in Okta and navigate to the **Sign On** tab.
- Copy the **Client ID** and **Client Secret**.
- Note your **Okta Domain** (e.g., `dev-12345678.okta.com`).
>  ### Step 2: Configure SSO Connection
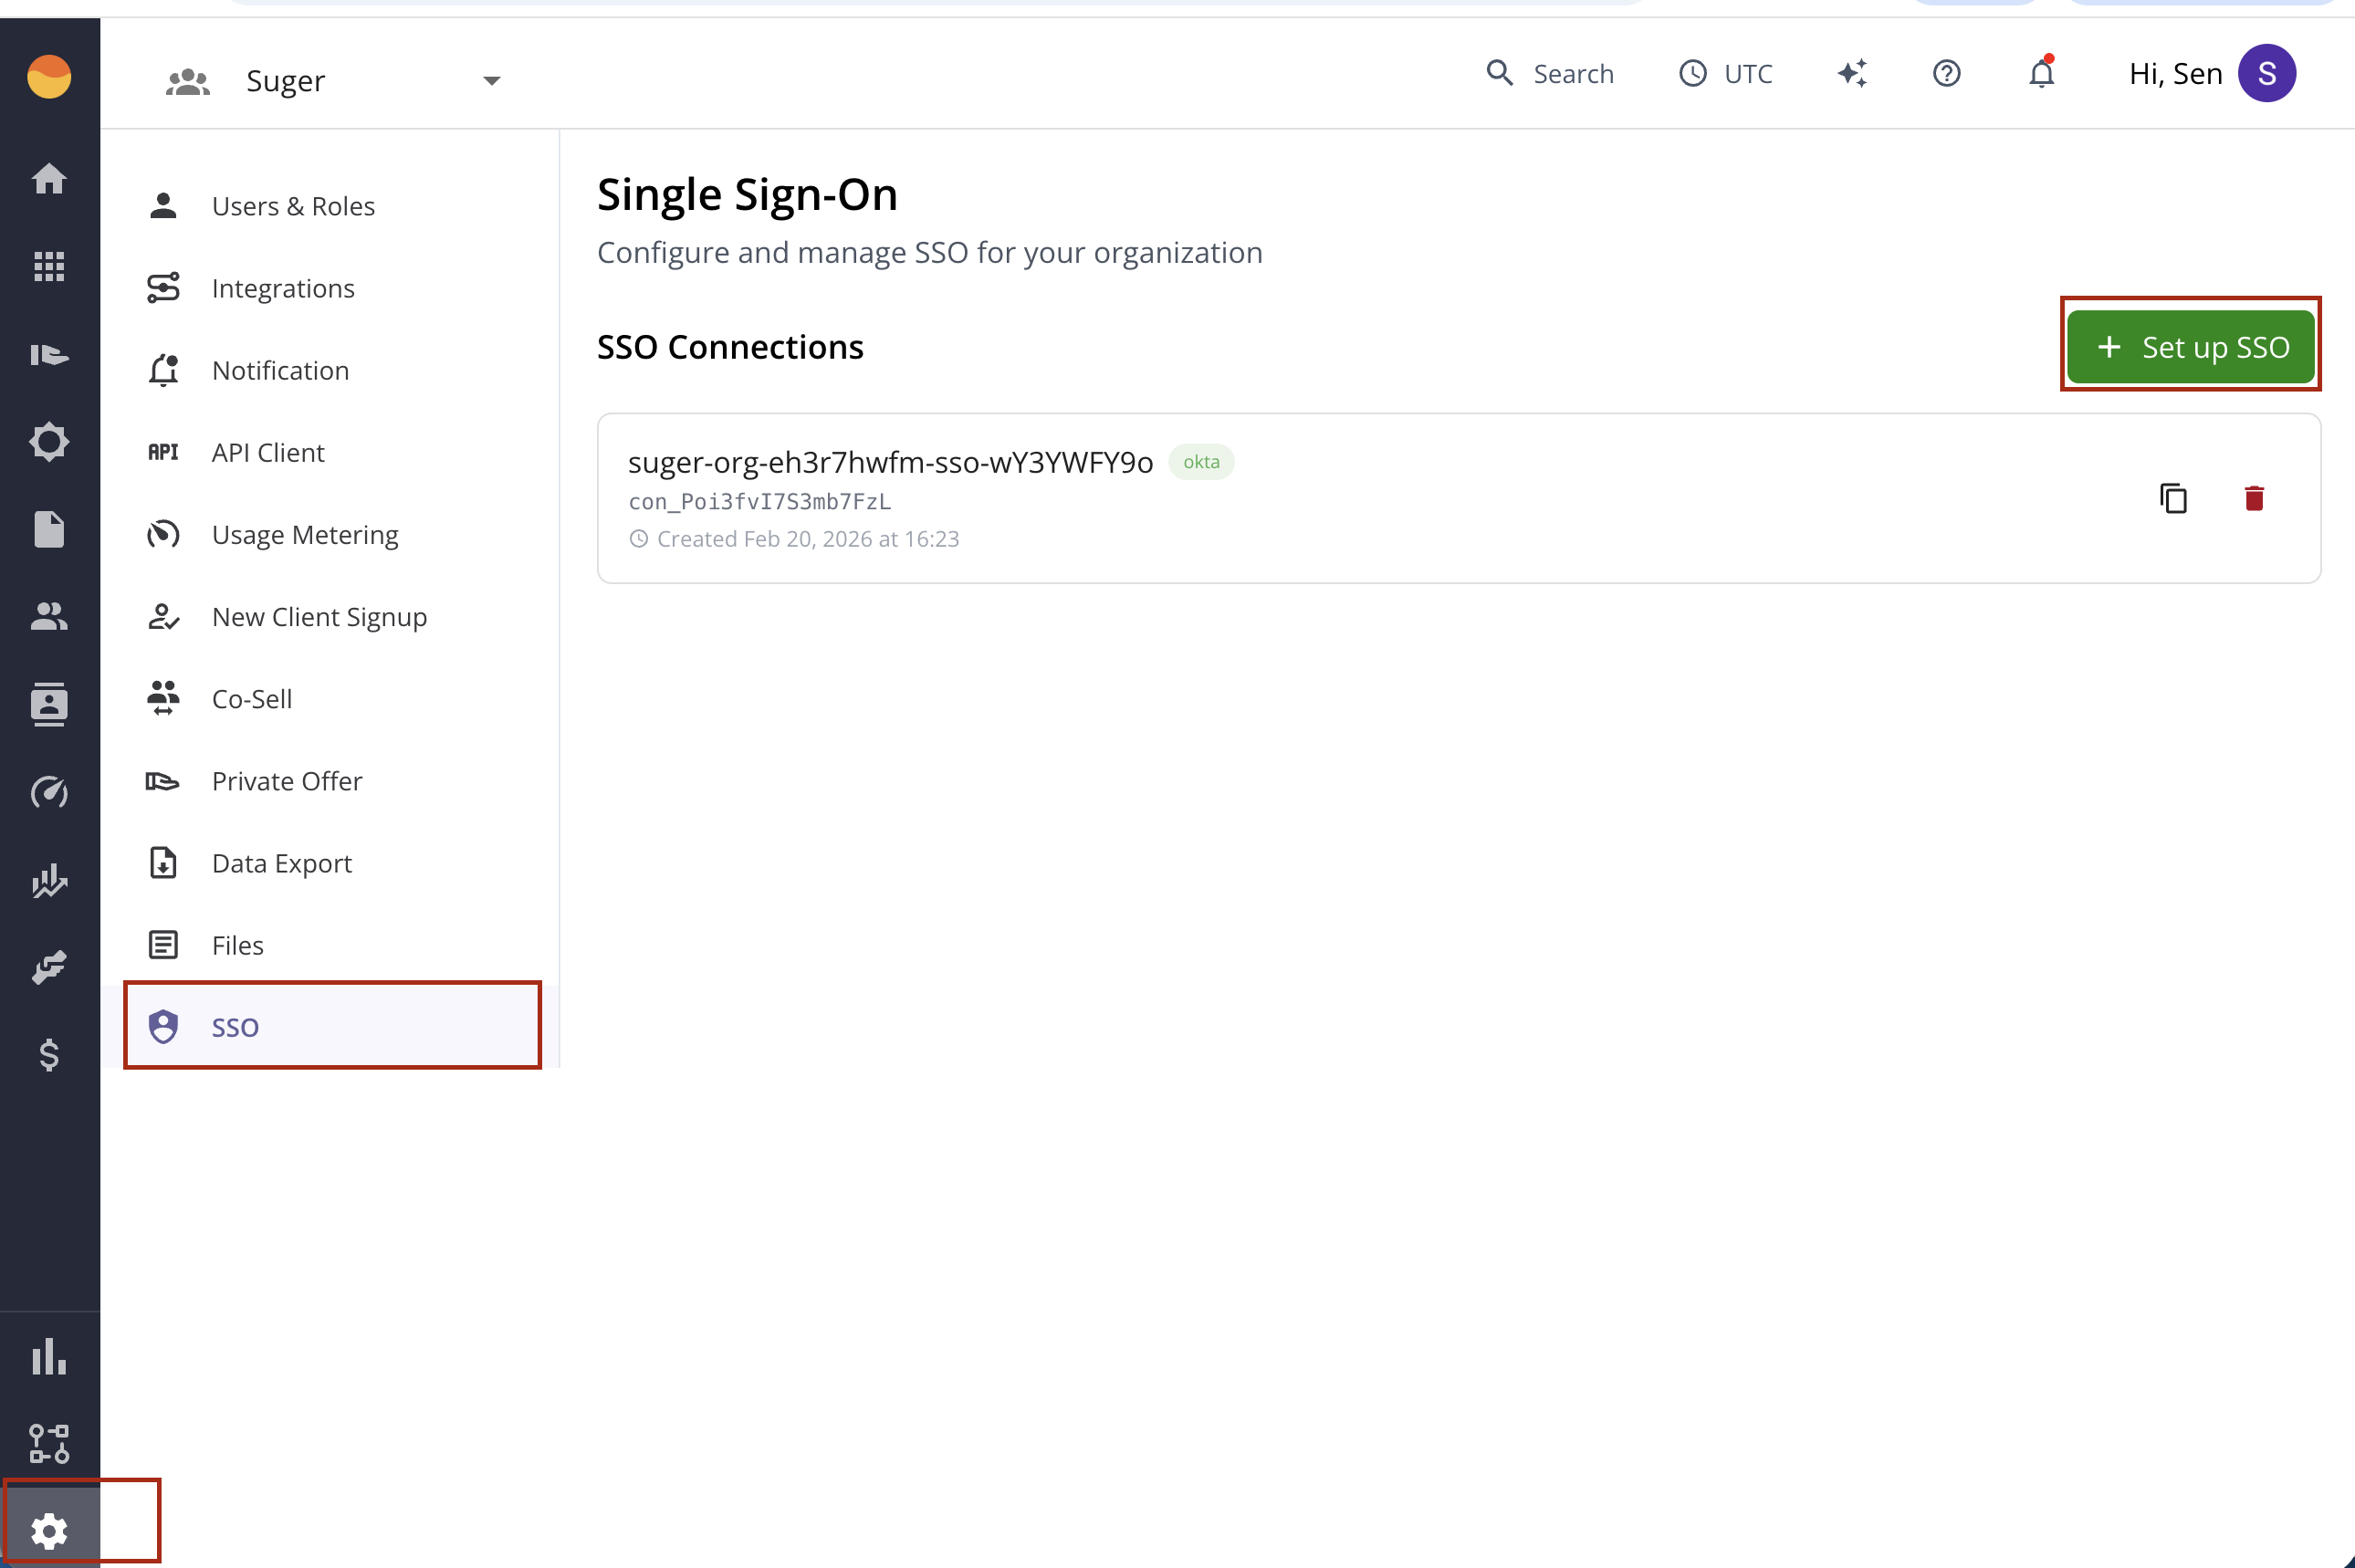
Configure your Okta SSO connection through our self-service setup:
1. Navigate to **Settings > SSO** in Suger Console
2. Click **"Set up SSO"**
>
### Step 2: Configure SSO Connection
Configure your Okta SSO connection through our self-service setup:
1. Navigate to **Settings > SSO** in Suger Console
2. Click **"Set up SSO"**
>  3. The system will generate a secure 24-hour setup ticket and redirect you to the Auth0 configuration wizard
>
3. The system will generate a secure 24-hour setup ticket and redirect you to the Auth0 configuration wizard
> 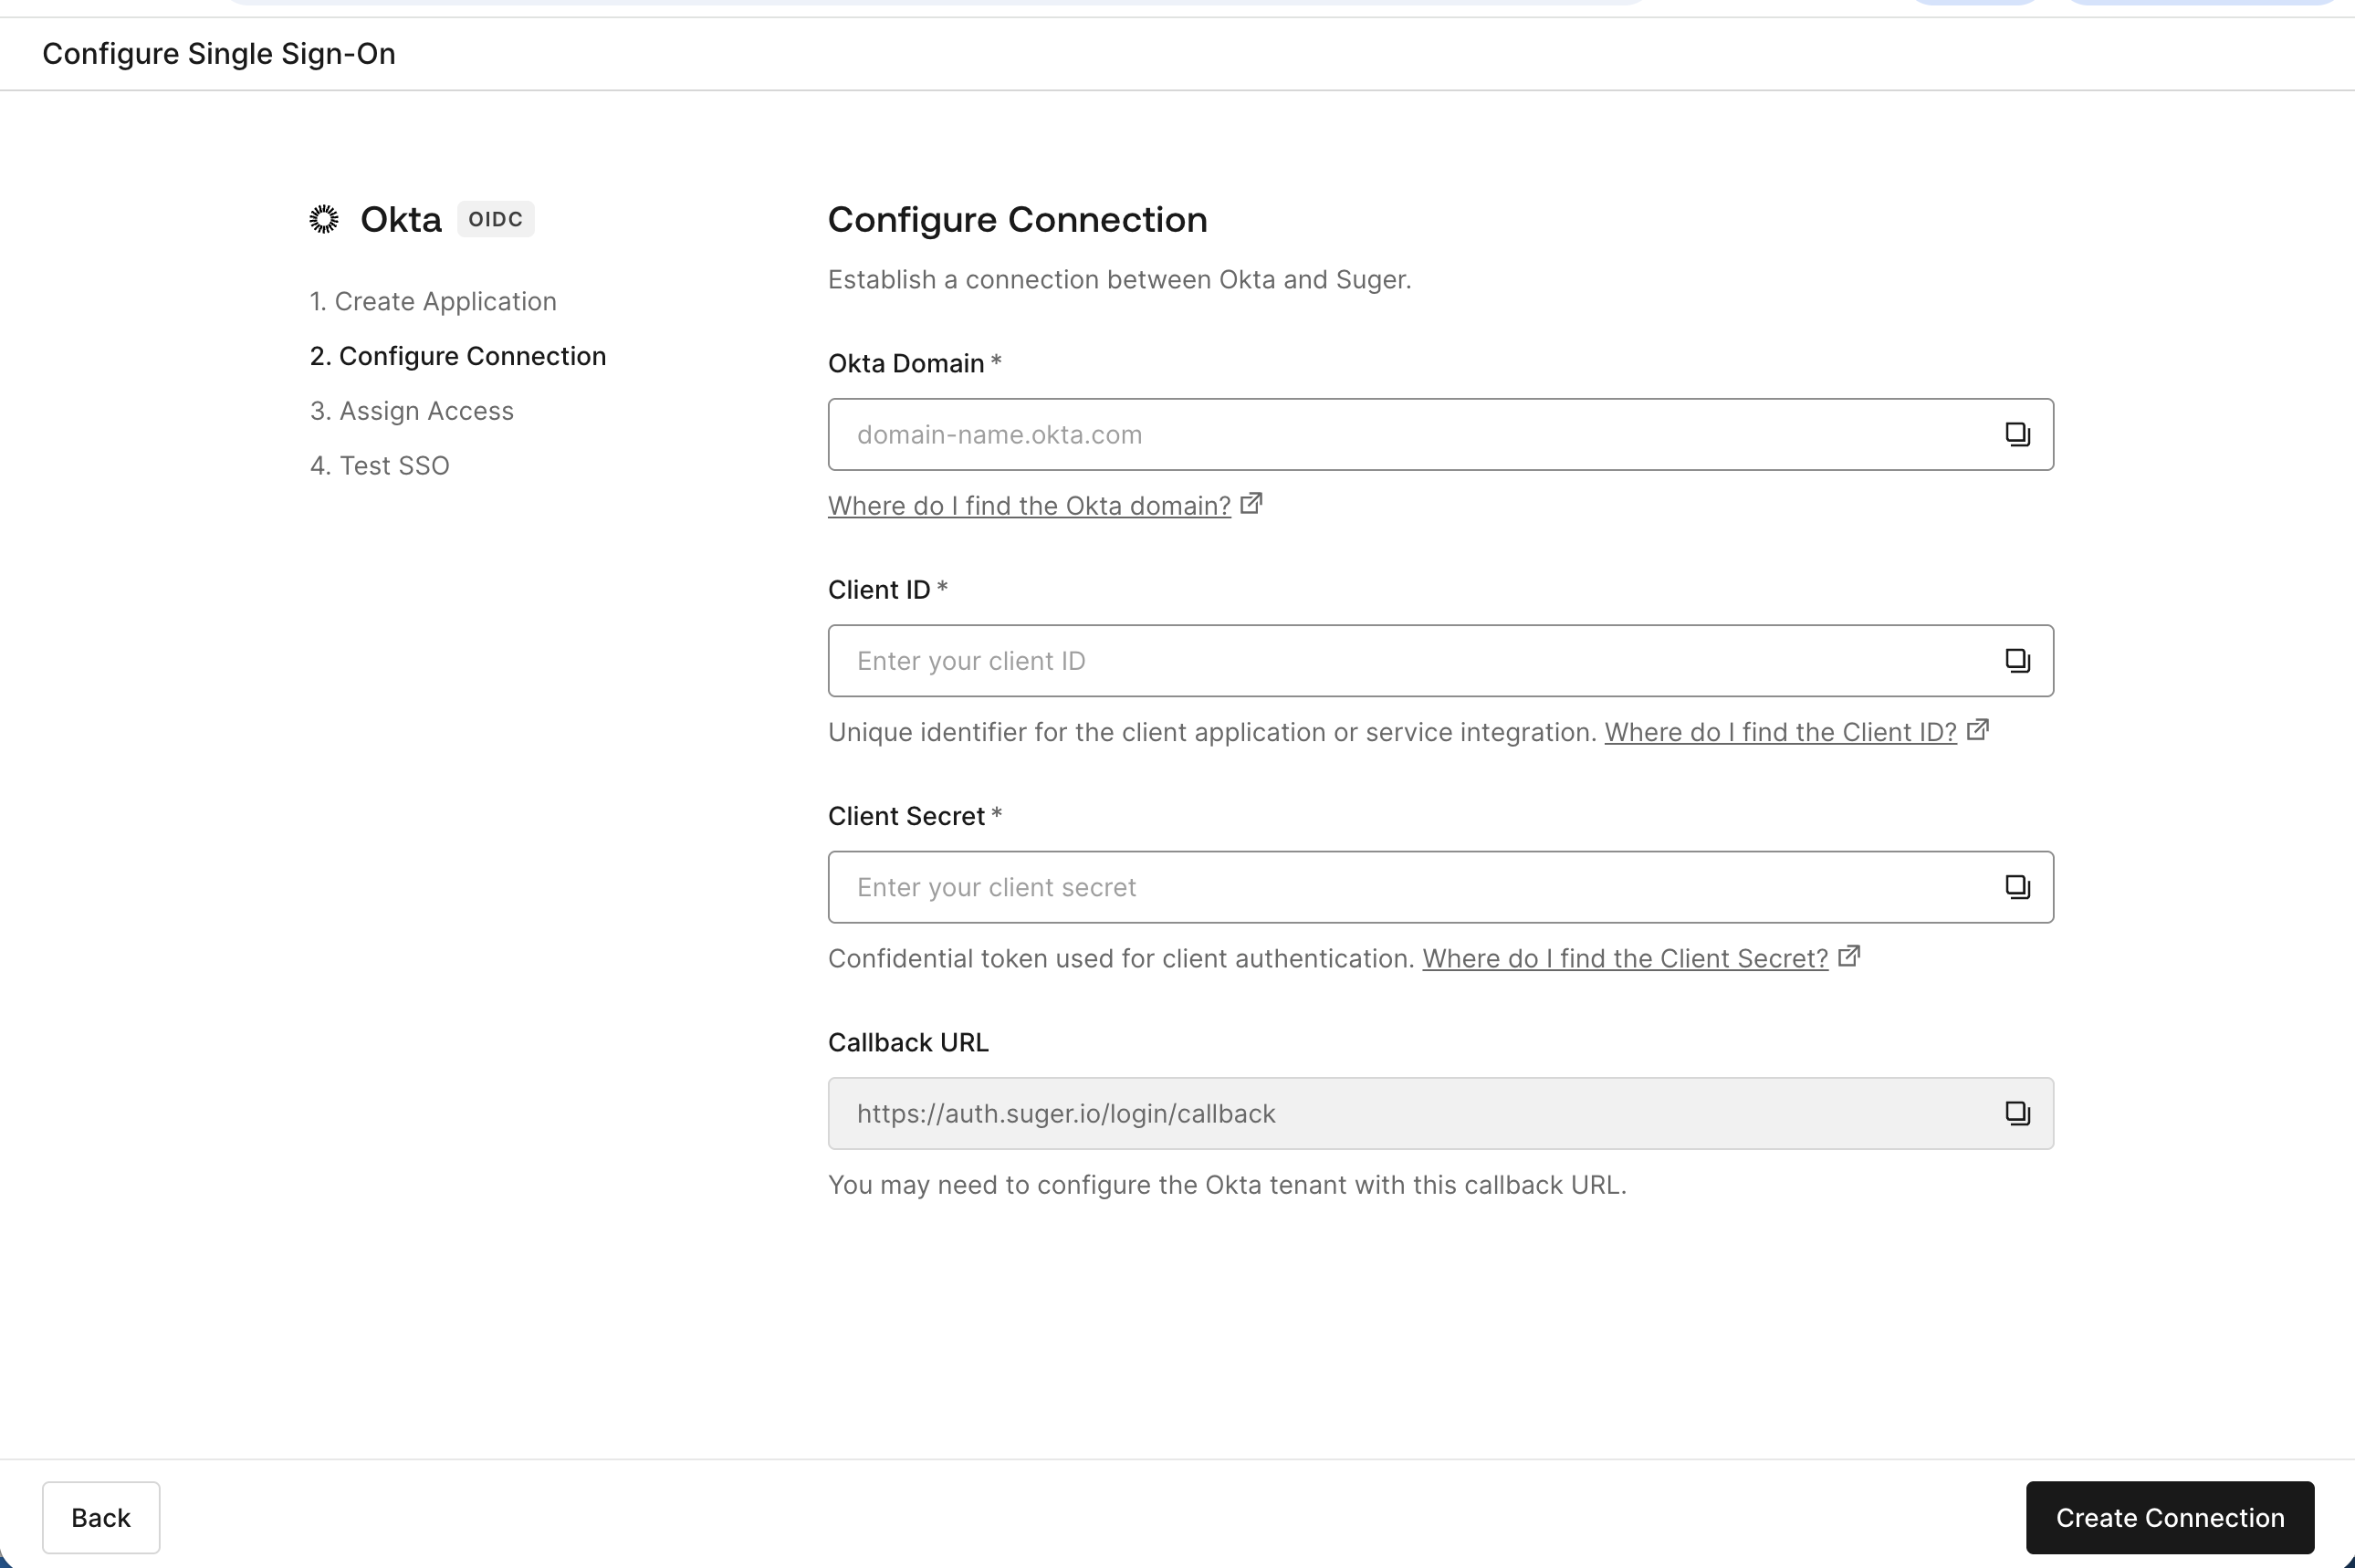 :::note
**You can ignore the "Callback URL" field shown in the wizard.** Because you are using the Suger app from the Okta Integration Network (OIN), the callback URL is already pre-configured by Suger — no manual setup is required.
:::
4. Follow the wizard prompts to connect your Okta Identity Provider using the credentials you collected in Step 1
5. The connection will be active immediately upon completion
:::tip
If you only need SSO authentication, you can stop here. Your Okta SSO is ready to use. User management will be handled manually in the Suger Console.
:::
**If you need SCIM user provisioning** for automated user lifecycle management (create, update, deactivate users), continue to Step 3 to configure SCIM directly from the Suger Console.
:::info
SCIM provisioning provides automated user creation, updates, deactivation, and role mapping. This is optional and only needed if you want full user lifecycle automation.
:::
### Step 3: Configure SCIM Provisioning (Optional)
:::note
This step is only required if you need SCIM user provisioning. If you only configured SSO in Step 2, you can skip this section.
:::
You can generate the SCIM credentials directly from the Suger Console:
1. **Navigate to the SCIM Configuration**: In the Suger Console, go to **Settings > SSO**. Find your SSO connection and click the **SCIM** dropdown to expand the SCIM provisioning section.
>
:::note
**You can ignore the "Callback URL" field shown in the wizard.** Because you are using the Suger app from the Okta Integration Network (OIN), the callback URL is already pre-configured by Suger — no manual setup is required.
:::
4. Follow the wizard prompts to connect your Okta Identity Provider using the credentials you collected in Step 1
5. The connection will be active immediately upon completion
:::tip
If you only need SSO authentication, you can stop here. Your Okta SSO is ready to use. User management will be handled manually in the Suger Console.
:::
**If you need SCIM user provisioning** for automated user lifecycle management (create, update, deactivate users), continue to Step 3 to configure SCIM directly from the Suger Console.
:::info
SCIM provisioning provides automated user creation, updates, deactivation, and role mapping. This is optional and only needed if you want full user lifecycle automation.
:::
### Step 3: Configure SCIM Provisioning (Optional)
:::note
This step is only required if you need SCIM user provisioning. If you only configured SSO in Step 2, you can skip this section.
:::
You can generate the SCIM credentials directly from the Suger Console:
1. **Navigate to the SCIM Configuration**: In the Suger Console, go to **Settings > SSO**. Find your SSO connection and click the **SCIM** dropdown to expand the SCIM provisioning section.
> 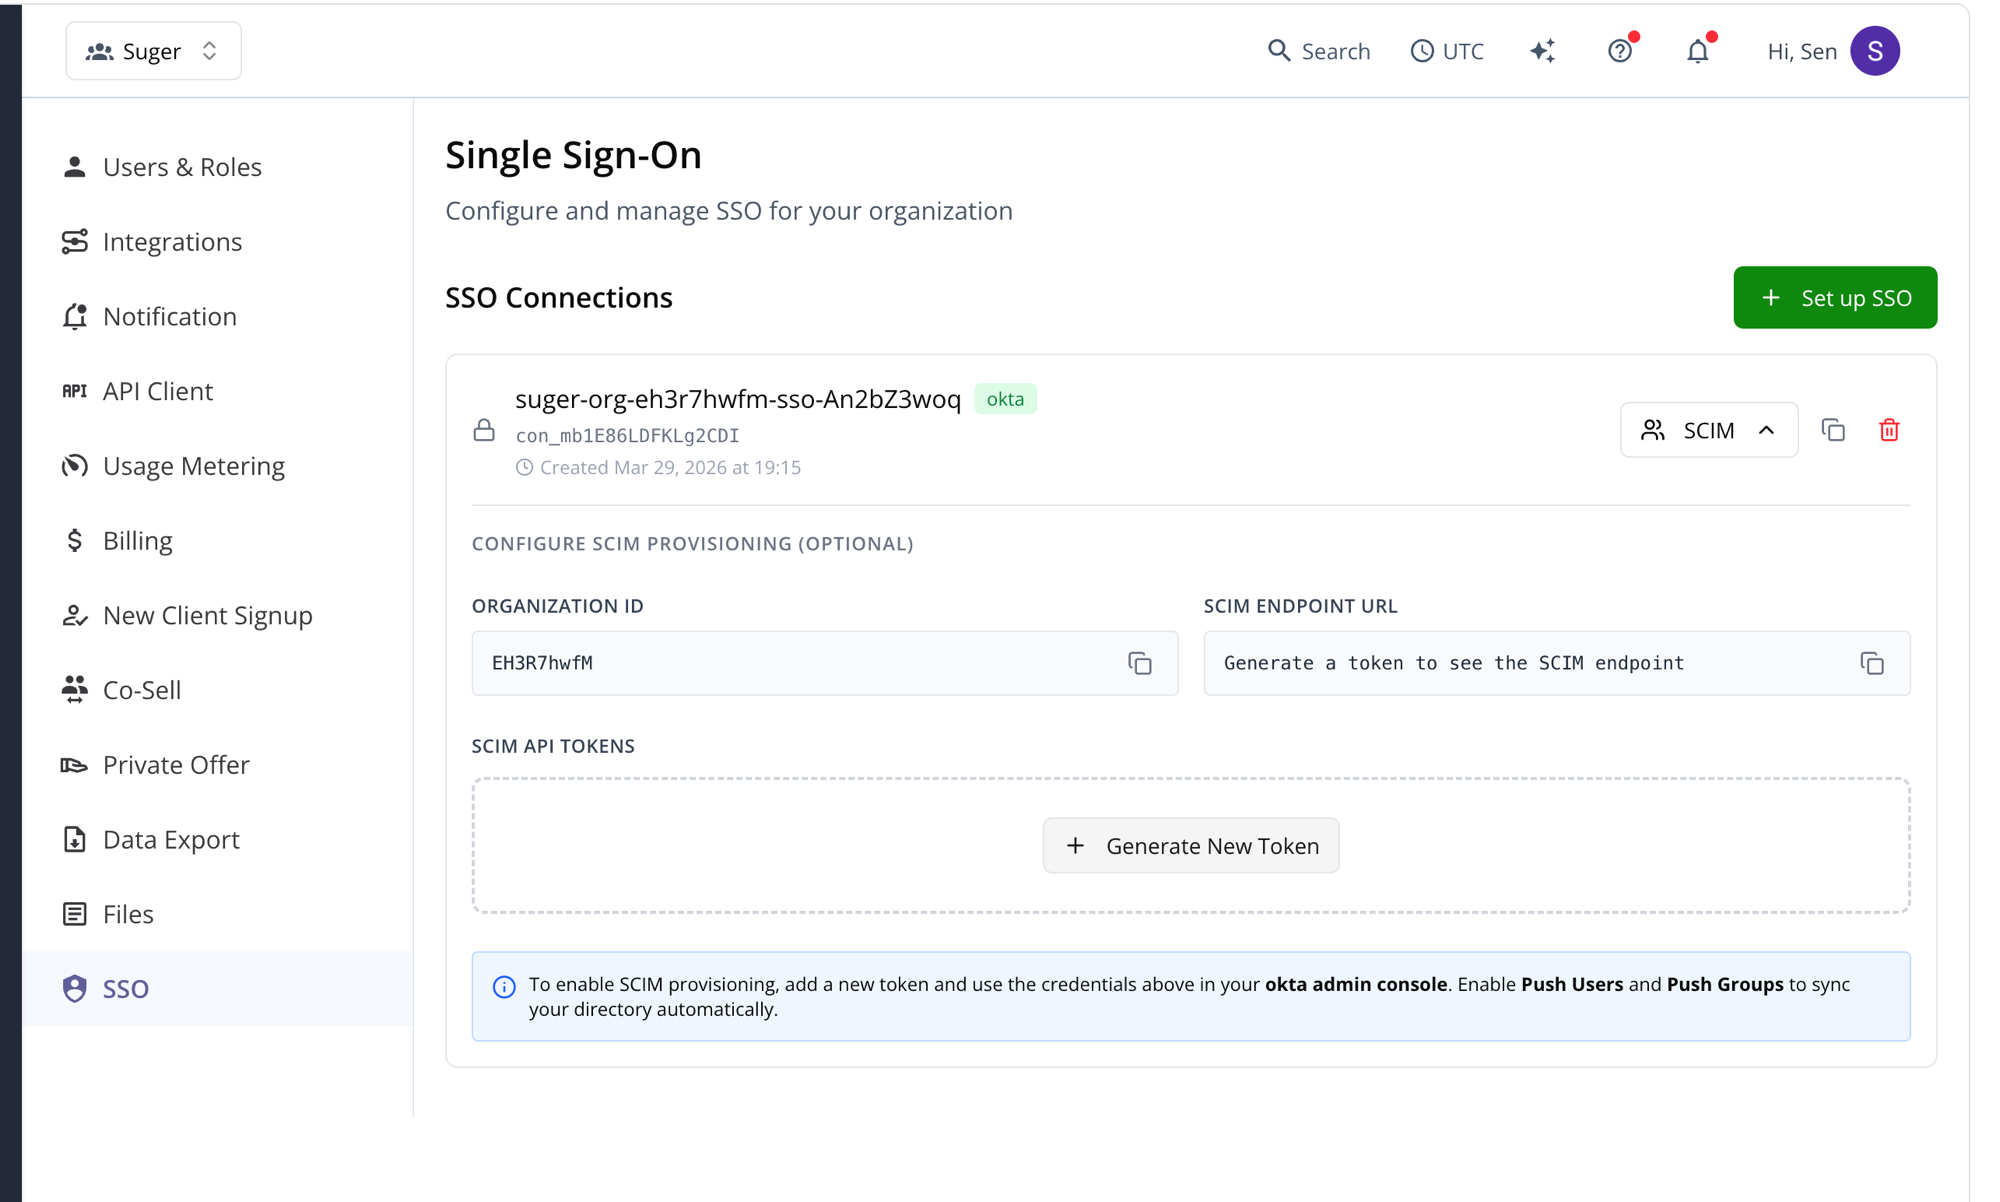 2. **Generate a SCIM API Token**: Click **"+ Generate New Token"**. A dialog will appear with your token.
>
2. **Generate a SCIM API Token**: Click **"+ Generate New Token"**. A dialog will appear with your token.
> 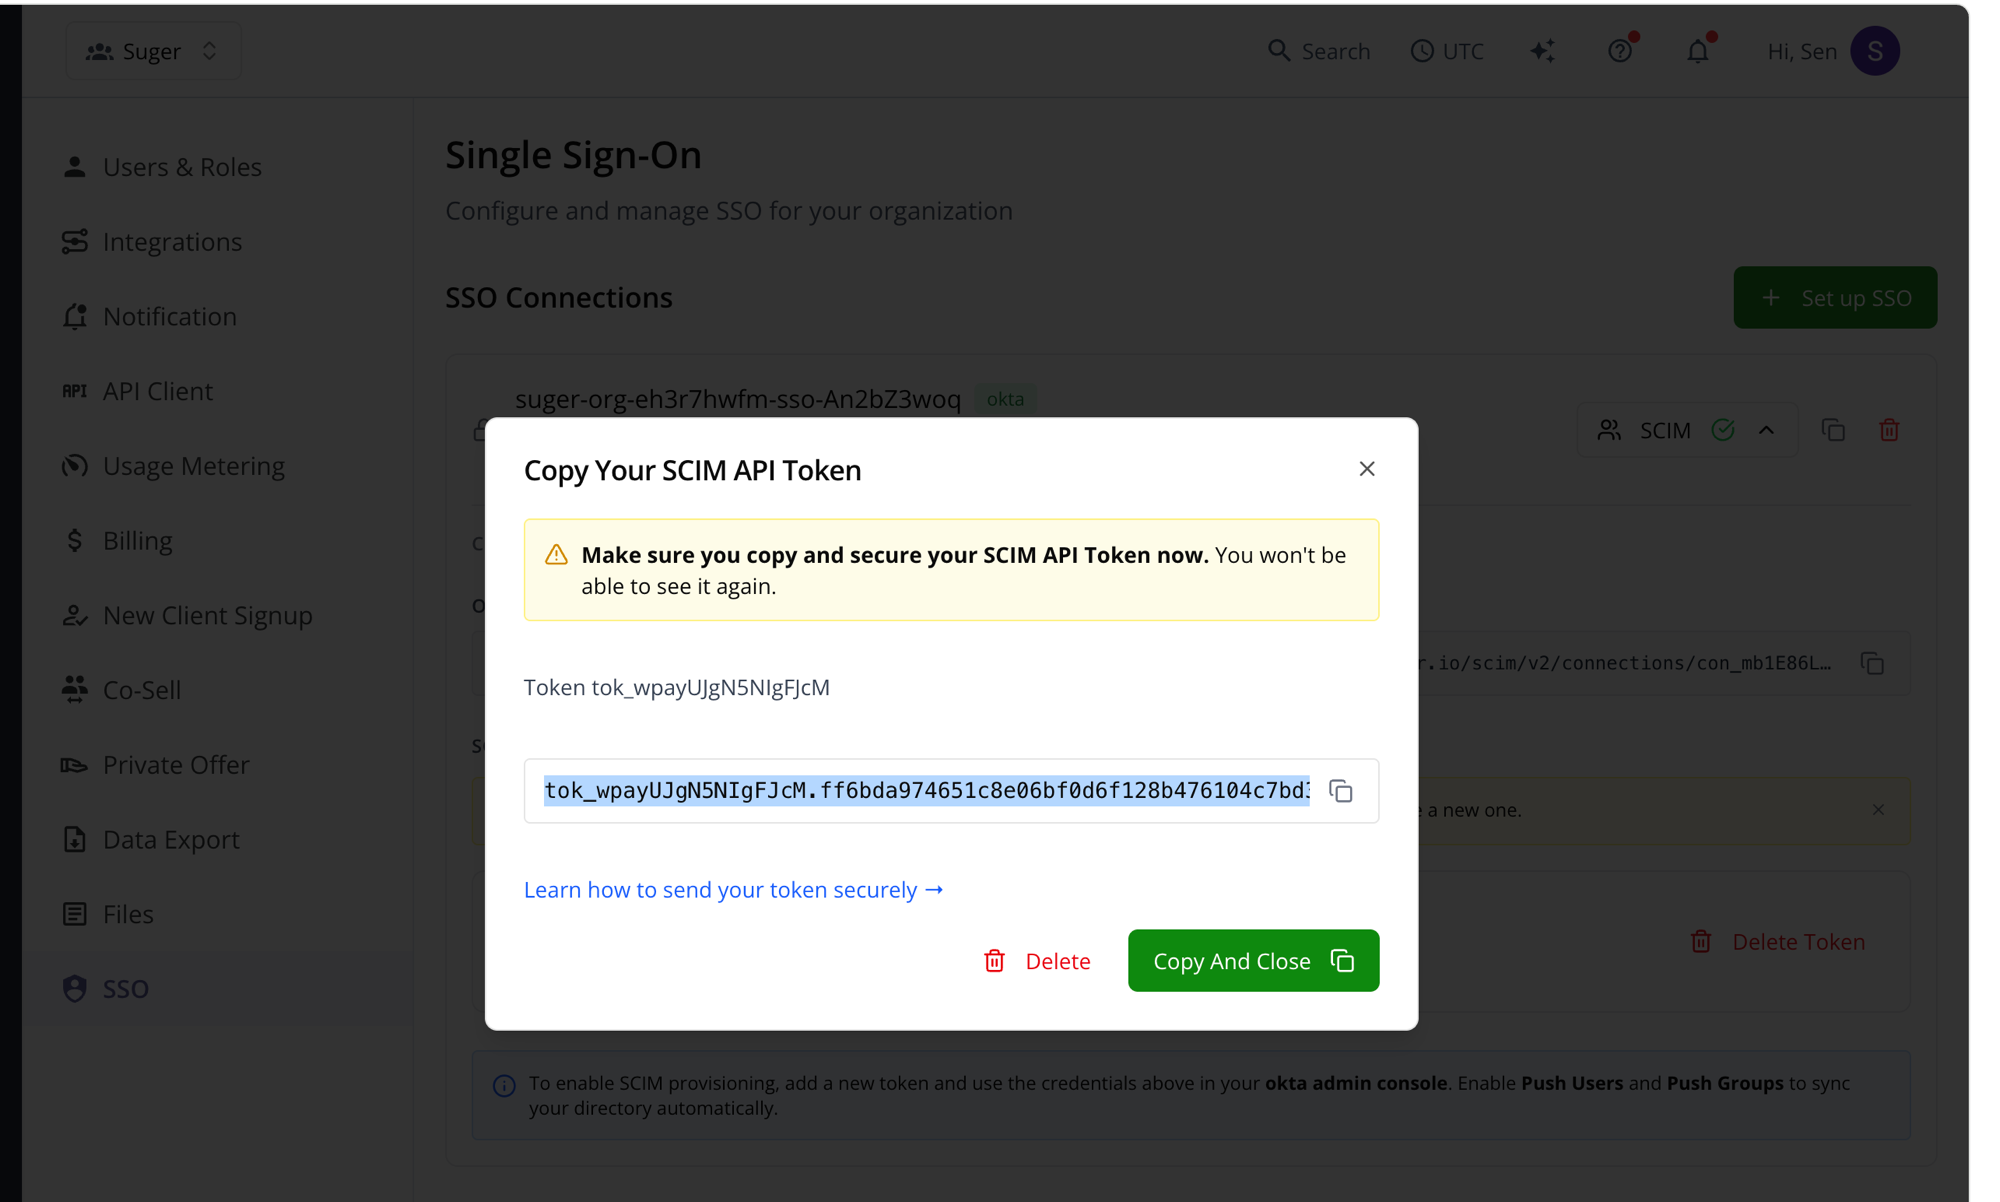 :::warning
**Copy and save your SCIM API Token immediately.** Suger does not store this token — you will not be able to view it again. If you lose it, you can delete the token and generate a new one.
:::
3. **Copy the SCIM Credentials**: After the token is generated, the following information will be available in the SCIM section. Copy them for use in Okta:
- **Organization ID**
- **SCIM Endpoint URL**
- **SCIM API Token** (from the previous step)
>
:::warning
**Copy and save your SCIM API Token immediately.** Suger does not store this token — you will not be able to view it again. If you lose it, you can delete the token and generate a new one.
:::
3. **Copy the SCIM Credentials**: After the token is generated, the following information will be available in the SCIM section. Copy them for use in Okta:
- **Organization ID**
- **SCIM Endpoint URL**
- **SCIM API Token** (from the previous step)
> 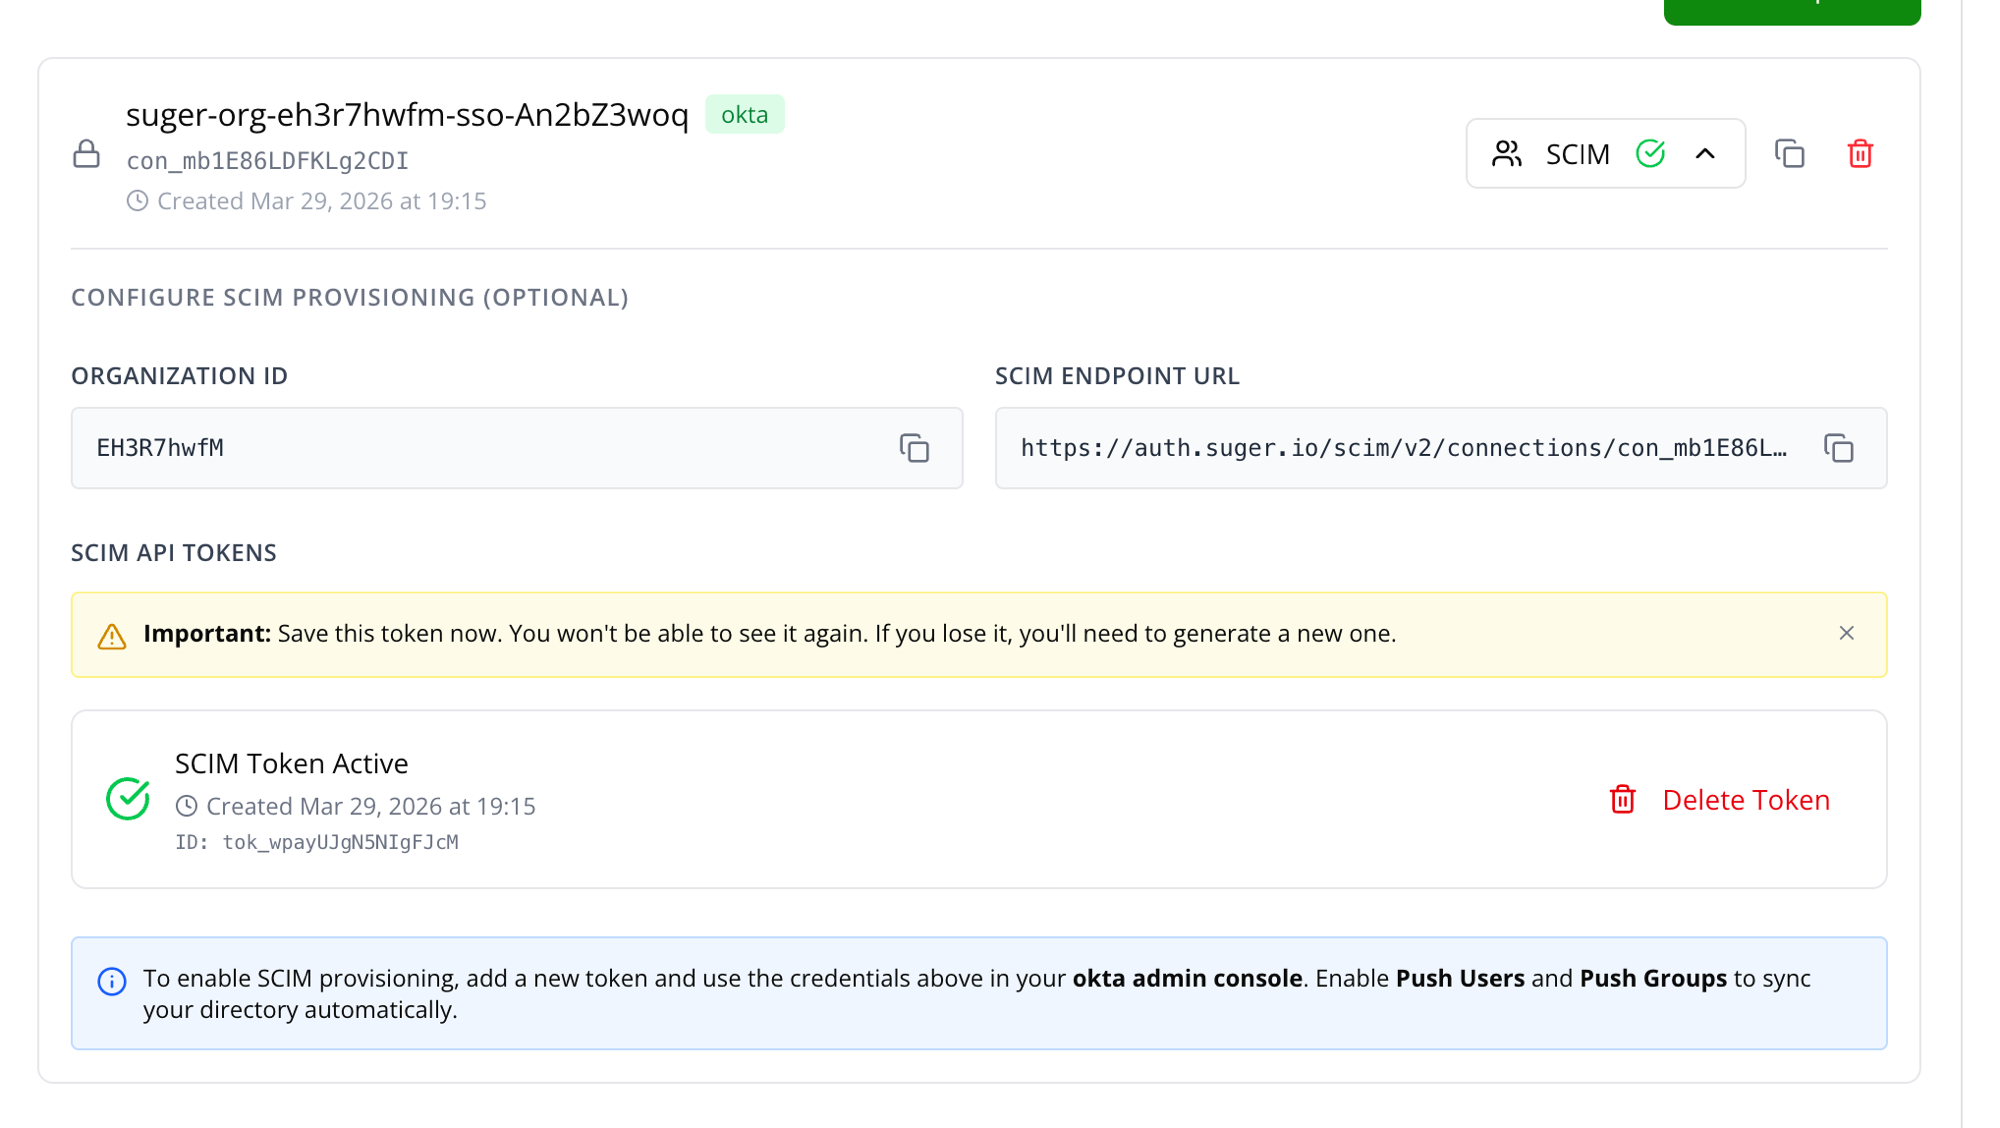 Use these values to complete the setup in Okta.
#### A. Update General Settings
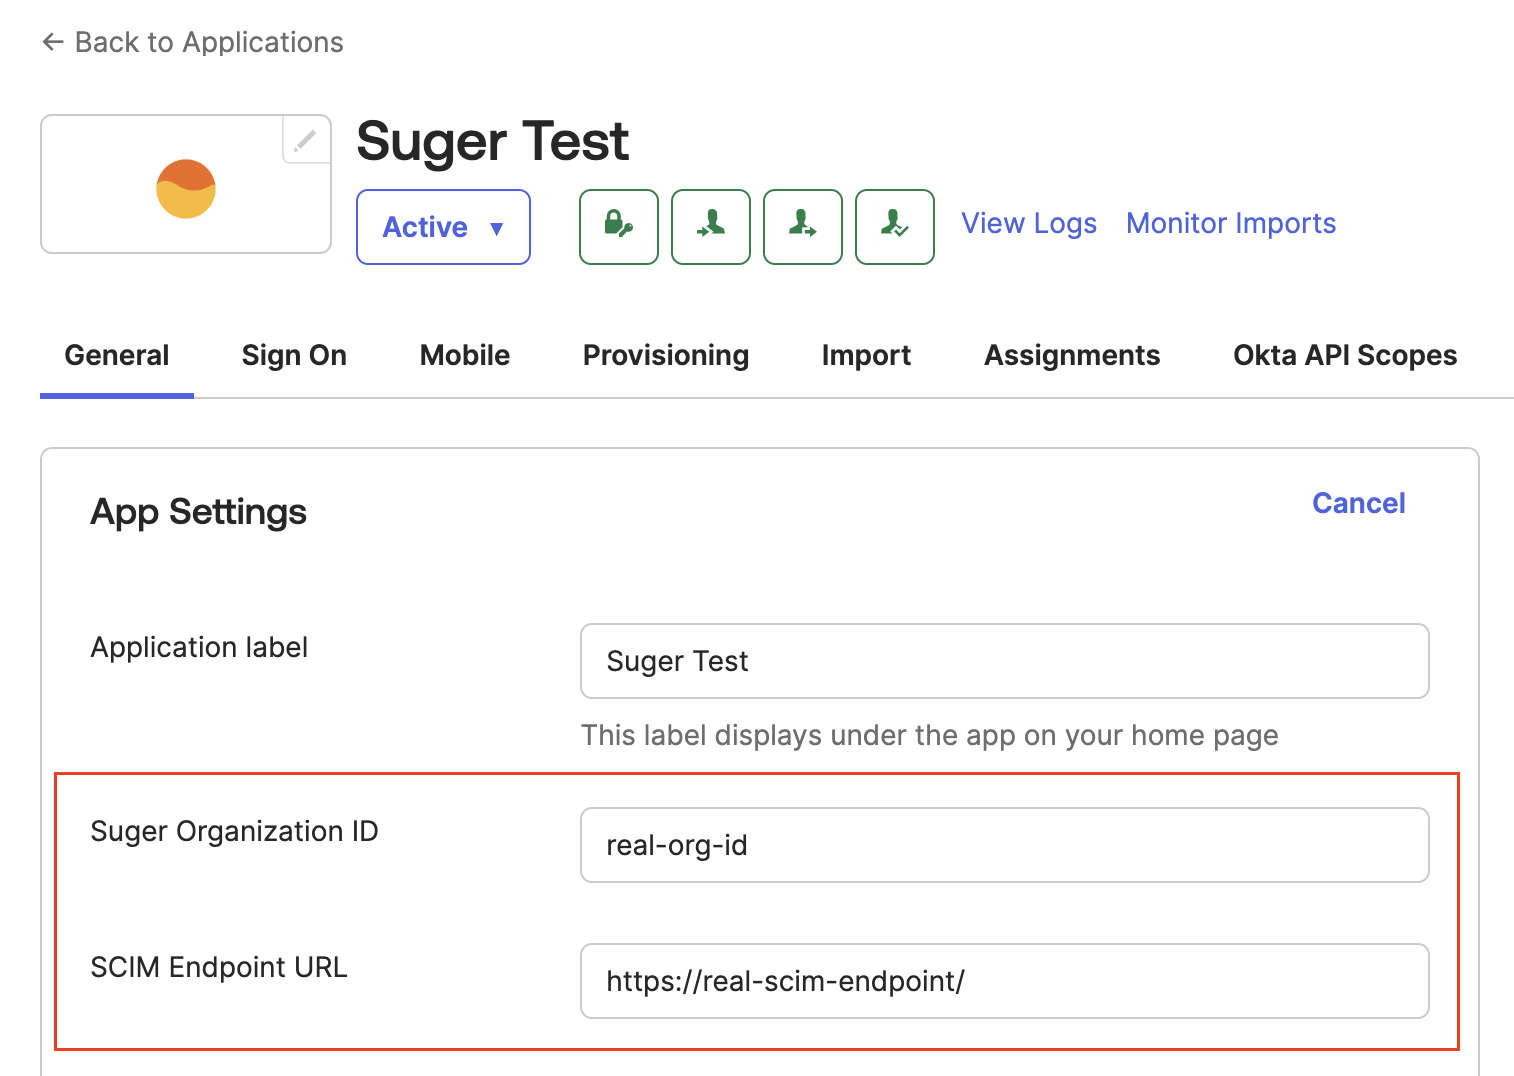
1. In the Suger app in Okta, navigate to the **General** tab and click **Edit** in the "App Settings" section.
2. Replace the placeholder values with the **Suger Organization ID** and **SCIM Endpoint URL** provided by Suger Support.
>
Use these values to complete the setup in Okta.
#### A. Update General Settings
1. In the Suger app in Okta, navigate to the **General** tab and click **Edit** in the "App Settings" section.
2. Replace the placeholder values with the **Suger Organization ID** and **SCIM Endpoint URL** provided by Suger Support.
>  :::warning
- Ensure the **SCIM endpoint URL** ends with a trailing slash (`/`).
- Ensure the **Suger Organization ID** has no leading or trailing spaces.
:::
#### B. Configure SCIM Provisioning
1. **Enable API Integration**:
- Navigate to the **Provisioning** tab and click **Configure API Integration**.
- Check **Enable API Integration**.
- Paste the **SCIM API Token** provided by Suger Support into the "API Token" field.
- Click **Test API Credentials**. A success message should appear.
- Click **Save**.
>
:::warning
- Ensure the **SCIM endpoint URL** ends with a trailing slash (`/`).
- Ensure the **Suger Organization ID** has no leading or trailing spaces.
:::
#### B. Configure SCIM Provisioning
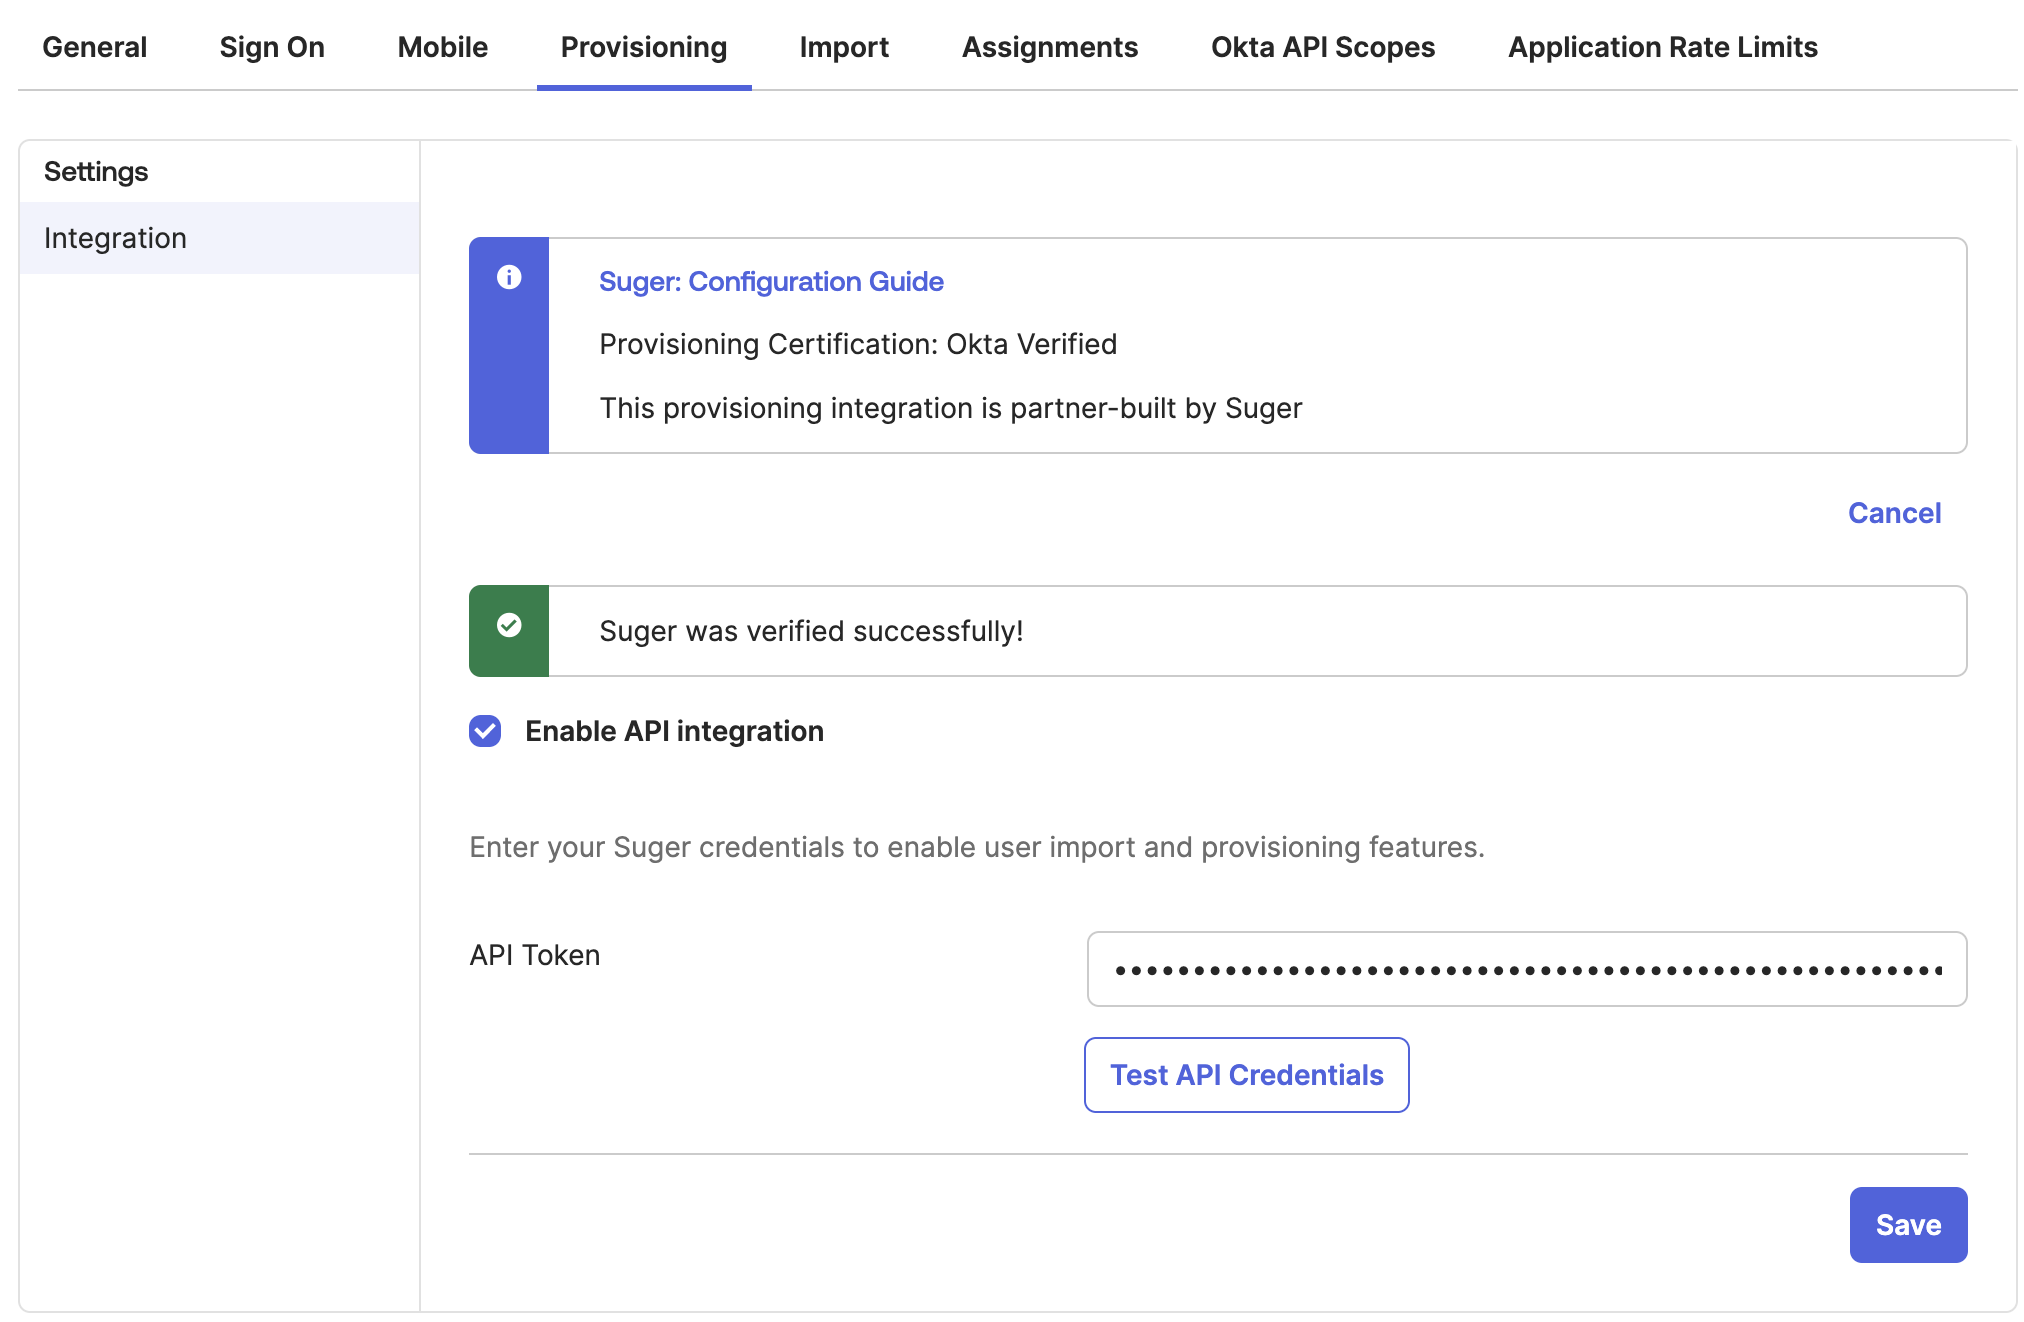
1. **Enable API Integration**:
- Navigate to the **Provisioning** tab and click **Configure API Integration**.
- Check **Enable API Integration**.
- Paste the **SCIM API Token** provided by Suger Support into the "API Token" field.
- Click **Test API Credentials**. A success message should appear.
- Click **Save**.
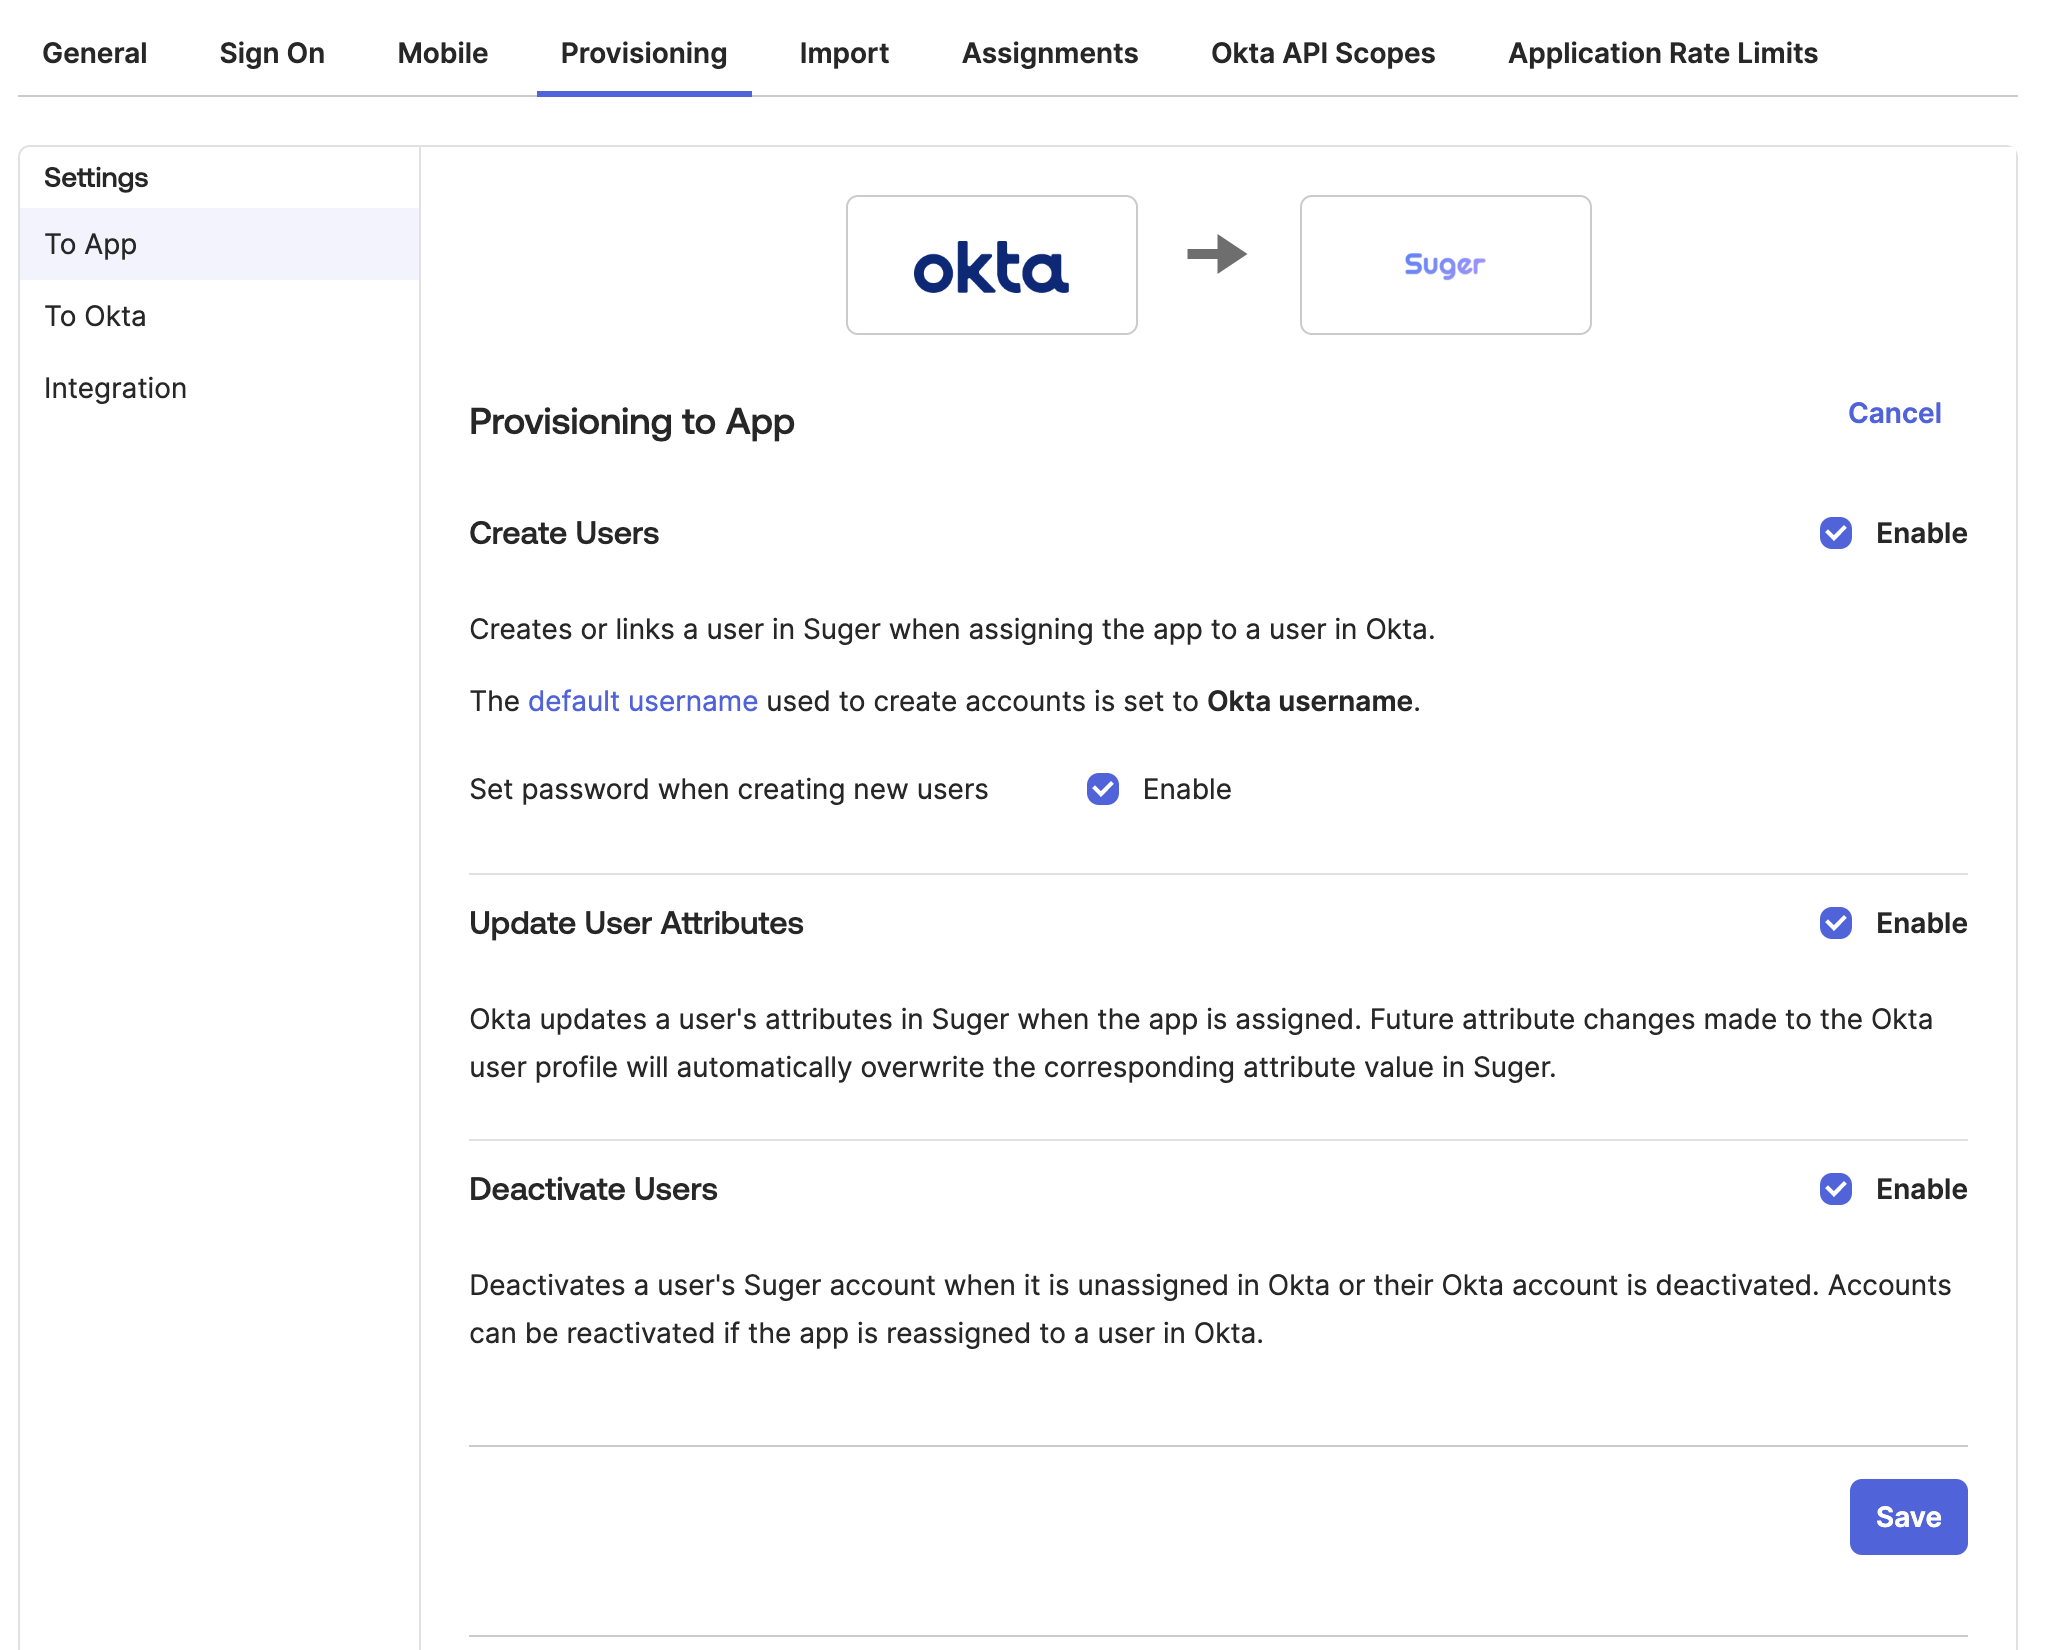
>  2. **Enable Provisioning Features**:
- In the "Provisioning to App" section, click **Edit**.
- Enable **Create Users**, **Update User Attributes**, and **Deactivate Users**.
- Click **Save**.
>
2. **Enable Provisioning Features**:
- In the "Provisioning to App" section, click **Edit**.
- Enable **Create Users**, **Update User Attributes**, and **Deactivate Users**.
- Click **Save**.
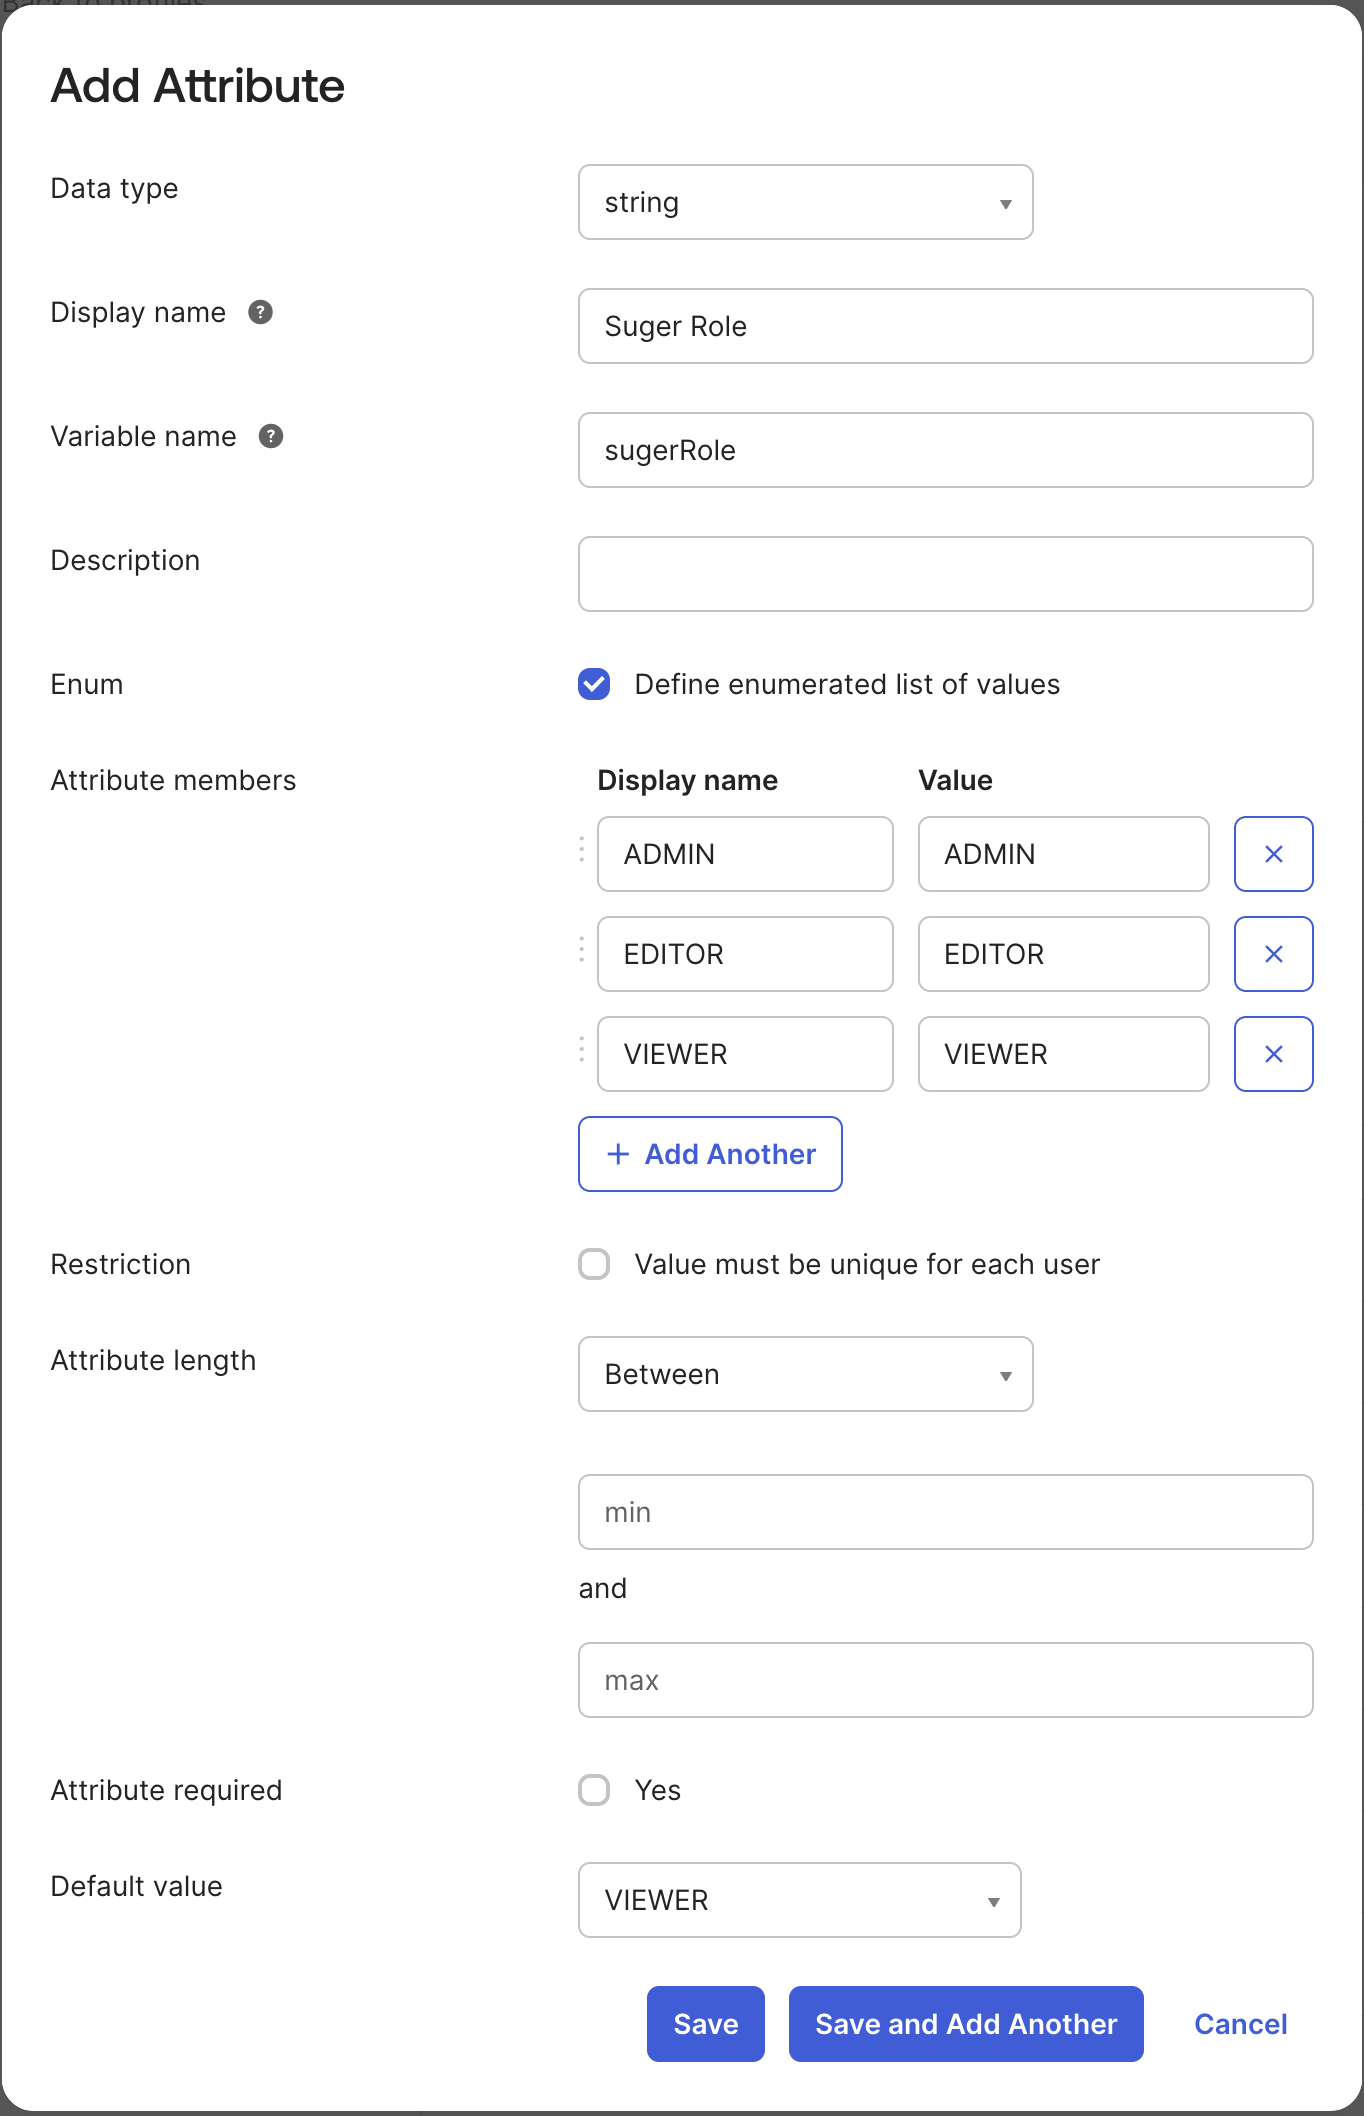
>  3. **Map User Roles**: To manage user roles (Admin, Editor, Viewer) in Suger via Okta, you must create a custom attribute and map it.
- **Create a Custom Attribute on the Okta User Profile**:
- Go to **Directory** → **Profile Editor** → **Okta** → **User (default)** profile and click **Edit**.
- Add a new attribute with the following settings:
- **Data type**: `string`
- **Display name**: `Suger Role`
- **Variable name**: `sugerRole`
- Check **Define enumerated list of values** and add the following members:
- `ADMIN`
- `EDITOR`
- `VIEWER`
- **Default value**: `VIEWER`
- Click **Save**.
>
3. **Map User Roles**: To manage user roles (Admin, Editor, Viewer) in Suger via Okta, you must create a custom attribute and map it.
- **Create a Custom Attribute on the Okta User Profile**:
- Go to **Directory** → **Profile Editor** → **Okta** → **User (default)** profile and click **Edit**.
- Add a new attribute with the following settings:
- **Data type**: `string`
- **Display name**: `Suger Role`
- **Variable name**: `sugerRole`
- Check **Define enumerated list of values** and add the following members:
- `ADMIN`
- `EDITOR`
- `VIEWER`
- **Default value**: `VIEWER`
- Click **Save**.
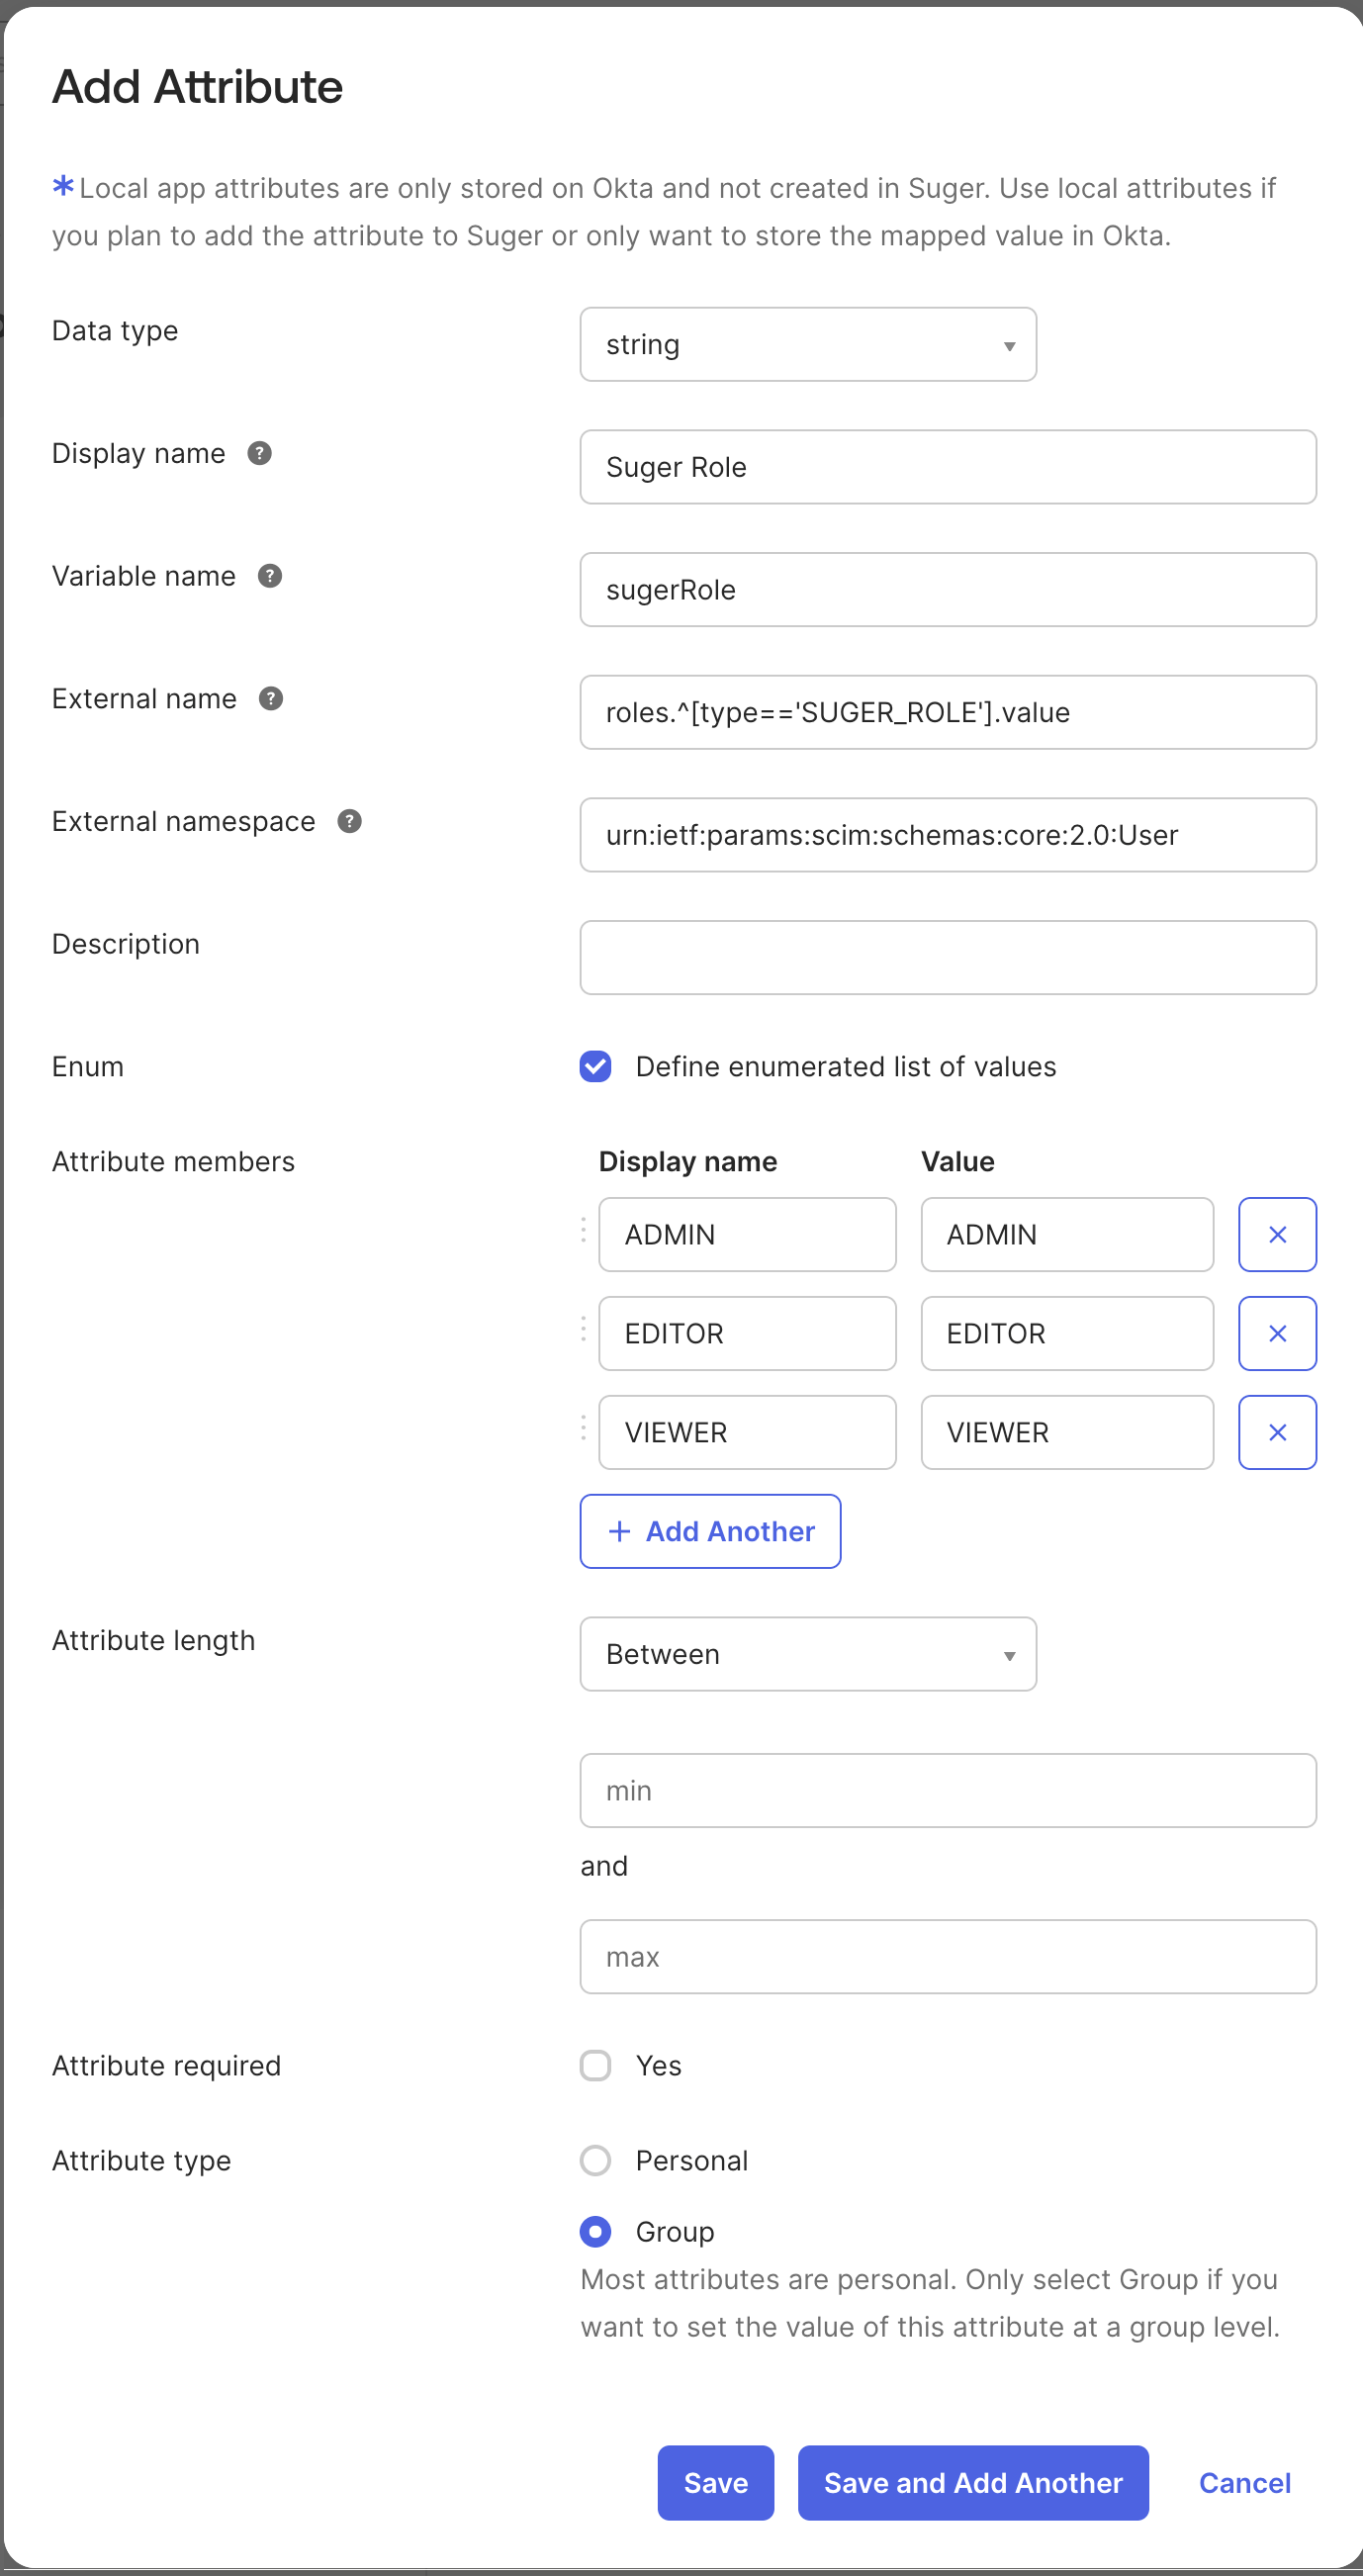
>  - **Create a Custom Attribute on the Suger App User Profile**:
- Go to **Directory** → **Profile Editor** → **Apps** → **Suger App user** profile and click **Edit**.
- Add a new attribute with the following settings:
- **Data type**: `string`
- **Display name**: `Suger Role`
- **Variable name**: `sugerRole`
- **External name**: `roles.^[type=='SUGER_ROLE'].value`
- **External namespace**: `urn:ietf:params:scim:schemas:core:2.0:User`
- **Enum**: Define enumerated list of values
- **Attribute members**: `ADMIN`, `EDITOR`, `VIEWER`
- **Attribute required**: `Yes`
- **Attribute type**: `Group`
- Click **Save**.
>
- **Create a Custom Attribute on the Suger App User Profile**:
- Go to **Directory** → **Profile Editor** → **Apps** → **Suger App user** profile and click **Edit**.
- Add a new attribute with the following settings:
- **Data type**: `string`
- **Display name**: `Suger Role`
- **Variable name**: `sugerRole`
- **External name**: `roles.^[type=='SUGER_ROLE'].value`
- **External namespace**: `urn:ietf:params:scim:schemas:core:2.0:User`
- **Enum**: Define enumerated list of values
- **Attribute members**: `ADMIN`, `EDITOR`, `VIEWER`
- **Attribute required**: `Yes`
- **Attribute type**: `Group`
- Click **Save**.
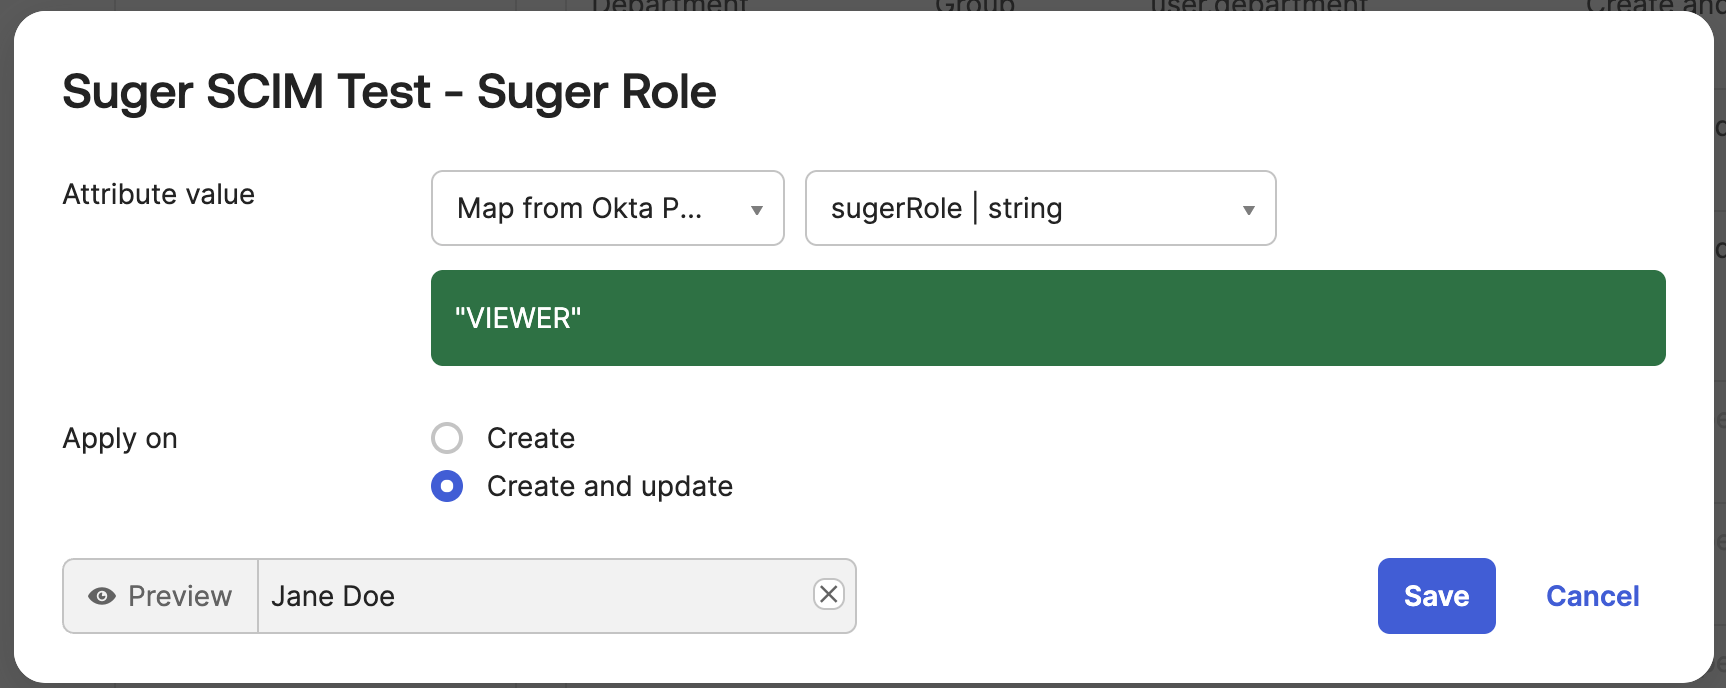
>  - **Map the Attribute to the Suger App**:
- In the Suger app in Okta, navigate to the **Provisioning** tab → **To App** section.
- Find the `sugerRole` attribute and set the mapping:
- **Attribute value**: `Map from Okta Profile`
- Select `sugerRole` from the dropdown.
- **Apply on**: `Create and update`
- Click **Save**.
>
- **Map the Attribute to the Suger App**:
- In the Suger app in Okta, navigate to the **Provisioning** tab → **To App** section.
- Find the `sugerRole` attribute and set the mapping:
- **Attribute value**: `Map from Okta Profile`
- Select `sugerRole` from the dropdown.
- **Apply on**: `Create and update`
- Click **Save**.
>  ### Step 4: Assign Users in Okta (Required for SCIM Only)
:::note
This step is only required if you configured SCIM provisioning in Step 3. If you only configured SSO, users can log in directly after the SSO connection is active. User management will be handled in the Suger Console.
:::
Instead of assigning roles to individual users, the best practice is to assign users to Okta groups that correspond to Suger roles.
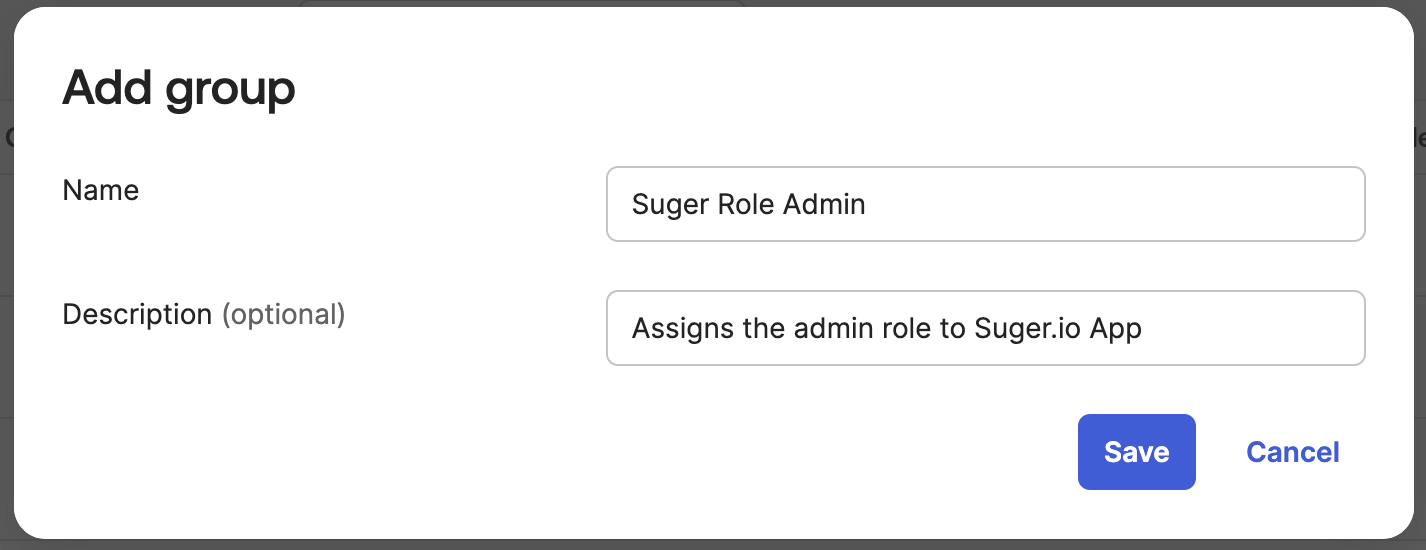
1. **Create Okta Groups**: Create three Okta groups, one for each role: `Suger Admins`, `Suger Editors`, and `Suger Viewers`.
>
### Step 4: Assign Users in Okta (Required for SCIM Only)
:::note
This step is only required if you configured SCIM provisioning in Step 3. If you only configured SSO, users can log in directly after the SSO connection is active. User management will be handled in the Suger Console.
:::
Instead of assigning roles to individual users, the best practice is to assign users to Okta groups that correspond to Suger roles.
1. **Create Okta Groups**: Create three Okta groups, one for each role: `Suger Admins`, `Suger Editors`, and `Suger Viewers`.
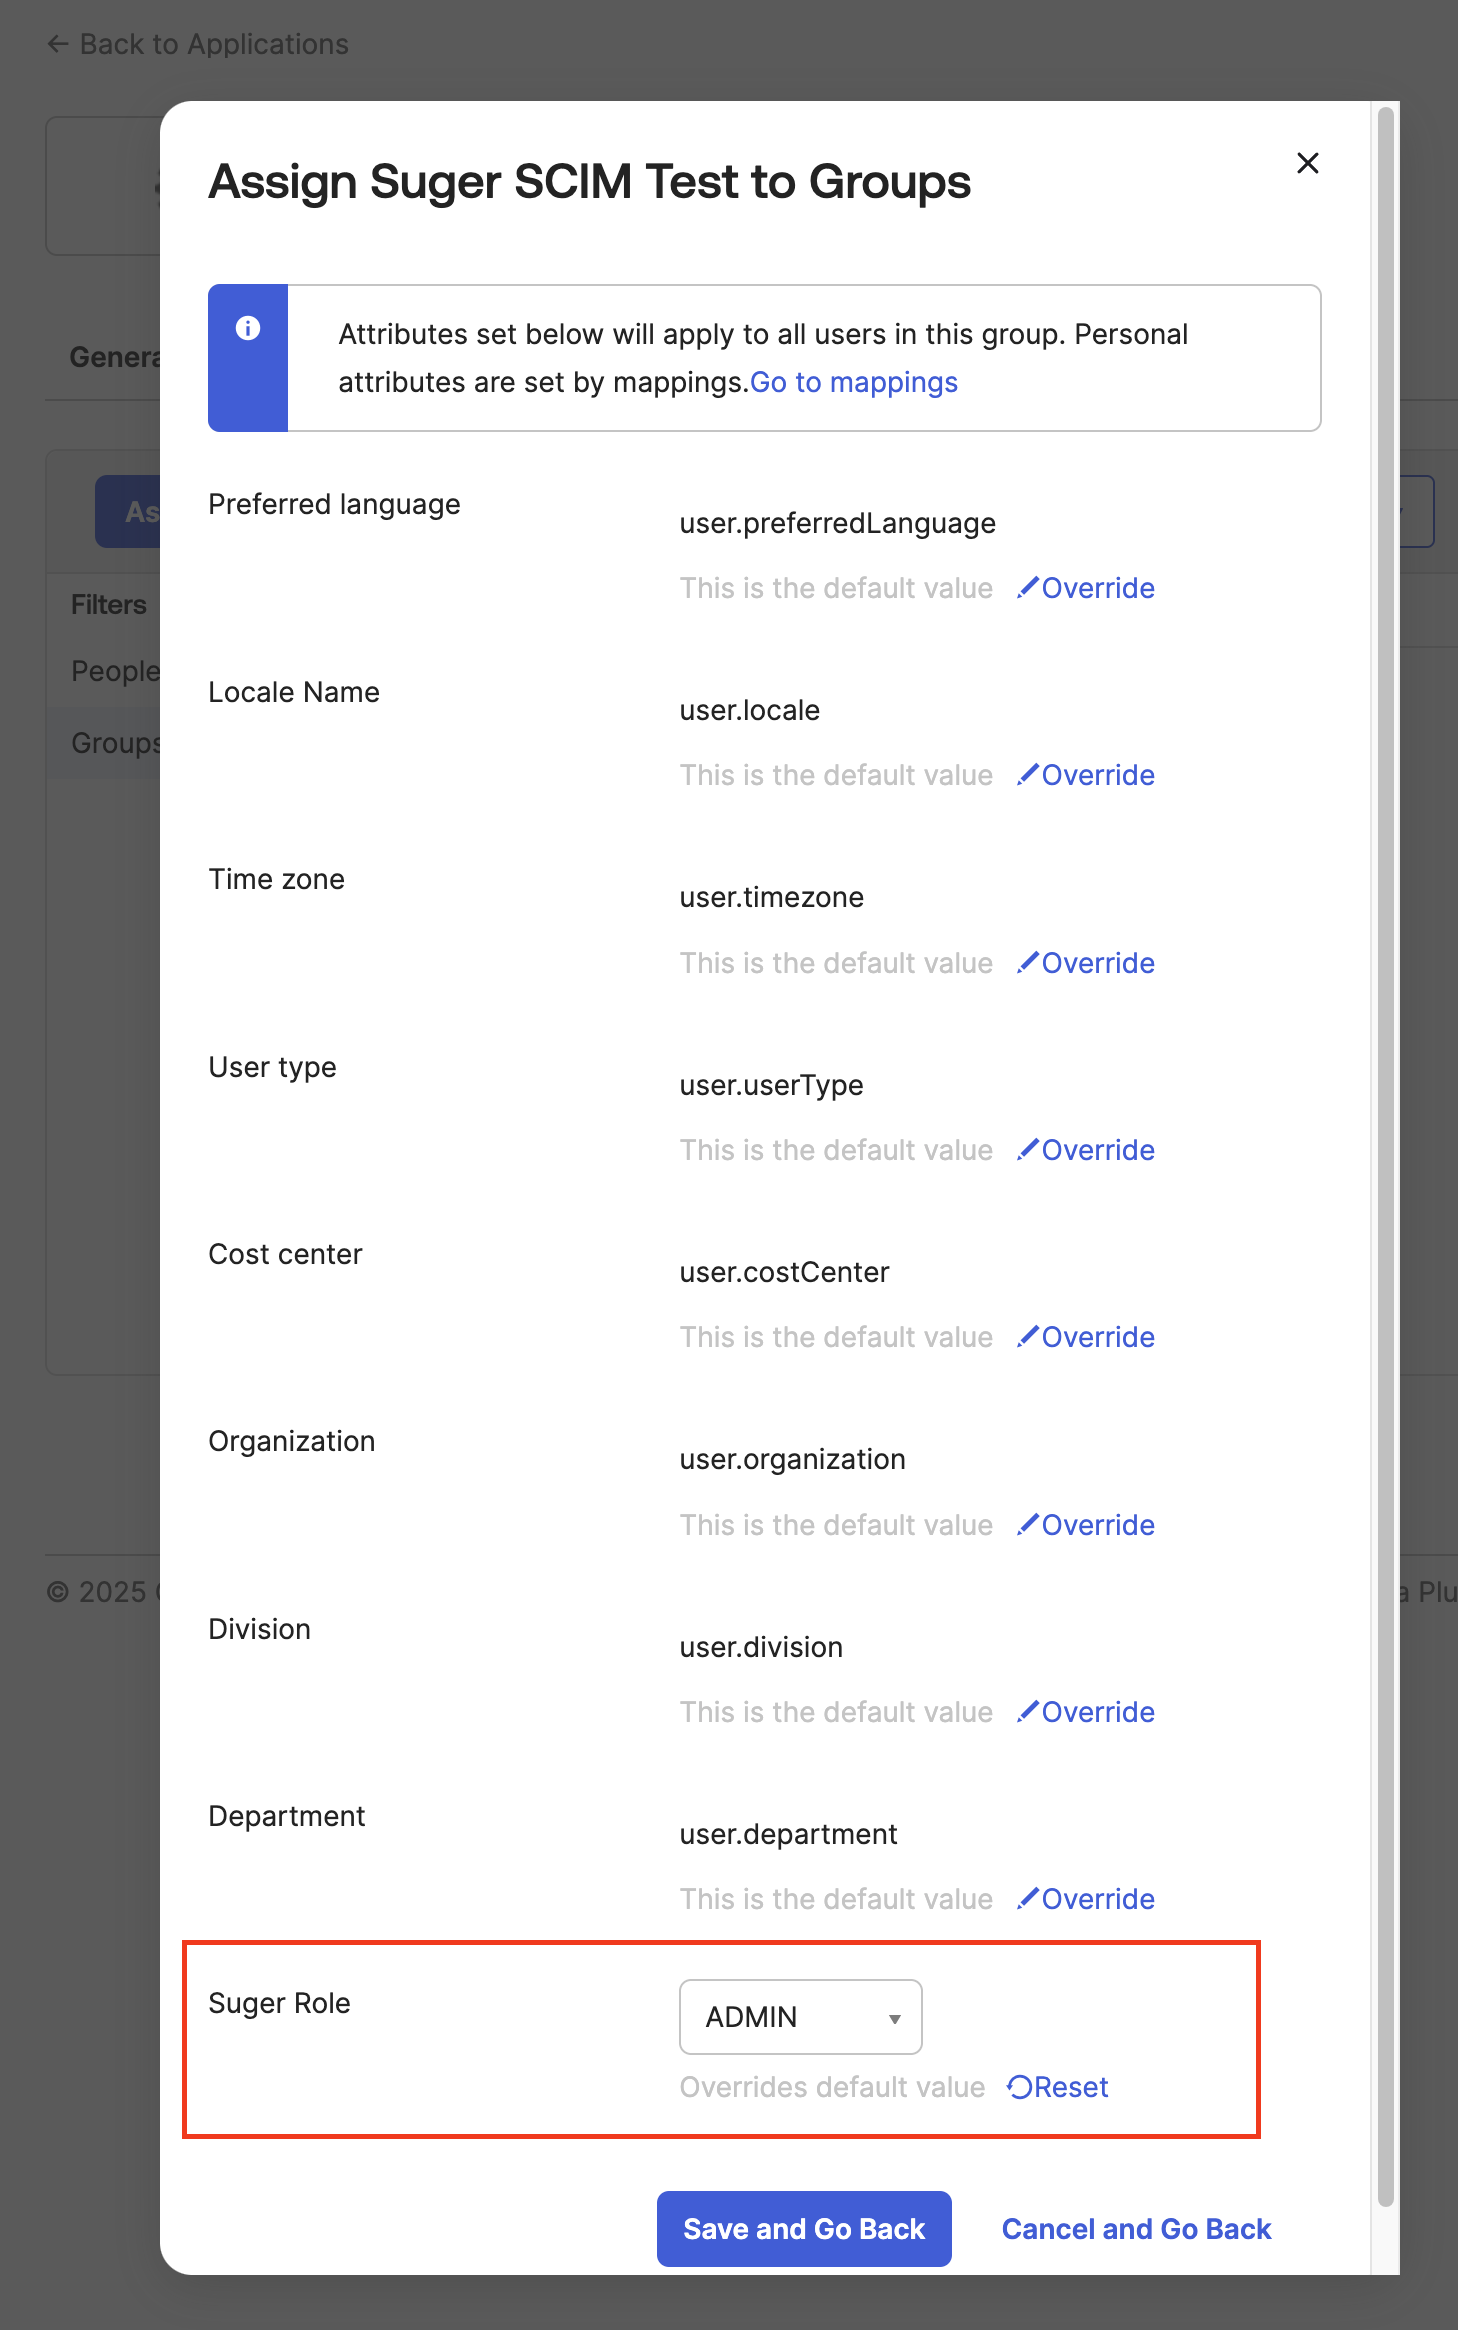
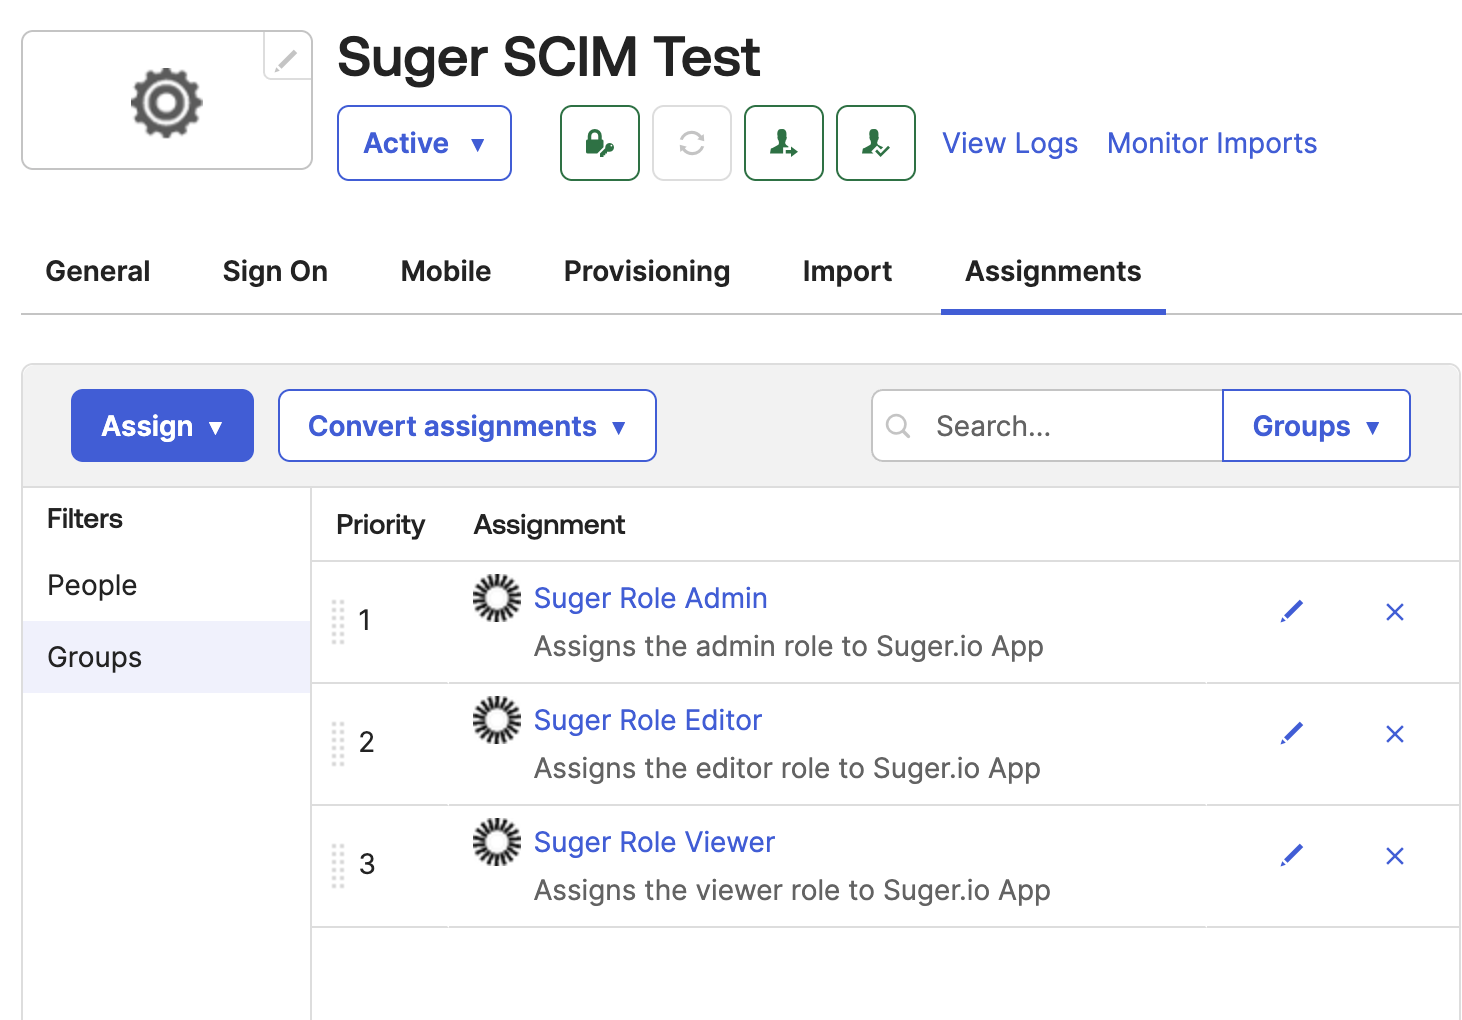
>  2. **Assign Groups to the Suger App**:
- Navigate to the **Assignments** tab of the Suger app.
- Assign each of the three groups to the application.
- When assigning each group, override the `Suger Role` attribute to the corresponding value (`ADMIN`, `EDITOR`, or `VIEWER`).
>
2. **Assign Groups to the Suger App**:
- Navigate to the **Assignments** tab of the Suger app.
- Assign each of the three groups to the application.
- When assigning each group, override the `Suger Role` attribute to the corresponding value (`ADMIN`, `EDITOR`, or `VIEWER`).
>  >
>
>
>  3. **Manage Users**:
- To grant a user access, add them to one of the Suger role groups in Okta.
- To revoke access, remove the user from the group.
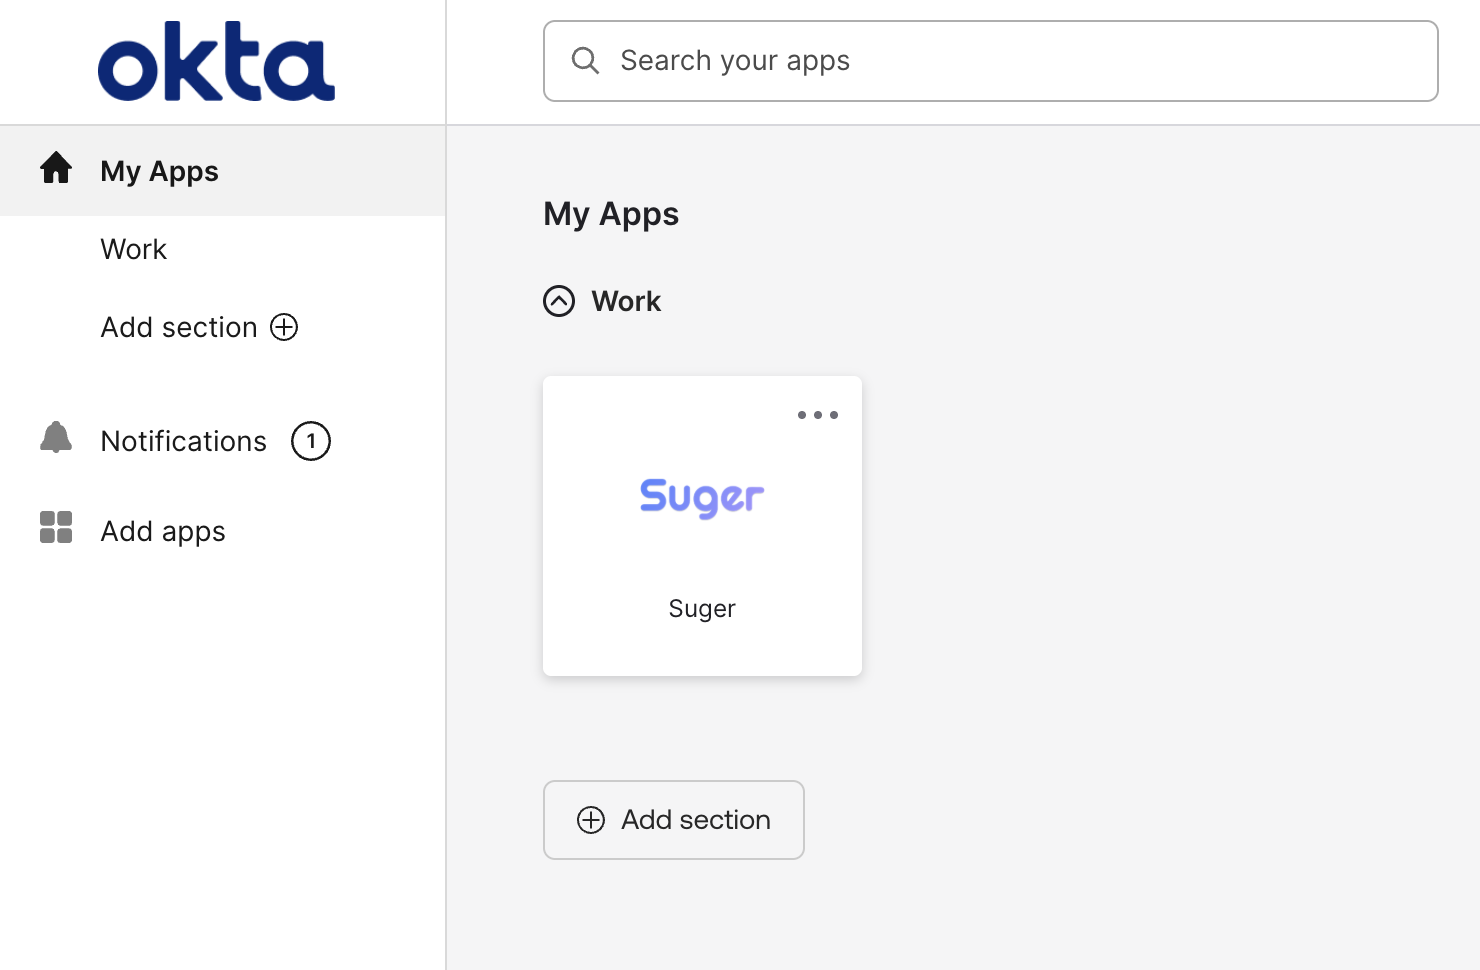
- The Suger app will now appear on the Okta dashboard for assigned users.
>
3. **Manage Users**:
- To grant a user access, add them to one of the Suger role groups in Okta.
- To revoke access, remove the user from the group.
- The Suger app will now appear on the Okta dashboard for assigned users.
>  ---
## Using the SSO Connection
- **Identity Provider (IdP)-Initiated**: Click the Suger app icon from the Okta end-user dashboard.
- **Service Provider (SP)-Initiated**:
- Navigate to `https://console.suger.io/login?orgId={your_suger_org_id}`. After the first login, a shortcut will appear on the main login page https://console.suger.io/login and you can omit the `orgId` parameter.
>
---
## Using the SSO Connection
- **Identity Provider (IdP)-Initiated**: Click the Suger app icon from the Okta end-user dashboard.
- **Service Provider (SP)-Initiated**:
- Navigate to `https://console.suger.io/login?orgId={your_suger_org_id}`. After the first login, a shortcut will appear on the main login page https://console.suger.io/login and you can omit the `orgId` parameter.
>  - Click **"Continue with Okta"** to authenticate with your Okta credentials. (Note: This step is automatically skipped if Okta is configured as the default SSO connection. To enforce Okta-only login, contact Suger Support.)
>
- Click **"Continue with Okta"** to authenticate with your Okta credentials. (Note: This step is automatically skipped if Okta is configured as the default SSO connection. To enforce Okta-only login, contact Suger Support.)
>  #### Note
:::warning
Once this integration is active, all user management (creation, deactivation, and role changes) **MUST** be done in Okta. Manual changes in the Suger console will be overridden by Okta.
:::
---
## Troubleshooting
1. **"Conflict" or "Matching user not found" error**
- If you encounter this error when assigning users to the SCIM app, navigate to **Dashboard > Tasks** to check the error details and retry the task.
- If the error persists, verify the SCIM endpoint URL and API token. Ensure the SCIM endpoint URL ends with a `/`.
2. **"The connection is not enabled" error**
- Check the "Auth0 Enterprise Connection Name" setting in the Suger console under Settings > Organization. Ensure the Okta connection name is correct and does not contain any extra characters such as spaces.
3. **User provisioning**
- After a user is provisioned, they will gain access to the Suger console immediately.
- The user will not be visible in the Suger console until they complete their first login via OIDC authentication.
4. **SCIM provisioning for `sugerRole` updates**
- To apply `sugerRole` updates, log out and then log back into the Suger console.
- Updates to `sugerRole` may take a few minutes to reflect due to caching. Please wait a while and try again.
5. **Synced user attributes**
- Only `email` and `sugerRole` are synchronized.
- Changes to the family name and given name will **NOT** be reflected in the Suger console.
6. **User deprovisioning**
- After a user is un-provisioned, they will lose access to the Suger console upon their next login attempt. However, they can continue accessing the Suger console until their current session expires.
- The user will still be visible in the Suger console, and removal may take up to **24 hours**.
7. **"400 Bad Request" error during login**
- This error typically indicates a mismatch in the OIDC client credentials. Double-check that the **Client ID** and **Client Secret** you generated in Okta (Step 1) were correctly sent to and configured by Suger Support.
8. **"JIT user provisioning is disabled" error during login**
- In Okta, navigate to the **Assignments** tab of the Suger app.
- Look for a red icon next to the user, which indicates a provisioning failure.
- Try to resolve the issue by removing and re-assigning the user to the application.
- If the error persists, contact Suger Support for assistance.
If you have any further questions, please contact Suger support at [support@suger.io](mailto:support@suger.io).
#### Note
:::warning
Once this integration is active, all user management (creation, deactivation, and role changes) **MUST** be done in Okta. Manual changes in the Suger console will be overridden by Okta.
:::
---
## Troubleshooting
1. **"Conflict" or "Matching user not found" error**
- If you encounter this error when assigning users to the SCIM app, navigate to **Dashboard > Tasks** to check the error details and retry the task.
- If the error persists, verify the SCIM endpoint URL and API token. Ensure the SCIM endpoint URL ends with a `/`.
2. **"The connection is not enabled" error**
- Check the "Auth0 Enterprise Connection Name" setting in the Suger console under Settings > Organization. Ensure the Okta connection name is correct and does not contain any extra characters such as spaces.
3. **User provisioning**
- After a user is provisioned, they will gain access to the Suger console immediately.
- The user will not be visible in the Suger console until they complete their first login via OIDC authentication.
4. **SCIM provisioning for `sugerRole` updates**
- To apply `sugerRole` updates, log out and then log back into the Suger console.
- Updates to `sugerRole` may take a few minutes to reflect due to caching. Please wait a while and try again.
5. **Synced user attributes**
- Only `email` and `sugerRole` are synchronized.
- Changes to the family name and given name will **NOT** be reflected in the Suger console.
6. **User deprovisioning**
- After a user is un-provisioned, they will lose access to the Suger console upon their next login attempt. However, they can continue accessing the Suger console until their current session expires.
- The user will still be visible in the Suger console, and removal may take up to **24 hours**.
7. **"400 Bad Request" error during login**
- This error typically indicates a mismatch in the OIDC client credentials. Double-check that the **Client ID** and **Client Secret** you generated in Okta (Step 1) were correctly sent to and configured by Suger Support.
8. **"JIT user provisioning is disabled" error during login**
- In Okta, navigate to the **Assignments** tab of the Suger app.
- Look for a red icon next to the user, which indicates a provisioning failure.
- Try to resolve the issue by removing and re-assigning the user to the application.
- If the error persists, contact Suger Support for assistance.
If you have any further questions, please contact Suger support at [support@suger.io](mailto:support@suger.io).