# AWS Partner Central API
## Overview
This guide walks you through setting up the AWS Partner Central integration using the **Partner Central API**.
With this integration, you can seamlessly sync opportunities, share referrals, and manage co-sell engagements with AWS.
## Prerequisites
- **Identity and Access Management (IAM) administrator**
- handles permissions and technical setup in AWS (e.g. IAM roles, policies, or SSO).
- **AWS Partner Central Alliance Lead or Cloud Administrator**
- the primary account owner in **AWS Partner Central**, with authority to accept **AWS Partner Network** terms.
- **CRM access**
- AWS ACE currently supports **Salesforce** and **HubSpot** only.
## 1. Link AWS Seller Account to APN
### Step 1. Identify an AWS account to link
Before linking, your **Alliance Lead (or Cloud Admin)** and **IAM Administrator** should select the AWS account that will be connected to Partner Central.
- **General recommendation**
- AWS recommends linking an account dedicated to APN engagements.
- If your company has multiple AWS accounts, consider selecting the one that:
- You use to sign in to AWS Partner Central
- Represents your global business
- Serves as the primary account for administrative tasks
- If you are an **AWS Marketplace seller**:
- You may choose to link a Marketplace seller account.
- If you own multiple Marketplace accounts, select your primary account such as the one with the most transactions.
### Step 2. Grant Access to Your Team
Before linking your AWS account, ensure that the right permissions are in place. This step is handled by your IAM Administrator.
- The **IAM Administrator** must configure IAM policies so that Partner Central users (Alliance Lead or Cloud Admin) have the necessary access to complete the account linking process.
- Follow the AWS official guide: [Account Linking Prerequisites](https://partnercentral.awspartner.com/partnercentral2/s/article?category=Introductory_resources&article=AWS-Partner-Central#Pre-requisite:%20Granting%20IAM%20permissions%20(Option%201)) → **Granting IAM Permissions**
for the latest instructions on which IAM policies are required.
:::tip
In most cases, this involves granting read-only IAM permissions and allowing Partner Central to create the required roles (e.g., Cloud Admin, Alliance, ACE).
We recommend letting your IAM Administrator review the official AWS guide to ensure compliance with your company’s security practices.
:::
### Step 3. Start the Linking Process
1. Sign in to [AWS Partner Central](https://partnercentral.awspartner.com/partnercentral2/s/) with an Alliance Lead or Cloud Admin role.
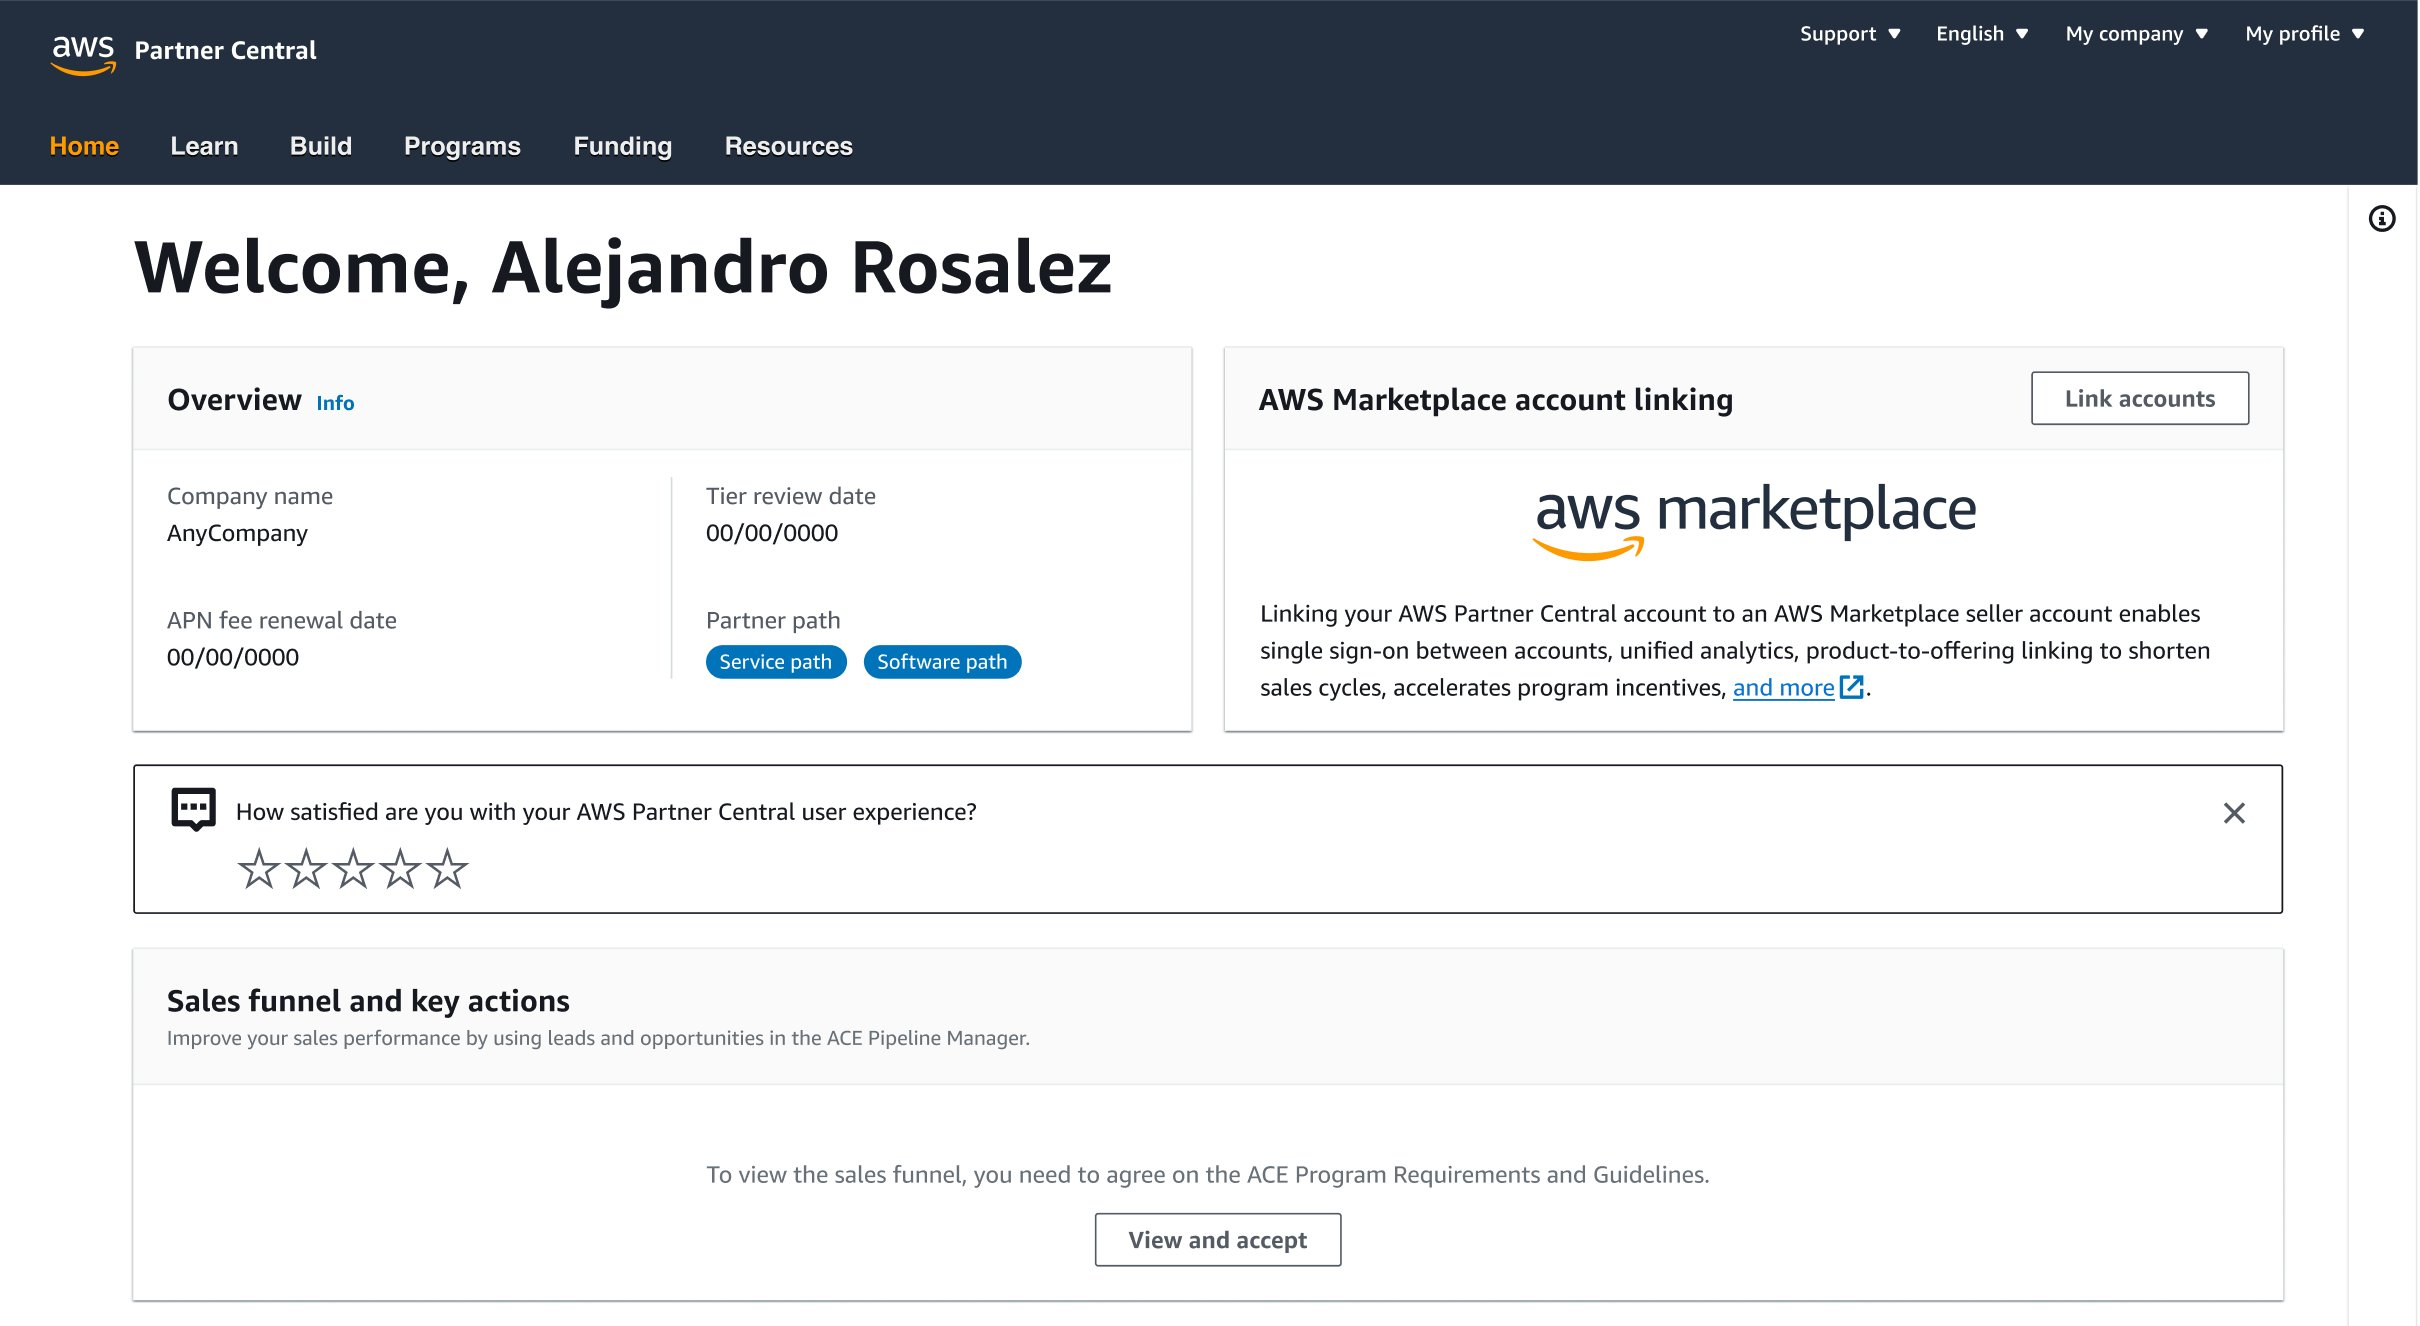
2. On the homepage, click **Link Account**.
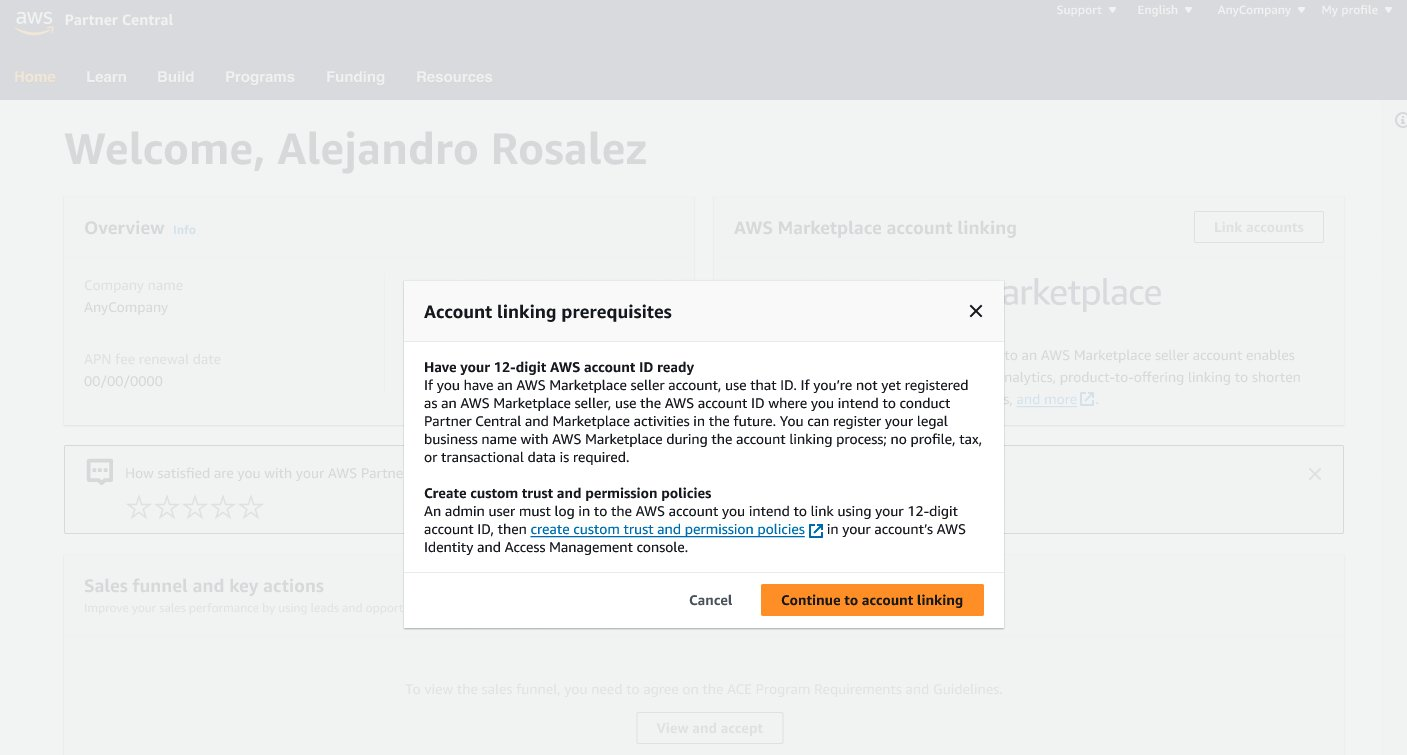
>  3. Click **Continue to Account Linking** once Step 2 has been completed.
>
3. Click **Continue to Account Linking** once Step 2 has been completed.
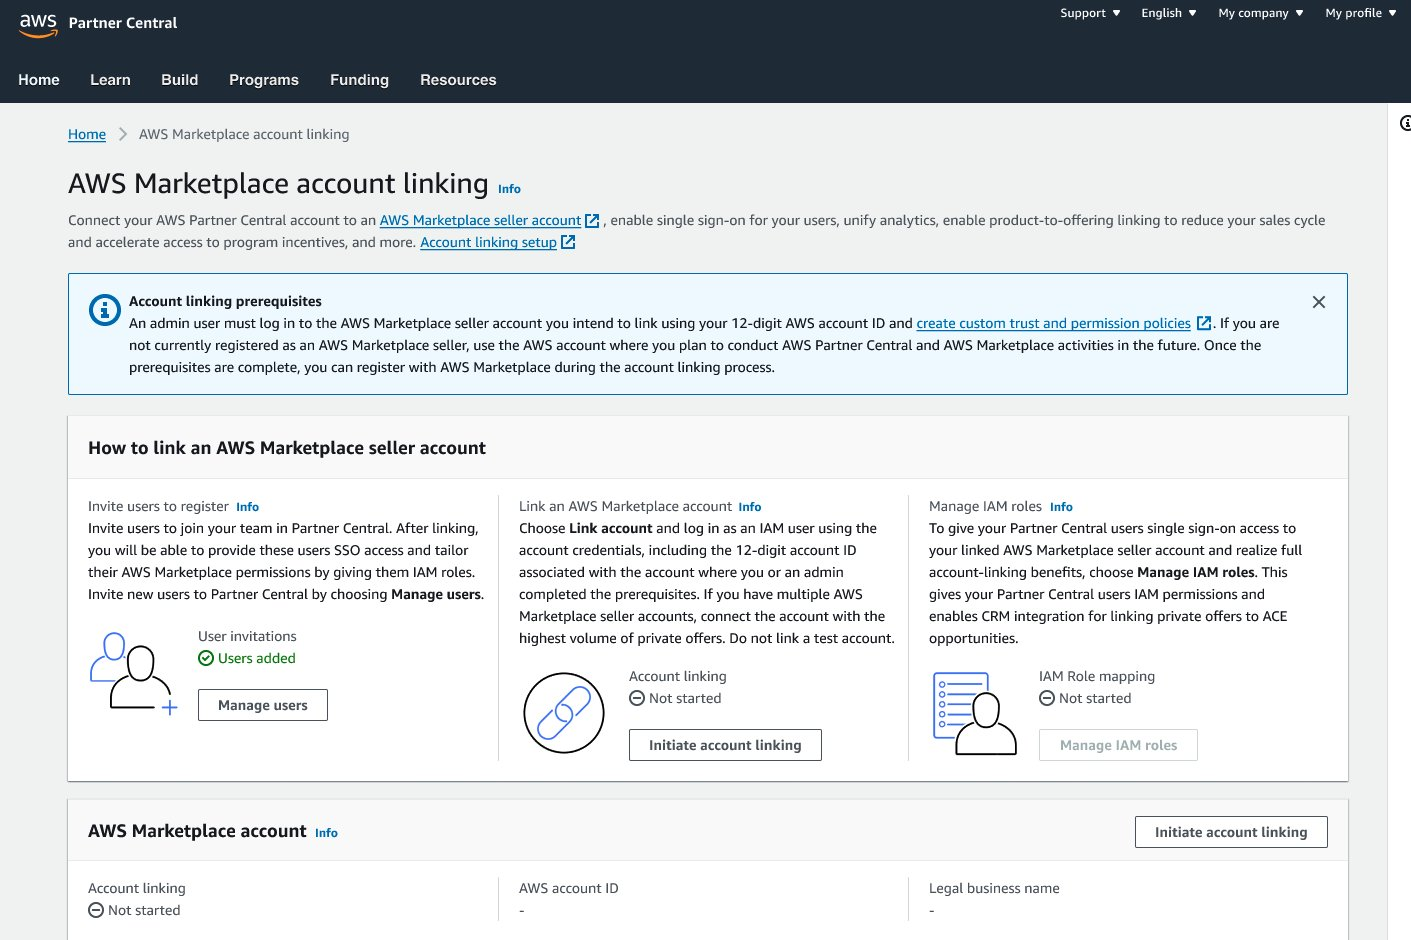
>  4. Click **Initiate Account Linking**
>
4. Click **Initiate Account Linking**
>  ### Step 4. Sign in to Your AWS Account
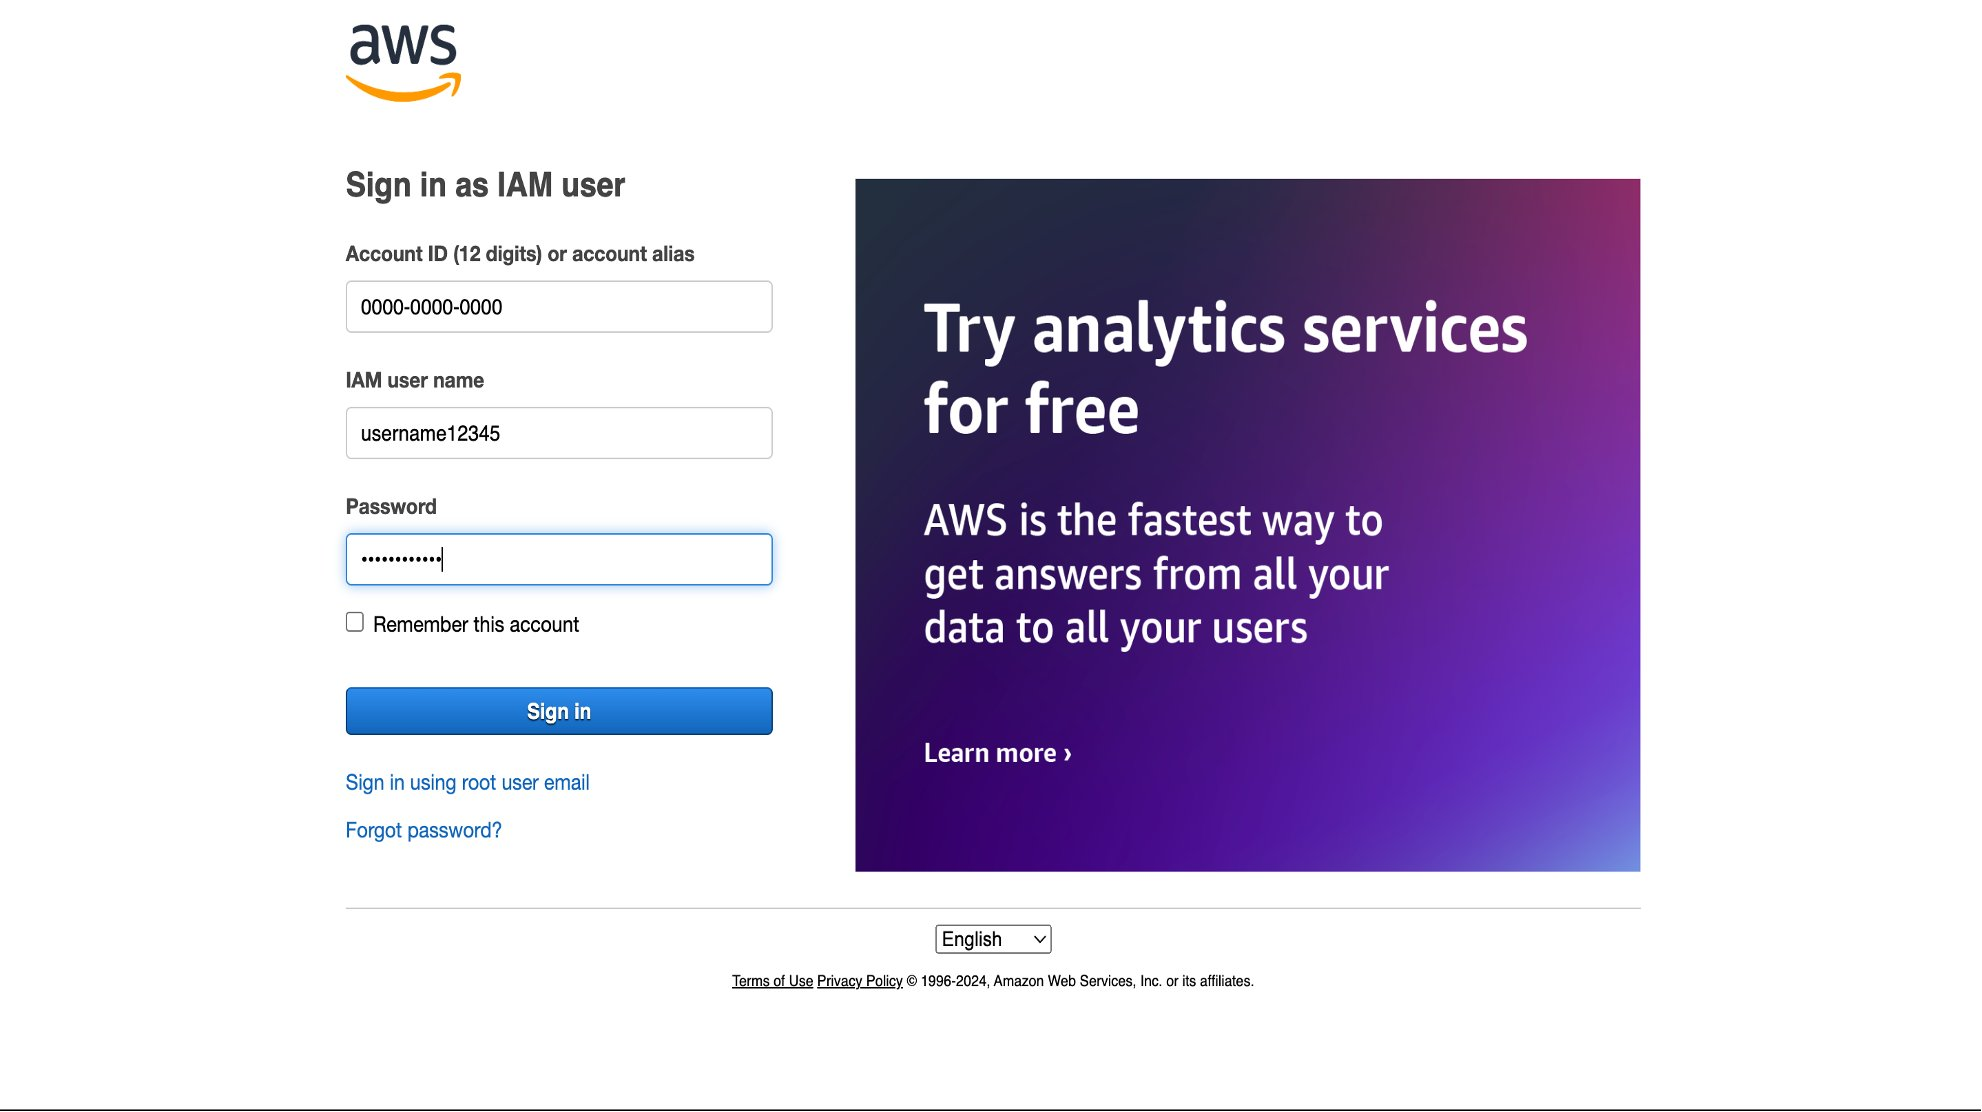
1. Sign in with AWS account ID along with its IAM user name, and Password.
2. If your organization uses **single sign-on (SSO)**, use those credentials to sign in to your AWS account first, then sign in to **AWS Partner Central**.
>
### Step 4. Sign in to Your AWS Account
1. Sign in with AWS account ID along with its IAM user name, and Password.
2. If your organization uses **single sign-on (SSO)**, use those credentials to sign in to your AWS account first, then sign in to **AWS Partner Central**.
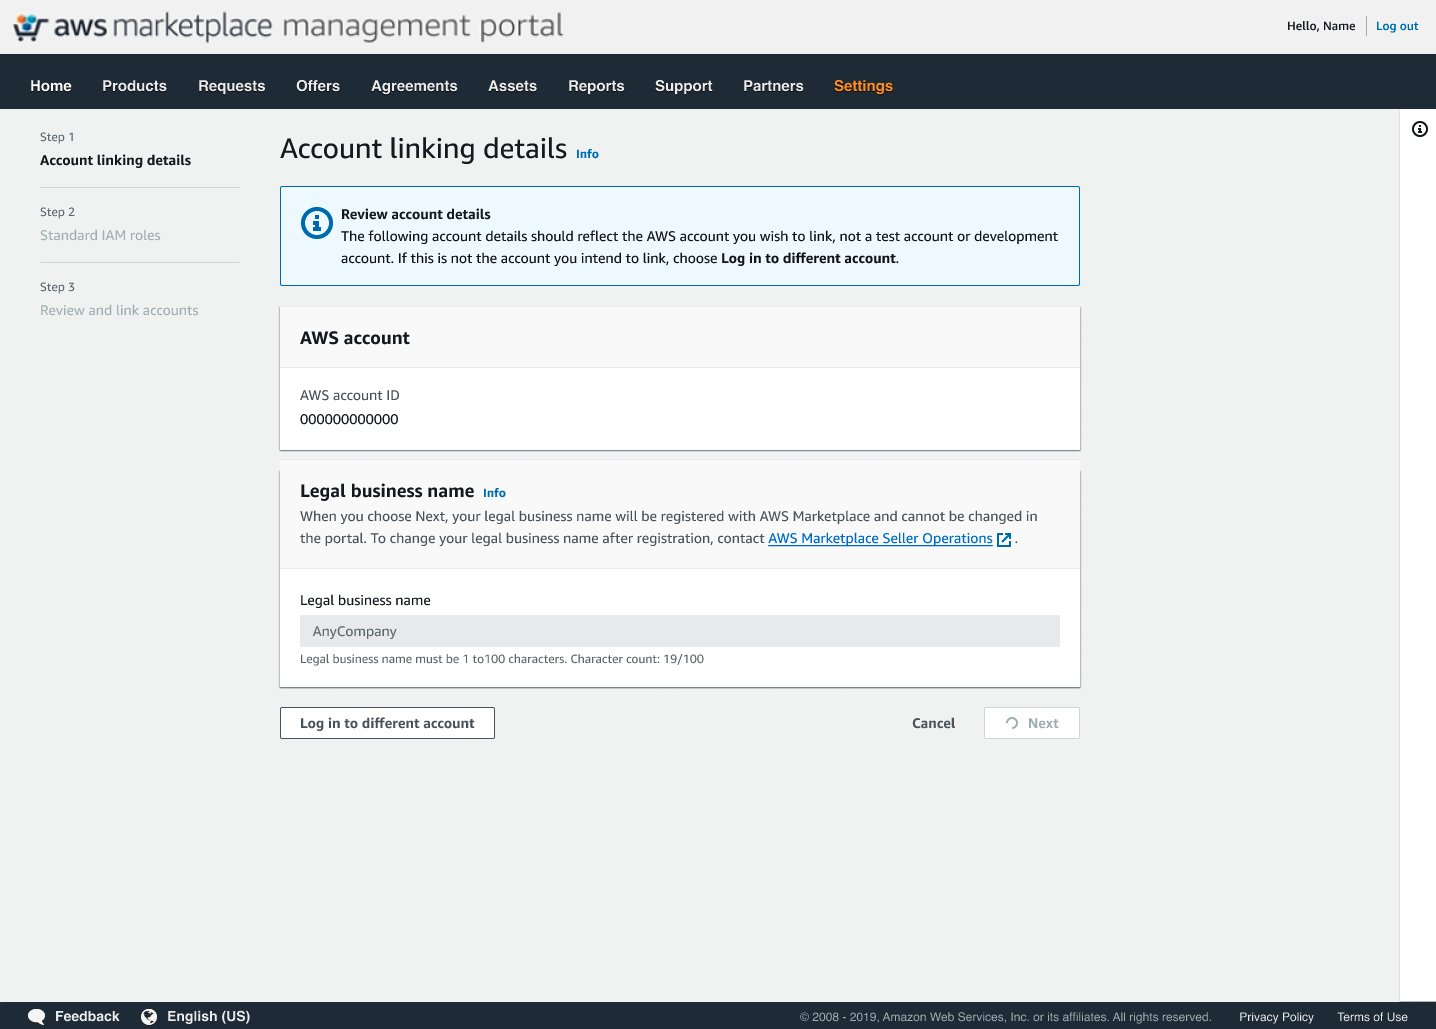
>  ### Step 5. Provide Legal Business Information
:::note
This step is **required only** if the selected account has not yet been registered as a **Marketplace seller**.
:::
1. Enter your **Legal Business Name** and click **Next**.
2. Doing this will register your account as a seller in the background, but:
- Your account will not become public-facing.
- You will not be able to list products until you complete the full [Marketplace seller registration process](https://docs.aws.amazon.com/marketplace/latest/userguide/seller-registration-process.html) separately.
3. Regional note: If your company is under AWS India (Amazon Web Services India Private Limited), you can skip this step and proceed directly by clicking Next.
>
### Step 5. Provide Legal Business Information
:::note
This step is **required only** if the selected account has not yet been registered as a **Marketplace seller**.
:::
1. Enter your **Legal Business Name** and click **Next**.
2. Doing this will register your account as a seller in the background, but:
- Your account will not become public-facing.
- You will not be able to list products until you complete the full [Marketplace seller registration process](https://docs.aws.amazon.com/marketplace/latest/userguide/seller-registration-process.html) separately.
3. Regional note: If your company is under AWS India (Amazon Web Services India Private Limited), you can skip this step and proceed directly by clicking Next.
>  ### Step 6. Assign IAM Roles
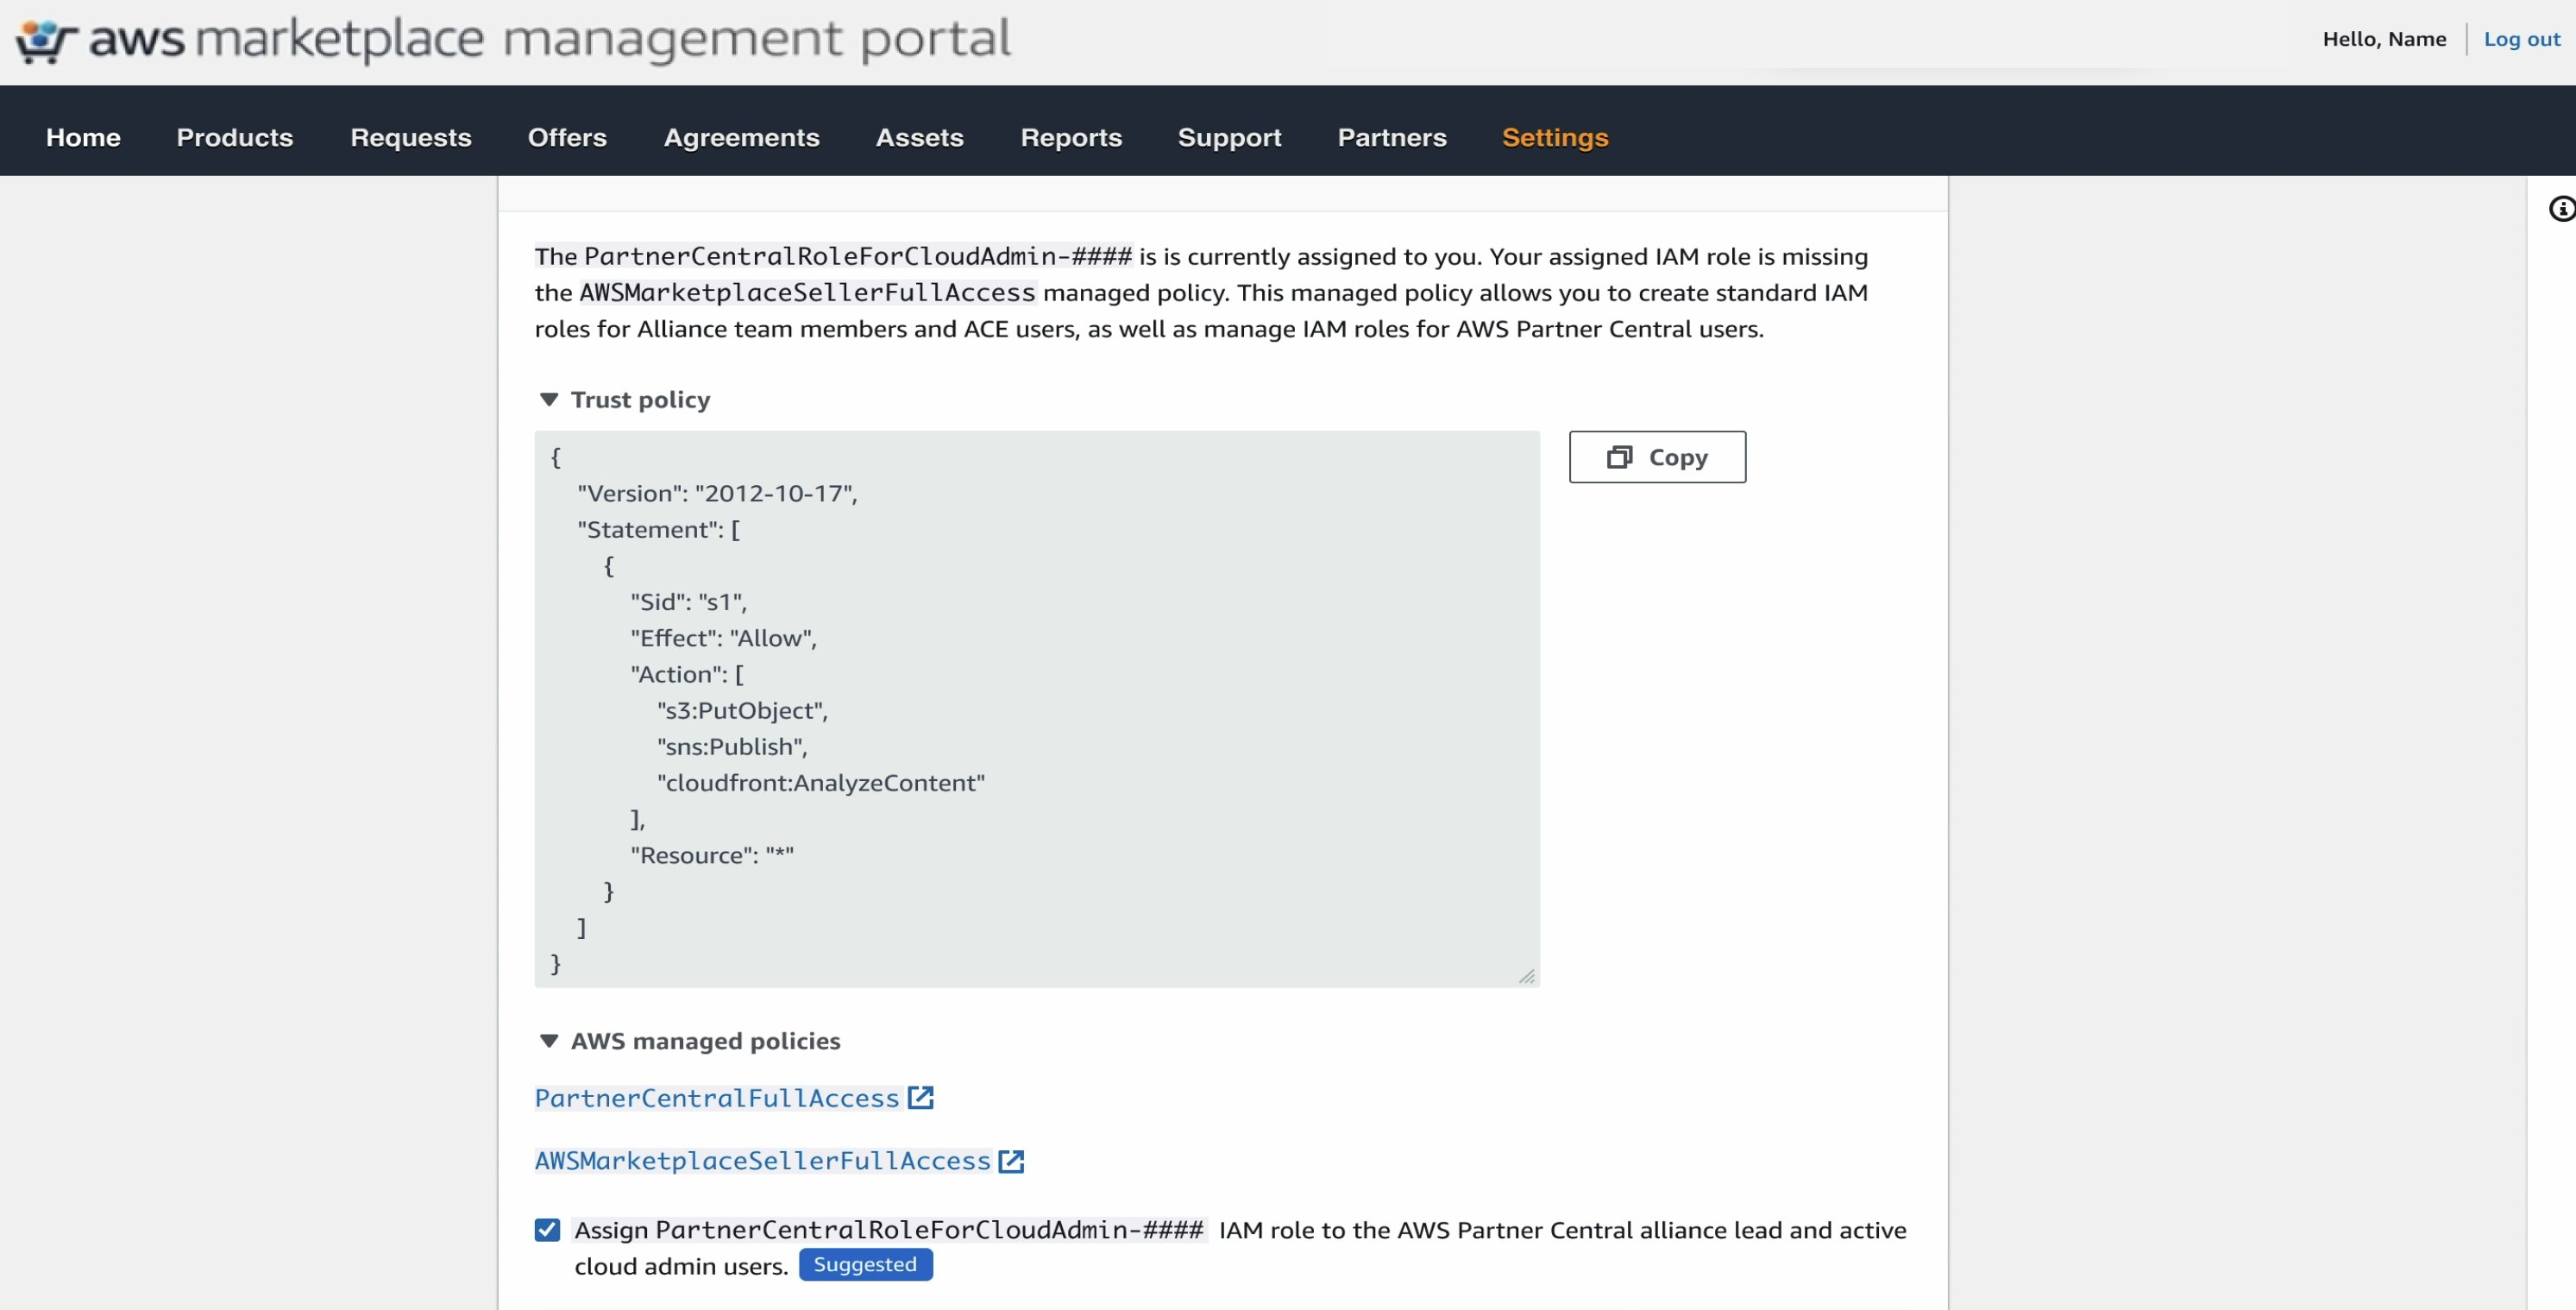
1. **(Recommended)** Check all the boxes to assign IAM roles (eg. Cloud Admin, Alliance Team, and ACE team) to existing Cloud Admins, Alliance Team, and ACE users in AWS Partner Central.
>
### Step 6. Assign IAM Roles
1. **(Recommended)** Check all the boxes to assign IAM roles (eg. Cloud Admin, Alliance Team, and ACE team) to existing Cloud Admins, Alliance Team, and ACE users in AWS Partner Central.
>  :::info
- This ensures that your Partner Central users have the correct permissions from the start.
Bulk assignment vs. manual mapping: Bulk assignment is only available during the linking workflow. You can still assign or adjust IAM roles later, but it must be done manually after linking.
- Standard role creation: Cloud Admin, Alliance Team, and ACE Team roles are created automatically once the account is linked — even if you don’t assign them during this step.
- Role cleanup: If any roles are unnecessary, your IAM Administrator can remove them in the AWS IAM console.
:::
2. Click **Next** button.
### Step 7. Verify Linking Status
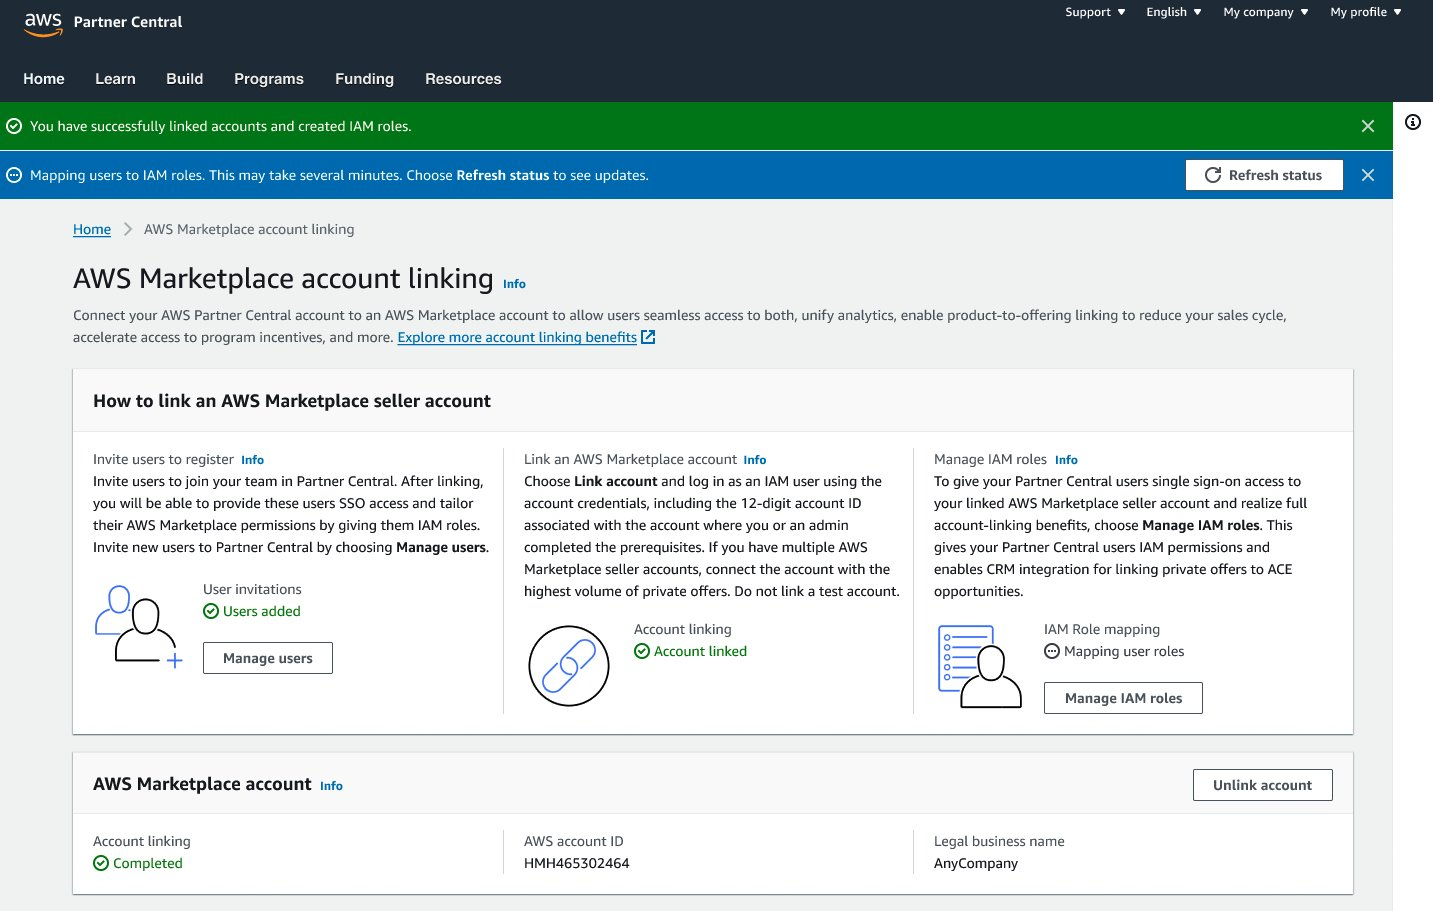
1. Verify account linking status is green and states **Completed** under both sections.
2. Click on **Refresh status** button to see updates on IAM roles mapping progress.
>
:::info
- This ensures that your Partner Central users have the correct permissions from the start.
Bulk assignment vs. manual mapping: Bulk assignment is only available during the linking workflow. You can still assign or adjust IAM roles later, but it must be done manually after linking.
- Standard role creation: Cloud Admin, Alliance Team, and ACE Team roles are created automatically once the account is linked — even if you don’t assign them during this step.
- Role cleanup: If any roles are unnecessary, your IAM Administrator can remove them in the AWS IAM console.
:::
2. Click **Next** button.
### Step 7. Verify Linking Status
1. Verify account linking status is green and states **Completed** under both sections.
2. Click on **Refresh status** button to see updates on IAM roles mapping progress.
>  ## 2. Configure Integration in Suger
### Step 1. Access the Suger Integrations page
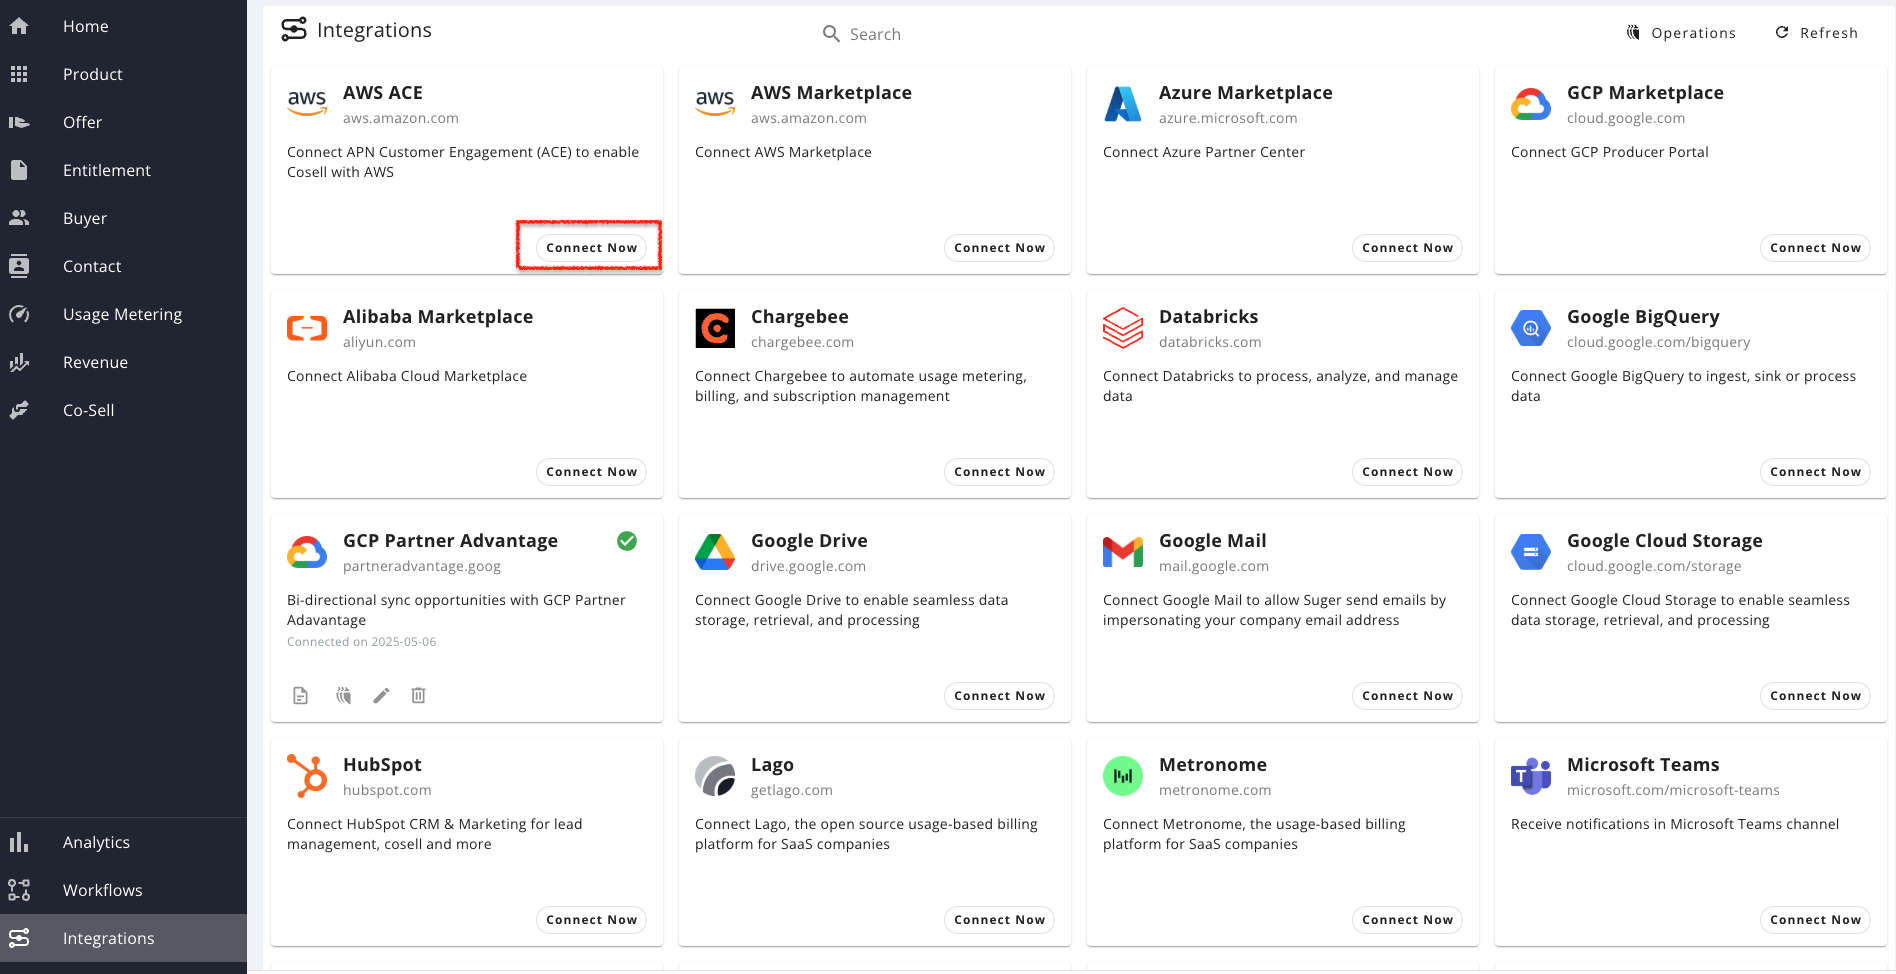
1. In the **Suger Console**, go to **[Integrations](https://console.suger.io/settings?tab=integrations) → AWS ACE**.
2. Click **Connect Now** on the AWS ACE card.
>
## 2. Configure Integration in Suger
### Step 1. Access the Suger Integrations page
1. In the **Suger Console**, go to **[Integrations](https://console.suger.io/settings?tab=integrations) → AWS ACE**.
2. Click **Connect Now** on the AWS ACE card.
>  ### Step 2. Create IAM role via CloudFormation
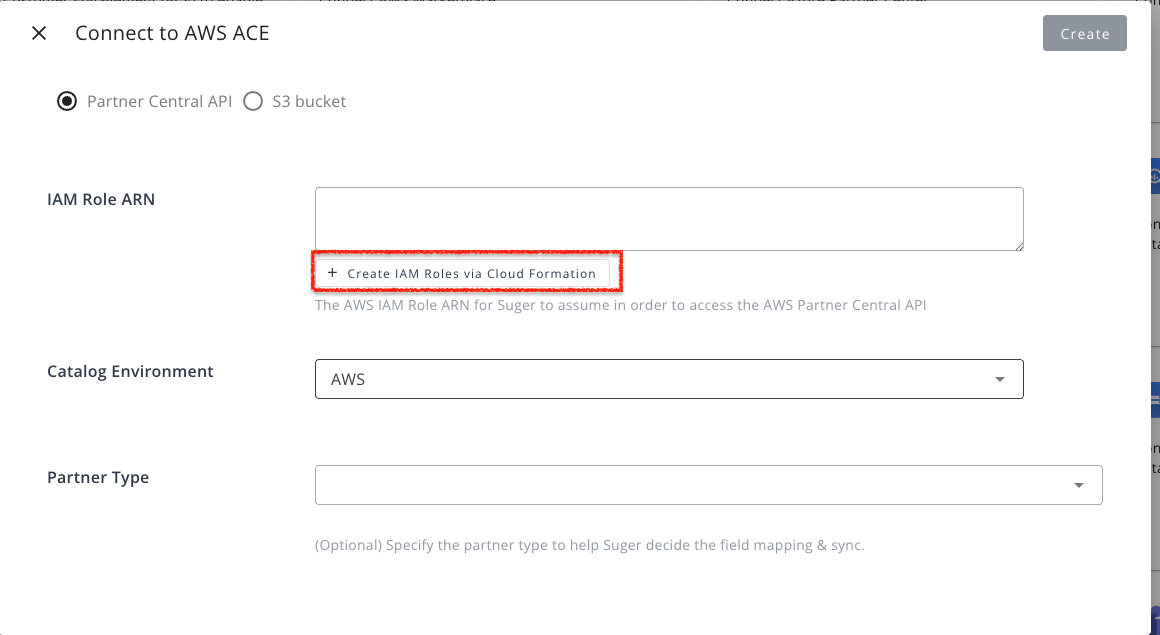
1. Click **Create IAM role via CloudFormation**. You will be redirected to **CloudFormation** in the linked AWS seller account.
>
### Step 2. Create IAM role via CloudFormation
1. Click **Create IAM role via CloudFormation**. You will be redirected to **CloudFormation** in the linked AWS seller account.
>  2. Sign in with AWS account ID along with its IAM user name, and Password.
:::info
If your organization uses single sign-on (SSO), use those credentials to sign in to your AWS account first, then sign in to AWS Partner Central.
:::
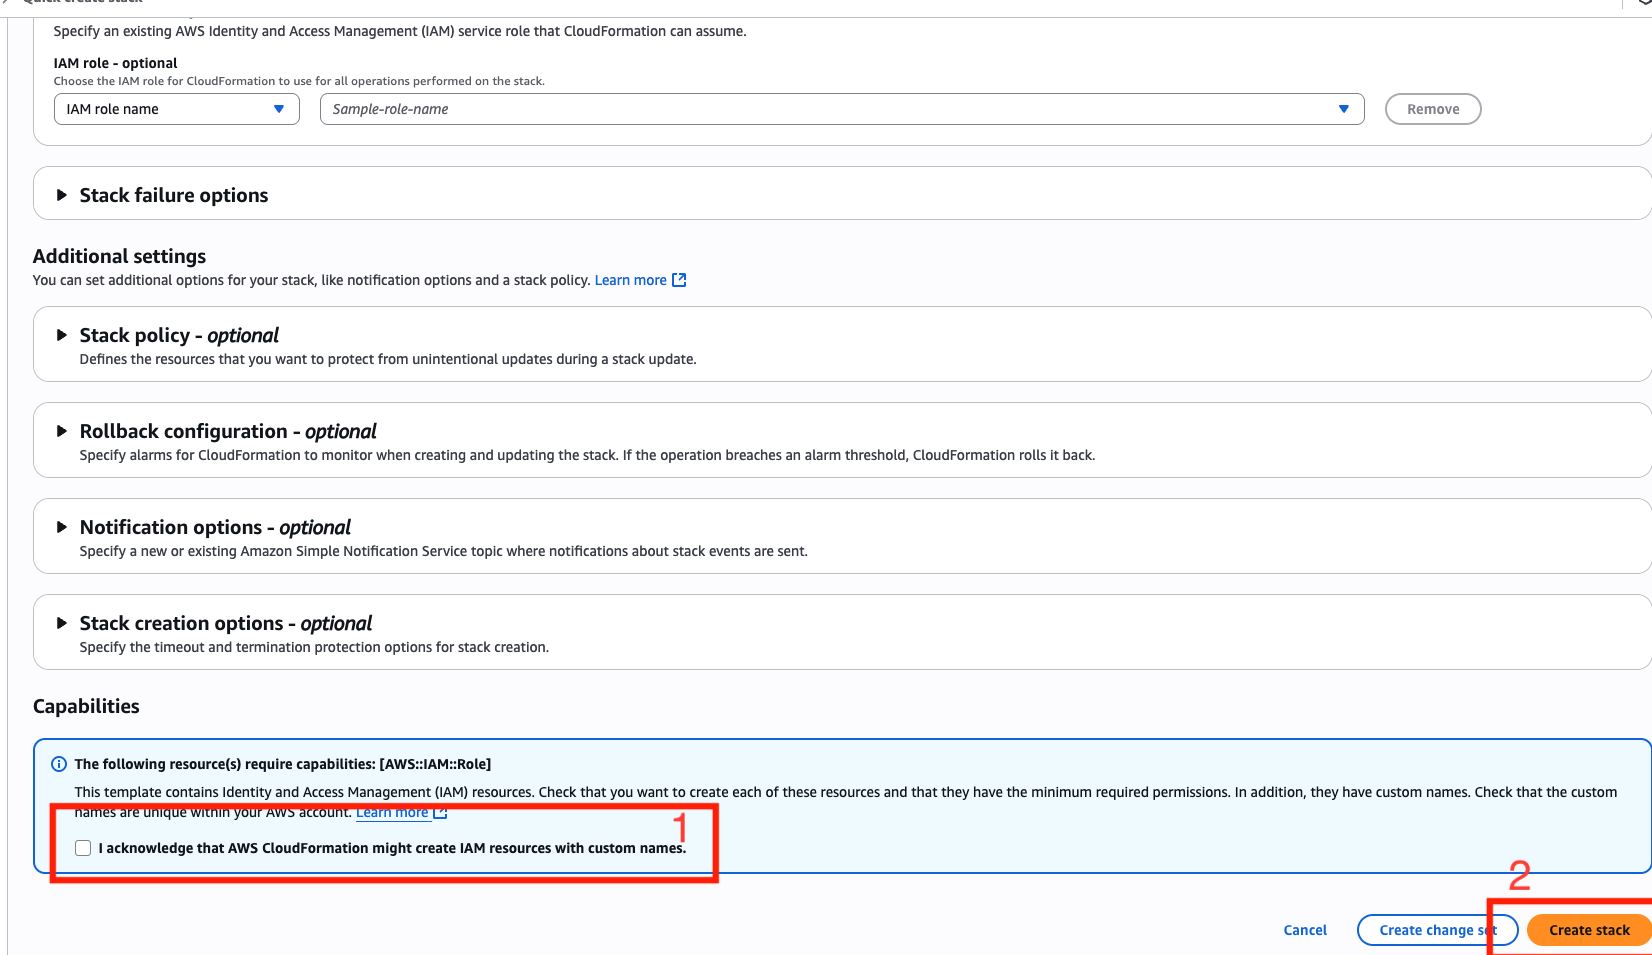
3. Check the acknowledgment box and click **Create Stack**. All required fields are pre-populated.
>
2. Sign in with AWS account ID along with its IAM user name, and Password.
:::info
If your organization uses single sign-on (SSO), use those credentials to sign in to your AWS account first, then sign in to AWS Partner Central.
:::
3. Check the acknowledgment box and click **Create Stack**. All required fields are pre-populated.
>  ### Step 3. Verify the IAM Role Policies
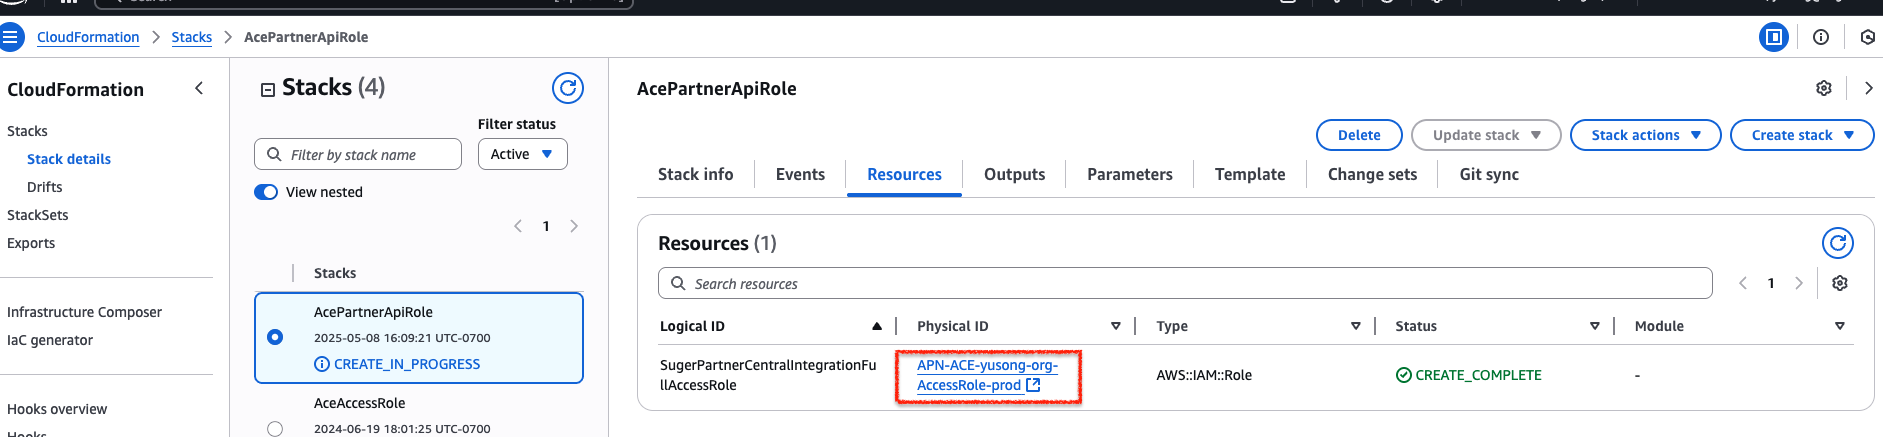
1. Find the created IAM role under the **Resources** tab or by navigating to IAM → Roles.
>
### Step 3. Verify the IAM Role Policies
1. Find the created IAM role under the **Resources** tab or by navigating to IAM → Roles.
>  >
> 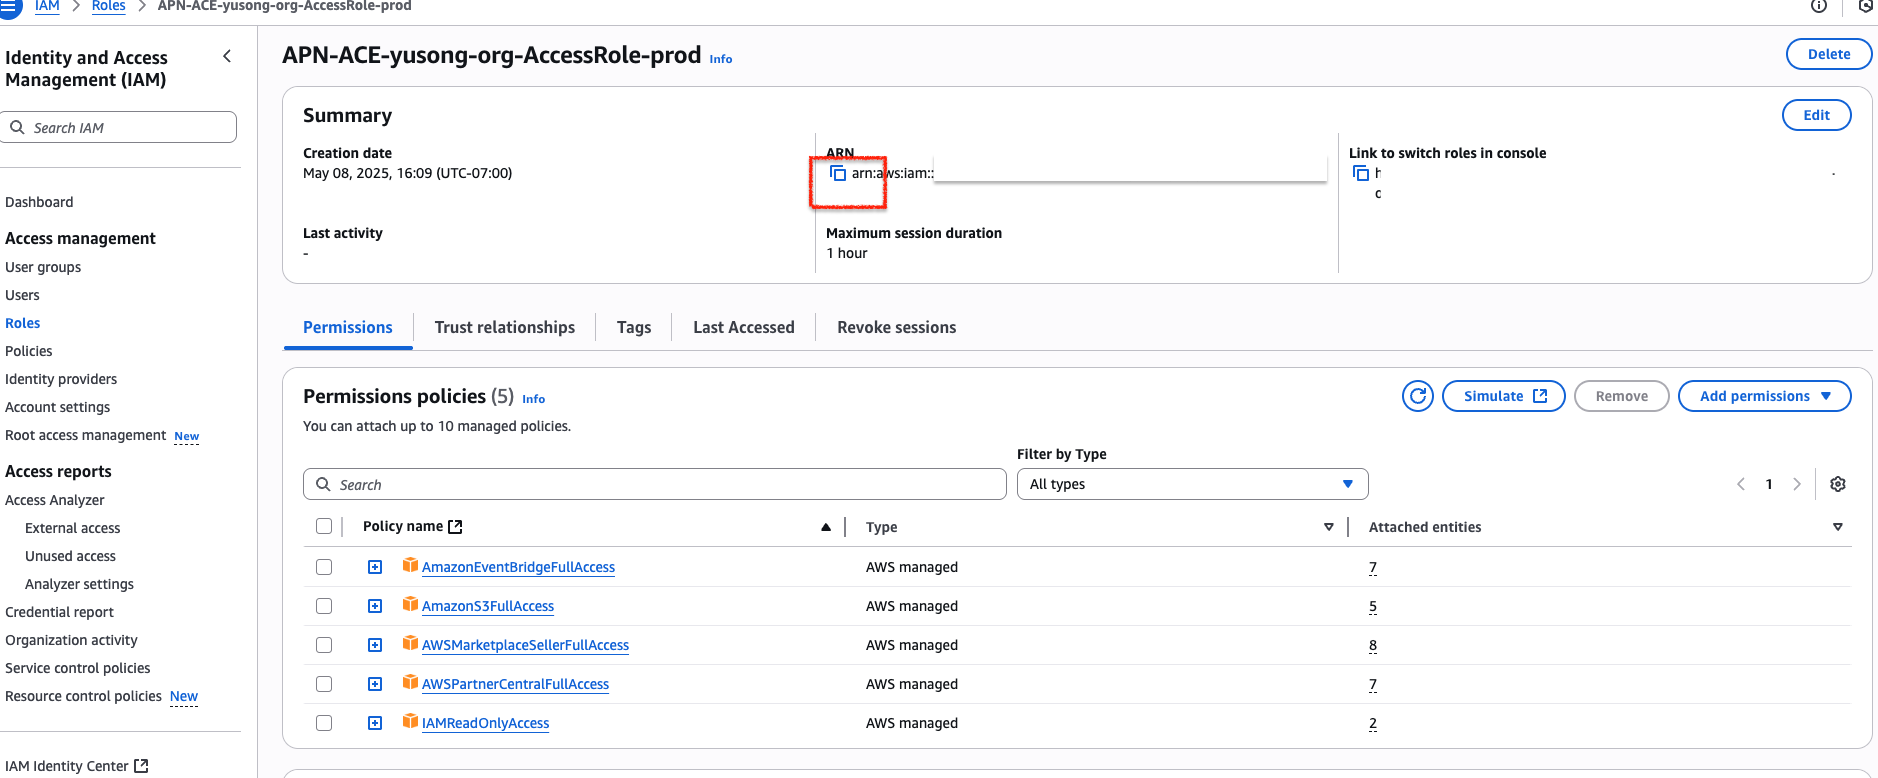 2. The IAM role is automatically created with these AWS managed policies:
- `AmazonEventBridgeFullAccess` & `IAMReadOnlyAccess`: allow EventBridge rules and webhooks for APN opportunity changes.
- `AmazonS3FullAccess`: optional, for S3-bucket-based integration.
- `AWSMarketplaceSellerFullAccess` & `AWSPartnerCentralFullAccess`: enable linking APN opportunities with Marketplace private offers and Marketplace product listings.
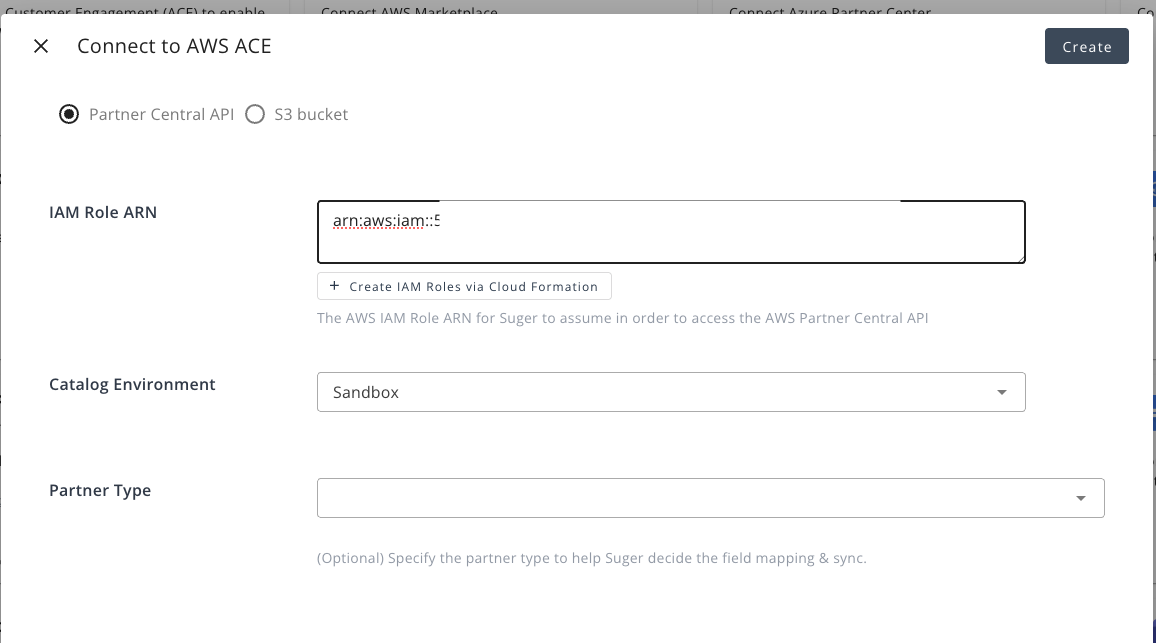
### Step 4. Connect IAM role to Suger
1. Copy the **ARN** of the generated role.
2. Paste it into the **Integration IAM Role ARN** field in Suger.
3. Click **Create**.
>
2. The IAM role is automatically created with these AWS managed policies:
- `AmazonEventBridgeFullAccess` & `IAMReadOnlyAccess`: allow EventBridge rules and webhooks for APN opportunity changes.
- `AmazonS3FullAccess`: optional, for S3-bucket-based integration.
- `AWSMarketplaceSellerFullAccess` & `AWSPartnerCentralFullAccess`: enable linking APN opportunities with Marketplace private offers and Marketplace product listings.
### Step 4. Connect IAM role to Suger
1. Copy the **ARN** of the generated role.
2. Paste it into the **Integration IAM Role ARN** field in Suger.
3. Click **Create**.
>  ### Step 5. Verify integration
1. Click **Verify** in Suger.
>
### Step 5. Verify integration
1. Click **Verify** in Suger.
> 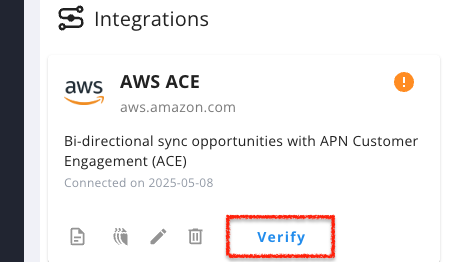 2. When verification succeeds, the status will show **Connected**.
:::info
Once verified, the system will automatically create an EventBridge rule and an API destination in your AWS account to listen for APN opportunity changes.
Verification ensures that your IAM role and API connection are working correctly before moving on to data synchronization.
:::
### Step 6. Perform Data Synchronization
1. In the **Suger Console → [Co-Sell](https://console.suger.io/cosell) → AWS ACE**, click the **Inbound Sync** button to pull opportunity data from **APN** into **Suger**.
2. Go to **Settings → Integrations → AWS ACE → Operations** and wait until the inbound sync **status** changes to **Completed**.
:::note Duration
_This typically takes a few minutes; the actual duration depends on the number of APN opportunities being fetched._
:::
>
2. When verification succeeds, the status will show **Connected**.
:::info
Once verified, the system will automatically create an EventBridge rule and an API destination in your AWS account to listen for APN opportunity changes.
Verification ensures that your IAM role and API connection are working correctly before moving on to data synchronization.
:::
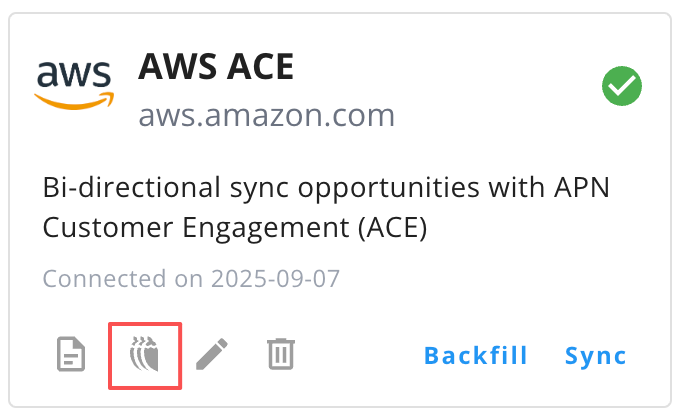
### Step 6. Perform Data Synchronization
1. In the **Suger Console → [Co-Sell](https://console.suger.io/cosell) → AWS ACE**, click the **Inbound Sync** button to pull opportunity data from **APN** into **Suger**.
2. Go to **Settings → Integrations → AWS ACE → Operations** and wait until the inbound sync **status** changes to **Completed**.
:::note Duration
_This typically takes a few minutes; the actual duration depends on the number of APN opportunities being fetched._
:::
>  >
>  :::info
This confirms the data has been synchronized successfully.
:::
3. Now you are all set!
## Troubleshooting
| Issue | Cause | Resolution |
| --- | --- | --- |
| Error: `Record not editable` | You tried to update an opportunity that is currently under ACE review. | These opportunities cannot be edited until they are validated by AWS. |
| Errors: `Missing IAM Role Mapping`, `Missing Permission`, or `Access denied` | An AWS Partner Central user wasn't mapped to an IAM role. | Ask your Alliance Lead or Cloud Admin to map the appropriate role to the user. |
| Integration progress is not updating in the AWS Partner Central portal | The integration process is unverified or unfinished. | Verify the account linking status is green and shows **Completed** under both sections, then click **Refresh status** to see the latest updates on your IAM role mapping progress. |
## Frequently Asked Questions
**How long does data synchronization take?**
This typically takes a few minutes, though the actual duration depends on the number of APN opportunities being fetched.
**Should I use the legacy S3 integration?**
No. The S3-based integration is **deprecated** — AWS no longer provisions it for new users (unavailable since 2024), so new S3 connections cannot be created. Start with the AWS Partner Central API integration described on this page. Existing S3 connections remain supported for now; see the [S3-to-API migration guide](./aws-ace-migration-from-s3-to-api.md).
## Delete Integration
To delete the integration, simply click the 🗑️ button in the **Integrations** list. Once the deletion is triggered, all integration information, including the access token, will be immediately and permanently deleted from Suger.
:::warning
Please note: once deleted, integration data cannot be recovered.
:::
:::info
This confirms the data has been synchronized successfully.
:::
3. Now you are all set!
## Troubleshooting
| Issue | Cause | Resolution |
| --- | --- | --- |
| Error: `Record not editable` | You tried to update an opportunity that is currently under ACE review. | These opportunities cannot be edited until they are validated by AWS. |
| Errors: `Missing IAM Role Mapping`, `Missing Permission`, or `Access denied` | An AWS Partner Central user wasn't mapped to an IAM role. | Ask your Alliance Lead or Cloud Admin to map the appropriate role to the user. |
| Integration progress is not updating in the AWS Partner Central portal | The integration process is unverified or unfinished. | Verify the account linking status is green and shows **Completed** under both sections, then click **Refresh status** to see the latest updates on your IAM role mapping progress. |
## Frequently Asked Questions
**How long does data synchronization take?**
This typically takes a few minutes, though the actual duration depends on the number of APN opportunities being fetched.
**Should I use the legacy S3 integration?**
No. The S3-based integration is **deprecated** — AWS no longer provisions it for new users (unavailable since 2024), so new S3 connections cannot be created. Start with the AWS Partner Central API integration described on this page. Existing S3 connections remain supported for now; see the [S3-to-API migration guide](./aws-ace-migration-from-s3-to-api.md).
## Delete Integration
To delete the integration, simply click the 🗑️ button in the **Integrations** list. Once the deletion is triggered, all integration information, including the access token, will be immediately and permanently deleted from Suger.
:::warning
Please note: once deleted, integration data cannot be recovered.
:::