# Integration
Grant Suger the necessary permissions to manage your AWS Marketplace on your behalf, no more no less.
---
## Overview
:::info Concurrent Agreements Support
Suger already supports **AWS Marketplace Concurrent Agreements** for SaaS products. This feature allows buyers to make multiple purchases of the same product within a single AWS account, enabling multi-team procurement, mid-term expansions, and repeat purchases without requiring workarounds.
**EventBridge is required** for Concurrent Agreements support. You must enable EventBridge integration to handle multiple active subscriptions. Starting **June 1, 2026**, AWS will require Concurrent Agreements support for all new SaaS products.
:::
1. Visit the [Integration page](https://console.suger.io/settings?tab=integrations) of `suger console`.
>  2. Click the button `CONNECT` and redirect to new browser tab. It will automatically start a `AWS CloudFormation Stack` on your AWS account to create an `IAM role` for Suger to access & manage your `AWS Marketplace` on your behalf.
:::tip
- Contact support@suger.io for the Suger AWS Account ID to fill the stack field `AccountId`.
- Fulfill the field `MdfsS3BucketName` with `suger-mdfs-s3-bucket-{your-aws-account-id}`.
:::
>
2. Click the button `CONNECT` and redirect to new browser tab. It will automatically start a `AWS CloudFormation Stack` on your AWS account to create an `IAM role` for Suger to access & manage your `AWS Marketplace` on your behalf.
:::tip
- Contact support@suger.io for the Suger AWS Account ID to fill the stack field `AccountId`.
- Fulfill the field `MdfsS3BucketName` with `suger-mdfs-s3-bucket-{your-aws-account-id}`.
:::
> 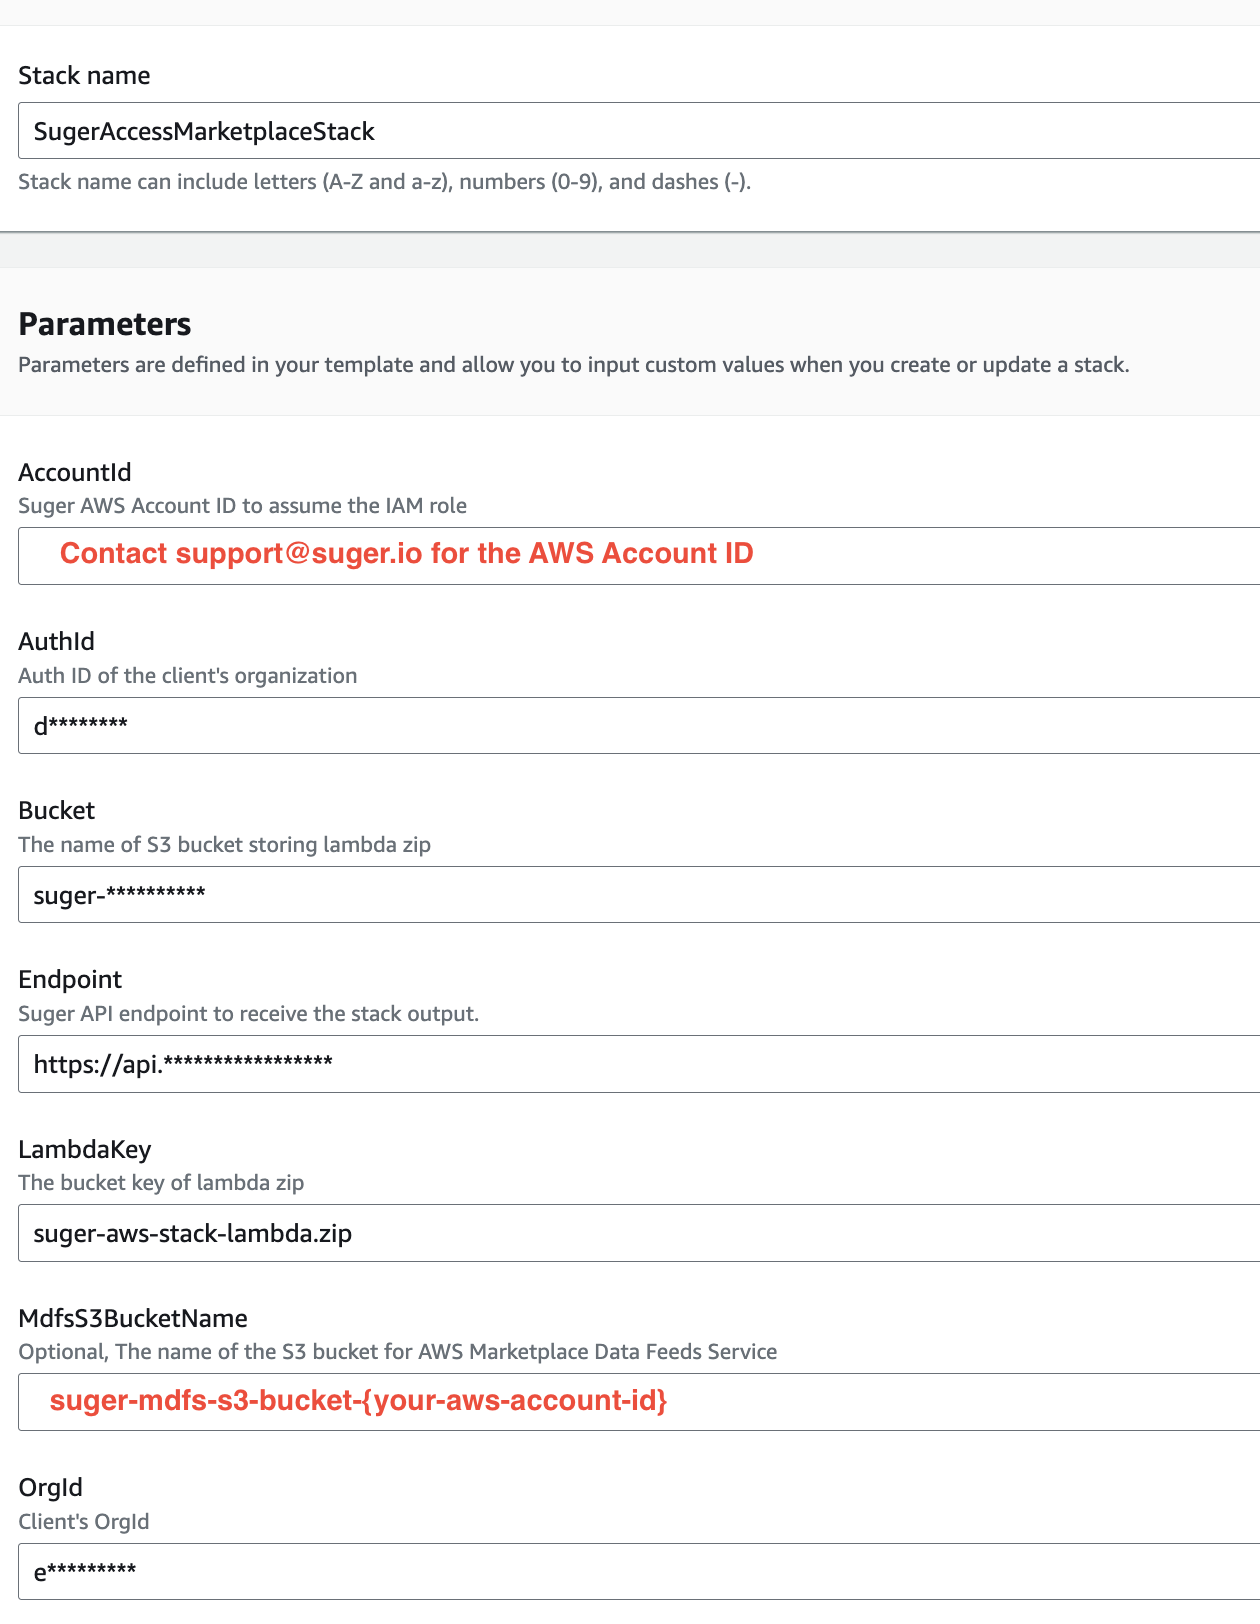 3. Check the box of `I acknowledge that ...` and click button `Create stack`.
4. Wait for a few minutes, the `AWS Marketplace` integration status will be updated as `VERIFIED`.
>
3. Check the box of `I acknowledge that ...` and click button `Create stack`.
4. Wait for a few minutes, the `AWS Marketplace` integration status will be updated as `VERIFIED`.
>  :::tip
- You may need to click the button `VERIFY` to verify whether the `AWS marketplace` integration works correctly.
:::
:::tip Need to open AWS support cases?
That's a separate **AWS Support** integration — see [AWS Support Cases](/aws-marketplace/support-cases/).
:::
## Edit Integration
You can edit the integration to update the following fields:
- **Enable Entitlement End Soon Notification**: When enabled, specify the number of days (10-60) before an entitlement ends to trigger notifications. Suger will send an initial notification when AWS Marketplace entitlements approach ending, followed by reminders every 5 days. To configure recipients, follow the [email notification configuration guide](https://doc.suger.io/get-started/email-notification#configuration) and add the scope `END_SOON.ENTITLEMENT`.
## Delete Integration
The AWS integration can be deleted like all other integrations. Once the deletion icon is clicked & confirmed, the integration info will be deleted immediately & permanently from Suger. No time window or methods to recover.
:::warning
- To completely delete the `IAM Role` created for Suger, please visit your [AWS CloudFormation](https://us-west-2.console.aws.amazon.com/cloudformation/home?region=us-west-2), and delete the stack `SugerAccessMarketplaceStack`, which will remove all resources including `IAM Role` created for Suger.
- If you also deployed the standalone EventBridge stack from [Manual EventBridge Setup](#manual-eventbridge-setup), delete that stack as well (in `us-east-1`) to remove the EventBridge Connection, API Destination, Rule, and IAM Role it created.
:::
## Multiple Integrations
It is supported to have multiple AWS Marketplace integrations under the same Suger organization, with each integration operating independently. To set up multiple AWS Marketplace integrations, please follow the guidances below:
1. Create a new Suger organization in the Suger Console and wait for it to be approved.
2. In the newly approved Suger organization, set up a second AWS Marketplace integration.
3. Contact [Suger Support](mailto:support@suger.io) with both the new and old Suger organization IDs. The support team will merge the two organizations—retaining the old one and deleting the new one—while preserving both AWS Marketplace integrations under the original/old Suger organization.
:::tip
- Once set up, you will see multiple integrations listed on the Suger Console integration page. Each integration can be edited or deleted individually.
- There are no changes to the process of creating private offers, reporting usage records, or generating revenue reports across the Suger web console, Salesforce app, and HubSpot app. All connections for each integration are automatically managed by the Suger service.
:::
## AWS IAM Policies
Here is the list of AWS managed policies included in the `Suger Access IAM role`.
| Policy Name | Description |
| -------------------------------------------------------- | :------------------------------------------------------------------------------------------------------------------------------------------------------------------------------------------------------------------------------------------------------------------------------------------------------------------------------------------------------------------------------------------------------------ |
| `arn:aws:iam::aws:policy/AWSMarketplaceFullAccess` | This policy grants `Suger` full access to AWS Marketplace and related services, as well as access to Amazon EC2, AWS CloudFormation, and Amazon EC2 Systems Manager. |
| `arn:aws:iam::aws:policy/AWSMarketplaceSellerFullAccess` | This policy grants `Suger` to manage your sales (product listings, offers, entitlements & metering) on marketplace. |
| `SugerAccessMarketplacePolicy` | This policy grants `Suger` necessary-only permissions on `AWS s3` & `AWS SNS` to configure & access your [AWS Marketplace Commerce Analytics Service](https://docs.aws.amazon.com/marketplace/latest/userguide/commerce-analytics-service.html#permissions-for-commerce-analytics) and [AWS Marketplace Data Feeds Service](https://docs.aws.amazon.com/marketplace/latest/userguide/data-feed-service.html). |
:::info
None of these policies grant access to the AWS Support API; the AWS Support integration uses its own IAM role. See [AWS Support Cases](/aws-marketplace/support-cases/).
:::
## Minimum-Permission Deployment (Optional)
The default CloudFormation template requests broad permissions — including `iam:CreateRole`, the `events:*` family, and the AWS-managed `AWSMarketplaceFullAccess` / `AWSMarketplaceSellerFullAccess` policies — so that Suger can automatically provision and maintain the IAM role, EventBridge rule, connection, and API destination required for AWS Marketplace event delivery. With the default template, no further manual work is needed on your side, and new AWS Marketplace capabilities are picked up automatically as we add support.
If your security team prefers a tighter blast radius, **we recommend using a dedicated AWS seller account exclusively for the Suger integration**. A dedicated account is the cleanest way to isolate Suger's access from the rest of your AWS footprint and is what we suggest for most enterprise customers.
If a dedicated seller account is not an option, please contact [Suger Support](mailto:support@suger.io) for a **minimum-permission deployment package**. We can provide a CloudFormation template scoped down to only the actions Suger needs at deploy time.
:::warning Trade-offs of the minimum-permission deployment
- AWS Marketplace ships new features regularly, and most of them depend on additional IAM actions. With the default template, Suger picks them up transparently. With the minimum-permission template, support for those new features may temporarily break in your account.
- Each time we add support for a new AWS Marketplace capability that requires extra permissions, you will most likely need to **redeploy an updated minimum-permission CloudFormation stack** before the capability works for you. We will reach out when this is needed, but onboarding new functionality will not be as seamless as with the default template.
:::
### Manual EventBridge Setup
If your Suger Access IAM role does not grant `iam:CreateRole` / `iam:CreatePolicy` / `iam:PutRolePolicy` (for example, because you are running the minimum-permission template, or your security team disallows Suger from creating IAM resources on your behalf), Suger cannot auto-provision the IAM role and EventBridge resources required for [Concurrent Agreements](#overview) and other event-driven capabilities. In that case, deploy the standalone CloudFormation template below — under an AWS principal that *does* have IAM and EventBridge admin permissions — in **the same AWS account and region** as your AWS Marketplace listings. It creates the four resources Suger needs:
- An EventBridge **Connection** with API-key auth (header `x-suger-api-key`).
- An EventBridge **API Destination** pointing at `${Endpoint}/public/aws/eventbridge/webhook/orgId/${OrgId}`.
- An **IAM Role** that lets EventBridge invoke the API Destination.
- An EventBridge **Rule** matching `aws.marketplacecatalog` and `aws.agreement-marketplace` events and routing them to the API Destination.
The template uses a `-manual` suffix on resource names so it will not collide with the resources that Suger normally auto-provisions.
#### Parameters
| Parameter | Description |
| ---------- | ----------------------------------------------------------------------------------------------------------------------------------------------------------------- |
| `AuthId` | Suger API key value. Sent on every forwarded event as the `x-suger-api-key` header. Generate one on the [API Keys page](https://console.suger.io/settings?tab=api-keys). |
| `Endpoint` | Suger API base URL: `https://api.suger.cloud`. |
| `OrgId` | Your Suger organization ID, visible on the Suger Console settings page. |
:::tip
- Deploy the stack in **`us-east-1`**. AWS Marketplace SaaS events are emitted from `us-east-1`, and cross-region delivery is not supported by the default rule.
- Treat `AuthId` like any other production secret — set the parameter with `NoEcho` enabled (already the default in the template) and avoid committing it to source control.
:::
#### Template
```yaml
AWSTemplateFormatVersion: '2010-09-09'
Description: Forward AWS Marketplace events to Suger via EventBridge API Destination
Parameters:
AuthId:
Type: String
NoEcho: true
Description: Suger API key value (sent as x-suger-api-key header)
Endpoint:
Type: String
Description: Suger API base URL, e.g. https://api.suger.cloud
AllowedPattern: ^https?://.+
OrgId:
Type: String
Description: Suger organization ID
AllowedPattern: ^[A-Za-z0-9-]+$
Resources:
SugerMarketplaceConnection:
Type: AWS::Events::Connection
Properties:
Name: aws-marketplace-event-connection-manual
Description: API key auth for Suger event ingestion
AuthorizationType: API_KEY
AuthParameters:
ApiKeyAuthParameters:
ApiKeyName: x-suger-api-key
ApiKeyValue: !Ref AuthId
SugerMarketplaceApiDestination:
Type: AWS::Events::ApiDestination
Properties:
Name: aws-marketplace-event-api-destination-manual
Description: Suger marketplace event ingestion endpoint
ConnectionArn: !GetAtt SugerMarketplaceConnection.Arn
HttpMethod: POST
InvocationEndpoint: !Sub '${Endpoint}/public/aws/eventbridge/webhook/orgId/${OrgId}'
# Trust policy uses constructed rule ARN (not !GetAtt) to break the cycle
# Rule.Targets -> InvokeRole -> Rule.
SugerEventBridgeInvokeRole:
Type: AWS::IAM::Role
Properties:
RoleName: event-bridge-iam-role-invoke-api-destination
AssumeRolePolicyDocument:
Version: '2012-10-17'
Statement:
- Effect: Allow
Principal:
Service: events.amazonaws.com
Action: sts:AssumeRole
Condition:
ArnEquals:
aws:SourceArn:
!Sub 'arn:aws:events:${AWS::Region}:${AWS::AccountId}:rule/aws-marketplace-event-rule-webhook-manual'
Policies:
- PolicyName: event-bridge-iam-policy-invoke-api-destination
PolicyDocument:
Version: '2012-10-17'
Statement:
- Effect: Allow
Action: events:InvokeApiDestination
Resource: !GetAtt SugerMarketplaceApiDestination.Arn
SugerMarketplaceEventRule:
Type: AWS::Events::Rule
Properties:
Name: aws-marketplace-event-rule-webhook-manual
Description: Captures AWS Marketplace events and forwards to Suger
State: ENABLED
EventPattern:
source:
- aws.marketplacecatalog
- aws.agreement-marketplace
Tags:
- Key: SugerVersion
Value: '3'
Targets:
- Id: suger-api-destination
Arn: !GetAtt SugerMarketplaceApiDestination.Arn
RoleArn: !GetAtt SugerEventBridgeInvokeRole.Arn
Outputs:
ConnectionArn:
Description: EventBridge Connection ARN
Value: !GetAtt SugerMarketplaceConnection.Arn
ApiDestinationArn:
Description: EventBridge API Destination ARN
Value: !GetAtt SugerMarketplaceApiDestination.Arn
EventRuleArn:
Description: EventBridge Rule ARN
Value: !GetAtt SugerMarketplaceEventRule.Arn
InvokeRoleArn:
Description: IAM Role ARN used by the rule to invoke the API Destination
Value: !GetAtt SugerEventBridgeInvokeRole.Arn
```
#### Verify
1. Wait for the stack to reach `CREATE_COMPLETE`.
2. Trigger any AWS Marketplace action that emits an event — see the table below (for example, publish a private offer or have a buyer accept one).
3. On the [Integrations page](https://console.suger.io/settings?tab=integrations) of the Suger Console, scroll down to the **Auditing Events** table and confirm a new entry appears with **Source = `AWS_EVENT_BRIDGE`**. The **Action** column shows which AWS event arrived (e.g. `Offer Released`).

The AWS Marketplace activities that produce EventBridge events:
| AWS Marketplace activity | Auditing event action |
| ----------------------------------------------------------------- | ------------------------------------------------------------ |
| A private offer is published (released to the buyer) | `Offer Released` |
| A buyer accepts an offer — a purchase agreement is created | `Purchase Agreement Created - Manufacturer` / `- Proposer` |
| An existing agreement is amended (e.g. expansion, renewal) | `Purchase Agreement Amended - Manufacturer` / `- Proposer` |
| An agreement ends (expires or is cancelled) | `Purchase Agreement Ended - Manufacturer` / `- Proposer` |
| The license backing an agreement (entitlements) is updated | `License Updated - Manufacturer` |
| The license backing an agreement is deprovisioned | `License Deprovisioned - Manufacturer` |
:::tip
Product change-set activity is not a reliable test: Suger deliberately filters out the `Change Set Succeeded` and `AWS API Call via CloudTrail` detail types, so they never appear in Auditing Events. Use an offer or agreement action from the table above instead.
:::
:::note The console warning "Event Bridge Rule is not setup correctly." is expected
After a manual setup, the AWS Marketplace integration card in the Suger Console keeps showing a warning icon with the message **"Event Bridge Rule is not setup correctly."**. This is expected and does not affect event delivery.
 Suger only tracks the EventBridge rule it auto-provisions itself, and in this scenario the Suger Access IAM role does not have the permissions to look up EventBridge resources in your account — so Suger cannot confirm that the manually created rule exists. Use the verification steps above (events arriving in the Suger Console) as the source of truth instead of the card status.
:::
If events do not appear within a few minutes, check the EventBridge rule's **Monitoring** tab in the AWS Console for `FailedInvocations` and contact [Suger Support](mailto:support@suger.io) with the failure details.
#### Cleanup
When you remove the AWS Marketplace integration from Suger, also delete this stack from CloudFormation (in `us-east-1`) to clean up the EventBridge Connection, API Destination, Rule, and IAM Role it provisioned. See [Delete Integration](#delete-integration) for the standard cleanup steps.
## Enable Concurrent Agreements
Concurrent Agreements let your buyers hold multiple active agreements for the same AWS Marketplace product at the same time. That lets your sales team run expansion deals, multi-team procurement, and repeat purchases without waiting for a buyer's existing contract to renew or expire.
Starting **June 1, 2026**, AWS requires all new SaaS listings to support Concurrent Agreements. Suger handles the backend work for you — your responsibility is to confirm your EventBridge integration is active, submit the opt-in request to AWS, and complete a short validation test.
:::info
Concurrent Agreements also changes how usage metering works for the product — see [Usage Metering for AWS Concurrent Agreements](/get-started/metering/#usage-metering-for-aws-concurrent-agreements).
:::
:::important
If your product's **Product Type** is `Container`, opting into Concurrent Agreements breaks usage metering for it — AWS's `BatchMeterUsage` API rejects usage records for Container products once they carry a `LicenseArn`, and usage has to be reported from within the container itself instead. See [Container products](/get-started/metering/#container-products) before you continue.
:::
### Does this apply to you?
| Your situation | What you need to do |
| ------------------------------------------------- | ------------------------------------------------------------------------------------------------------------ |
| New SaaS listing created after June 1, 2026 | Concurrent Agreements is already enabled. Confirm EventBridge is active in Suger, then you are done. |
| Existing SaaS listing created before June 1, 2026 | Concurrent Agreements is not enabled automatically. Complete all steps in this section. |
| Professional Services listing | Concurrent Agreements is enabled automatically by AWS. No action needed. |
| Product Type is `Container` | Usage metering breaks once Concurrent Agreements applies. See [Container products](/get-started/metering/#container-products). |
### Step 1: Confirm EventBridge is active
Concurrent Agreements require EventBridge to be enabled on your AWS integration in Suger. EventBridge is what lets Suger receive the `LicenseArn` parameter that uniquely identifies each concurrent agreement. Without it, the feature won't work.
1. Open the **Suger Console** and click **Settings**.
2. Click **Integrations**, then find the **AWS Marketplace** card.
3. Click **Details** on your AWS integration.

4. Make sure that `agreementEventBridgeEnrolled` = `true`.

If EventBridge is not enabled, complete the [Manual EventBridge Setup](#manual-eventbridge-setup) before continuing.
### Step 2: Submit the opt-in request to AWS
Existing SaaS listings require a support request to AWS before Concurrent Agreements can be enabled.
1. Open the [AWS Marketplace Contact Us form](https://aws.amazon.com/marketplace/management/contact-us/).
2. Fill in the form with the following selections:
- **Primary email address** — your preferred contact email
- **Which AWS Marketplace Catalog are you inquiring about** — Commercial Marketplace
- **What do you need help with** — Product Configuration / Integration
- **Select a subcategory** — Concurrent Agreements Support
3. Under **Provide more details about your request**, include:
- **Seller Account ID**
- **Suger Seller Name**
- **AWS Product ID(s)** for all public listings you want to migrate. To find these, open the **Suger Console**, go to **Products**, select your AWS Cloud Partner, and filter by **Status = Public**.
- **Number of active agreements** on each listing
- **Why you're opting in rather than creating a new listing** — AWS requires a brief explanation
4. Also request that AWS allow-list the Suger test buyer account for validation testing. Contact [Suger Support](mailto:support@suger.io) for the test buyer account ID.
5. Click **Message support** to send your request.
### Step 3: Create test private offers
AWS requires validation testing before completing the opt-in. For each pricing model your products use, create a test [private offer](/aws-marketplace/create-private-offer/) in Suger directed at the allow-listed Suger test buyer account.
Configure each test offer with:
| Field | Value |
| ------------- | -------------------------------- |
| Offer Name | Test Concurrent Agreement Offer |
| Buyer | Suger test buyer account ID |
| Contract Term | 1 month |
| Commit Amount | $1 |
| Terms | Standard AWS Marketplace Terms |
Create one offer per pricing model you use:
- **Contract** — fixed commitment
- **Usage** — usage-based only
- **Contract + Usage** — commitment with usage overage
### Step 4: Accept the test offer and report usage
1. Have your AWS admin accept each test private offer from the allow-listed buyer account.
2. If your product uses usage-based pricing, submit a small test usage record via the **Suger Console** to validate your metering pipeline:
| Field | Value |
| --------------- | ---------------------------- |
| Date | Current date |
| Usage Dimension | Your product's usage dimension |
| Quantity | 1 |
This generates approximately $0.01 in usage, which AWS uses to confirm your metering is working correctly.
### Step 5: AWS completes the migration
AWS reviews the test transactions to confirm that Concurrent Agreement events, entitlements, and usage reporting are all functioning correctly. Once validated, AWS completes the migration on their end and notifies you.
After migration, your team can immediately:
- Create multiple private offers for the same product and buyer simultaneously.
- Run expansion deals and mid-term upgrades without waiting for renewal dates.
- Support multi-team procurement with independent pricing and terms per agreement.
## Marketplace Commerce Analytics Service (MCAS)
The Commerce Analytics Service accesses the Amazon S3 bucket and Amazon SNS topic after you configure the service with the ARN for the topic and name of the bucket. To enable MCAS, please follow the steps below. For more details, see the [documentation](https://docs.aws.amazon.com/marketplace/latest/userguide/commerce-analytics-service.html#technical-implementation-guide).
1. Log in to the [AWS Marketplace Management Portal](https://aws.amazon.com/marketplace/management/) with the AWS account you use to manage your AWS Marketplace products.
2. Ensure you have the [necessary IAM permissions](https://docs.aws.amazon.com/marketplace/latest/userguide/commerce-analytics-service.html#technical-implementation-guide) to enroll in the AWS Marketplace Commerce Analytics Service.
3. Navigate to the [Commerce Analytics Service enrollment page](https://aws.amazon.com/marketplace/management/cas/enroll).
- Select `Use an existing IAM role`
- Select IAM role as the default `MarketplaceCommerceAnalyticsRole`
- Set S3 bucket name `suger-mcas-s3-bucket-{aws-account-id}`
- Set SNS topic ARN `arn:aws:sns:us-east-1:{aws-account-id}:suger-mcas-sns-topic`
- Click the `Enroll` button
:::warning
- If you have enrolled the MCAS before, please contact us to get custom configuration. We will update the IAM policy of the IAM role `MarketplaceCommerceAnalyticsRole` to support the right S3 bucket & SNS topic.
:::
4. On the AWS Marketplace Management Portal, record the Role Name ARN in the success message.
## Marketplace Data Feeds Service (MDFS)
To get the full structured, up-to-date product billing and customer information from AWS Marketplace, it is highly recommended to set up the [Data Feeds Service](https://docs.aws.amazon.com/marketplace/latest/userguide/data-feed-service.html). Follow the below steps:
:::warning
- If you have set up the field `MdfsS3BucketName` with `suger-mdfs-s3-bucket-{your-aws-account-id}` in the previous cloud formation stack of AWS Marketplace integration, please skip the following **step 1** & **step 2** since the MDFS S3 bucket and KMS have been created.
:::
1. Go to the [Data Feed Configuration page](https://aws.amazon.com/marketplace/management/reports/data-feed-configuration).
2. Click `Configure with Cloud Formation`, a new page with stack template will be opened. Type in the `Stack name` with `mp-data-feed` (don't change this name since it is recognized by Suger service), and the `S3BucketName` with an unique S3 name `suger-mdfs-s3-bucket-{aws-account-id}`. Then click button `Create stack`.
:::warning
- The `stack name` must be `mp-data-feed`. Otherwise, Suger service won't recognize.
- The `S3BucketName` must be `suger-mdfs-s3-bucket-{aws-account-id}`. Otherwise, suger service won't have permissions to access.
- The stack must be running in the AWS region `us-east-1`, not other regions.
:::
>
:::tip
- You may need to click the button `VERIFY` to verify whether the `AWS marketplace` integration works correctly.
:::
:::tip Need to open AWS support cases?
That's a separate **AWS Support** integration — see [AWS Support Cases](/aws-marketplace/support-cases/).
:::
## Edit Integration
You can edit the integration to update the following fields:
- **Enable Entitlement End Soon Notification**: When enabled, specify the number of days (10-60) before an entitlement ends to trigger notifications. Suger will send an initial notification when AWS Marketplace entitlements approach ending, followed by reminders every 5 days. To configure recipients, follow the [email notification configuration guide](https://doc.suger.io/get-started/email-notification#configuration) and add the scope `END_SOON.ENTITLEMENT`.
## Delete Integration
The AWS integration can be deleted like all other integrations. Once the deletion icon is clicked & confirmed, the integration info will be deleted immediately & permanently from Suger. No time window or methods to recover.
:::warning
- To completely delete the `IAM Role` created for Suger, please visit your [AWS CloudFormation](https://us-west-2.console.aws.amazon.com/cloudformation/home?region=us-west-2), and delete the stack `SugerAccessMarketplaceStack`, which will remove all resources including `IAM Role` created for Suger.
- If you also deployed the standalone EventBridge stack from [Manual EventBridge Setup](#manual-eventbridge-setup), delete that stack as well (in `us-east-1`) to remove the EventBridge Connection, API Destination, Rule, and IAM Role it created.
:::
## Multiple Integrations
It is supported to have multiple AWS Marketplace integrations under the same Suger organization, with each integration operating independently. To set up multiple AWS Marketplace integrations, please follow the guidances below:
1. Create a new Suger organization in the Suger Console and wait for it to be approved.
2. In the newly approved Suger organization, set up a second AWS Marketplace integration.
3. Contact [Suger Support](mailto:support@suger.io) with both the new and old Suger organization IDs. The support team will merge the two organizations—retaining the old one and deleting the new one—while preserving both AWS Marketplace integrations under the original/old Suger organization.
:::tip
- Once set up, you will see multiple integrations listed on the Suger Console integration page. Each integration can be edited or deleted individually.
- There are no changes to the process of creating private offers, reporting usage records, or generating revenue reports across the Suger web console, Salesforce app, and HubSpot app. All connections for each integration are automatically managed by the Suger service.
:::
## AWS IAM Policies
Here is the list of AWS managed policies included in the `Suger Access IAM role`.
| Policy Name | Description |
| -------------------------------------------------------- | :------------------------------------------------------------------------------------------------------------------------------------------------------------------------------------------------------------------------------------------------------------------------------------------------------------------------------------------------------------------------------------------------------------ |
| `arn:aws:iam::aws:policy/AWSMarketplaceFullAccess` | This policy grants `Suger` full access to AWS Marketplace and related services, as well as access to Amazon EC2, AWS CloudFormation, and Amazon EC2 Systems Manager. |
| `arn:aws:iam::aws:policy/AWSMarketplaceSellerFullAccess` | This policy grants `Suger` to manage your sales (product listings, offers, entitlements & metering) on marketplace. |
| `SugerAccessMarketplacePolicy` | This policy grants `Suger` necessary-only permissions on `AWS s3` & `AWS SNS` to configure & access your [AWS Marketplace Commerce Analytics Service](https://docs.aws.amazon.com/marketplace/latest/userguide/commerce-analytics-service.html#permissions-for-commerce-analytics) and [AWS Marketplace Data Feeds Service](https://docs.aws.amazon.com/marketplace/latest/userguide/data-feed-service.html). |
:::info
None of these policies grant access to the AWS Support API; the AWS Support integration uses its own IAM role. See [AWS Support Cases](/aws-marketplace/support-cases/).
:::
## Minimum-Permission Deployment (Optional)
The default CloudFormation template requests broad permissions — including `iam:CreateRole`, the `events:*` family, and the AWS-managed `AWSMarketplaceFullAccess` / `AWSMarketplaceSellerFullAccess` policies — so that Suger can automatically provision and maintain the IAM role, EventBridge rule, connection, and API destination required for AWS Marketplace event delivery. With the default template, no further manual work is needed on your side, and new AWS Marketplace capabilities are picked up automatically as we add support.
If your security team prefers a tighter blast radius, **we recommend using a dedicated AWS seller account exclusively for the Suger integration**. A dedicated account is the cleanest way to isolate Suger's access from the rest of your AWS footprint and is what we suggest for most enterprise customers.
If a dedicated seller account is not an option, please contact [Suger Support](mailto:support@suger.io) for a **minimum-permission deployment package**. We can provide a CloudFormation template scoped down to only the actions Suger needs at deploy time.
:::warning Trade-offs of the minimum-permission deployment
- AWS Marketplace ships new features regularly, and most of them depend on additional IAM actions. With the default template, Suger picks them up transparently. With the minimum-permission template, support for those new features may temporarily break in your account.
- Each time we add support for a new AWS Marketplace capability that requires extra permissions, you will most likely need to **redeploy an updated minimum-permission CloudFormation stack** before the capability works for you. We will reach out when this is needed, but onboarding new functionality will not be as seamless as with the default template.
:::
### Manual EventBridge Setup
If your Suger Access IAM role does not grant `iam:CreateRole` / `iam:CreatePolicy` / `iam:PutRolePolicy` (for example, because you are running the minimum-permission template, or your security team disallows Suger from creating IAM resources on your behalf), Suger cannot auto-provision the IAM role and EventBridge resources required for [Concurrent Agreements](#overview) and other event-driven capabilities. In that case, deploy the standalone CloudFormation template below — under an AWS principal that *does* have IAM and EventBridge admin permissions — in **the same AWS account and region** as your AWS Marketplace listings. It creates the four resources Suger needs:
- An EventBridge **Connection** with API-key auth (header `x-suger-api-key`).
- An EventBridge **API Destination** pointing at `${Endpoint}/public/aws/eventbridge/webhook/orgId/${OrgId}`.
- An **IAM Role** that lets EventBridge invoke the API Destination.
- An EventBridge **Rule** matching `aws.marketplacecatalog` and `aws.agreement-marketplace` events and routing them to the API Destination.
The template uses a `-manual` suffix on resource names so it will not collide with the resources that Suger normally auto-provisions.
#### Parameters
| Parameter | Description |
| ---------- | ----------------------------------------------------------------------------------------------------------------------------------------------------------------- |
| `AuthId` | Suger API key value. Sent on every forwarded event as the `x-suger-api-key` header. Generate one on the [API Keys page](https://console.suger.io/settings?tab=api-keys). |
| `Endpoint` | Suger API base URL: `https://api.suger.cloud`. |
| `OrgId` | Your Suger organization ID, visible on the Suger Console settings page. |
:::tip
- Deploy the stack in **`us-east-1`**. AWS Marketplace SaaS events are emitted from `us-east-1`, and cross-region delivery is not supported by the default rule.
- Treat `AuthId` like any other production secret — set the parameter with `NoEcho` enabled (already the default in the template) and avoid committing it to source control.
:::
#### Template
```yaml
AWSTemplateFormatVersion: '2010-09-09'
Description: Forward AWS Marketplace events to Suger via EventBridge API Destination
Parameters:
AuthId:
Type: String
NoEcho: true
Description: Suger API key value (sent as x-suger-api-key header)
Endpoint:
Type: String
Description: Suger API base URL, e.g. https://api.suger.cloud
AllowedPattern: ^https?://.+
OrgId:
Type: String
Description: Suger organization ID
AllowedPattern: ^[A-Za-z0-9-]+$
Resources:
SugerMarketplaceConnection:
Type: AWS::Events::Connection
Properties:
Name: aws-marketplace-event-connection-manual
Description: API key auth for Suger event ingestion
AuthorizationType: API_KEY
AuthParameters:
ApiKeyAuthParameters:
ApiKeyName: x-suger-api-key
ApiKeyValue: !Ref AuthId
SugerMarketplaceApiDestination:
Type: AWS::Events::ApiDestination
Properties:
Name: aws-marketplace-event-api-destination-manual
Description: Suger marketplace event ingestion endpoint
ConnectionArn: !GetAtt SugerMarketplaceConnection.Arn
HttpMethod: POST
InvocationEndpoint: !Sub '${Endpoint}/public/aws/eventbridge/webhook/orgId/${OrgId}'
# Trust policy uses constructed rule ARN (not !GetAtt) to break the cycle
# Rule.Targets -> InvokeRole -> Rule.
SugerEventBridgeInvokeRole:
Type: AWS::IAM::Role
Properties:
RoleName: event-bridge-iam-role-invoke-api-destination
AssumeRolePolicyDocument:
Version: '2012-10-17'
Statement:
- Effect: Allow
Principal:
Service: events.amazonaws.com
Action: sts:AssumeRole
Condition:
ArnEquals:
aws:SourceArn:
!Sub 'arn:aws:events:${AWS::Region}:${AWS::AccountId}:rule/aws-marketplace-event-rule-webhook-manual'
Policies:
- PolicyName: event-bridge-iam-policy-invoke-api-destination
PolicyDocument:
Version: '2012-10-17'
Statement:
- Effect: Allow
Action: events:InvokeApiDestination
Resource: !GetAtt SugerMarketplaceApiDestination.Arn
SugerMarketplaceEventRule:
Type: AWS::Events::Rule
Properties:
Name: aws-marketplace-event-rule-webhook-manual
Description: Captures AWS Marketplace events and forwards to Suger
State: ENABLED
EventPattern:
source:
- aws.marketplacecatalog
- aws.agreement-marketplace
Tags:
- Key: SugerVersion
Value: '3'
Targets:
- Id: suger-api-destination
Arn: !GetAtt SugerMarketplaceApiDestination.Arn
RoleArn: !GetAtt SugerEventBridgeInvokeRole.Arn
Outputs:
ConnectionArn:
Description: EventBridge Connection ARN
Value: !GetAtt SugerMarketplaceConnection.Arn
ApiDestinationArn:
Description: EventBridge API Destination ARN
Value: !GetAtt SugerMarketplaceApiDestination.Arn
EventRuleArn:
Description: EventBridge Rule ARN
Value: !GetAtt SugerMarketplaceEventRule.Arn
InvokeRoleArn:
Description: IAM Role ARN used by the rule to invoke the API Destination
Value: !GetAtt SugerEventBridgeInvokeRole.Arn
```
#### Verify
1. Wait for the stack to reach `CREATE_COMPLETE`.
2. Trigger any AWS Marketplace action that emits an event — see the table below (for example, publish a private offer or have a buyer accept one).
3. On the [Integrations page](https://console.suger.io/settings?tab=integrations) of the Suger Console, scroll down to the **Auditing Events** table and confirm a new entry appears with **Source = `AWS_EVENT_BRIDGE`**. The **Action** column shows which AWS event arrived (e.g. `Offer Released`).

The AWS Marketplace activities that produce EventBridge events:
| AWS Marketplace activity | Auditing event action |
| ----------------------------------------------------------------- | ------------------------------------------------------------ |
| A private offer is published (released to the buyer) | `Offer Released` |
| A buyer accepts an offer — a purchase agreement is created | `Purchase Agreement Created - Manufacturer` / `- Proposer` |
| An existing agreement is amended (e.g. expansion, renewal) | `Purchase Agreement Amended - Manufacturer` / `- Proposer` |
| An agreement ends (expires or is cancelled) | `Purchase Agreement Ended - Manufacturer` / `- Proposer` |
| The license backing an agreement (entitlements) is updated | `License Updated - Manufacturer` |
| The license backing an agreement is deprovisioned | `License Deprovisioned - Manufacturer` |
:::tip
Product change-set activity is not a reliable test: Suger deliberately filters out the `Change Set Succeeded` and `AWS API Call via CloudTrail` detail types, so they never appear in Auditing Events. Use an offer or agreement action from the table above instead.
:::
:::note The console warning "Event Bridge Rule is not setup correctly." is expected
After a manual setup, the AWS Marketplace integration card in the Suger Console keeps showing a warning icon with the message **"Event Bridge Rule is not setup correctly."**. This is expected and does not affect event delivery.
 Suger only tracks the EventBridge rule it auto-provisions itself, and in this scenario the Suger Access IAM role does not have the permissions to look up EventBridge resources in your account — so Suger cannot confirm that the manually created rule exists. Use the verification steps above (events arriving in the Suger Console) as the source of truth instead of the card status.
:::
If events do not appear within a few minutes, check the EventBridge rule's **Monitoring** tab in the AWS Console for `FailedInvocations` and contact [Suger Support](mailto:support@suger.io) with the failure details.
#### Cleanup
When you remove the AWS Marketplace integration from Suger, also delete this stack from CloudFormation (in `us-east-1`) to clean up the EventBridge Connection, API Destination, Rule, and IAM Role it provisioned. See [Delete Integration](#delete-integration) for the standard cleanup steps.
## Enable Concurrent Agreements
Concurrent Agreements let your buyers hold multiple active agreements for the same AWS Marketplace product at the same time. That lets your sales team run expansion deals, multi-team procurement, and repeat purchases without waiting for a buyer's existing contract to renew or expire.
Starting **June 1, 2026**, AWS requires all new SaaS listings to support Concurrent Agreements. Suger handles the backend work for you — your responsibility is to confirm your EventBridge integration is active, submit the opt-in request to AWS, and complete a short validation test.
:::info
Concurrent Agreements also changes how usage metering works for the product — see [Usage Metering for AWS Concurrent Agreements](/get-started/metering/#usage-metering-for-aws-concurrent-agreements).
:::
:::important
If your product's **Product Type** is `Container`, opting into Concurrent Agreements breaks usage metering for it — AWS's `BatchMeterUsage` API rejects usage records for Container products once they carry a `LicenseArn`, and usage has to be reported from within the container itself instead. See [Container products](/get-started/metering/#container-products) before you continue.
:::
### Does this apply to you?
| Your situation | What you need to do |
| ------------------------------------------------- | ------------------------------------------------------------------------------------------------------------ |
| New SaaS listing created after June 1, 2026 | Concurrent Agreements is already enabled. Confirm EventBridge is active in Suger, then you are done. |
| Existing SaaS listing created before June 1, 2026 | Concurrent Agreements is not enabled automatically. Complete all steps in this section. |
| Professional Services listing | Concurrent Agreements is enabled automatically by AWS. No action needed. |
| Product Type is `Container` | Usage metering breaks once Concurrent Agreements applies. See [Container products](/get-started/metering/#container-products). |
### Step 1: Confirm EventBridge is active
Concurrent Agreements require EventBridge to be enabled on your AWS integration in Suger. EventBridge is what lets Suger receive the `LicenseArn` parameter that uniquely identifies each concurrent agreement. Without it, the feature won't work.
1. Open the **Suger Console** and click **Settings**.
2. Click **Integrations**, then find the **AWS Marketplace** card.
3. Click **Details** on your AWS integration.

4. Make sure that `agreementEventBridgeEnrolled` = `true`.

If EventBridge is not enabled, complete the [Manual EventBridge Setup](#manual-eventbridge-setup) before continuing.
### Step 2: Submit the opt-in request to AWS
Existing SaaS listings require a support request to AWS before Concurrent Agreements can be enabled.
1. Open the [AWS Marketplace Contact Us form](https://aws.amazon.com/marketplace/management/contact-us/).
2. Fill in the form with the following selections:
- **Primary email address** — your preferred contact email
- **Which AWS Marketplace Catalog are you inquiring about** — Commercial Marketplace
- **What do you need help with** — Product Configuration / Integration
- **Select a subcategory** — Concurrent Agreements Support
3. Under **Provide more details about your request**, include:
- **Seller Account ID**
- **Suger Seller Name**
- **AWS Product ID(s)** for all public listings you want to migrate. To find these, open the **Suger Console**, go to **Products**, select your AWS Cloud Partner, and filter by **Status = Public**.
- **Number of active agreements** on each listing
- **Why you're opting in rather than creating a new listing** — AWS requires a brief explanation
4. Also request that AWS allow-list the Suger test buyer account for validation testing. Contact [Suger Support](mailto:support@suger.io) for the test buyer account ID.
5. Click **Message support** to send your request.
### Step 3: Create test private offers
AWS requires validation testing before completing the opt-in. For each pricing model your products use, create a test [private offer](/aws-marketplace/create-private-offer/) in Suger directed at the allow-listed Suger test buyer account.
Configure each test offer with:
| Field | Value |
| ------------- | -------------------------------- |
| Offer Name | Test Concurrent Agreement Offer |
| Buyer | Suger test buyer account ID |
| Contract Term | 1 month |
| Commit Amount | $1 |
| Terms | Standard AWS Marketplace Terms |
Create one offer per pricing model you use:
- **Contract** — fixed commitment
- **Usage** — usage-based only
- **Contract + Usage** — commitment with usage overage
### Step 4: Accept the test offer and report usage
1. Have your AWS admin accept each test private offer from the allow-listed buyer account.
2. If your product uses usage-based pricing, submit a small test usage record via the **Suger Console** to validate your metering pipeline:
| Field | Value |
| --------------- | ---------------------------- |
| Date | Current date |
| Usage Dimension | Your product's usage dimension |
| Quantity | 1 |
This generates approximately $0.01 in usage, which AWS uses to confirm your metering is working correctly.
### Step 5: AWS completes the migration
AWS reviews the test transactions to confirm that Concurrent Agreement events, entitlements, and usage reporting are all functioning correctly. Once validated, AWS completes the migration on their end and notifies you.
After migration, your team can immediately:
- Create multiple private offers for the same product and buyer simultaneously.
- Run expansion deals and mid-term upgrades without waiting for renewal dates.
- Support multi-team procurement with independent pricing and terms per agreement.
## Marketplace Commerce Analytics Service (MCAS)
The Commerce Analytics Service accesses the Amazon S3 bucket and Amazon SNS topic after you configure the service with the ARN for the topic and name of the bucket. To enable MCAS, please follow the steps below. For more details, see the [documentation](https://docs.aws.amazon.com/marketplace/latest/userguide/commerce-analytics-service.html#technical-implementation-guide).
1. Log in to the [AWS Marketplace Management Portal](https://aws.amazon.com/marketplace/management/) with the AWS account you use to manage your AWS Marketplace products.
2. Ensure you have the [necessary IAM permissions](https://docs.aws.amazon.com/marketplace/latest/userguide/commerce-analytics-service.html#technical-implementation-guide) to enroll in the AWS Marketplace Commerce Analytics Service.
3. Navigate to the [Commerce Analytics Service enrollment page](https://aws.amazon.com/marketplace/management/cas/enroll).
- Select `Use an existing IAM role`
- Select IAM role as the default `MarketplaceCommerceAnalyticsRole`
- Set S3 bucket name `suger-mcas-s3-bucket-{aws-account-id}`
- Set SNS topic ARN `arn:aws:sns:us-east-1:{aws-account-id}:suger-mcas-sns-topic`
- Click the `Enroll` button
:::warning
- If you have enrolled the MCAS before, please contact us to get custom configuration. We will update the IAM policy of the IAM role `MarketplaceCommerceAnalyticsRole` to support the right S3 bucket & SNS topic.
:::
4. On the AWS Marketplace Management Portal, record the Role Name ARN in the success message.
## Marketplace Data Feeds Service (MDFS)
To get the full structured, up-to-date product billing and customer information from AWS Marketplace, it is highly recommended to set up the [Data Feeds Service](https://docs.aws.amazon.com/marketplace/latest/userguide/data-feed-service.html). Follow the below steps:
:::warning
- If you have set up the field `MdfsS3BucketName` with `suger-mdfs-s3-bucket-{your-aws-account-id}` in the previous cloud formation stack of AWS Marketplace integration, please skip the following **step 1** & **step 2** since the MDFS S3 bucket and KMS have been created.
:::
1. Go to the [Data Feed Configuration page](https://aws.amazon.com/marketplace/management/reports/data-feed-configuration).
2. Click `Configure with Cloud Formation`, a new page with stack template will be opened. Type in the `Stack name` with `mp-data-feed` (don't change this name since it is recognized by Suger service), and the `S3BucketName` with an unique S3 name `suger-mdfs-s3-bucket-{aws-account-id}`. Then click button `Create stack`.
:::warning
- The `stack name` must be `mp-data-feed`. Otherwise, Suger service won't recognize.
- The `S3BucketName` must be `suger-mdfs-s3-bucket-{aws-account-id}`. Otherwise, suger service won't have permissions to access.
- The stack must be running in the AWS region `us-east-1`, not other regions.
:::
>  3. Once the upper Cloud Formation stack is 'CREATE_COMPLETE', find the `S3 Bucket ARN` (for example: `arn:aws:s3:::suger-mdfs-s3-bucket-{aws-account-id}`) and the `KMS Key ARN` (for example: arn:aws:kms:us-west-2:awsAccountId:key/keyId), and input them to the [Data Feed Configuration page](https://aws.amazon.com/marketplace/management/reports/data-feed-configuration). Click buttion `Submit`.
4. Suger service take all the rest of setup and cron data sync pipeline.
### FAQ
- #### My Security team asked about the need for a KMS access policy. How does Suger use KMS in our account?
The KMS access is for MDFS integration, which syncs revenue data and buyer information (company name, address, and email domain).
AWS requires all S3 buckets for marketplace revenue and buyer reports to be encrypted by a KMS key. This KMS key is created via the cloud formation template provided by AWS.
[More details can be found here](https://doc.suger.io/aws-marketplace/integration#set-up-aws-marketplace-data-feeds-service-mdfs).
Suger doesn’t require general access to your KMS resources; it is only limited to the one related to the MDFS integration.
## Set up Tax & Banking Info
AWS marketplace requires the seller/ISV to provide valid Tax & Banking Info before selling paid or BYOL (bring your own license) products. Please visit the [setting page](https://aws.amazon.com/marketplace/management/seller-settings/account) of your AWS marketplace management portal, and submit the tax information & banking information (to collect revenue from marketplace sales).
### Tax Information
The following fields for tax information are required:
1. **Federal tax classification**. Most companies are `C Corporation`, and the others may be `S Corporation`, `Partnership` or `Limited liability company`.
2. **Business Name** and **Business Address**
3. **EIN** (Federal Employer Identification Number)
>
3. Once the upper Cloud Formation stack is 'CREATE_COMPLETE', find the `S3 Bucket ARN` (for example: `arn:aws:s3:::suger-mdfs-s3-bucket-{aws-account-id}`) and the `KMS Key ARN` (for example: arn:aws:kms:us-west-2:awsAccountId:key/keyId), and input them to the [Data Feed Configuration page](https://aws.amazon.com/marketplace/management/reports/data-feed-configuration). Click buttion `Submit`.
4. Suger service take all the rest of setup and cron data sync pipeline.
### FAQ
- #### My Security team asked about the need for a KMS access policy. How does Suger use KMS in our account?
The KMS access is for MDFS integration, which syncs revenue data and buyer information (company name, address, and email domain).
AWS requires all S3 buckets for marketplace revenue and buyer reports to be encrypted by a KMS key. This KMS key is created via the cloud formation template provided by AWS.
[More details can be found here](https://doc.suger.io/aws-marketplace/integration#set-up-aws-marketplace-data-feeds-service-mdfs).
Suger doesn’t require general access to your KMS resources; it is only limited to the one related to the MDFS integration.
## Set up Tax & Banking Info
AWS marketplace requires the seller/ISV to provide valid Tax & Banking Info before selling paid or BYOL (bring your own license) products. Please visit the [setting page](https://aws.amazon.com/marketplace/management/seller-settings/account) of your AWS marketplace management portal, and submit the tax information & banking information (to collect revenue from marketplace sales).
### Tax Information
The following fields for tax information are required:
1. **Federal tax classification**. Most companies are `C Corporation`, and the others may be `S Corporation`, `Partnership` or `Limited liability company`.
2. **Business Name** and **Business Address**
3. **EIN** (Federal Employer Identification Number)
>  ### Banking Information
The following fields for banking information are required:
1. **Bank account address**, the address on your company bank account.
2. **Bank account holder name**, in most cases, it is your company legal name.
3. **Routing Number**
4. **Account Number**
>
### Banking Information
The following fields for banking information are required:
1. **Bank account address**, the address on your company bank account.
2. **Bank account holder name**, in most cases, it is your company legal name.
3. **Routing Number**
4. **Account Number**
>  ## AWS Payment Flow
When a customer purchases your product on AWS Marketplace, the transaction follows AWS's billing and payment structure:

1. The customer subscribes to or purchases your product.
2. AWS generates an invoice and adds it to the customer's consolidated AWS billing.
3. The customer pays AWS according to their payment terms (for example, net 30, 45, or 60 days).
4. Once AWS receives the payment, it disburses to you based on your selected disbursement cycle (daily or monthly).
:::info
- AWS disburses payments to sellers **only after** receiving payment from the customer. For example, if a customer on net 60 terms buys your product today, payment is due to AWS in 60 days, and only after AWS receives it will you be paid.
:::
### Disbursement cycles
Choose your disbursement cycle in the [AWS Marketplace Management Portal](https://aws.amazon.com/marketplace/management/seller-settings/account) under **Payment Information**:
- **Daily** — AWS pays as soon as payment becomes available.
- **Monthly** — AWS pays on a fixed day (1–28) of each month.
### Currency and exchange rates
Offers are created in **USD**, customers are billed in their **local currency**, and AWS uses **Bloomberg exchange rates** to convert. See [Multi Currency](/aws-marketplace/create-private-offer/#multi-currency) for creating offers in non-USD currencies.
### Track expected payment in Suger
To check when AWS is expected to receive payment from the buyer:
1. Go to the **Entitlement** menu.
2. Click the entitlement in question.
3. Open the **Revenue** tab.
4. Scroll to the **Due Date** column in the revenue table — this shows the estimated date the buyer will pay AWS.
:::tip
- The **Due Date** is not the date the money is disbursed to your account. AWS processes disbursement only **after** this payment is received.
:::
### Common payment issues
Payments can be delayed by incorrect account permissions, declined credit cards, or customer billing setup issues. Make sure your customers have a valid payment method and a correctly configured AWS account. If payment is delayed beyond the expected due date, open a support case on the [AWS Marketplace Management Portal](https://aws.amazon.com/marketplace/management/contact-us/).
## FAQ
- #### Who do I receive the payment from?
Payment will always be deposited into your registered bank account. To check your registered bank account, visit the [Settings section](https://aws.amazon.com/marketplace/management/seller-settings/account) on AMMP > Payment Information.
- #### How much listing/transaction fee does AWS take?
Listing fees depend on the type of listing, TCV of the offer, and type of offer. The document below is an official document by AWS that covers the fee structure for all scenarios.
https://docs.aws.amazon.com/marketplace/latest/userguide/listing-fees.html
- #### When is the customer billed?
AWS bills the customer based on three ways:
1. Date of subscription acceptance (upfront billing)
2. Custom payment schedule (private offers built by flexible payment scheduler)
3. Metered usage on the second and third day of the month for the prior month’s usage
- #### When will I receive money from AWS?
Every customer has agreed to net payment terms with AWS, which are either net 30,45,60 or net 0 for credit cards. Once a customer receives the bill, they must pay the amount within the agreed terms.
Every seller has a disbursement cycle, which can be set up under settings. There are two cycles: daily and monthly. You can receive the money as soon as the AWS receives it or on a specific date every month.
To check your registered bank account, visit the [Settings section](https://aws.amazon.com/marketplace/management/seller-settings/account) on AMMP > Payment Information > Update Banking Information > Disbursement Preference.
- #### Do I need to charge and remit taxes separately?
This depends on the buyer's country. In countries such as the USA, where the marketplace is responsible for collecting and remitting taxes, this function will be handled by AWS itself. In other countries, such as France, the Seller must collect the tax manually.
[This video](https://youtu.be/qaBDxNiZkho) has all the details about taxes.
[This link](https://aws.amazon.com/tax-help/marketplace-sellers/) has other details about taxes on different product types, countries supported, and the process.
- #### What should we do if there is a delay in receiving payments from AWS?
You can create a ticket to AWS Support using [this link](https://aws.amazon.com/marketplace/management/contact-us/).
- #### How to process refunds?
You can process a full or partial refund to the buyer by clicking [this link](https://aws.amazon.com/marketplace/management/support/refund-request) and submitting the form.
You can request a refund even when the buyer has not yet paid the invoice. In the additional comments section, mention that the charges should be waived if they are unpaid.
- #### Can I invoice a customer in their currency?
You will create private offers in Dollars ($) as a seller. AWS will, in turn, check the buyer's currency based on the account ID and the payment settings and then bill them in their currency.
AWS uses exchange rates published by Bloomberg every day. [Here](https://docs.aws.amazon.com/marketplace/latest/buyerguide/buyer-paying-for-products.html#supported-currencies) is the updated list of supported currencies.
- #### We have an offer that was accepted, but the payment transaction failed. Is there a way to reprocess the transaction?
If a private offer acceptance fails due to an issue with the customer's payment method/account, the customer can try accepting the same private offer again after it is fixed. This time, it should go through. The offer they initially accepted didn't generate any entitlement because it wasn't processed. They can use the same offer link to accept it again, and it should work this time.
- #### We have an offer that the customer has tried to accept three times, and we get an acceptance email and then immediately get a cancellation email. Is this a typical payment issue? Is there something that you'd advise us to tell the customers to solve this?
There are three main reasons why an offer acceptance might fail:
1. The person trying to accept the offer doesn't have the proper permission to complete that transaction.
2. Their credit card operator declined the transaction, or they have not correctly set up their account for payment.
3. AWS can reject them from transacting if they have not paid their latest billing.
Usually, it's a problem with the customer's credit card or with their payment account in general. You can contact the customer to have them help you verify the transaction.
We recommend asking in the discovery if they are on an Invoice or Credit Card with AWS. If they are on a Credit Card, tell them they need to make sure that their Bank knows this transaction is about to be processed so that it does not get rejected, as often Credit Card companies will reject due to the size of the transaction as possible fraud.
## AWS Payment Flow
When a customer purchases your product on AWS Marketplace, the transaction follows AWS's billing and payment structure:

1. The customer subscribes to or purchases your product.
2. AWS generates an invoice and adds it to the customer's consolidated AWS billing.
3. The customer pays AWS according to their payment terms (for example, net 30, 45, or 60 days).
4. Once AWS receives the payment, it disburses to you based on your selected disbursement cycle (daily or monthly).
:::info
- AWS disburses payments to sellers **only after** receiving payment from the customer. For example, if a customer on net 60 terms buys your product today, payment is due to AWS in 60 days, and only after AWS receives it will you be paid.
:::
### Disbursement cycles
Choose your disbursement cycle in the [AWS Marketplace Management Portal](https://aws.amazon.com/marketplace/management/seller-settings/account) under **Payment Information**:
- **Daily** — AWS pays as soon as payment becomes available.
- **Monthly** — AWS pays on a fixed day (1–28) of each month.
### Currency and exchange rates
Offers are created in **USD**, customers are billed in their **local currency**, and AWS uses **Bloomberg exchange rates** to convert. See [Multi Currency](/aws-marketplace/create-private-offer/#multi-currency) for creating offers in non-USD currencies.
### Track expected payment in Suger
To check when AWS is expected to receive payment from the buyer:
1. Go to the **Entitlement** menu.
2. Click the entitlement in question.
3. Open the **Revenue** tab.
4. Scroll to the **Due Date** column in the revenue table — this shows the estimated date the buyer will pay AWS.
:::tip
- The **Due Date** is not the date the money is disbursed to your account. AWS processes disbursement only **after** this payment is received.
:::
### Common payment issues
Payments can be delayed by incorrect account permissions, declined credit cards, or customer billing setup issues. Make sure your customers have a valid payment method and a correctly configured AWS account. If payment is delayed beyond the expected due date, open a support case on the [AWS Marketplace Management Portal](https://aws.amazon.com/marketplace/management/contact-us/).
## FAQ
- #### Who do I receive the payment from?
Payment will always be deposited into your registered bank account. To check your registered bank account, visit the [Settings section](https://aws.amazon.com/marketplace/management/seller-settings/account) on AMMP > Payment Information.
- #### How much listing/transaction fee does AWS take?
Listing fees depend on the type of listing, TCV of the offer, and type of offer. The document below is an official document by AWS that covers the fee structure for all scenarios.
https://docs.aws.amazon.com/marketplace/latest/userguide/listing-fees.html
- #### When is the customer billed?
AWS bills the customer based on three ways:
1. Date of subscription acceptance (upfront billing)
2. Custom payment schedule (private offers built by flexible payment scheduler)
3. Metered usage on the second and third day of the month for the prior month’s usage
- #### When will I receive money from AWS?
Every customer has agreed to net payment terms with AWS, which are either net 30,45,60 or net 0 for credit cards. Once a customer receives the bill, they must pay the amount within the agreed terms.
Every seller has a disbursement cycle, which can be set up under settings. There are two cycles: daily and monthly. You can receive the money as soon as the AWS receives it or on a specific date every month.
To check your registered bank account, visit the [Settings section](https://aws.amazon.com/marketplace/management/seller-settings/account) on AMMP > Payment Information > Update Banking Information > Disbursement Preference.
- #### Do I need to charge and remit taxes separately?
This depends on the buyer's country. In countries such as the USA, where the marketplace is responsible for collecting and remitting taxes, this function will be handled by AWS itself. In other countries, such as France, the Seller must collect the tax manually.
[This video](https://youtu.be/qaBDxNiZkho) has all the details about taxes.
[This link](https://aws.amazon.com/tax-help/marketplace-sellers/) has other details about taxes on different product types, countries supported, and the process.
- #### What should we do if there is a delay in receiving payments from AWS?
You can create a ticket to AWS Support using [this link](https://aws.amazon.com/marketplace/management/contact-us/).
- #### How to process refunds?
You can process a full or partial refund to the buyer by clicking [this link](https://aws.amazon.com/marketplace/management/support/refund-request) and submitting the form.
You can request a refund even when the buyer has not yet paid the invoice. In the additional comments section, mention that the charges should be waived if they are unpaid.
- #### Can I invoice a customer in their currency?
You will create private offers in Dollars ($) as a seller. AWS will, in turn, check the buyer's currency based on the account ID and the payment settings and then bill them in their currency.
AWS uses exchange rates published by Bloomberg every day. [Here](https://docs.aws.amazon.com/marketplace/latest/buyerguide/buyer-paying-for-products.html#supported-currencies) is the updated list of supported currencies.
- #### We have an offer that was accepted, but the payment transaction failed. Is there a way to reprocess the transaction?
If a private offer acceptance fails due to an issue with the customer's payment method/account, the customer can try accepting the same private offer again after it is fixed. This time, it should go through. The offer they initially accepted didn't generate any entitlement because it wasn't processed. They can use the same offer link to accept it again, and it should work this time.
- #### We have an offer that the customer has tried to accept three times, and we get an acceptance email and then immediately get a cancellation email. Is this a typical payment issue? Is there something that you'd advise us to tell the customers to solve this?
There are three main reasons why an offer acceptance might fail:
1. The person trying to accept the offer doesn't have the proper permission to complete that transaction.
2. Their credit card operator declined the transaction, or they have not correctly set up their account for payment.
3. AWS can reject them from transacting if they have not paid their latest billing.
Usually, it's a problem with the customer's credit card or with their payment account in general. You can contact the customer to have them help you verify the transaction.
We recommend asking in the discovery if they are on an Invoice or Credit Card with AWS. If they are on a Credit Card, tell them they need to make sure that their Bank knows this transaction is about to be processed so that it does not get rejected, as often Credit Card companies will reject due to the size of the transaction as possible fraud.